
Hi, crafty friends. It’s no secret that I love a lot of the cute characters that pop up around Christmas. Reindeer, snowmen, penguins, polar bears; give me all of them (please leave Santa out, he’s creepy). Today’s card features an adorable snowman from the Snow folk stamp set from Lili of the Valley.
 I colored my snowman with Copics, added black Glaze to his eyes, then a white dot using a Gelly Roll 05 once the black was dry. I also used the white to add the white dots to his hat. I fussy cut my snowman, leaving a thin white trim around him, before putting him to the side to work on the rest of my card. I covered my card base with patterned paper from Maja Design. This frosty blue paper is from the Vintage Frost Basics collection from 2013, the sheet’s called 13th of December. I used the Notebook Edge die from My Favorite Things to create a fun border on a piece of Stamper’s Select White cardstock from Papertrey Ink. I used Light & Fluffy Modeling Paste from The Crafter’s Workshop to create snow through the Falling Snow stencil from Simon Says Stamp. While the paste was still wet, I sprinkled on Rock Candy distress glitter for an even frostier effect, and mounted my white panel with foam tape to my card front.
 I stamped and white heat embossed a sentiment from the Christmas Greetings stamp set from Lili of the Valley onto a scrap piece of the patterned paper, before using a die from the Itty Bitty Strips die set from My Favorite Things to turn it into a banner. I also die cut a white banner, grouped the two together and adhered them to the back of my snowman, which I mounted using foam tape. I finished off with a few snowflakes I die cut using the Snowflake Confetti Fancy die from Hero Arts. Sadly, this die is discontinued, but the snowflakes it creates are the perfect size, so I probably won’t ever stop using it!!
 Simple color palette for this one. Lots of blues.

 I die cut a tree nine times from three different shades of green patterned paper. The two lighter ones are both from Maja Design, while the dark one’s from Kaisercraft. This die is pretty small and perfect for scraps. There’s also a die in the sets that cuts the trunk, but I decided not to use that for this card.
 I sprinkled on Chunky white embossing enamel from Stampendous to each of the trees and melted the granules from the back to make snowy trees. I then used three different thicknesses of foam tape behind the trees for varying dimension.
 I stamped and white heat embossed the sentiment onto a black cardstock strip (True Black cardstock from Papertrey Ink), added a couple of more layers of cardstock behind it for dimension and glued it on top of two of my trees.
 This little mouse is so cute, and she might be adding her name to Santa’s nice list, who knows? I colored her with Copics and fussy cut her leaving a white border.
 I covered a white card base with a panel of patterned paper from Maja Design. This is the Snowflakes pattern from the Holiday in the Alps collection. I love the design paper from Maja Design, it’s my favorite patterned paper to use! Into a panel of Stamper’s Select White cardstock from Papertrey Ink, I die cut a circle opening towards the top left and also used a stitched rectangle die from the A2 Stitched Rectangle STAX 2 set from My Favorite Things.
 I stamped God jul from the M-442 stamp set from Kort & Godt using Blue Beyond ink from My Favorite Things. I die cut trees using the Silhouette Snow Trees die set from Mama Elephant, stacked them and added Rock Candy distress glitter from Ranger for a super snowy look. With the layering of the trees, this was pretty dimensional, so I had to double up on the foam tape when I added the panel with the circle opening.
 I also added foam tape behind the mouse and this card is very thick as a result.
 I colored up the reindeer with my Copics and fussy cut him leaving a white trim around the edges. I added Glossy Accents to his nose for shine and put him aside while I worked on the rest of my card.
 I used the Snowflake Confetti Fancy die from Hero Arts to make an impression into a white piece of cardstock. By dry embossing with the die, I add a bit of interest to the background without it being distracting.
 I used partial die cutting with the Stitched Rectangle Scallop Edge Frames die set from My Favorite Things to create my scalloped borders on either side of the dry embossed white cardstock. I used patterned paper from Maja Design for this. The design is called Ornaments and comes from the Happy Christmas collection from 2021. I don’t use a lot of patterned paper on my cards, but I really like this green pattern with some sprigs, leaves and hearts in a darker green, along with some white dots scattered around like snow. The patterned paper from Maja Design has always been my favorite. It’s double sided and very thick. It’s so thick you can even use it for a card base.
 I used the Snowflakes and Ornament die set from Hero Arts to create the ornament for my reindeer to sit in. I die cut the ornament die itself from the same patterned paper that I used for my scalloped borders. I then temporarily taped the two dies in the set together, so I could create an ornament with snowflakes. I cut a few from white cardstock and one from silver glitter cardstock from Kort & Godt, stacking them for dimension. I tied a bow to the top of the ornament using May Arts natural twine and added a few pearls from the Glossy Porcelain mix from Little Things from Lucy’s Cards on top of the knot for additional shine.
 I added Rudolph with his shiny nose to the center of my ornament. I also stamped a sentiment from the Itty Bitty Holiday stamp set from My Favorite Things using Shadow Creek ink from Altenew onto a scrap piece of the patterned paper I’ve used throughout. I added a few strips of white cardstock behind it for dimension and adhered it below the ornament, centered on my white, dry embossed piece.
 This card wound up very simple looking, but it’s still kind of technique heavy. Partial die cutting, dry embossing with a die and layered die cuts. All the layers make it a very thick card, and it’s not the most mail friendly card I’ve ever made – I love dimension!
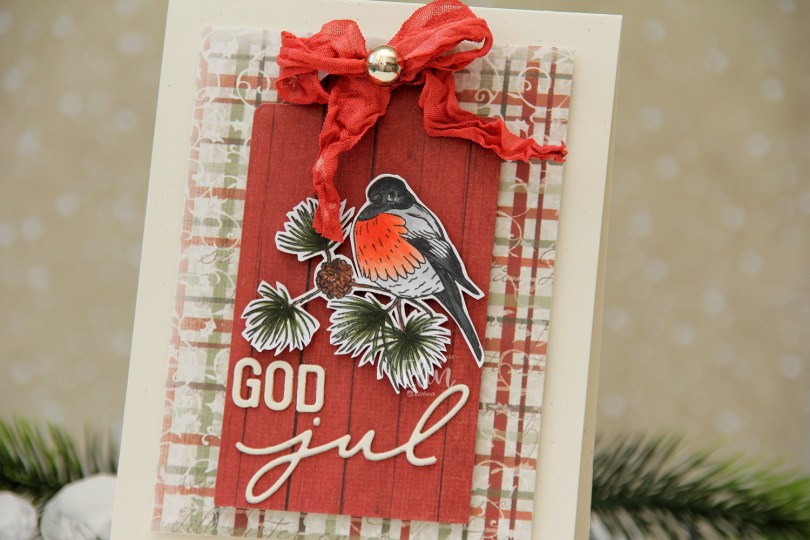
 I shared a card a couple of weeks ago with a bullfinch. The stamp set has another bullfinch image, and I decided to put this one to good use too. This time I fussy cut around him, leaving a white trim around the edge. Onto a top fold card base I created from Rustic Cream cardstock from Papertrey Ink, I mounted a piece of patterned paper from Maja Design (Tomten kommer from the Gammaldags Jul collection). From the Christmas Flower sheet from the Wintertime in Swedish Lapland collection from Pion Design, I die cut a tag, added that in the center using foam tape and a bow at the top that I found in my stash.
 I used a die to create the word jul. The die actually cuts the word juleklem, but I only needed jul for my card and cut the other part off. Using an alphabet die, I die cut the letters to spell god and glued them above jul to complete my sentiment. I added the bullfinch image using foam squares and also added a big gold pearl to the knot on the bow for a little bit of shine to finish my card.
 Simple color palette, and it happens to be the same as the one I used for the previous bullfinch card.
 These mitten dies from Kort & Godt are perfect for gift tags. There are three dies in the set: the cuff, a base layer and a top layer. I only used the cuff on one of these, but used the base layer and top layer for all of them.
 I used scraps of patterned paper from Maja Design for all three of the mittens, stamped and white heat embossed a sentiment on one of them and added a gold gem stone to the center of each of the snowflakes. I also pulled some string through a hole I made at the top left corner and added a couple of bells to each.
 On the back I stamped to and from using ink colors that matched the mittens. I used Dark Chocolate ink from Papertrey Ink for the brown mitten, Scarlet Jewel ink (also from PTI) for the red mittens.
 I added a bunny to the top of the teacup stack and colored the image with Copics, before fussy cutting, leaving a thin white border around the edge. I used a black glaze pen from Sakura to add shine and a tiny bit of dimension to the bunny’s eyes, then a white dot of Gelly Roll 05 on top of the black, once the black was dry. The glaze pen dries fairly quickly once applied, so I didn’t have to wait long.
 I adhered a panel of Blueberry cardstock from My Favorite Things to my white card base. Using a die in the A2 Double Stitched Rectangle STAX die set, also from My Favorite Things, I die cut a piece of patterned paper from Sunny Studio to adhere on top of the blue. This patterned paper is from the Subtle Grey Tones pack, and it really is subtle.
 I realized I hadn’t made any of my signature clusters in a while, and decided to pull out my die cut scraps of patterned paper and have a play. These patterned papers are from Sunny Studio (more from the subtle grey pack), Kaisercraft (light blue with dots), Papirdesign (dark blue with smaller dots) and Maja Design (pink floral), all die cut using a combination of the Happy Days Ticket Stubs die from XCut and the Fishtail Flag Frames dies from My Favorite Things. I used a mini paper doily from Doodlebug to mat my little clusters, and embellished with sequins from Pretty Pink Posh and Simon Says Stamp.
 The sentiment is from the Coffee and Chocolate stamp set from hÄnglar & Wings, white heat embossed on a strip of the same color cardstock I used for the card front. I then die cut it using one of the dies in the Itty Bitty Banners die set from My Favorite Things.
 The interactive element that I mentioned at the beginning of the post is actually the image. As you can see in this photo, it sits pretty high off the base. The reason for that is that it’s on an action wobble, so it’ll shake and move once you help it along a tiny bit.
 Fairly simple color palette for this one.

 I used flowers from different companies (I honestly don’t know where these are from, I’ve had them for 10+ years, but I’m thinking most of these are from Wild Orchid Crafts. The ruffled roses are really old ones from Kort & Godt, and I think the teal ones might be from I am roses, though I’m not entirely sure), removed the yellow centers from the teal ones and replaced them with white pearls from Papirdesign.
 Both insides share the same layout, and so does the back. I printed a sentiment to go on the back, as well as the date, and a few more flowers. These cards that I make with decorations on all four sides are thick, flowers add a ton of dimension. I used old patterned paper from Maja Design for this card. The Vintage Spring Basics collection and the Vintage Summer Basics collection are both collections that Maja Design released over 10 years ago. Back then, I used plenty of patterned paper, and especially Maja Design. Their paper is such good quality, and I love their use of pattern and color. My style has changed considerably, and I rarely use large pieces of patterned paper anymore, but I still have a lot, and Maja Design is still a favorite.
 This
This  I colored the image with Copics and used patterned paper from Maja Design to create this criss cross card. I added some flowers, a few pearls and also a charm to the large square tag I put inside, which has plenty of room for a personal message.
 On the back I put an additional sentiment, and the card was complete. Easy peasy.
 Simple color palette, not a whole lot of Copics.
 I had my penguins colored, fussy cut and ready to go. I rummaged through my Christmas themed patterned paper scraps and found a piece from Papirdesign and one from Maja Design that were just big enough to die cut a snowflake from. This snowflake is the Stitched Snowflake Frame from Lawn Fawn that came out last year. I added a white die cut circle to the back of the opening that the die creates and stamped a to/from stamp on the back.
 I added the penguin using foam squares and also a white heat embossed sentiment strip. The sentiment is from the Jul stamp set from Norsk Stempelblad. I stamped and white heat embossed a bunch at once on a scrap piece of blue cardstock from Maja Design. I added my strip using foam squares and finished off the tag with a few sequins from the Igloo mix from Little Things from Lucy’s Cards and a bow I tied to the top using Divine Twine in the color Blueberry.
 I used the same setup for the second tag, only switching out the sentiment and using pearls instead of sequins. They’re from the same mix from Lucy, though.
 I love using 1 mm foam squares. It adds a little bit of raised dimension to something that is very simple, and the bow adds a little bit of texture.
 Simple color palette for these two (and the other two penguins that are still lost somewhere in my craft room).