Hi, everyone!
 I feel like every other day is Wednesday, and today’s another one. Time just goes by so incredibly quickly, it’s hard to keep up and keep track of the weekdays. I colored up Mona from Mo’s Digital Pencil on Saturday, that much I know. I’ve now turned her into a happy card. I diecut a panel with my image as I often do using the largest of the Stitched Rectangle STAX Set 2 dies from My Favorite Things, it’s probably the one die I use the most out of all the dies I own. I used double sided tape to glue it to a cardbase, which I made from Ocean Tides cardstock from Papertrey Ink.
 I haven’t made one of my cluster cards in quite some time, but I really enjoy the process of putting these clusters together, so I decided to do it for this card. It’s a great way to use some patterned paper scraps, and one of these patterned papers is actually from 2007! It’s from Autumn Leaves. Remember them? I think it’s been a while since they ceased to exist. Now, when you go to autumleaves.com, you get to a site for assisted living communities for those with dementia. It’s a Texas based company, and definitely not a maker of pretty patterned paper. The other papers I’ve used are also what we’d call old in the card making world, the yellow one is from My Mind’s Eye and was released in 2011, and the remaining two were both released in 2013, they’re from Maja Design and Inkido, respectively.
 I use a couple of different dies to make these clusters, I make the banners using the Fishtail Flag Frames set from My Favorite Things, and I use the Happy Days Ticket Stubs die from Xcut for all those tickets. It’s one die that cuts nine different tickets, and I love that I get that many from one run through my diecutting machine. I mounted some of my diecut pieces on 1 mm foam tape, and glued others down using just double sided tape. Behind the whole thing I put half a mini paper doily from Doodlebug Design. I used the other half for the card I posted yesterday. On top I added a sentiment from Norsk Stempelblad AS stamped in Ocean Tides ink from Papertrey Ink. I mounted that on foam squares, and tripled up the foam squares on the left side of the banner. Finished off with a few pink dots from Papirdesign.

I have so many tickets left over, and with this kind of cluster you don’t even use whole pieces for all of it, so I have the off cuts from some of these also. I added half a ticket in the bottom left corner, too, and glued another dot on top. And that finishes my card for today.
 I leave you with the colors I used for the adorable little girl. Not too many today.
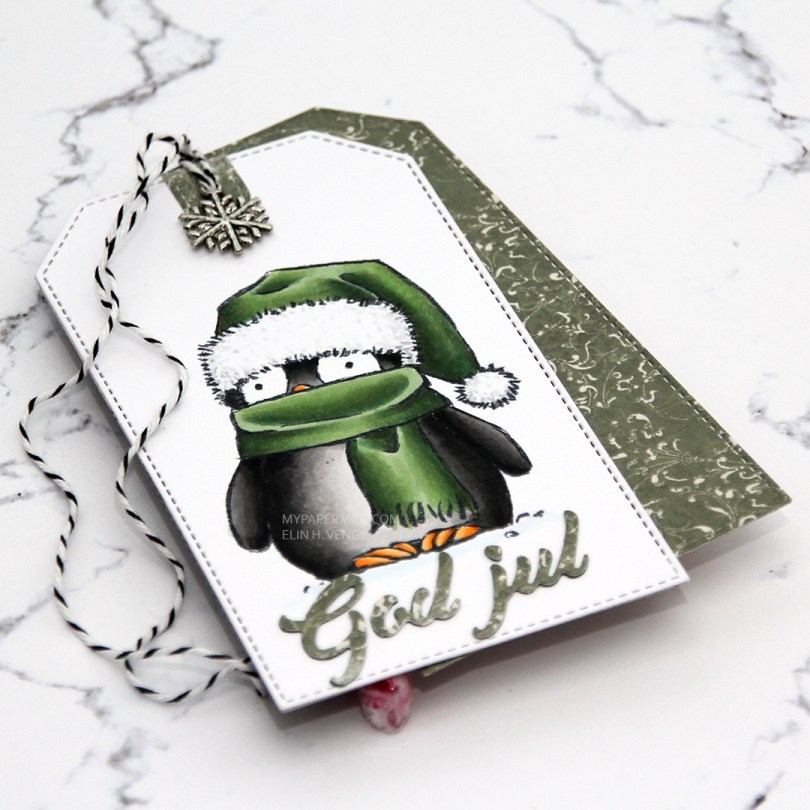
 This is a simple one. I colored a penguin chick from Mo Manning, die cut it using a tag die from My Favorite Things and added a die cut God jul sentiment below the penguin.
 On the back of the tag I die cut an additional two tags from patterned paper from Maja Design and stamped a To/From stamp from Norsk Stempelblad AS using Olive Twist ink from Papertrey Ink. I used a couple of strips of patterned paper to get a candy cane in there, as well.
 I added some twine through the top of the tag and even a snowflake charm, but let the rest be very simple. I’m hoping this penguin will put a smile on my sister’s face, she loves penguins, and this one is going to her and her husband.
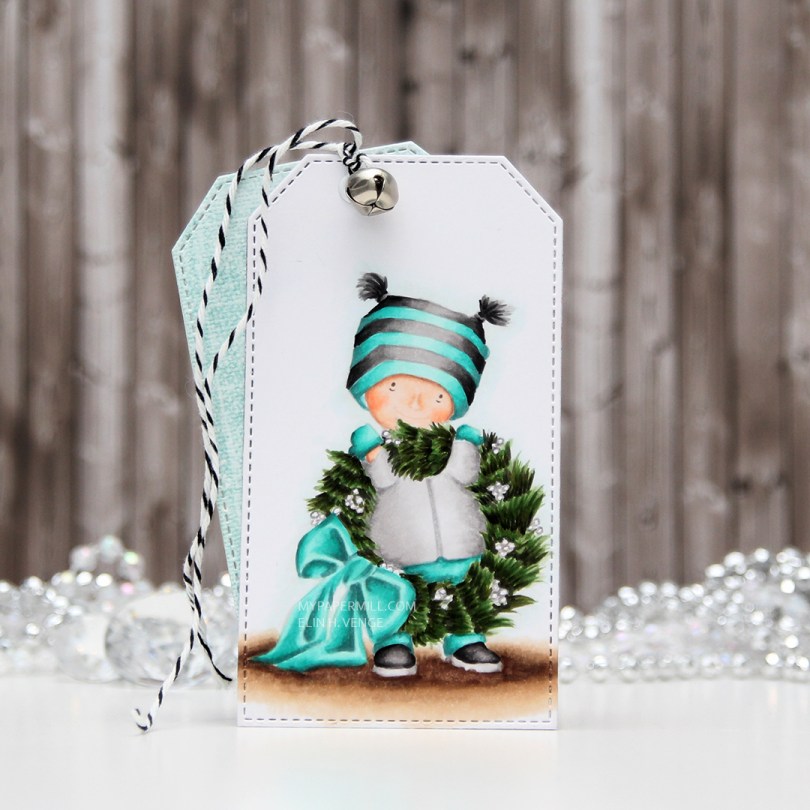
 I decided to go for a teal and gray color combo today, and white berries on the wreath instead of red ones. I just used a gray colored pencil to trace around the outline of the berries, everything else is noline colored using Copics. I used a stitched tag die from My Favorite Things to create the actual tag.
 I diecut a couple of pieces of scraps of patterned paper using the same die. I chose Julbukett from the Fröjdefull Jul collection from Maja Design and Good Cheer from the Christmas Magic collection from Fancy Pants Designs, which happens to be a collection from 2009, I have a lot of patterned paper. I stamped a to/from stamp from Norsk Stempelblad AS using Hawaiian Shores ink from Papertrey Ink straight onto the patterned paper. I made a hole at the top, added an eyelet, some twine and a bell, and my tag was done.
 I wanted my cluster with the sentiment to be more to the right than to the left, so I flipped my image in Photoshop to make the boy and the dog look to the right instead of the left, it fit my card better. It’s one of the great advantages of digital stamps.
 Once I’d colored in my image, I used my favorite faux stitch rectangle die from My Favorite Things to turn my colored piece into a panel for the front of my card. I added about half a tiny paper doily from Doodlebug Design, and some die cut scraps of Maja Design patterned paper, before adding a green strip with a word (Christmas hug) from Papirdesign using foam tape.
 I added another little piece of the green patterned paper from Maja Design towards the bottom of the left hand side and glued on a few snowdrift sprinkles from Little Things from Lucy’s Cards, before adhering everything to a card base I made out of Soft Stone cardstock from Papertrey Ink. Easy peasy, lemon squeezy, right?
 I tried to limit the amount of Copics I used on the snow for this one. Only five (plus the blender) isn’t too shabby.
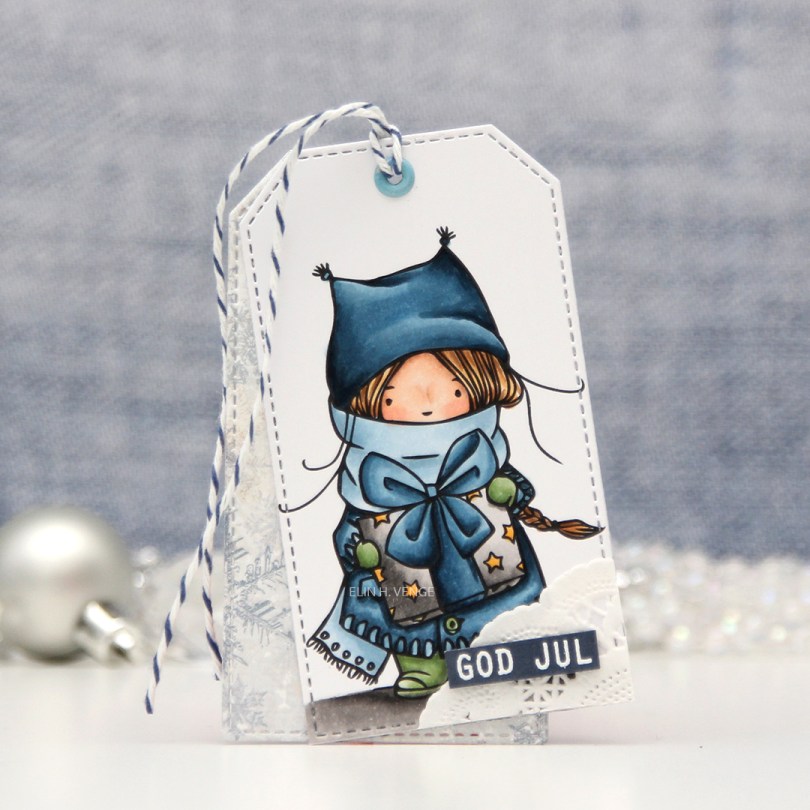
 I colored in my image using Copics and used a stitched tag die from My Favorite Things to turn it into a tag. I die cut another tag from a scrap piece of patterned paper from last year’s Christmas collection from Maja Design and glued the two together, offset a little bit for the patterned paper one to show. I added a tiny bit of a scrap of a doily to the bottom right corner of my colored tag and a white heat embossed sentiment on top using 1 mm foam squares. I punched a hole near the top, added an eyelet and used some Blueberry Twine from Whisker Graphics that I threaded through the hole.
 On the back I used a to/from stamp from Norsk Stempelblad AS that I white heat embossed on blue cardstock from Maja Design. I used my cut align tool to make sure I had an even 1/16″ border around the stamped image. I love that tool, it’s the best thing ever.
 Lots of blues used for this one. Another one, too, actually, I’ve made myself a B90 that I also used. What can I say, I love those blues!
 I colored up the cute
  I die cut the tag an additional two times, once in a red patterned paper that I glued on the back of my colored piece, and once in a green patterned paper that I offset and glued on the back for a little interest. I stamped the standard To/From (this particular stamp is from Norsk Stempelblad AS) on the green patterned paper using Olive Twist ink from Papertrey Ink.
 Underneath the kitten I stamped ho ho ho from the Scripty Xmas stamp set from Mama Elephant, using that same Olive Twist color ink. I added a bit of red lacey ribbon to the hole on the top of the tag, tied a bow around it using a very fine thread that I think is meant for warping looms, it used to be my grandmother’s. I added a little bell charm to the bow, I thought it was a nice finishing touch.
 Not a whole lot of colors used for this one, but the image isn’t very big either.
 I felt like I really needed to add a photo of the kitten in the tree. She was very content up there.
 I used a very bright red for the hat and sweater on the mouse, and the only color that really goes with it, in my opinion, is gray. I found some red and gray die cut scraps from a couple of Maja Design collections (Fröjdefull Jul and Joyous Winterdays) and made a little mini cluster in the top right corner.
 I started with a mini paper doily from Doodlebug Design, added a red fishtail flag frame die cut with a die from My Favorite Things, then a piece of a ticket die cut with a Docrafts die. I used some 1 mm foam squares for that. I added my sentiment at the end, which is from one of those strips at the bottom of the 12×12″ papers that you usually cut off. Maja Design has always had some kind of pattern on the back of theirs, which means that nothing needs to go to waste. This one was perfect in gray with a hint of red, and I used 1 mm foam squares to add it. I even doubled up on the foam on the left hand side of it.
 I added some red enamel dots from Papirdesign to finish it off, and glued a leftover piece of the doily to the bottom left corner and an additional two dots. I added my panel to a top folding card base I made from Gravel Gray card stock from My Favorite Things.
 This was a very simple image to color, so obviously I didn’t use a lot of colors.
 I used a cover die from Neat & Tangled to diecut twice from white cardstock and several times from scraps of different green patterned paper scraps. These are a mix of Papirdesign, Maja Design, Kaisercraft, and one that I don’t even know. Great way to use all those little bits.
 I glued my white frames together and inlayed my green pieces, before die cutting a word die from Papirdesign using Ripe Avocado cardstock from Papertrey Ink for the word itself and white for the shadow. I stacked a few of the green ones on top of each other for it to stand out a little bit.
 I used some angel hair to make a nest underneath my diecut and glued it right on top using liquid glue. I also added a few sparkling clear sequins from Pretty Pink Posh for some shine, and stamped a Norsk Stempelblad AS sentiment in Ripe Avocado ink from Papertrey Ink on a white strip and added it below my die cut word.
 Simple, but the dimension in the frame and the focal point still give the card a little bit of interest.

 I colored up
  I used the largest of the faux stitch rectangle dies from My Favorite Things to create a nice edge for my panel. I mounted it to a cardbase I made from Soft Stone cardstock from Papertrey Ink.
 I dug through my scrap stash of Christmas themed patterned paper and got really lucky with part of a diecut ticket and some pine branches.
 I made a little cluster starting with half a Doodlebug mini paper doily, then the partial ticket stub and the pine branches. I found a fitting sentiment on the bottom of a piece of patterned paper from Papirdesign, so I cut that bit out and added foam tape behind it. I finished the card with a few snowflake sprinkles from Little Things from Lucy’s Cards.
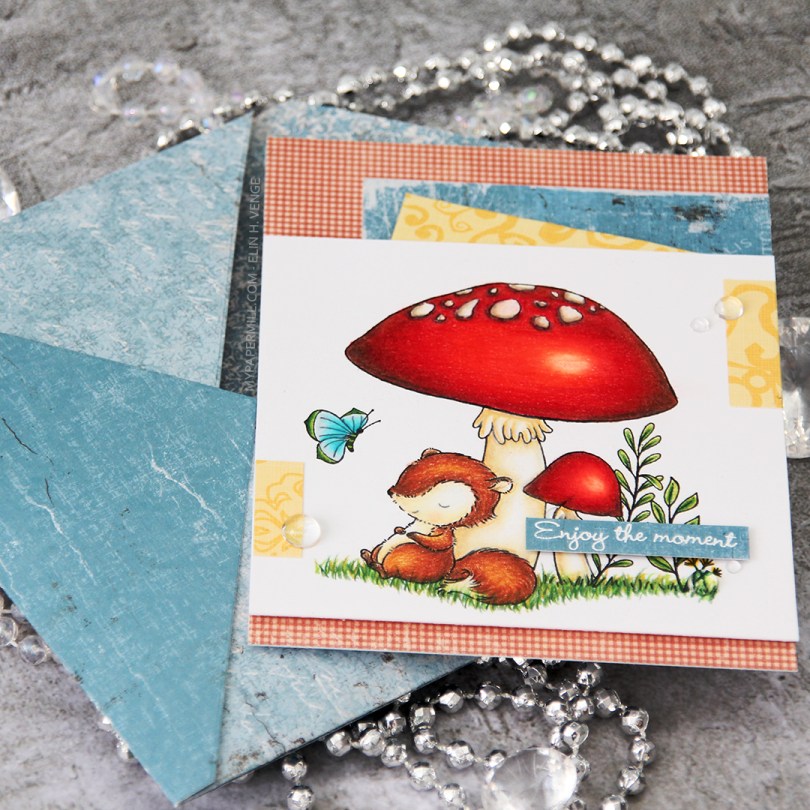
 This little fox scene is from the Always Bring a Smile set, designed for My Favorite Things by Stacey Yacula. I really love her characters, they’re so full of life, and this little guy looks like he’s taking a well deserved nap against the stem of that big mushroom. I actually stamped this on Stamper’s Select White cardstock from Papertrey Ink and pulled out my Prismacolor pencils to color him in for day 2 of the current round of Kathy Racoosin’s 30 day coloring challenge.
 I found some scraps of patterned paper in my stash (the red is from Pion Design, the tealy blue from Maja Design and the yellow from Chatterbox) and added them here and there on my card, before propping my panel with the cute fox onto the card front using foam tape. Lots of foam tape, I wasn’t shy! I stamped and white heat embossed a
  I added a few raindrops from Little Things from Lucy’s Cards around my sentiment and near those small yellow bits, and called it done. I had enough of those Maja Design scraps to make a matching envelope using the A2 V flap envelope dies from Simon Says Stamp.
 I don’t usually do anything to the back of my clean and simple (it’s somewhat clean and simple, this one?), but I recently bought this