Hi, there. It’s been kind of quiet here lately, I’ve been busy at work and I also prioritized getting my international holiday cards out in the mail. I still have the domestic ones to go, but there’s still time to send those, so I’m not too worried. I created this fun gift tag/ornament for my sister and her husband for Christmas, featuring the brand new Gingerbread Couple from Rachelle Anne Miller.
 I colored the gingerbread cookies with my Copics and used a circle die to turn it into a circle. I die cut another circle from patterned paper from Papirdesign and used a die from the Glassic Snow Globe die set from My Favorite Things to cut a window from the same piece. I stamped and white heat embossed a sentiment from Norsk Stempelblad AS below the window and added a shaker pouch from My Favorite Things that I filled with the Icicle Sequin mix from Hero Arts.
 I die cut another circle from the same patterned paper that I used on the front and white heat embossed a to/from stamp from Norsk Stempelblad AS in the center. After adhering all the pieces together, I cut a hole at the top, reinforcing it with an eyelet before pulling string through. This shaker gift tag can definitely be used as an ornament too, and I’m hoping that’s what will happen.
 Simple image and simple colors for this one.


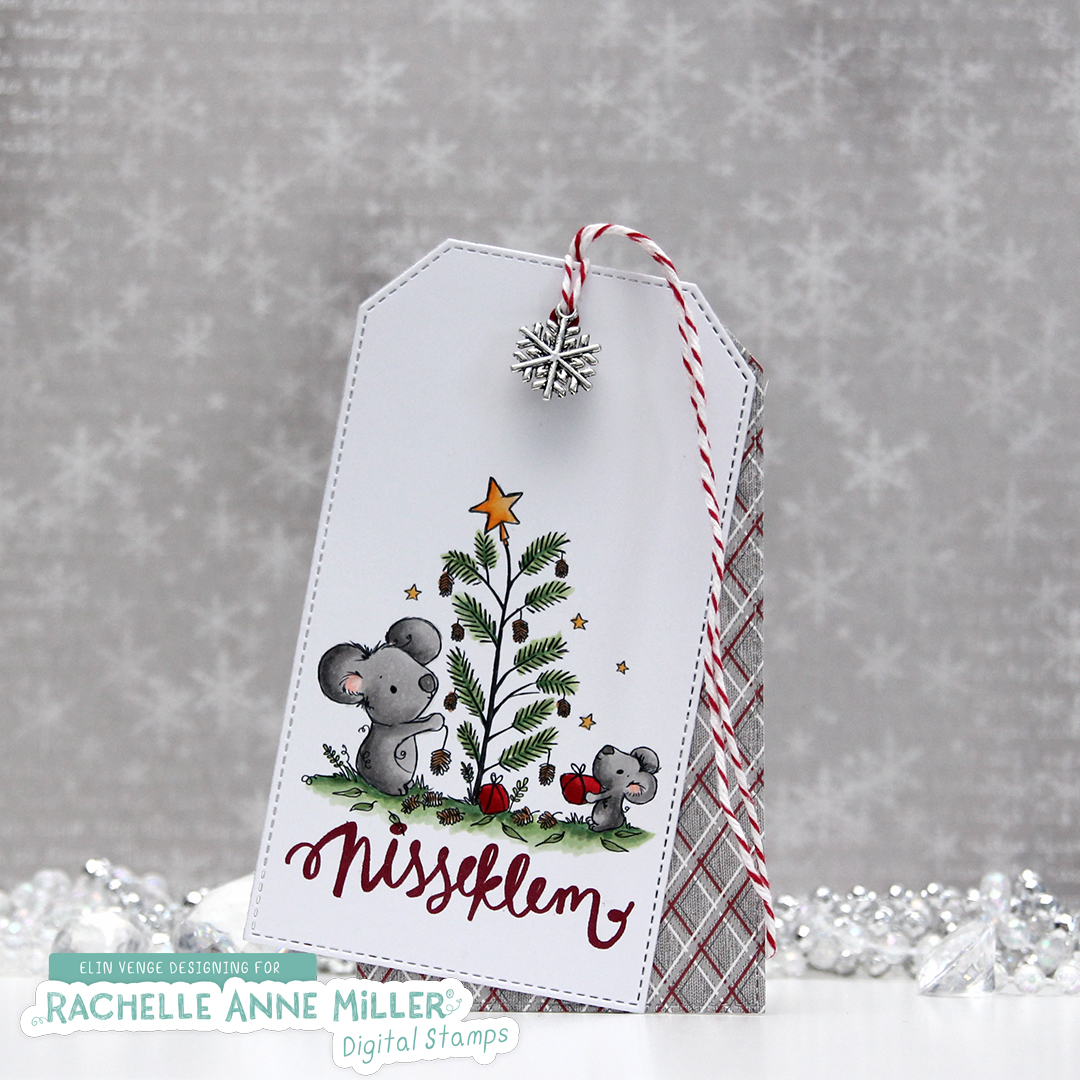 I stamped a sentiment from Norsk Stempelblad AS below the image using Scarlet Jewel ink from Papertrey Ink. Using a faux stitch tag die from My Favorite Things, I die cut four tags, one from the panel with the image and three from scraps of patterned paper from the Fröjdefull Jul collection from Maja Design. I glued two and two back to back, before gluing the two double tags together, offset quite a bit.
 On the back, I used another stamp from Norsk Stempelblad AS and the same color ink as I used for the front.
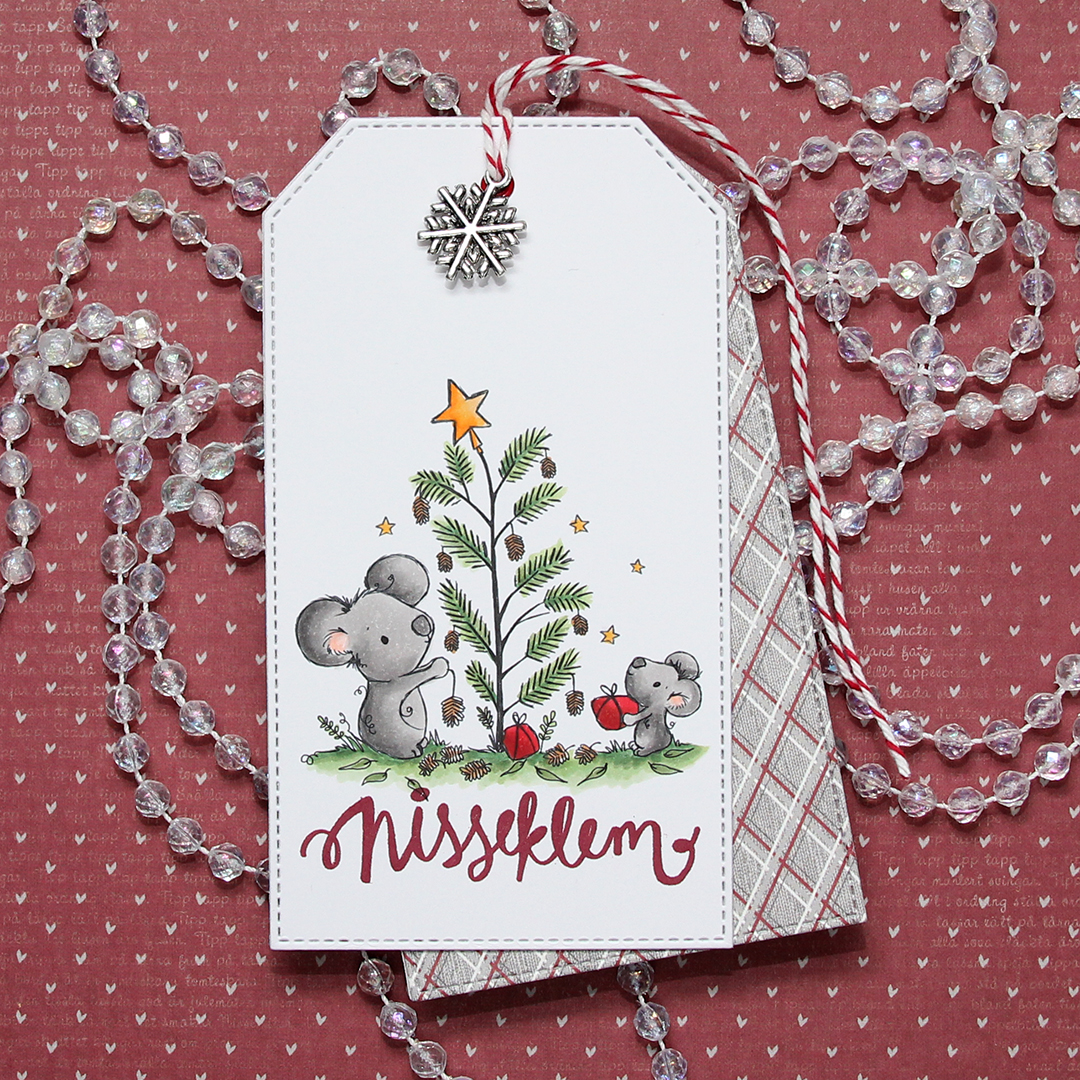 I punched a hole through the top of the tag, added a red eyelet for strength, pulled some twine through and also added a snowflake charm to finish.
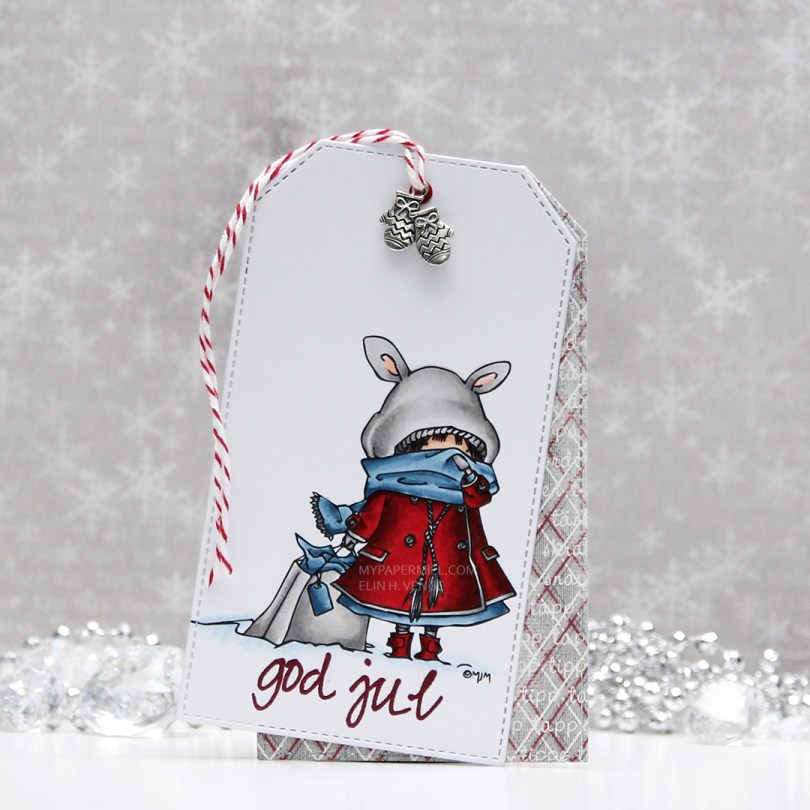
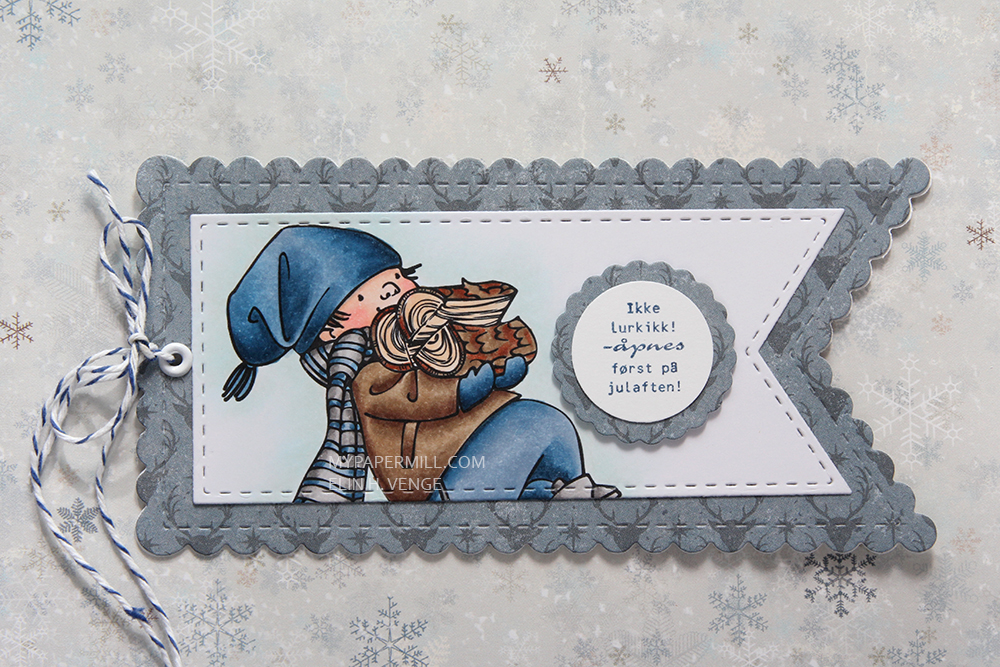
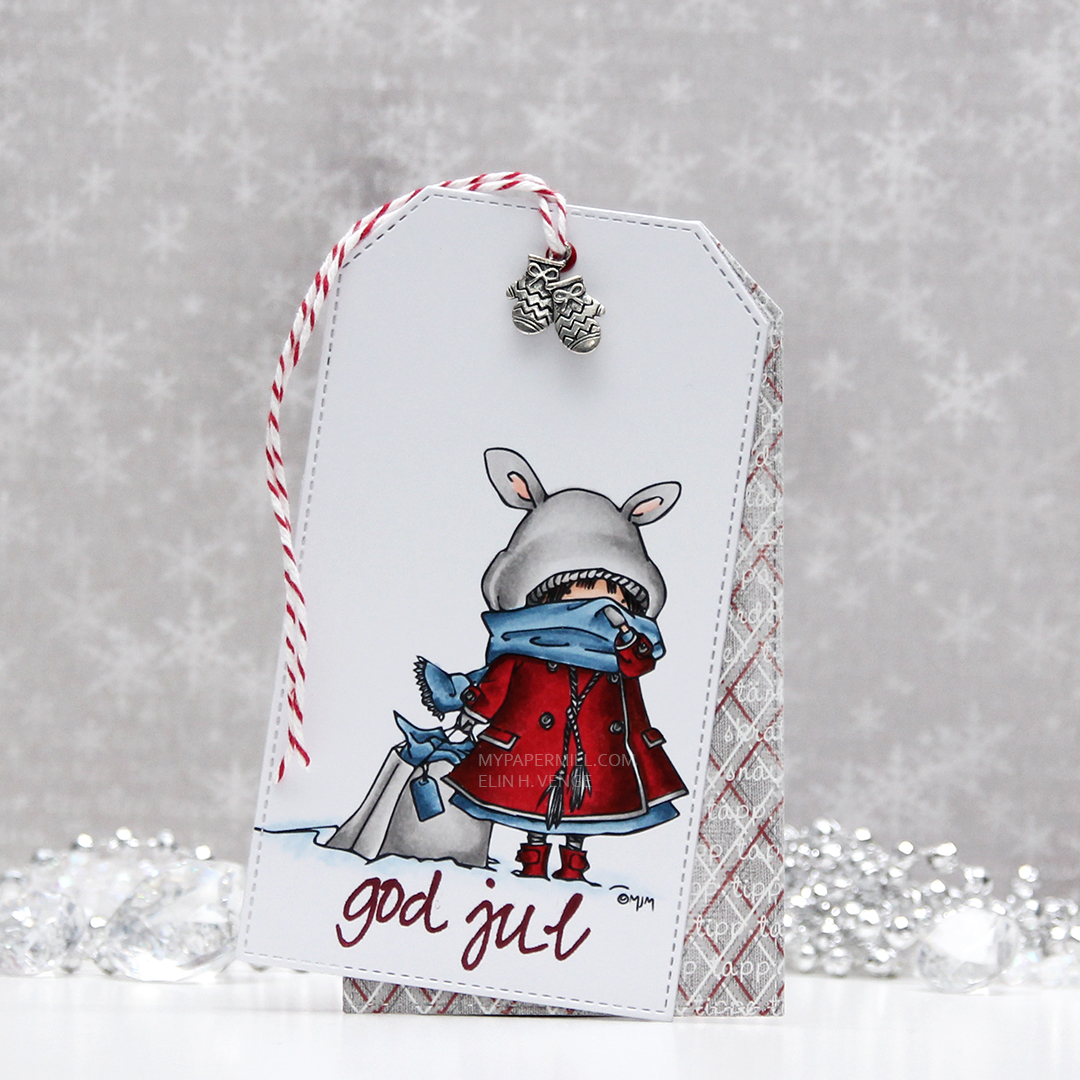 I colored the image with Copics, die cut it using a large faux stitch tag die from My Favorite Things and stamped a sentiment from Norsk Stempelblad AS on the bottom using Scarlet Jewel ink from Papertrey Ink. I created three more tag die cuts from the Fröjdefull Jul collection from Maja Design and glued one of them to the back of my colored panel. I glued the other two back to back and glued my two double tags together, slightly offset. I cut a hole at the top of the tag, used a red eyelet for strength and threaded some red twine through, adding a charm with mittens for that little bit extra.
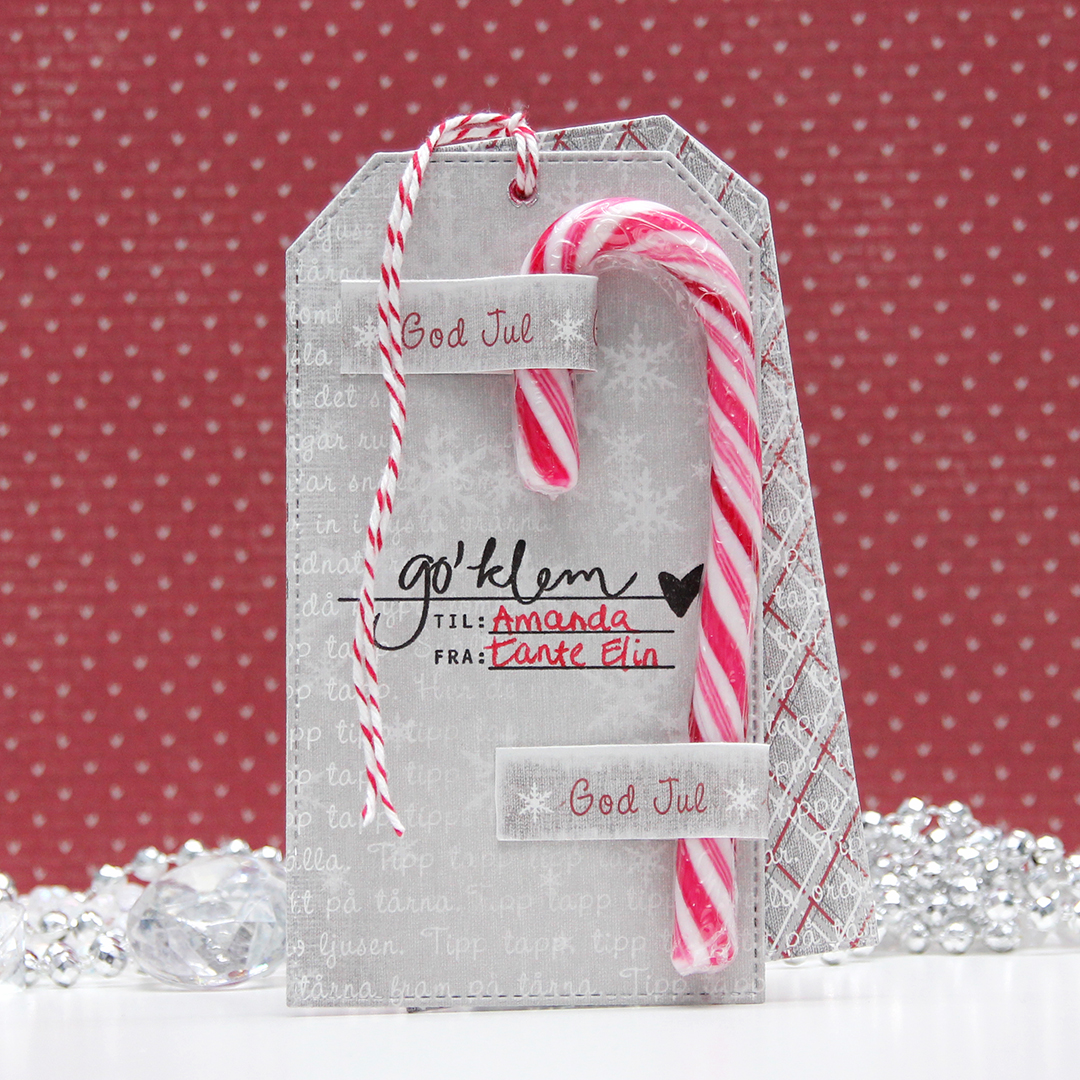 On the back of the tag I stamped a To/From stamp from Norsk Stempelblad AS using Smokey Shadow ink from Papertrey Ink, which is a nice dark gray. I attached a couple of loops I made from one of the patterned papers and was able to thread a candy cane through, I just hope the dog doesn’t get into the presents and eats the candy cane.
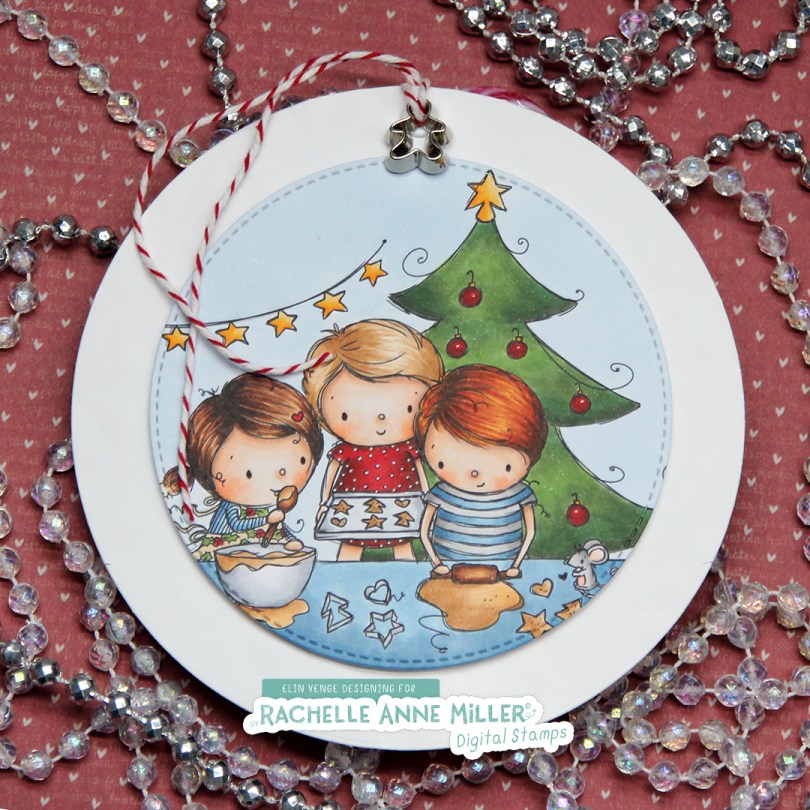
 I created this gift tag for my niece. It’s quite a big tag, its diameter is about 5″. The white circle panel isn’t just a panel, it’s dry embossed using an embossing folder from We R Memory Keepers. Unfortunately, dry embossing doesn’t show up very well in photos, and even less so when you’ve used white cardstock. It’s there in real life, though, and it provides a little bit of texture. I colored and die the Christmas Baking image from Rachelle Anne Miller, and popped it up on foam tape in the center of the white panel, before creating a hole at the top, adding an eyelet for strength. Through the hole I thread some cherry red divine twine and a tiny little cookie cutter embellishment, I thought it fit the image well.
 On the back I added another diecut circle that I’d already added a To/From stamp to, using Scarlet Jewel ink from Papertrey Ink. I cut a slit above and below that to feed the candy cane to, and double up on the foam tape when I glued it to the larger circle.
 Quite a few Copics for this one, and I used B90, which is a color I’ve created myself, on the background.
 I colored in my image using Copics and used a stitched tag die from My Favorite Things to turn it into a tag. I die cut another tag from a scrap piece of patterned paper from last year’s Christmas collection from Maja Design and glued the two together, offset a little bit for the patterned paper one to show. I added a tiny bit of a scrap of a doily to the bottom right corner of my colored tag and a white heat embossed sentiment on top using 1 mm foam squares. I punched a hole near the top, added an eyelet and used some Blueberry Twine from Whisker Graphics that I threaded through the hole.
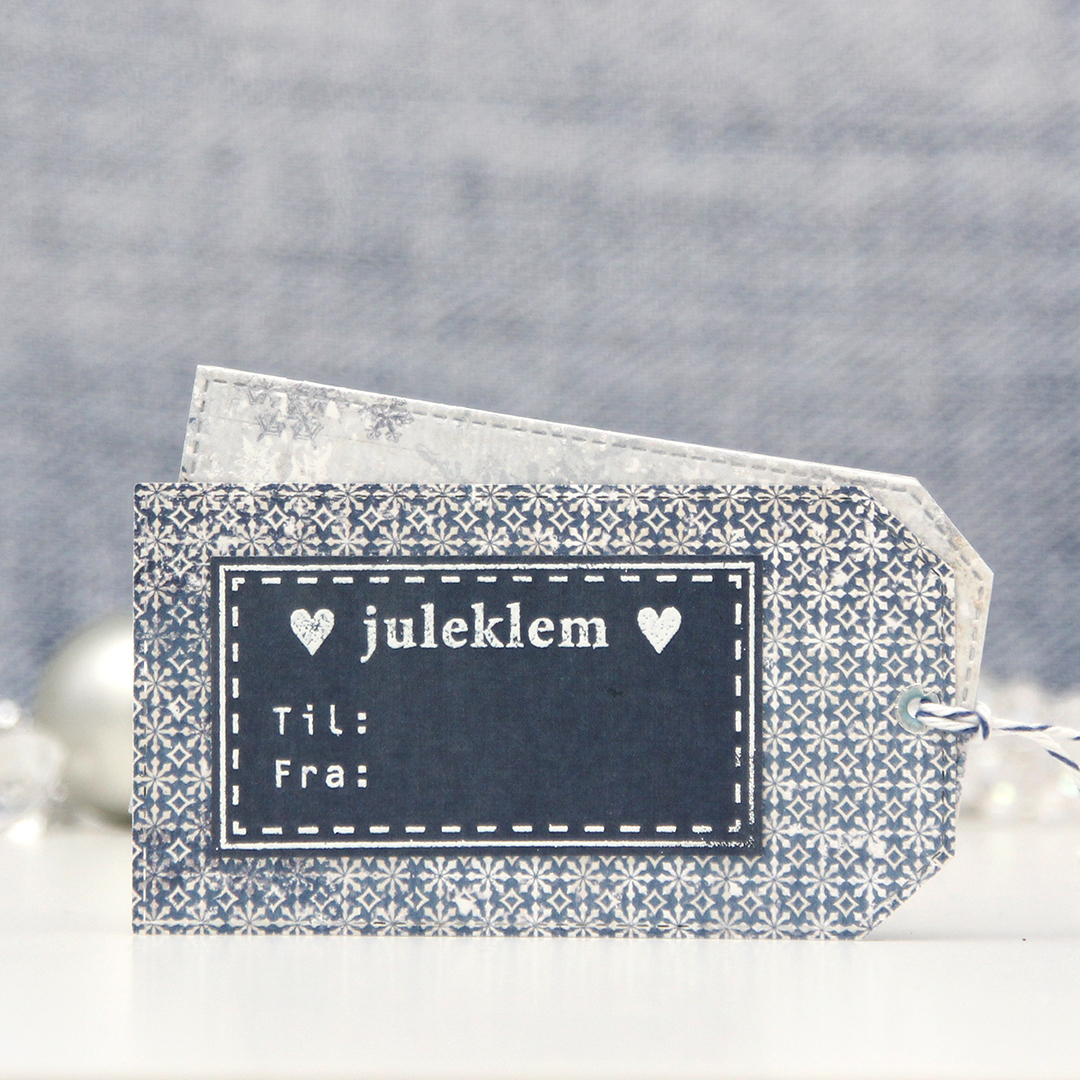 On the back I used a to/from stamp from Norsk Stempelblad AS that I white heat embossed on blue cardstock from Maja Design. I used my cut align tool to make sure I had an even 1/16″ border around the stamped image. I love that tool, it’s the best thing ever.
 Lots of blues used for this one. Another one, too, actually, I’ve made myself a B90 that I also used. What can I say, I love those blues!
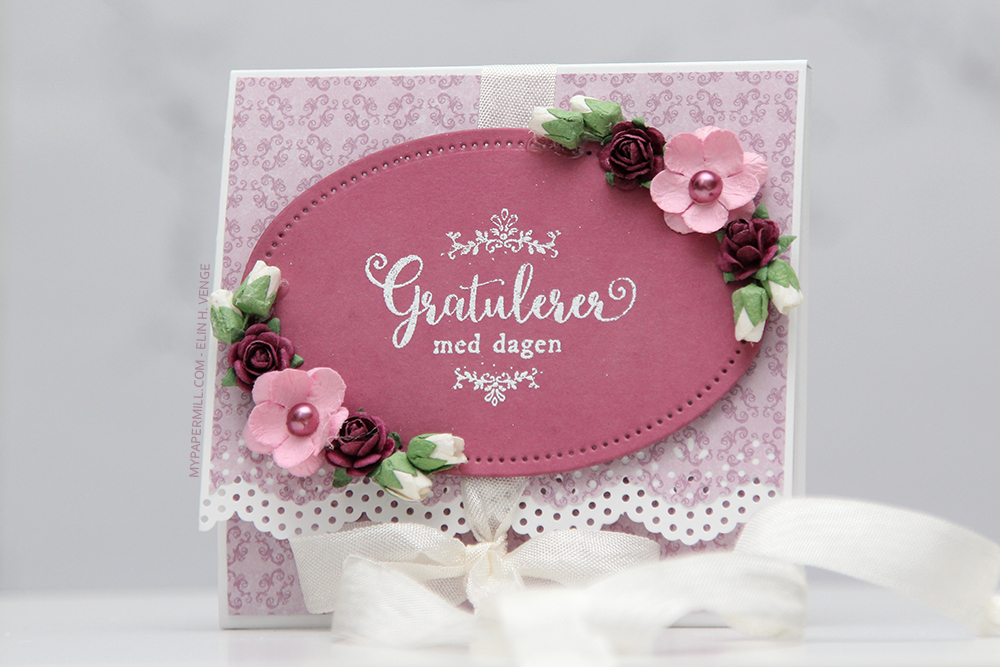 Når kortet er lukket ser det ganske lite ut, det måler i underkant av 4×4″. Jeg har pyntet veldig enkelt med blomster og erstattet midten av de rosa blomstene med perler. Teksten har jeg embosset i hvitt.
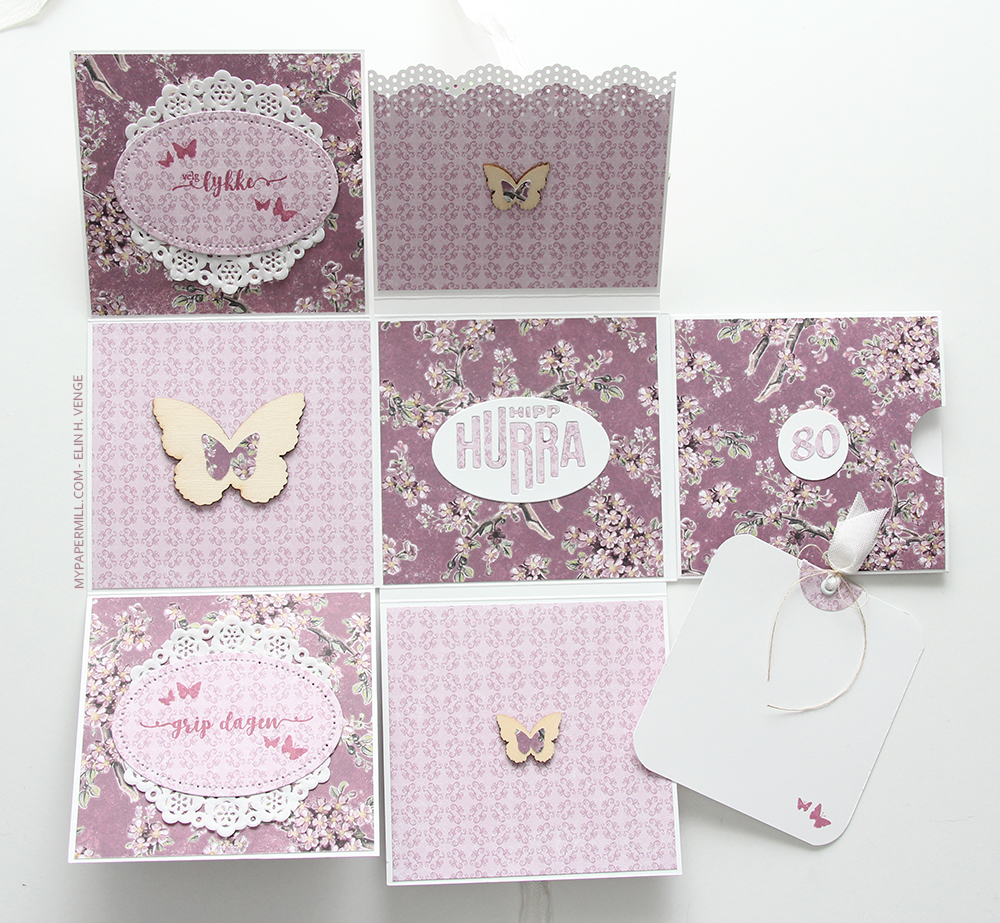 Når kortet lukkes opp vises det at det ikke er så lite likevel. Flere paneler med plass til litt relativt flat pynt og litt tekst. Jeg har brukt et ark fra Fremtidsdrømmer-serien som kom tidligere i år, jeg syns disse arkene har så fine farger.
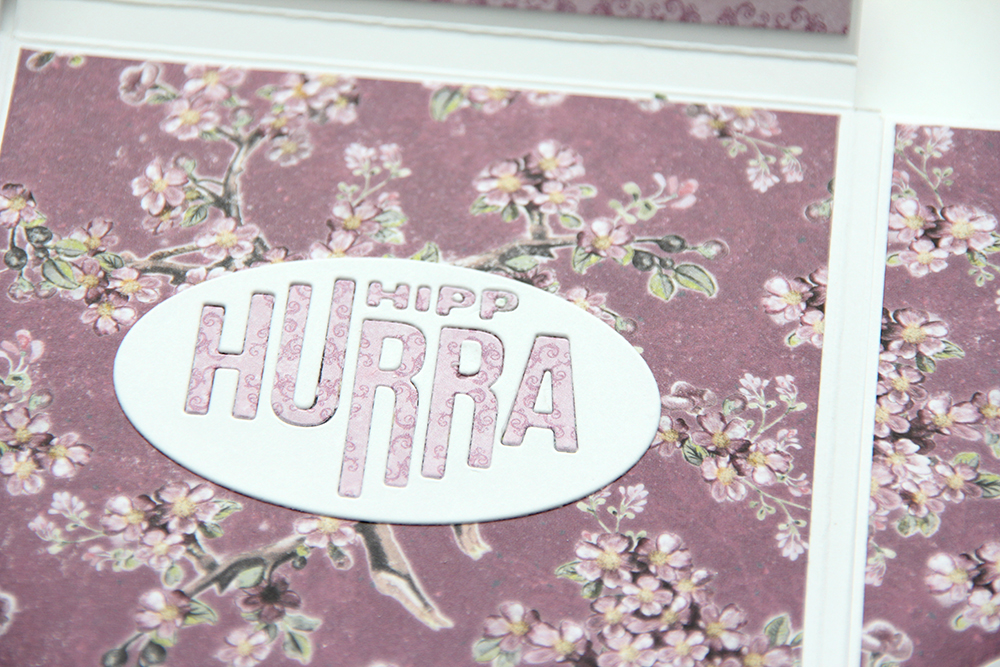 Jeg stanset ut Hipp hurra-ovalen to ganger, en gang i hvit kartong og en gang i mønsterarket. Jeg la bokstavene stanset ut av mønsterarket inni kartongovalen som puslespillbrikker.
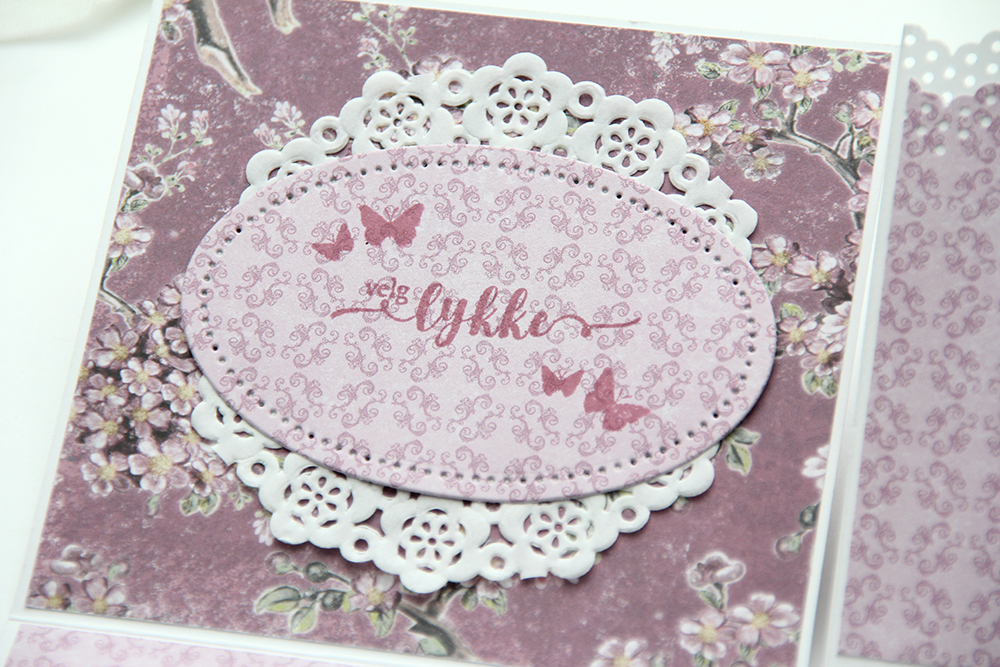 På to av panelene inni har jeg stemplet tekster. Begge tekstene er stemplet med blekk fra Papertrey Ink som passet fint til resten av kortet. Noen sommerfugler fant jeg også ut at jeg ville stemple på, de passer veldig fint til sommerfuglene jeg har punchet ut og limt på finérsommerfuglene jeg ellers har pyntet med.
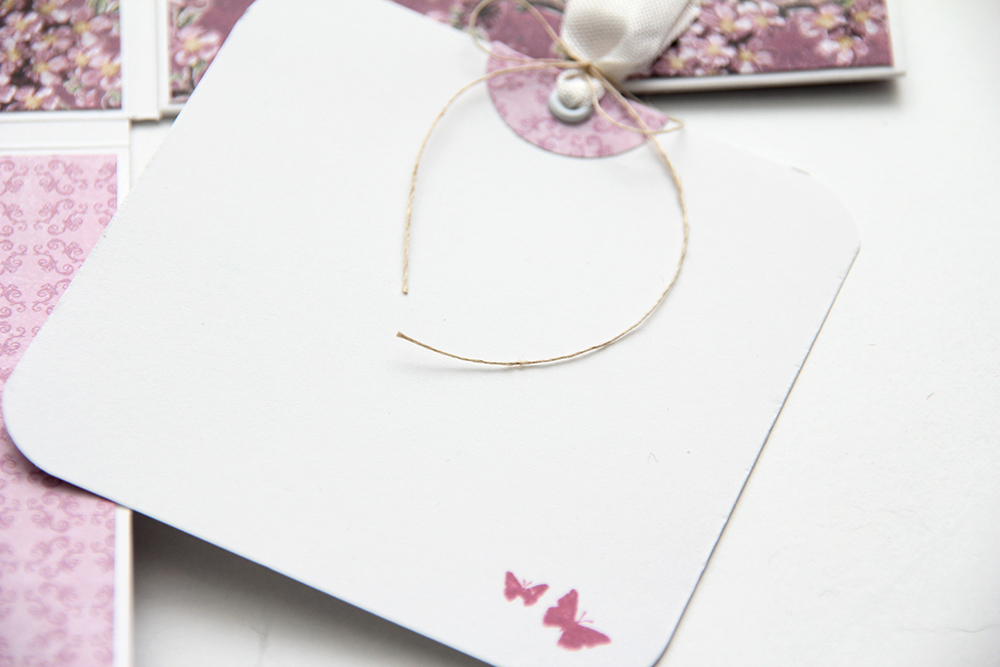 Høyresiden av kortet er en lomme med en tag med plass til en liten hilsen. Jeg har stemplet de samme sommerfuglene også her.
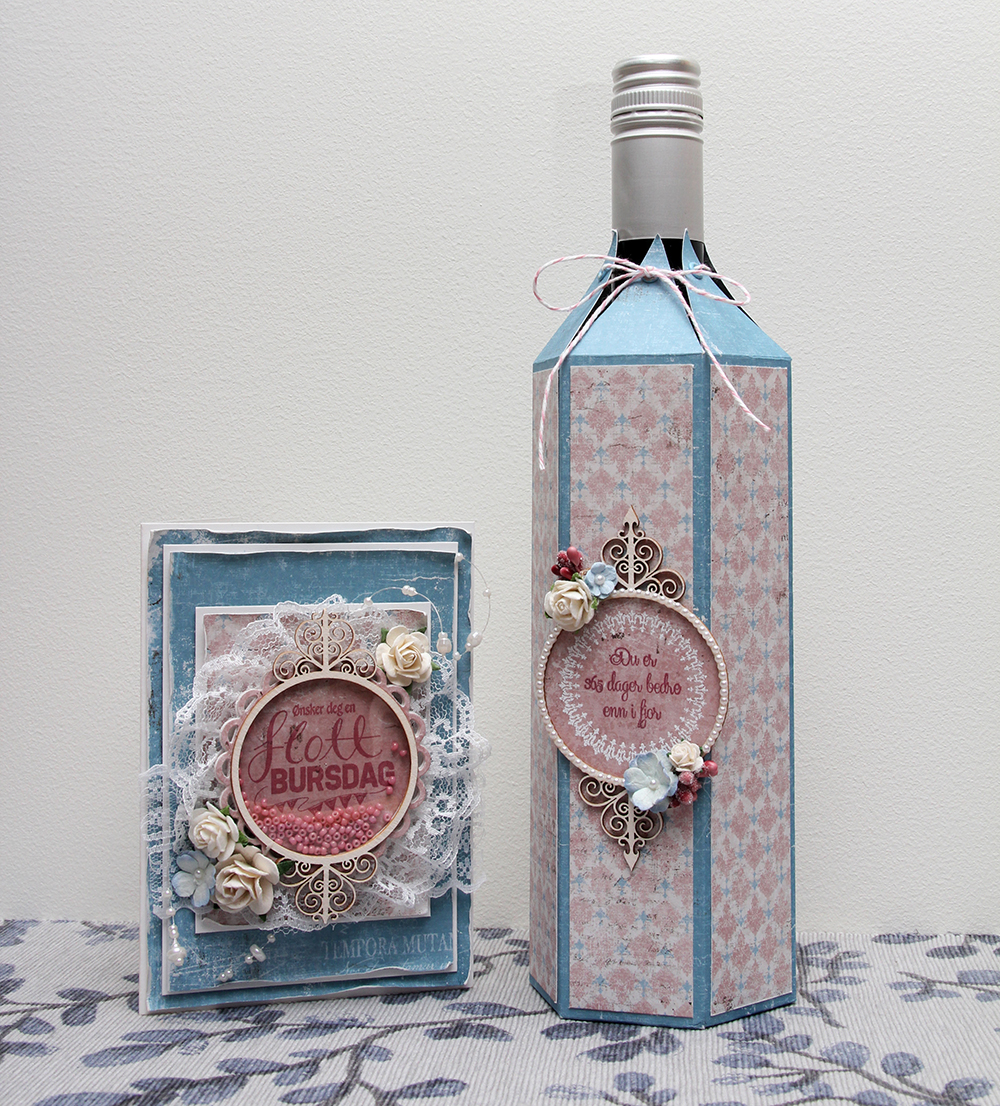 Jeg bestemte meg for at jeg skulle lage disse som et sett, så de matcher. Jeg har brukt mønsterark fra Vintage Summer Basics-serien til Maja Design på begge to, samme stempelpute og også en del av pynten er lik. I hver spiss på vinskjuleren har jeg satt en malje fra Making Memories for å forsterke hullene som tråden skal gjennom. På rammen har jeg limt 2mm perler fra Kort & Godt tett i tett rundt hele ringen for å pynte opp litt ekstra.
 Kortet har jeg laget litt lag på lag. Jeg har brukt den samme rammen her som på vinskjuleren, og stemplet en tekst fra Norsk Stempelblad AS med Papertrey Ink Autumn Rose blekk rett på det ene mønsterarket. Jeg har pyntet enkelt med blomster og en perlestreng og lagt en tynn blonde bak som en slags ekstra ramme.
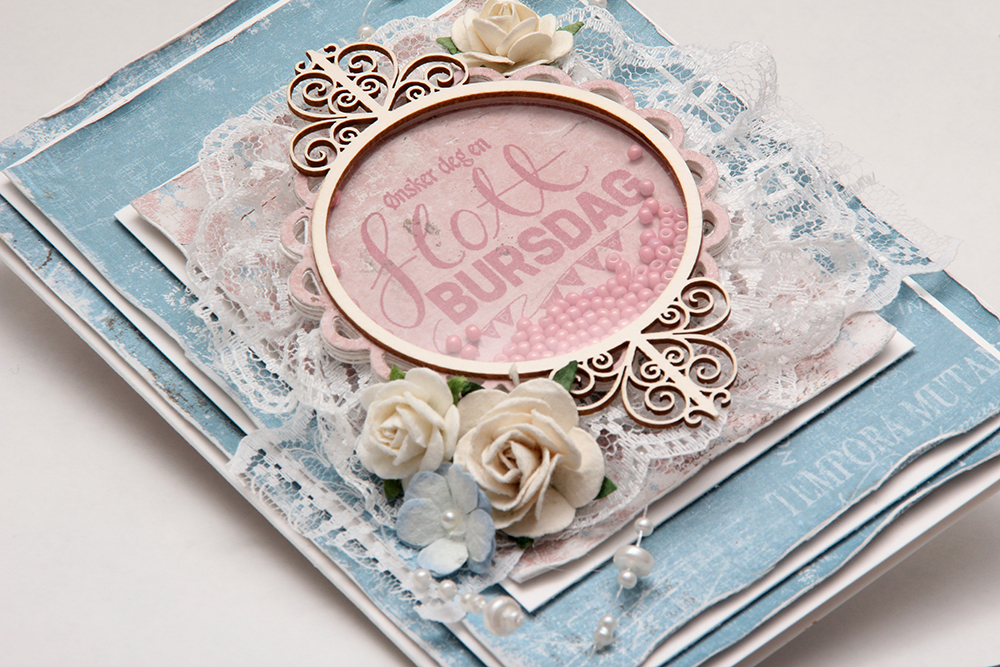 Jeg har laget hovedfokuset på kortet som en shakerboks, med glassperler inni. Disse perlene er kjempegamle, min bestemor kjøpte dem på bokhandelen på Åndalsnes en gang på åttitallet, men de matcher jo mønsterarket HELT perfekt.
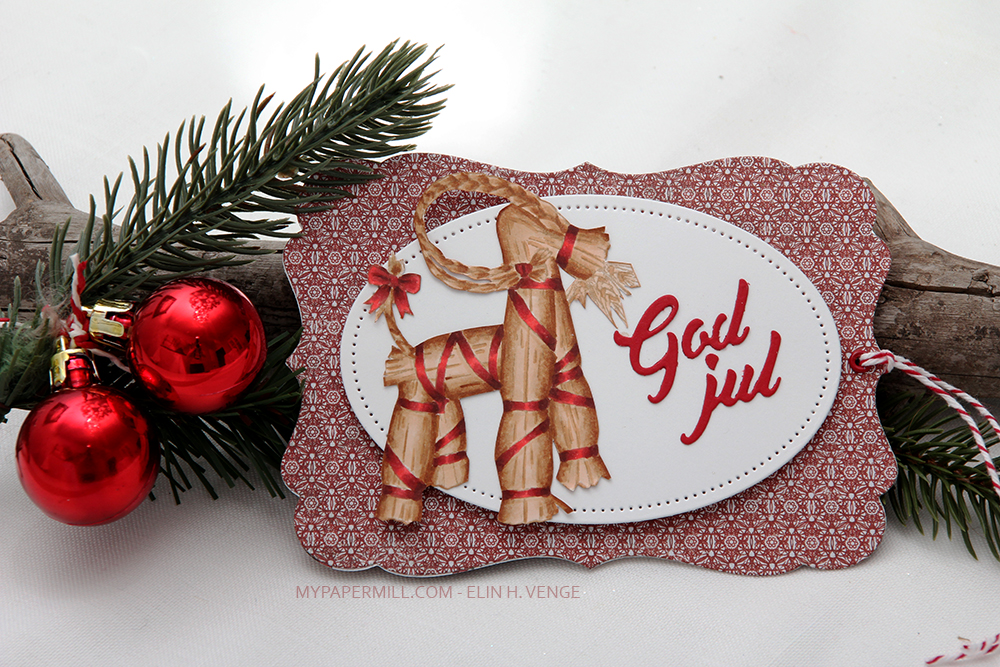 Jeg stemplet en julebukk med Papertrey Ink Classic Kraft blekk og farlela med Copics før jeg klippet ham ut og satte på pakkelappen min. Pakkelappen min er ikke veldig innviklet, men skal man lage pakkelapper til alle årets julegaver må man gjøre det litt enkelt.
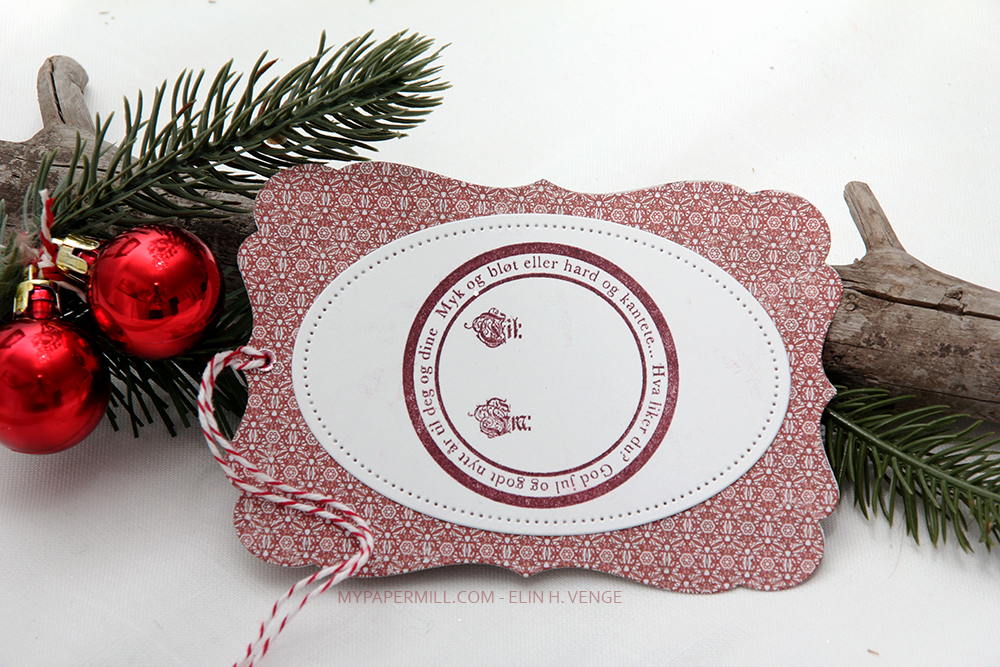 Jeg har brukt det samme oppsettet på baksiden av pakkelappen. Diecut og Til/Fra-stempel, stort enklere kan det ikke bli. Nå mangler bare å pakke inn gaven og henge på lappen.
 Som vanlig er motivet fargelagt med Copics. Jeg har stanset det ut med en die fra Rayher og brukt et mønsterark fra Papirdesign bak, også stanset ut med en Rayher-die.
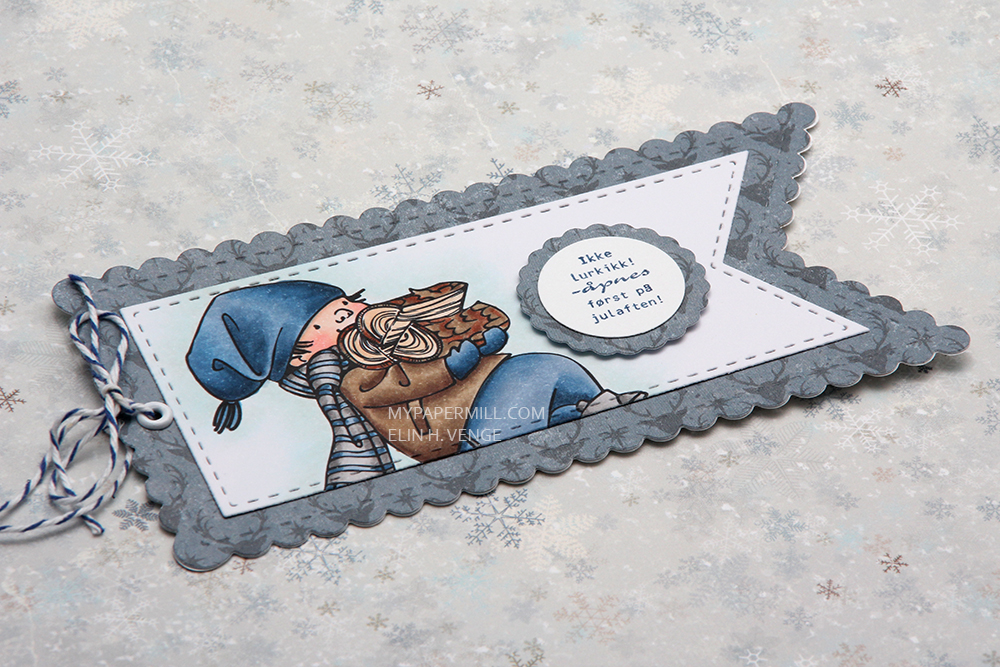 Jeg har stemplet en tekst fra Norsk Stempelblad AS med blått blekk fra Papertrey Ink og stanset ut med en 1″ sirkelpunch fra EK Success. I enden satte jeg en malje og blå twine til å knyte fast i pakken. Og det er faktisk det hele.
