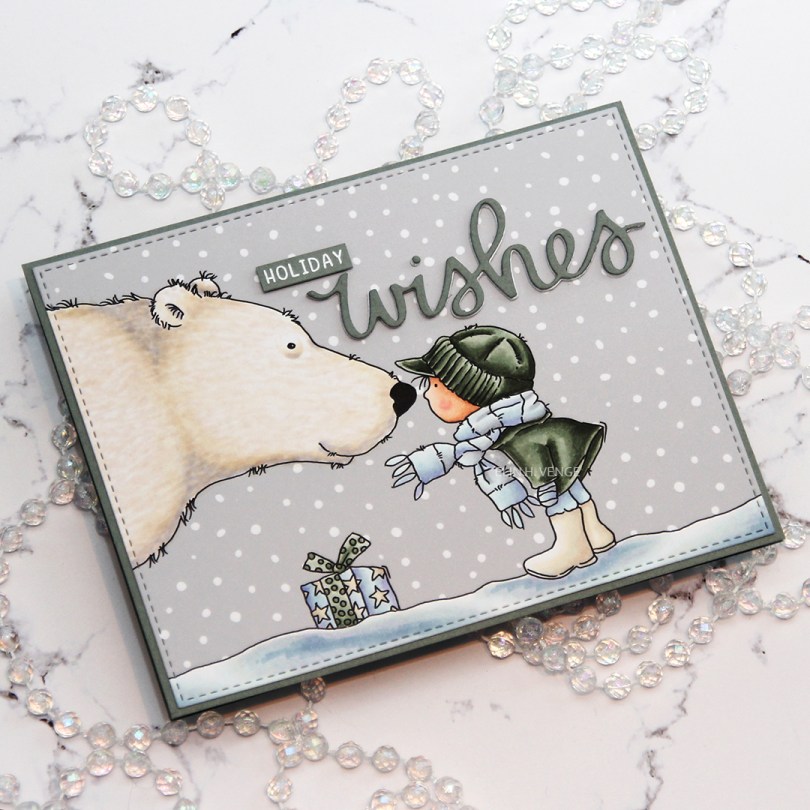
Hi, everyone! I’ve got a simple Christmas card to share today, featuring this adorable Christmas Friends image from Lili of the Valley. The gray background with the white snow (at least I’m imagining that it’s snow) is also from Lili of the Valley.
 Once I’d colored the image with Copics, I used the largest die in the A2 Stitched Rectangle STAX Set 2 from My Favorite Things to die cut a landscape oriented panel that would fit perfectly on my card base with a 1/16″ border around. I like the 1/16″ little frame, AND it’s the same width as the distance from the faux stitching to the cut line. I like having them the same. Little details like that matter, to paraphrase a famous German architect (Ludwig Mies van der Rohe, who coined the term “God is in the details”).
 I created a top fold card from Stormy Sea cardstock from Papertrey Ink. It’s a color that matches the BG90 family from Copic really really REALLY well. I need to order more, I only have half a sheet left of this color. I used the same color cardstock to diecut the word wishes using a die from Mama Elephant that was free with purchase if you spent a certain amount during their birthday extravaganza back in September. Normally I’d diecut the word several times in the color I wanted, but since I was running super low on this particular grayish green, I used a few layers of white diecut words, and only one layer of the colored cardstock on top. I stamped and white heat embossed the word “holiday” from the Iconic Ornament stamp set from Mama Elephant, also free with purchase over a certain amount on the Mama Elephant site back in September. I added a few more layers of cardstock behind it for dimension and glued it to my sky using Gina K liquid glue, which I also used for the die cut word.
 I decided not to add any additional elements. No embellishments, no nothing, I didn’t want to distract too much from that adorable image.
 Not a lot of Copics for this one, and 14 of these were used for the snow and polar bear.
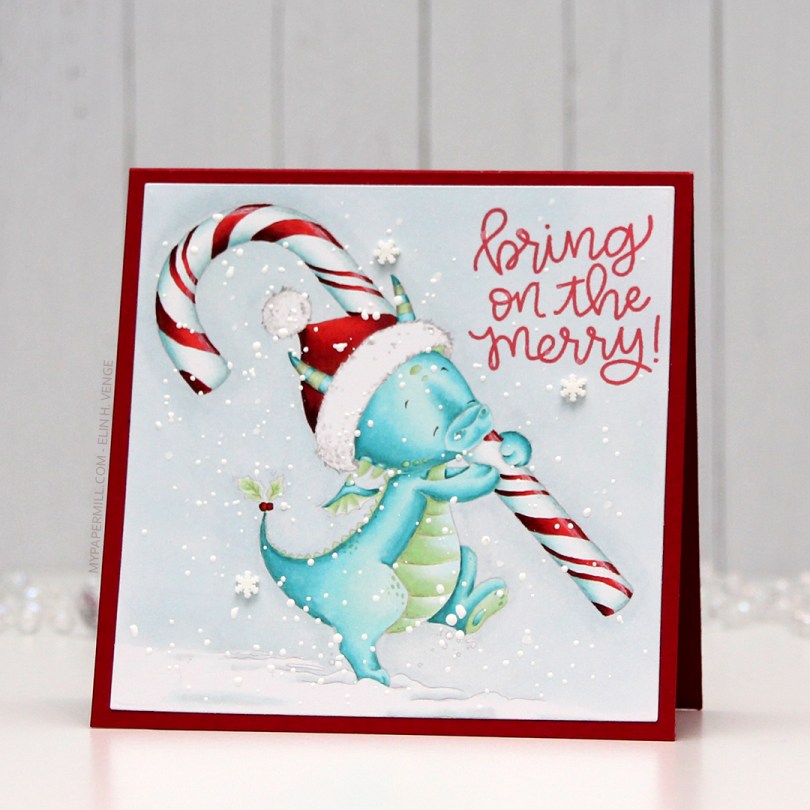
 I love no line coloring, and this guy with the candy cane was so much fun to color up. I added snow flurries to the background with a gelly roll pen when I did my coloring, and once I’d die cut my colored piece I wanted even more snow, so I sprinkled on embossing enamel, as well, and melted that.
 I even added a few snowdrift sprinkles from Little Things from Lucy’s Cards once my card was assembled. I love this look of snow on Christmas cards.
 The sentiment is from the Scripty Xmas stamp set from Mama Elephant, stamped in Lady Bug ink from Memento. I added my panel onto a 4 1/4 x 4 1/4″ top folding card base I made from Electric Red card stock from My Favorite Things.
 I used a square die from Lifestyle Crafts to die cut my elf down to the size I wanted, in this case 4″.
 I then stamped a sentiment from the Scripty Xmas stamp set from Mama Elephant using Enchanted Evening ink from Papertrey Ink, before gluing my panel to a 4 1/4″ square card base made from Dark Indigo cardstock, also from Papertrey Ink. I finished off my card by gluing on some stars from a sequin mix from Hero Arts. They’re iridescent, which I’m normally not a big fan of, but it worked on this card.
 I love the ease of clear stamps, but rubber stamps like this one have much finer lines, and they stamp beautifully every single time, I love that. I also love blue for Christmas, but that’s hardly a secret 😉
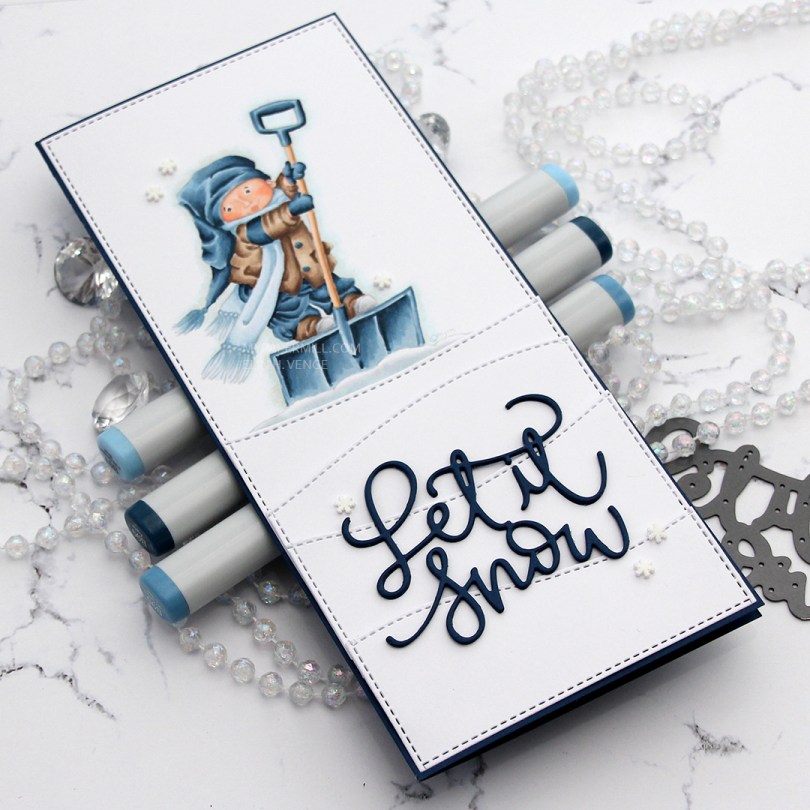
 I did no line coloring of the
  I adhered my panels with tape runner and 1 mm foam squares. Each panel has a little bit of dimension towards the top, while the rest is adhered using tape runner onto a slimline card base I created from After Midnight card stock from My Favorite Things. I used the piece that was left over to create my sentiment, which I die cut three times using a die from the Let it snow die set from Mama Elephant. My last finishing touch was a few snowflake sprinkles from Little Things from Lucy’s Cards.
 Limited color palette this time. I also used B90, which is a color I’ve made myself.
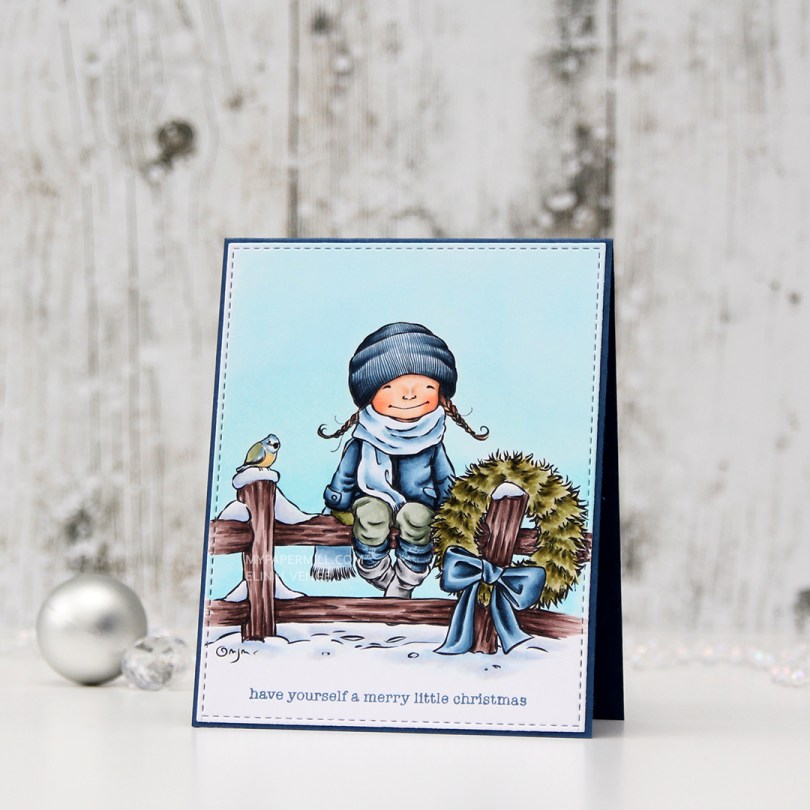
 I love this
  I felt like I’ve colored up far too many red Christmas images lately, so I didn’t want even a hint of red on this one. The blue bow totally works, I think, the same is true of the blue, green and hint of yellow on the bird that I tried to color up like a Eurasian Blue Tit. I die cut my image using a stitched rectangle die from My Favorite Things.
 I glued my panel onto a cardbase made from Enchanted Evening cardstock from Papertrey Ink, and stamped a sentiment from the Holiday Messages stamp set from Mama Elephant using Enchanted Evening ink, and my card was complete. I didn’t add any embellishments to this, I wanted the image to shine.
 Speaking of the image, here are the colors I used. I also used B90, which is a color I’ve made myself, on her scarf.
 I colored in my little scene using more Copics, die cut that using the same die, then fussy cut around the trees, snow and house. I added a sprinkling of snow by heat embossing chunky white embossing enamel on both panels. I glued my blue background to a cardbase I made from Pure Poppy cardstock from Papertrey Ink and added the rest of the scene on top using 1 mm foam squares – lots of them! I added a stacked die cut sentiment using a die from the So Many Snowmen die set from Mama Elephant and my card was done.
 I didn’t use too many colors on this, and most of these were actually used on the sky and the snow.
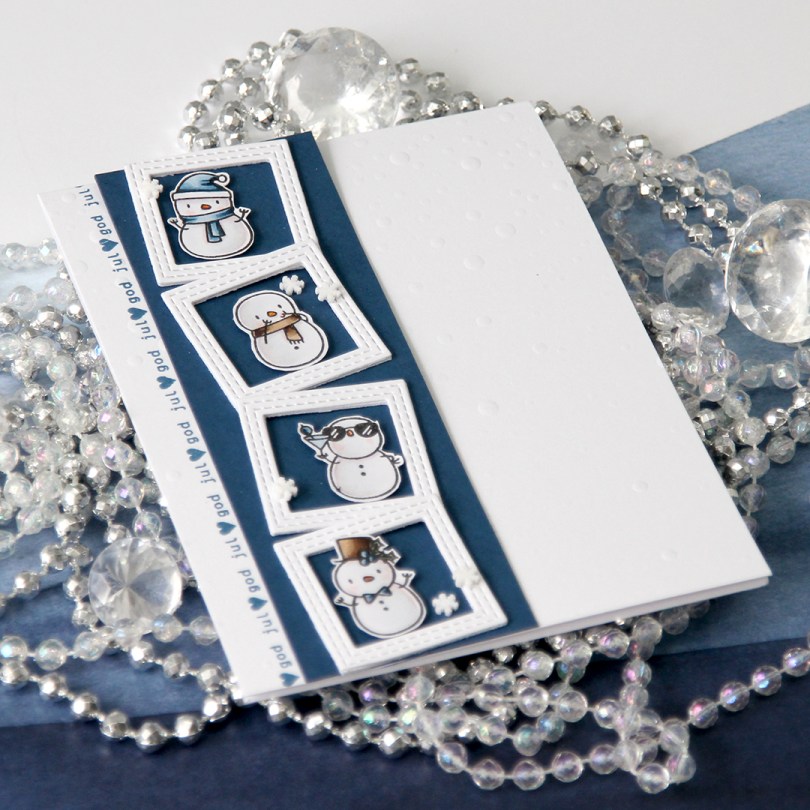
 I colored up these snowmen for Kathy Racoosin’s 30 day coloring challenge in June of last year, so it felt good to finally put them to use. Another thing I put to use? Those die cut squares. They were left over from
  I had 12 snowmen, but I needed room for a sentiment, so I stamped one from Norsk Stempelblad AS onto one of the die cut white squares using Papertrey Ink Enchanted Evening ink and glued the last snowman to the inside of the card instead.
 I used the largest die in the Stitched Rectangles Stax Set 1 from My Favorite Things on some Enchanted evening card stock, and glued it to my Stamper’s Select White card base before adding all the squares with 1 mm foam squares. I then used more 1 mm foam squares on the back of the snowmen. Dimension is life, as Laura Bassen says. I didn’t want this card to be too thick, though, so I stuck with the 1 mm. Added some snowflakes die cut with the Hero Arts Snowflake Confetti die, and my card was finished.
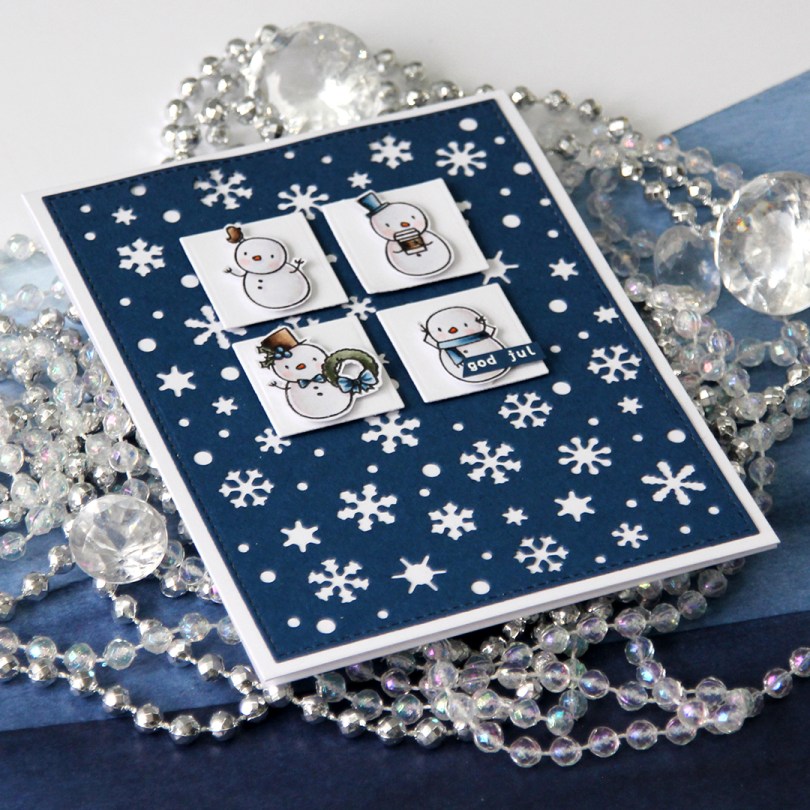

 I had loads of diecut squares left over from my previous card, they were the interior pieces of the stacked frames I used. Instead of letting them go to waste, I thought I’d put them to good use. I took four squares and mounted them to my blue snowflake panel using 1 mm foam squares. Believe it or not, but this was the part that took the longest. Getting them centered perfectly near the top with equal spacing between them all and equal distances to both sides and the top of the panel took…. well, it felt like forever. With this kind of design, though, you have to get it just right, or it’ll throw off the balance of the entire card. They’re equally distanced down to 1/32″, that’s about as good as it gets.


 Denne første pakkelappen er stanset ut med en tagdie fra Sizzix. Jeg har brukt mønsterark fra Pion Design og Inkido, og stempelmotivet kommer også fra Inkido. Teksten er fra Norsk Stempelblad AS, og jeg har pyntet veldig enkelt med utstansede kvister og noen pyntebær fra Magnolia. Den lille snellen kommer fra Maya Road.
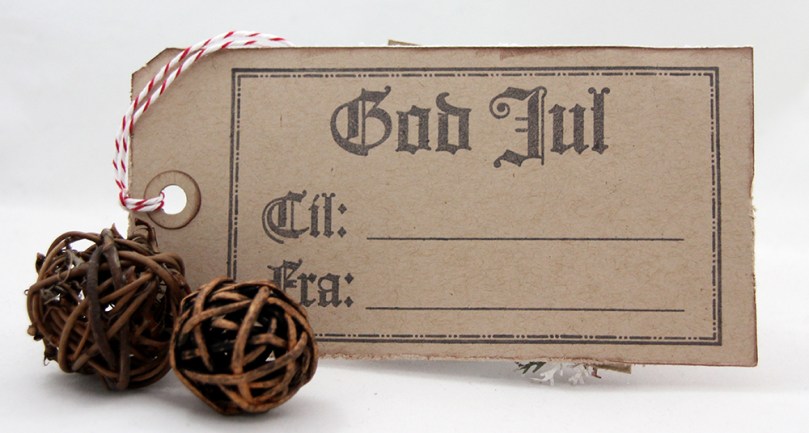 På baksiden stemplet jeg et digert Til/Fra-stempel fra North Star Design med Papertrey Ink Dark Chocolate blekk, som er samme blekkfarge som jeg brukte på stemplene foran på tagen. Den lille røde biten med twine kommer fra Whisker Graphics.
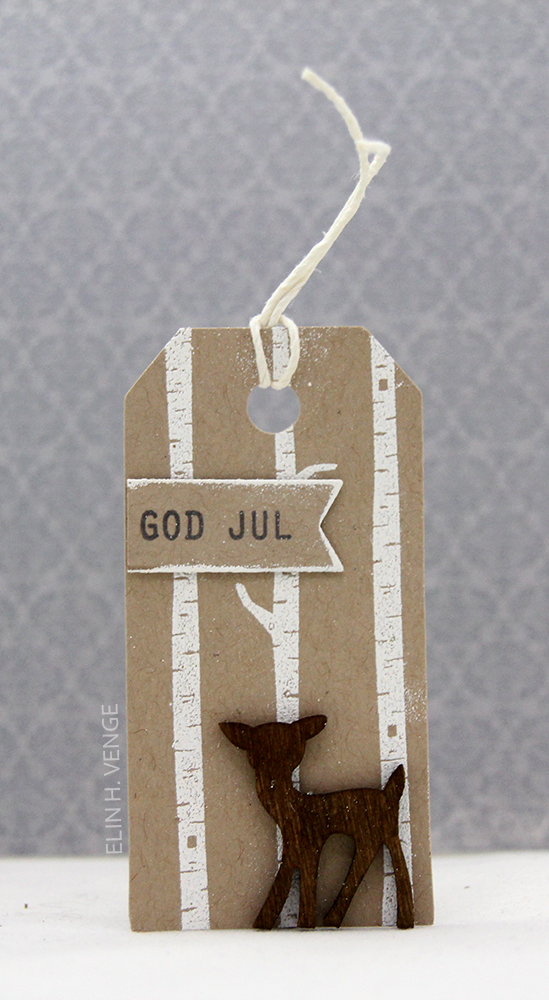 Pakkelapp nummer to er mye mindre. Her har jeg stemplet og embosset trær fra Mama Elephant på kraftfarget kartong og limt på et lite rådyr fra Nille. God jul-stempelet kommer fra Norsk Stempelblad AS og er stemplet med Papertrey Ink Dark Chocolate.
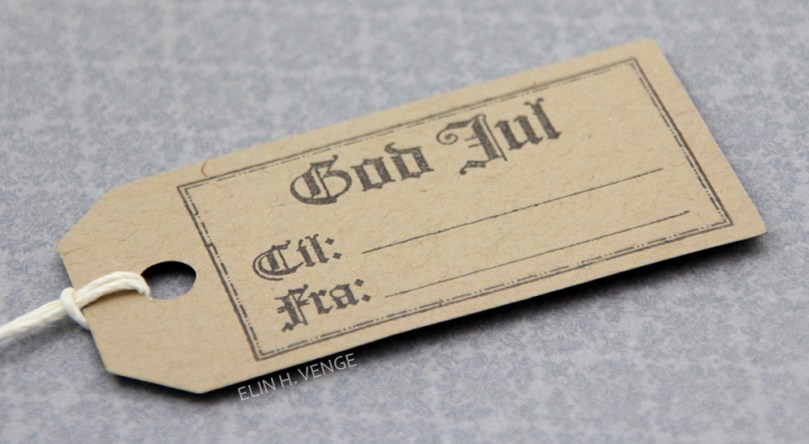 Også her har jeg brukt et stempel fra NSD på baksiden stemplet med Dark Chocolate, men dette stempelet er ganske mye mindre enn det på den første tagen. I enden har jeg festet hvit hamp fra Hemptique.
 Denne pakkelappen er av det veldig enkle slaget. Jeg brukte to vimpeldies fra Papertrey Ink, den ene litt større enn den andre, og stanset de ut i henholdsvis kartong og mønsterark fra Pion Design. Jeg pyntet enkelt med seam binding og to bjeller som lager herlig julelyd.
 Baksiden denne gangen har et stempel fra Inkido, stemplet med Blueberry Sky blekk fra Papertrey Ink.
 Enda en pakkelapp av det enkle slaget. Jeg stemplet et stempel fra Poppydesign rett på et mønsterark fra Maja Design med Coffee Archival Ink fra Ranger og klippet ut formen på pakkelappen rundt kanten på stempelet. Jeg limte på løs bling fra Kort & Godt i midten av hvert store snøfnugg på stempelet.
 Enkel bakside med stempler fra North Star Design. Her har jeg også brukt hvit hemp fra Hemptique.
 Pakkelapp nummer fire. Her har jeg stemplet tekst fra Papertrey Ink rett på mønsterark fra Pion Design med Memento Rich Cocoa blekk. Formen på pakkelappen er stanset ut med en die fra Magnolia, og jeg har brukt en liten bit blonde og litt naturlig twine fra May Arts i enden.
 Stemplene på baksiden kommer fra Norsk Stempelblad AS.
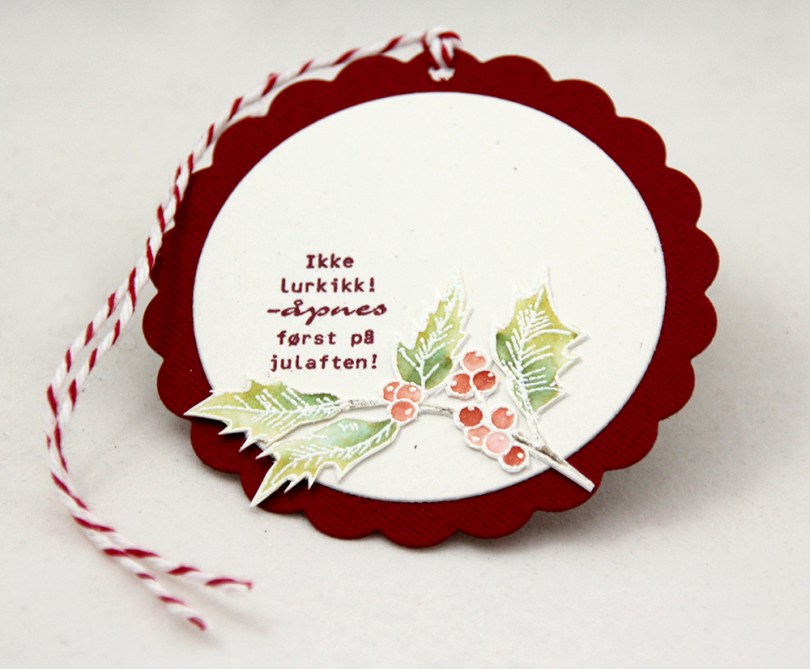
 Den siste pakkelappen er den som egentlig er mest omfattende. Her har jeg brukt en liten bit av et stempel fra Penny Black som jeg har stemplet og embosset på akvarellark før jeg har fargelagt med Copic-refiller og vannpensel fylt med blenderrefill. Motivet er skjært ut og limt på en sirkel av Rustic White kartong fra Papertrey Ink med en stemplet tekst fra Norsk Stempelblad AS stemplet med Papertrey Ink Scarlet Jewel blekk.
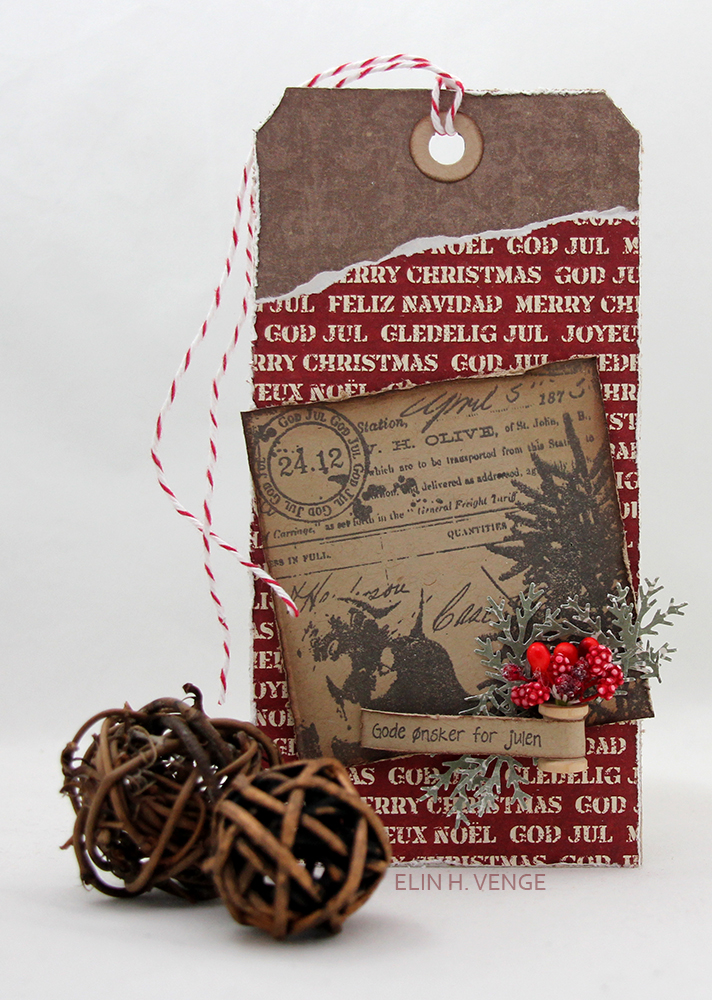
 På baksiden har jeg brukt et Til/Fra-stempel fra Papirdesign. Jeg oppdaget litt sent at bildet mitt av baksiden er litt uklart, men pakkelappen er jo gitt bort, så jeg kan ikke akkurat ta nye bilder. Også her har jeg brukt rød twine fra Whisker Graphics.