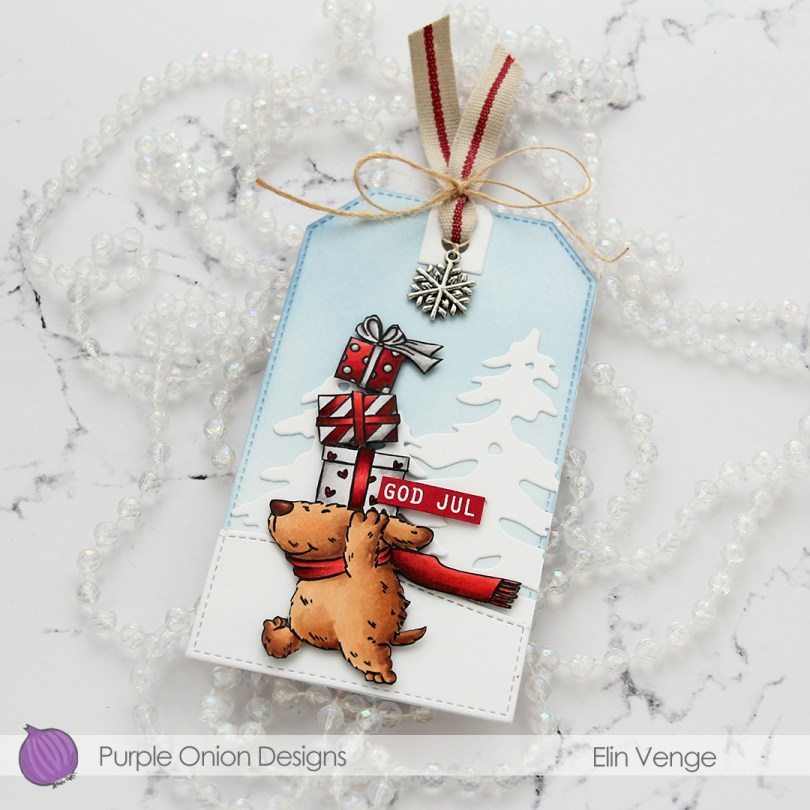
Hi, crafty friends! I have a fun gift tag to share today, featuring Flappy’s Christmas Delivery from the Tofu & Friends holiday collection from Purple Onion Designs. I love the quirky nature of the cuties in this collection from the new illustrator.
 I stamped the image with Extreme Black ink from My Favorite Things, colored it with Copics, then stamped again, this time using Obsidian ink from Altenew for crips, dark lines. I decided to fussy cut right against the stamped lines, and put this cute dog to the side while I worked on the rest of the tag.
 I die cut a tag from white cardstock using the Stitched Trad. Tag STAX die set from My Favorite Things, before using Polar Bear, Icy Water and Winter Lake inks from Altenew to ink blend a soft blue sky. I die cut a couple of trees using the silhouette snow trees from Mama Elephant and adhered them on top of my ink blending. I used a die in the Stitched Hillside Borders die set from Lawn Fawn to create the faux stitch hill, then used the tag die again to die cut the bottom part and adhered it to the tag also.
 I added my dog using foam squares. stamped and white heat embossed a sentiment from the Julehilsen stamp set from Norsk Stempelblad AS onto Wild Cherry cardstock from My Favorite Things, before trimming it down and adding it with foam squares to the tag. I die cut a reinforcement piece from white cardstock using a die in the Fold-up Tags die set from My Favorite Things and adhered it to the top, before threading some ribbon through and adding a charm. I used some May Arts Natural Twine to tie a bow to secure everything.
 On the back of the tag, I stamped the Til/Fra frame from Norsk Stempelblad AS using Obsidian ink from Altenew. I used Dark Chocolate and Classic Kraft inks from Papertrey Ink to stamp the images that make up the background. The stamps are from North Star Design, Inkido and Ladybug and Friends. I believe none of these companies are still in business, but I love these particular stamps and use them regardless.
 Simple color palette for this one. No wonder, as it’s essentially just brown, gray and red.

 Shari Bresciani’s cast of characters is so fun and quirky. Michele at Purple Onion Designs is very good at finding illustrators with a distinct style. The left tag features
  For both of my tags, I used the Wintry Forest stencil set from Pinkfresh Studio to create my background of blue trees. I used Polar Bear, Icy Water and Winter Lake inks from Altenew to create my trees, die cut my panel into tags using the Stitched Trad. Tag STAX die set from My Favorite Things, then sprinkled on Chunky White embossing enamel from Stampendous which I melted from the back for a snowy look.
 I love the expression on Scruffy’s face! This tree originally has a star on top, but I wanted Starla to add the star to the tree, so I cut off the star from the top and colored the cone shaped part of the star in green, so it looks like it’s the actual tree, even though the even curved line is a telltale sign that it’s not. I don’t think many people will notice, and even less will care.
 I stamped the sentiment using two ink colors from My Favorite Things: Jalapeño Popper and Sour Apple. I would have preferred a green tone with more blue in it, but I don’t have that in the ink formulation that’s best for this kind of mostly solid stamping. I find that the squishy ink pads that have become popular in recent years do better with this kind of stamping than the old firm felt pad type ink pads.
 Close to the sentiment, I added pearls from the Party Girl mix from Little Things from Lucy’s Cards. I was tempted to add lots of pearls in different colors to the tree too, to act as baubles, but opted not to.
 I threaded some satin ribbon through the tag hole and tied it with a piece of Natural twine from May Arts. I also added a couple of gold bells from my stash, I love tags that make that jingle sound.
 Lots of colors for this, even though I felt like I didn’t use too many.
 It’s Carrie’s turn. She goes so well with this snowman, you could almost think they’re one stamp and not two. I don’t mind when things hang off the edge of my cards or, in this case, tags. Will the ears and the branch get bent once this tag is on a present under the tree? Possibly. But I don’t mind, because I feel it adds to the design. If I had cut off the ears and branch to make everything fit inside the dimensions of the tag, this tag wouldn’t be as fun.
 For this one, I stamped the sentiment in Amarena Cherry ink from My Favorite Things. It matches her scarf nicely.
 I managed to get something sticky in the middle of Carrie. There was no way to remove it, so I was very strategic about the placement of the clay snowflakes I added. They’re Snowdrift sprinkles from Little Things from Lucy’s Cards, and I love them.
 I threaded ribbon through the hole at the top of the tag, tied a bow around it using more of that Natural Twine from May Arts and added a couple of gold bells to the top. Different kind of bell than on the green tag, but they still make that wonderful sound.
 Lots of Copics for this one too. I just can’t help myself.
 For the back of the tags, I stamped To/From from the B06 stamp set from Norsk Stempelblad AS using Obsidian ink from Altenew. The remaining stamps are stamped in Classic Kraft and Dark Chocolate inks from Papertrey Ink. For some of it, I used second generation stamping. The circle stamp with 24.12 in the center and the tree stamp are both from Inkido. The little snowflakes are from North Star Design, the smaller circle stamp with God jul in the center is from Ladybug & Friends. Unless I’m mistaken, none of these companies are still in business. It’s kind of sad, but I’m very glad I have these stamps!
 I colored up the reindeer with my Copics and fussy cut him leaving a white trim around the edges. I added Glossy Accents to his nose for shine and put him aside while I worked on the rest of my card.
 I used the Snowflake Confetti Fancy die from Hero Arts to make an impression into a white piece of cardstock. By dry embossing with the die, I add a bit of interest to the background without it being distracting.
 I used partial die cutting with the Stitched Rectangle Scallop Edge Frames die set from My Favorite Things to create my scalloped borders on either side of the dry embossed white cardstock. I used patterned paper from Maja Design for this. The design is called Ornaments and comes from the Happy Christmas collection from 2021. I don’t use a lot of patterned paper on my cards, but I really like this green pattern with some sprigs, leaves and hearts in a darker green, along with some white dots scattered around like snow. The patterned paper from Maja Design has always been my favorite. It’s double sided and very thick. It’s so thick you can even use it for a card base.
 I used the Snowflakes and Ornament die set from Hero Arts to create the ornament for my reindeer to sit in. I die cut the ornament die itself from the same patterned paper that I used for my scalloped borders. I then temporarily taped the two dies in the set together, so I could create an ornament with snowflakes. I cut a few from white cardstock and one from silver glitter cardstock from Kort & Godt, stacking them for dimension. I tied a bow to the top of the ornament using May Arts natural twine and added a few pearls from the Glossy Porcelain mix from Little Things from Lucy’s Cards on top of the knot for additional shine.
 I added Rudolph with his shiny nose to the center of my ornament. I also stamped a sentiment from the Itty Bitty Holiday stamp set from My Favorite Things using Shadow Creek ink from Altenew onto a scrap piece of the patterned paper I’ve used throughout. I added a few strips of white cardstock behind it for dimension and adhered it below the ornament, centered on my white, dry embossed piece.
 This card wound up very simple looking, but it’s still kind of technique heavy. Partial die cutting, dry embossing with a die and layered die cuts. All the layers make it a very thick card, and it’s not the most mail friendly card I’ve ever made – I love dimension!
 The card was made on order for a superintendent turning 60. I was told he likes wine, good food, sunny, warm weather and enjoying life and was given free reign to do as I pleased.
  I rarely use patterned papers on my cards anymore, and certainly not pieces this big, but I love the XXL Square Frames Frilly #10 die set from GoKreate, the dies in the set are perfect for creating shaped cards. I use two 12×12″ sheets of patterned paper to make one of these cards, and this time I used the Drivers License patterned paper from the Denim & Friends collection as well as the Tough but sweet sheet from the Denim & Girls collection, both from Maja Design. I can cut two of the larger shapes and two of the smaller shapes from one sheet, so the insides of the card are reverse.
 I colored the image in colors that went with the patterned paper, adding a bit of red to catch the eye and writing the words on his t shirt with a black Copic friendly pen. I thought the pun would tick the “loves wine” box.
 I used foam tape to add the smaller shape to the larger one, and also to add the die cut circle to the smaller shape. I stamped postmarks from various cities in the world using Memento Rich Cocoa ink to add a little bit of interest to the circle and the panel behind it. I figure if the guy loves warm, sunny weather, he probably also loves to travel, there’s not a whole lot of warm days in Oslo over the course of a year.
 I added some metal embellishments from Tim Holtz in a bit of a cluster near the bottom left “corner”, as well as his age, die cut and put on a 1″ circle with an epoxy sticker on top for a bit of added dimension.
 I hid a die cut tag behind my image. I used to do this all the time, and it’s a fun way to add a sentiment without having to find space for it on the front of the card. The sentiment is from the Til mannen stamp set from Norsk Stempelblad AS. The dies I used for the tag and reinforcer are old ones from Magnolia. I tied a bow from twill onto the tag, and some cutlery charms to the twill bow using natural twine from May Arts. I thought the cutlery was perfect for a food lover, I have so many treasures in my stash that I forget about until I go looking for something to use.
 The inside of the card are pretty simple. The same patterned paper as the front, only with the reverse size. I used more of the postmark stamps from Marianne Design, as well as a sentiment from the Gratulerer stamp set from Norsk Stempelblad AS. There’s plenty of space for a personal message on the second circle, which only has the postmark stamps on the edges.
 The back of the card is also simple. Another sentiment from Norsk Stempelblad AS, this time it’s the B03 stamp set. I love their stamp sets and use them more than any other of my Norwegian sentiment stamps. They’re hard to get your hands on because the company is no longer in business, but they’re the best sentiments out there.
 Simple color palette.
 I colored the penguins with Copics and fussy cut them all, leaving a white border around the edge. I used the Fold-Up Tags from My Favorite Things to die cut four tags from the Hvite juleblomster patterned paper from the Gledelig Jul collection from Papirdesign before I adhered each penguin to each of the tags using 1 mm foam squares.
 I stamped and white heat embossed several sentiments from the Jul stamp set from Norsk Stempelblad AS onto Classic Kraft cardstock from Papertrey Ink. I also die cut reinforcements for the tags from the same cardstock, and some tiny snowflakes from white cardstock (also from PTI) using the Snowflake Confetti Fancy die from Hero Arts. I mounted the sentiment strips on foam squares, adhered the snowflakes using liquid glue and added a 2 mm white pearl from Kort & Godt to the center of each of the snowflakes. I used natural twine from May Arts through the reinforcements and threaded two gold bells to each piece of twine before securing the twine to the tags.
 On the back of the tags I stamped to/from labels from the B06 stamp set from Norsk Stempelblad AS using Dark Chocolate Ink from Papertrey Ink. I stamped the labels before adding the reinforcements. In hindsight, I wish I’d kept the stamps in my MISTI and restamped after the reinforcements were glued on, so the label would be continuous on the back, but I didn’t think of it as I was creating. I’ll try to remember for my next batch of tags.
 These snowmen from the
  I have lots of layers on these, and used a whole bunch of Christmas scraps from old collections by Pion Design, as well as some sentiment stamps and other stamps from Inkido and Norsk Stempelblad AS.
 More scraps on the back. I love this way of creating, and I hope to do more of it this year!
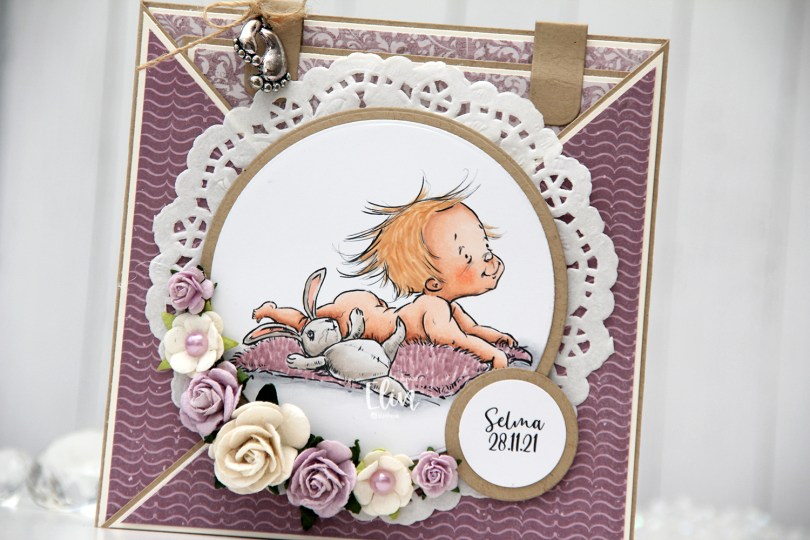
 This card was created for a little girl whose christening was this past Sunday. I think the
  I die cut the image using a circle die from Lifestyle Crafts and matted it with kraft cardstock. I also printed the name and date on a piece of white cardstock that I also matted with kraft. I put a doily from Helz Cuppelditch behind my image and added flowers using a hot glue gun. I took out the yellow centers of two of the flowers and replaced them with Lavender pearls from Kaisercraft.
 On the inside tag I added a circle diecut made from white cardstock for a space to write a personal message. I used the Labels Trio die set from Spellbinders to create two “handles” from kraft cardstock. I tied a bow and attached a charm to one of them for a little added interest.
 On the back of the card I stamped a sentiment from North Star Design using Amethyst ink from Altenew.
 The card isn’t very big, it only measures 5×5″, but it’s quite dimensional and doesn’t fit in a regular envelope, so I decided it was best to create a box envelope.
 I rummaged through my 12×12″ cardstock and found a color that matched pretty well, and used my Envelope Punch Board from We R Memory Keepers to create the box. I added another Helz Cuppelditch doily for cohesion, as well as more of the patterned paper that I die cut using the Impact alphabet die set from My Favorite Things.
 The process for creating this one was identical to the first ones I shared in
  There’s lots of texture and visual interest on this tag because of all the layers of paper, the foam tape to add dimension and the stenciled background. The accessories on the snowman are in a brighter green color than everything else on the tag, which still makes him stand out against the other elements.
 For the back of the tag I used a couple of stamps from Inkido, as well as more of the white heat embossed sentiments from Norsk Stempelblad that I created lots of in one of my compartmental crafty sessions. These tags were heaps of fun to put together like this.
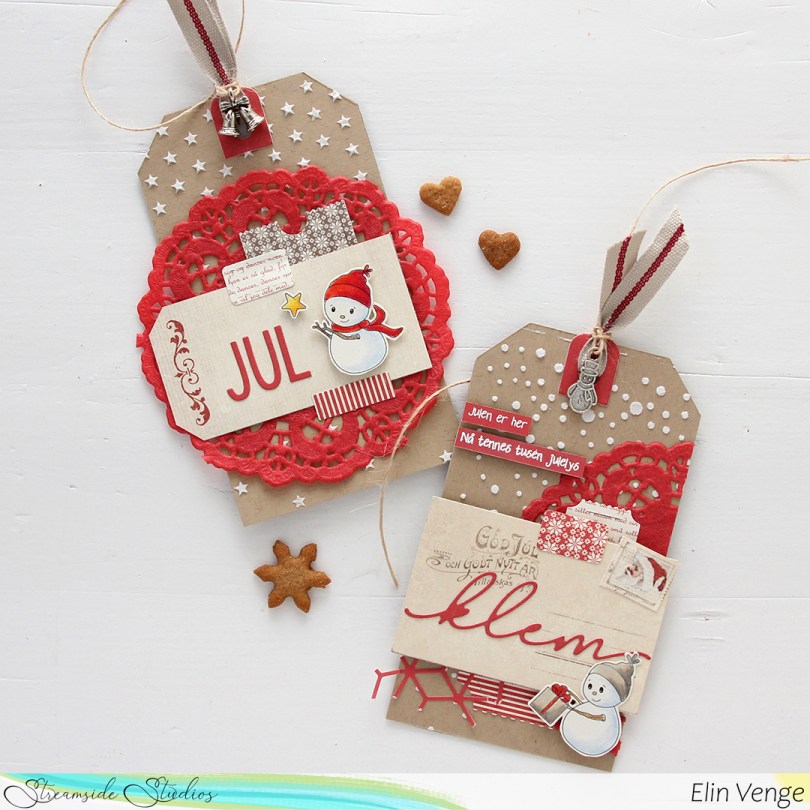
 For these tags, I chose red instead of green. I planned ahead and colored some of the snowmen with green accessories, and some with red. For one of these tags I used the Falling Stars stencil from Simon Says Stamp, and I thought it was fitting to add the snowman with the star for that particular tag.
 A lot of elements are the same on these two tags as the first two; patterned paper from Pion Design die cut using the Happy Days Ticket Stubs die from XCut. I also used the same die from Altenew that I used with the green cardstock on this one, and it’s a nice added element that doesn’t have the perpendicular angles than many of the other layers do, so it breaks up the monotony a little and adds interest. For the tag with the stars, I used the word JUL from the Gledelig jul die from Kort & Godt, and for the tag with the Christmas present, I used the word klem from the Juleklem die, also from Kort & Godt. I added red paper doilies from Papirdesign to the base of these tags, it’s a nice foundation to put everything else on top of.
 The backs of these are pretty similar to the backs of the green tags I made. I used the same 24.12 stamp from Inkido and the same stamps from the Distressed Patterns stamp set from My Favorite Things, but changed the ink color to Pure Poppy ink from Papertrey Ink.
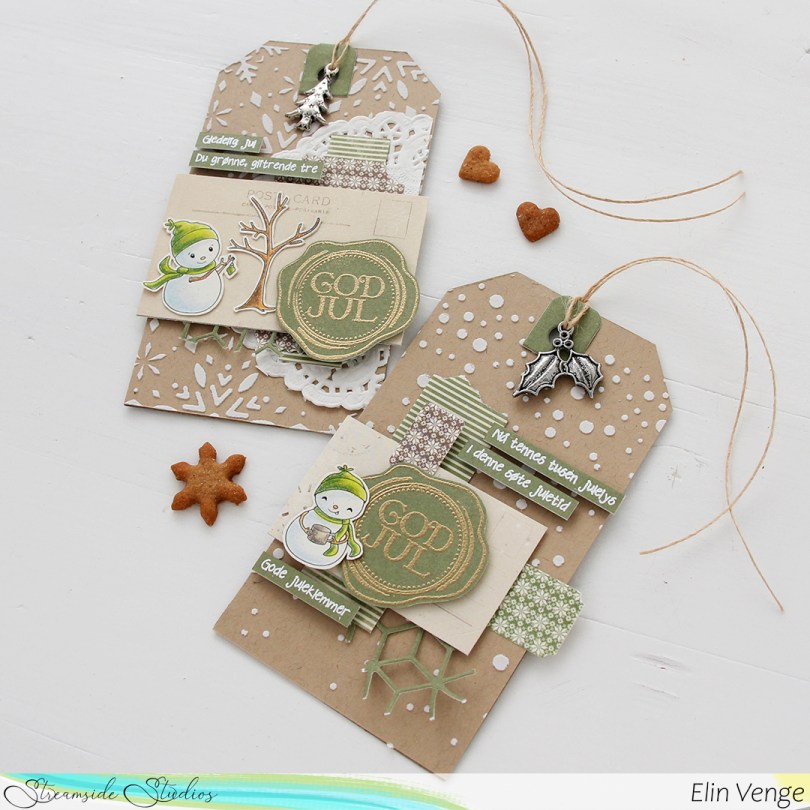
 For these tags (I’ll have more to share later), I did compartmental crafting. Tim Holtz always raves about this, but I usually sit down and create my cards from start to finish in one sitting. Actually, that’s not entirely true, I do prefer coloring one day and making the rest of the card another day. Coloring takes a while, and once I’m done with that, I’m not really in actual making and assembly mode.
 For the back of the tags I used a tag die from My Favorite Things to die cut from more of that Classic Kraft cardstock from Papertrey Ink. I die cut a bunch of tags in one session, so I’d have many to do at once when I did the actual assembly. I stamped an older Inkido stamp using Jalapeño Popper ink from My Favorite Things, and even did some second generation stamping. I also used a couple of stamps from the Distressed Patterns stamp set from MFT to add additional spatter beyond the 24.12 stamp. I used more of the scraps I die cut and cut with my trimmer, and stamped a to/from stamp from Inkido onto scraps of Pion Design patterned paper using Dark Chocolate ink from Papertrey Ink. First generation stamping on one, second generation on the other for a softer look. It was fun to break out acrylic blocks to use with my stamps again, I use my Misti for pretty much everything, but this didn’t have to be perfect or straight, so I just played and had fun!