
Hi, everyone! I’ve got a sweet, colorful, yet simple birthday card to share today, featuring the Fairy Party image from Rachelle Anne Miller.  I wanted a soft color palette for my card, so I have no colors that are really dark in this image. The darkest marker I used is E57, and it’s contained to the hair on one of the fairies, the flower centers and the ladybug.
 Once I’d colored the entire panel, I took the largest of the dies from the Stitched Rectangles STAX 1 set from My Favorite Things to turn it into a panel and create a nice border on the front of my card. I knew from the start that I wanted my sentiment inside the balloon, but I couldn’t decide on white or black. I thought the white might not pop enough against the yellow balloon, but I also knew that the end of the pigtail on the fairy would mess with any black stamping, making the letter illegible. In the end, I went with the white, but you can hardly see it in the photos against that lightest yellow. I might go in with a water brush and the refill for the darkest color I used on the balloon to darken it up later. I don’t want to ruin the nibs of my markers by touching the embossing, but refill and water brush with a little bit of blender solution will work without ruining anything.
 I finished my card by adding some groupings of sequins and Jewels from Little Things from Lucy’s Cards. I used the Iced Sherbet mix for this card.
 Last, but certainly not least, are the colors I used for my image.

 As usual, I colored my image in with my Copic before die cutting it down to a panel using a stitched reclangle die from My Favorite Things. I glued it to a card base I made from Stormy Sky cardstock from Papertrey Ink, also a gorgeous color, and it matches my coloring pretty well.
 I didn’t want to do too much to distract from my coloring, so I die cut a God jul (Merry Christmas) sentiment using a die from Papirdesign and that same color cardstock as my base, and glued that next to the little girl. I didn’t even stack several die cuts on top of each other like I normally would.
 I finished my card by gluing on some diamonds from the Glass mix in the Crystal Collection from Little Things from Lucy’s Cards.
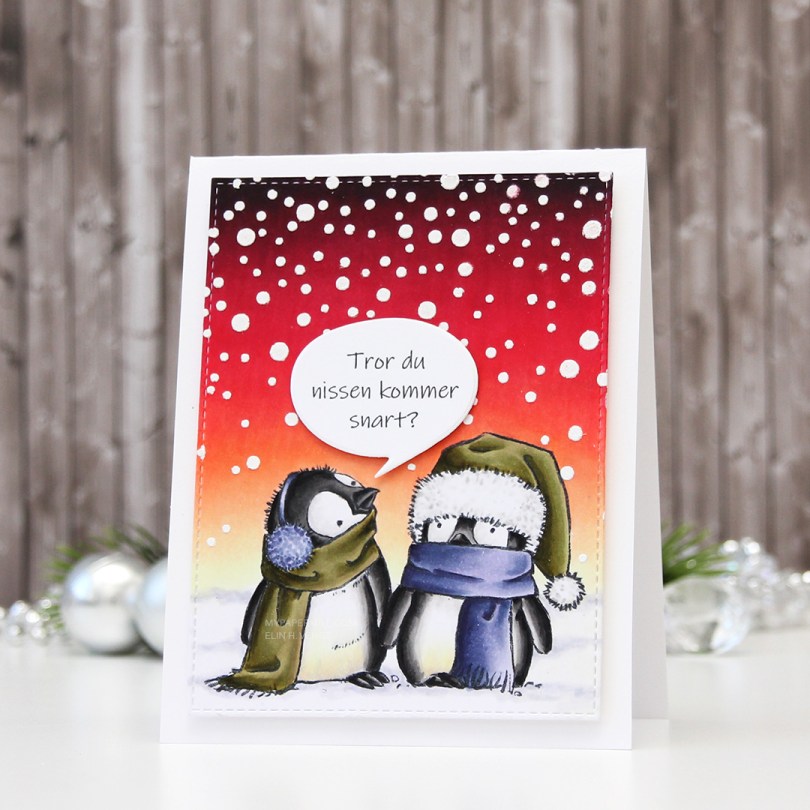
 Those last six colors in this graphic? All the colors I used to create the red scarf (I only used E08 for the red on the bird).
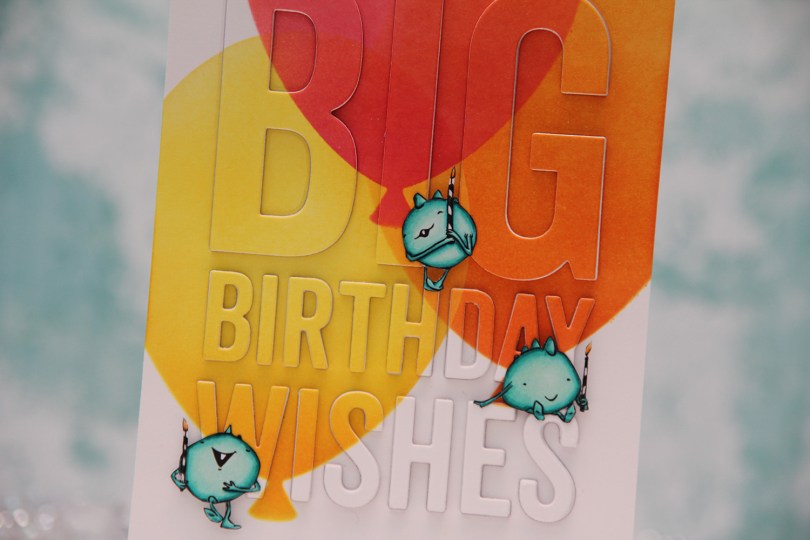

 I needed to make a quick card last night, and decided to color up three of the small monsters from the Cupcake Monster set from Mo Manning (I have
  When my little monsters were all colored in with my Copics, I pulled out the Big Balloon stencil from My Favorite Things along with four different colors of distress ink. I created three balloons that overlap. All the balloons are ink blended using two colors. The yellow one is Squeezed Lemonade with Spiced Marmalade toward the base of the balloon, the orange one is Spiced Marmalade with Worn Lipstick at the base, and the top one is Worn Lipstick with Picked Raspberry at the base.
 I die cut the Big Birthday Wishes die from My Favorite Things five times from Stamper’s Select White card stock from Papertrey Ink, as well as from the blended piece, which is also Stamper’s Select White. It’s my favorite white card stock, I haven’t found one that’s more white than this, and it’s also wonderfully sturdy at 110 lb. I did a layered inlay, then fussy cut my monsters and placed them strategically on my card. I love that the top one looks like he’s balancing on the top of the H, and the one on the right is leaning on the E while dangling his feet from the top of the S.


 I feel like every other day is Wednesday, and today’s another one. Time just goes by so incredibly quickly, it’s hard to keep up and keep track of the weekdays. I colored up
  I haven’t made one of my cluster cards in quite some time, but I really enjoy the process of putting these clusters together, so I decided to do it for this card. It’s a great way to use some patterned paper scraps, and one of these patterned papers is actually from 2007! It’s from Autumn Leaves. Remember them? I think it’s been a while since they ceased to exist. Now, when you go to autumleaves.com, you get to a site for assisted living communities for those with dementia. It’s a Texas based company, and definitely not a maker of pretty patterned paper. The other papers I’ve used are also what we’d call old in the card making world, the yellow one is from My Mind’s Eye and was released in 2011, and the remaining two were both released in 2013, they’re from Maja Design and Inkido, respectively.
 I use a couple of different dies to make these clusters, I make the banners using the Fishtail Flag Frames set from My Favorite Things, and I use the Happy Days Ticket Stubs die from Xcut for all those tickets. It’s one die that cuts nine different tickets, and I love that I get that many from one run through my diecutting machine. I mounted some of my diecut pieces on 1 mm foam tape, and glued others down using just double sided tape. Behind the whole thing I put half a mini paper doily from Doodlebug Design. I used the other half for the card I posted yesterday. On top I added a sentiment from Norsk Stempelblad AS stamped in Ocean Tides ink from Papertrey Ink. I mounted that on foam squares, and tripled up the foam squares on the left side of the banner. Finished off with a few pink dots from Papirdesign.
 I leave you with the colors I used for the adorable little girl. Not too many today.
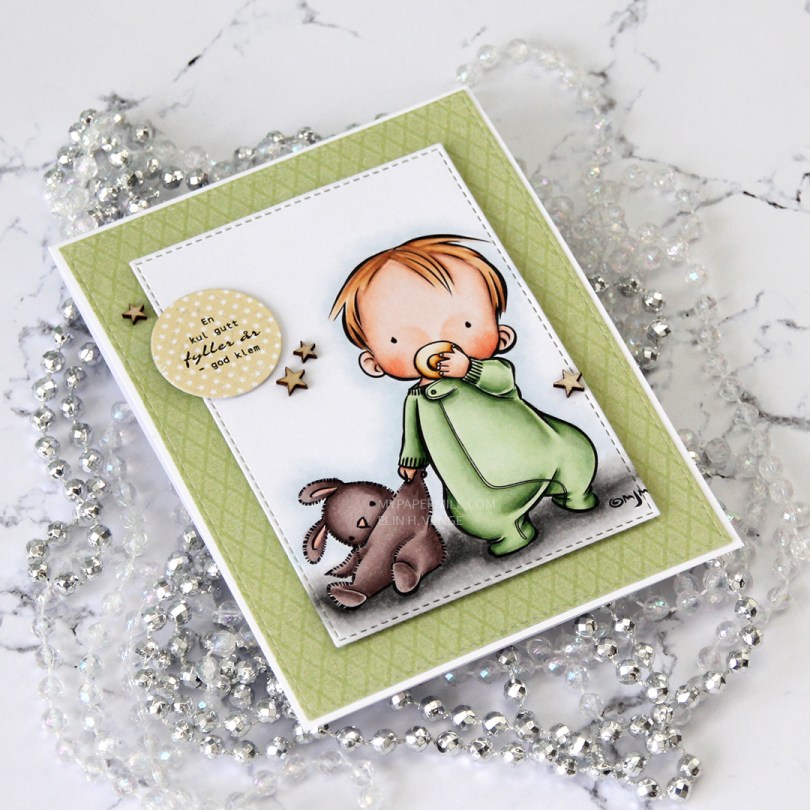
 I’m doing my best to make my pile of patterned paper scraps shrink and not grow. My biggest problem with that is that most of my cards are fairly simple without a lot of patterned paper, and my scrap pile feels endless. Still I keep chipping away at it, hoping it’ll be visibly smaller one of these days. For this card I used an old green scrap from Pion Design and a yellow one from Papirdesign. I diecut both, the green using the largest of the stitched rectangle dies from My Favorite Things, and the yellow one using a super old Quickutz die.
 I also diecut the image using a smaller stitched rectangle die from MFT, and popped the panel up on foam tape centered on my card. I used some 1 mm foam squares to adhere my circle diecut with a stamped sentiment from Norsk Stempelblad AS.
 I finished off the card by scattering veneer stars from Studio Calico at a diagonal across.
 These are the colors I used to color the image. I also used B40, which is a color I’ve made myself.
 I colored up
  I used the largest of the faux stitch rectangle dies from My Favorite Things to create a nice edge for my panel. I mounted it to a cardbase I made from Soft Stone cardstock from Papertrey Ink.
 I dug through my scrap stash of Christmas themed patterned paper and got really lucky with part of a diecut ticket and some pine branches.
 I made a little cluster starting with half a Doodlebug mini paper doily, then the partial ticket stub and the pine branches. I found a fitting sentiment on the bottom of a piece of patterned paper from Papirdesign, so I cut that bit out and added foam tape behind it. I finished the card with a few snowflake sprinkles from Little Things from Lucy’s Cards.
 I colored up
  This type of card has become my signature card style. I haven’t however, used those Doodlebug mini doilies in a while, so it was good to pull out half of one (a little less than half, actually) for this card. I used the Fishtail Flag Frames dies from My Favorite Things to diecut a couple of banners from yellow scraps of patterned paper. The bottom one is from My Mind’s Eye, the top one from Papirdesign. I also diecut the sentiment strip after stamping and heat embossing a sentiment from an old Papertrey Ink stamp set on that piece of Hawaiian Shores cardstock, also from Papertrey Ink. I added to more layers of cardstock behind my sentiment to make it a little more dimensional.
 The last little piece of business was adding some enamel dots. I hardly ever make cards without enamel dots or sequins, and I tend to always place them near the sentiment, it draws in the eyes. Nice little trick for’ya.
 I try very hard not to have favorites, but I can’t help it.
  I used the largest of the Stitched Rectangles STAX dies from My Favorite Things to create the front of the shaker, then the oval dies from the Card Front Designs die set from Neat & Tangled to create the actual window and the frame around it. I doubled up on my foam tape, and used acetate from Hot off the Press to create my window. I used the Urban Chic mix from Little Things from Lucy’s Cards for my filling.
 This really shakes, those sequins have a lot of room to move freely. I stamped an InkyWings sentiment using Ocean Tides ink from Papertrey Ink (which matches the Ocean Tides cardstock SO well) on a scrap piece of X-Press It (I wanted the white to match the white in the image) and mounted it on 1mm foam squares onto the front of my card, and it was finished.