Once again, we’ve reached Wednesday, which means coloring around here. Specifically, coloring of Mo Manning’s adorable digital stamps. This time, I chose Kayla with gingerbread and turned her into a gift tag for Christmas. You can never have too many gift tags.
 I’ve colored her up before. A couple of years ago I colored her with reds and turned her into a Christmas card. This time, though, I just had to go for the blues. I love blue for Christmas. Well, I love blue all year, but especially at Christmas time. There’s just something about it that screams Christmas to me, way more than red ever will.
 I wanted to make her hair golden blonde. Well, this is more in the area of light redish brown, but she’s so darn cute, I really don’t mind. The bench, her pants, and her little winter boots are actually all colored with the same color family, I just didn’t use the lighter ones for the bench, and similarly, I didn’t use the dark ones for her boots. Skipped both the lightest and the darkest for her pants. I did the same thing with my blues, I went very light with the scarf, and darker on everything else.
 I found a tiny little gingerbread man in my stash, I just had to include him. I used some lacy ribbon from Papirdesign in the perfect blue color to match my coloring, and tied the gingerbread man to the ribbon with some warp thread from my grandmother’s loom stash. Added a tiny bit of strong liquid glue to my knot, so that it wouldn’t come undone.
 The sentiment is made from two stamps from the B04 stamp set from Norsk Stempelblad AS. I stamped Nisseklem first, in Enchanted Evening ink from Papertrey Ink, then the smaller bit right below using the same ink. I wanted the two lines to be fairly close together, otherwise I would have stamped them both at the same time.
 On the back I used another Norsk Stempelblad AS stamp, stamped it in the same blue color, then started on my background. I started with my tree and the little kid tobogganing by stamping them both in white hybrid ink from Papertrey Ink. I did this in my Misti, making sure I got good coverage over the entire surface of both stamps. I then went in with an acrylic block and a tiny snowflake stamp from the same stamp set, rotating between each stamping to create a random snowflake border along the top. When I was sure my hybrid ink was dry (I used a heat tool to help speed up the drying process), I went in with a mini ink blending tool and blue inks (Spring Rain and Blueberry Sky from Papertrey Ink), trying to make an even blend across the rest of the background. The hybrid ink somewhat resists anything you put on top, but not completely, resulting in a much softer look than if I were to heat emboss the images, then ink blend on top. I really like this soft look, it won’t distract from the names I’m putting on my gift tag, and everyone will be able to read it on Christmas Eve when it’s time to open presents, even with dim lights.
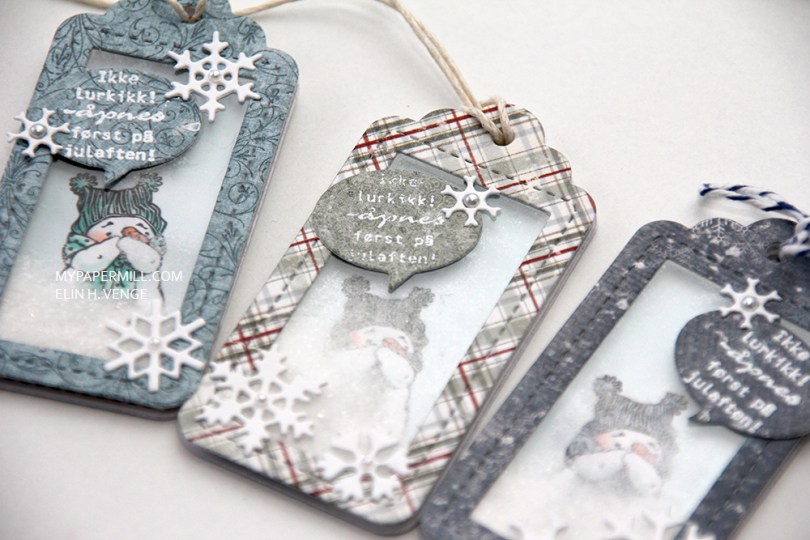
 I used a die set from Lawn Fawn for the tags and the speech bubbles, and found some scraps of patterned paper from Maja Design that I put to good use on these.
 I added distress glitter in the shaker area, giving the feel of snow. The sentiment reads “Don’t peek! To be opened on Christmas Eve!” The speech bubble was just big enough for it to fit. I added a few snowflakes diecut with a Marianne Design die before gluing a Kort & Godt pearl in the center of each.
 I’ve always loved this little snowman. I’ve always thought he looks kind of shy, but with the distress glitter working as snow in the shaker, it looks like he’s blowing hot air on his hands to try to stay warm – probably not the best thing for a snowman to do 😉
 Since they’re gift tags, they need To and From on the back. I’ve stamped a few different Norsk Stempelblad AS ones with different colored inks, each to sort of match the rest of the tag and the snowman on front.
 I started by coloring the bunny with different blue Copics, before adding texture to it with a piece of cloth soaked with blending solution. When I was happy with that I colored in the rest of the image before diecutting it using a cute circle die from Cottage Cutz.
 I decided to go with patterned papers from Maja Design. These are from the Vintage Baby and Sofiero collections. I added his name in tiny diecut letters and embellished simply with flowers, some Kort & Godt diamonds, and some Studio Calico veneer stars. I thought they went well with the stars in the patterned paper.
 I printed a sentiment for one of the insides with blue ink and diecut it using that same circle die as I used on the front of the card.
 I kept the back of the card pretty simple, a few more flowers and stars and another printed sentiment on a diecut circle.
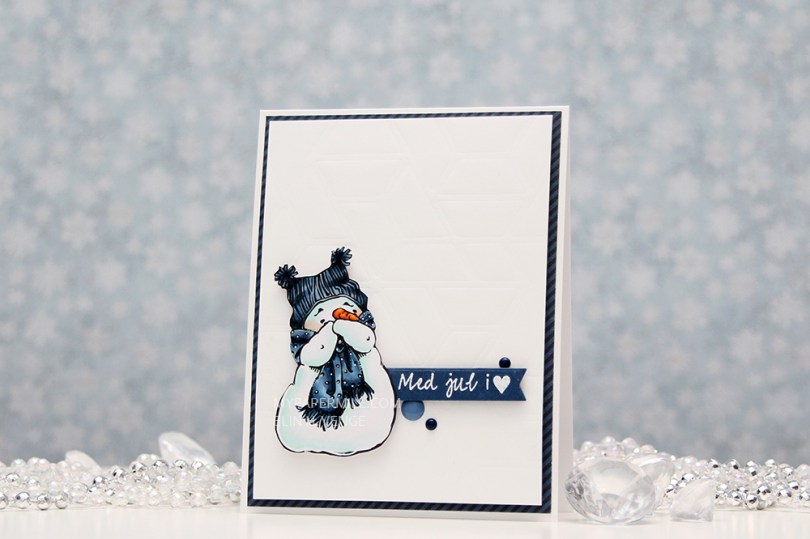
 I fussy cut my little snowman and stamped a Norsk Stempelblad AS sentiment on a diecut banner. I’ve dry embossed the bacground using a cover plate die from Neat and Tangled.
 I’ve added a few Papirdesign dots, mounted my dry embossed panel on foam tape and added a diagonally striped patterned paper from Papirdesign behind it. That’s it. Very clean and simple, and this time even fairly quick to make. My cards tend to be clean and time consuming, but this was clean and simple, it took me less than two hours from start to finish, including coloring.
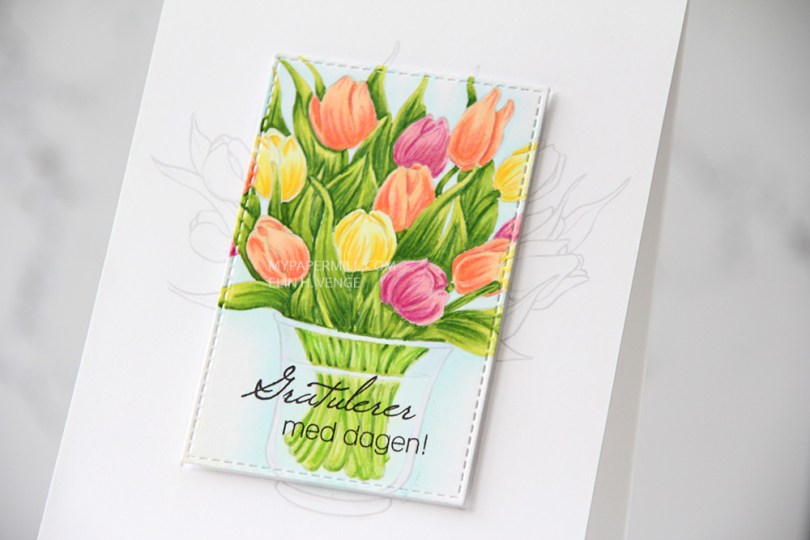
 Marika’s cards are always very simple, keeping the focus on her gorgeous coloring. I’ve tried doing the same, but I’ve got a long way to go before I’m able to keep up with her level. I still had fun, though.
 I printed my image with a very low opacity setting in Photoshop onto a piece of 4 1/4 x 5 1/2″ X-Press It blending card. I diecut the center of my image with a stitched reclangle die from My Favorite Things before I started coloring.
 I colored the center panel with Copics before going over it with Derwent Artists colored pencils for details. The combination of Copics and pencils is a really fun one, even though I still need heaps of practice.
 I stamped a Norsk Stempelblad AS sentiment over the vase and mounted my panel with a lot of foam tape for dimension. And that finishes the card. Simple, keeping all the focus on the coloring.
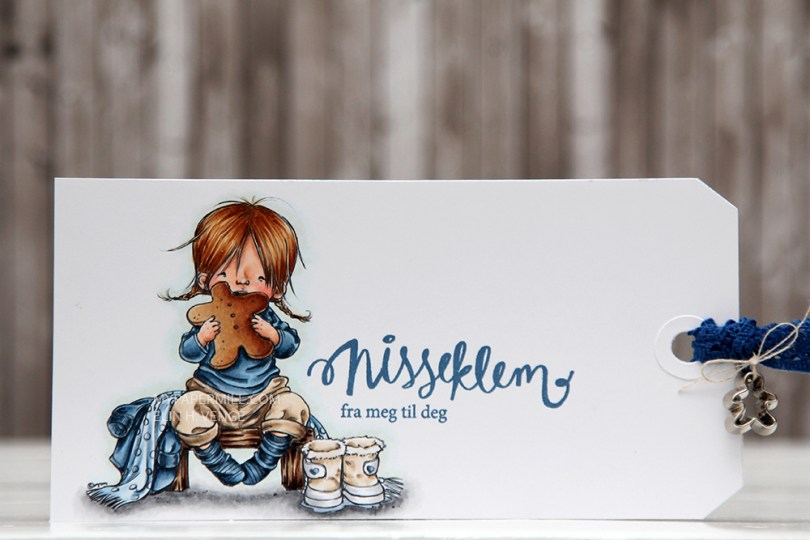


 My box is just over 5 x 5″, and about 2 3/4″ tall, meaning there’s lots of room for candy inside – half the fun of Halloween, right? I went with bright, in your face Halloween colors and added a couple of bats to embellish slightly.
 A closer look at my image. This was such a joy to color, even in orange with lots of pumpkins. I don’t like the taste of pumpkins, but they’re fun to color, and I feel like I struck gold with my orange combo. Doesn’t really happen a lot, as I’m not usually one to color orange, but I love how they turned out.
 I put some diecut letters on the side of the lid and the box itself. I diecut the letters from black craft foam and also from the patterned papers and glued them together. Added a few purple Papirdesign enamel dots as a last touch.
 Here are the colors I used for my image. I can’t remember the last time I entered a challenge, so I thought I would join the 100th challenge over at

 The scalloped circle on the scalloped half circle is actually the front of the card, which is kept closed with a pair of magnets hidden beneath the layers of patterned paper.
 Once you open it up, a hidden sentiment is revealed. The stamp is from Papirdesign, stamped in Papertrey Ink Blueberry Sky ink.
 When you open it up even further, you get to the actual insides of the card, with plenty of space to write a personal greeting. I added a little stamped crown in the bottom right hand corner on the right side, also a stamp from Papirdesign.
 The back of the card isn’t exactly very fascinating. The second half of the scalloped circle, another Papirdesign sentiment stamped in Blueberry Sky ink and a few Studio Calico veneer stars.
 Som vanlig er motivet farget med Copics. Jeg syns arkene fra Summer Crush-kolleksjonen til Maja Design er så utrolig fine til bryllup, og med dies fra GoKreate blir det helt perfekt. Selve motivet har jeg stanset ut med en sirkeldie med juksesøm fra My Favorite Things, og jeg har skrevet ut navnet på brudeparet fra PC i en farge som matchet motiv og papirer bra. Selve hjertet er stanset ut med en die fra Spellbinders.
 Da jeg lagde dette kortet var jeg nesten helt tom for lave 3D-puter, så jeg jukset litt ved å stanse ut ekstra lag kartong som jeg la bak mønsterarket mitt istedenfor. Kortet blir riktignok tyngre, men dette skulle gis rett til brudeparet og ikke sendes i posten, så da gjør det ingenting.
 Som seg hør og bør med bryllupskort har jeg lesset på med blomster og pyntebær. Her er kombinasjon av Prima, Kort & Godt, Papirdesign, Wild Orchid Crafts og Magnolia.
 Jeg lagde innsidene relativt enkle, men likevel litt pyntet. Jeg brukte en kakeserviett bak tekstpanelet, og teksten fra Kort & Godt er stemplet med Soft Stone blekk fra Papertrey Ink. Den andre innsiden er helt lik, med et rundt tekstfelt til å skrive personlig hilsen på.
 Jeg må jo gjøre noe med baksiden også. Her har jeg tatt igjen kakeserviettene fra innsiden, sommerfuglene fra forsiden og stanset ut et blomstermotiv fra et mønsterark med en sirkeldie fra det samme settet som jeg har brukt på de andre sirklene. Jeg limte et lite perlehjerte fra Staz midt på blomsten, jeg syns det passet fint inn som en ekstra liten pynt.
 Siden kortet er såpass tykt måtte jeg lage en eske til det, det får ikke akkurat plass i en konvolutt. Jeg har brukt de samme mønsterarkene og laget esken veldig enkel. Lokket er pyntet med kakeserviett, tekst fra Papirdesign og noen flere sommerfugler.
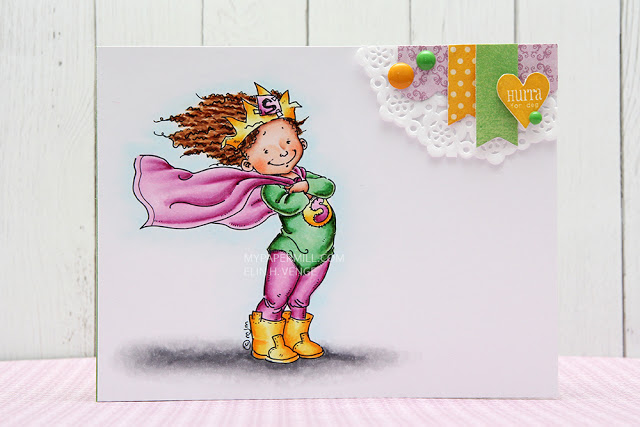
 I’ll admit, I struggled putting this one together. I had a stray pink Copic streak on the left side of the image, and no matter how times I used my blender on it, it was just too stubborn to go away. I decided to cut it off, I wasn’t about to redo the entire image. I sort of had a plan, but that didn’t really work, so I wound up diecutting a scrap piece of 7 Dots Studio patterned paper to go behind my image.
 I used the same patterned paper for my sentiment strip, which I stamped with a Norsk Stempelblad AS stamp and then diecut using one of the Fishtail Flag Frames dies from My Favorite Things. The pink patterned paper behind the sentiment strip is actually the other side of that same patterned paper. I thought it fit my Papertrey Ink Berry Sorbet cardstock pretty well, in addition to the pink in the actual image. The pink cardstock is debossed with an impression plate from Papertrey Ink and then diecut with a stitched rectangle die from My Favorite Things. I also added some enamel dots in coordinating colors, as well as a couple of scraps of some doilies I had in my stash.
 I popped up the entire image using foam tape – lots of it, I’m not shy when I use foam tape.
