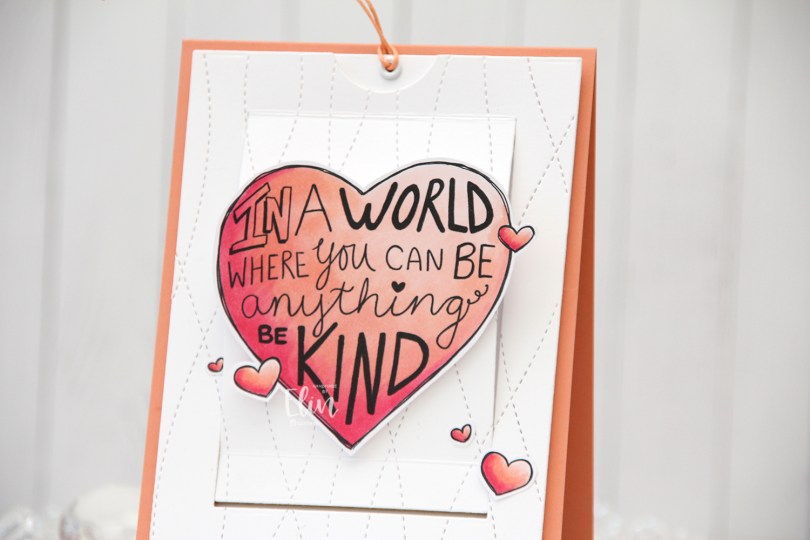
Hi, crafty friends. Today I’m sharing with you a card using one of the stamps in the brand new Positivity release from Rachelle Anne Miller. There are three stamps in the release, and I chose Be Kind for my card today.
 As you might be able to tell from the front, this isn’t a regular card. It’s a slider card. At first I wasn’t sure how to turn this particular stamp into a card, but then I had a lightbulb moment and realized it was perfect for a slider card.
 I colored the images with Copics, did some fussy cutting leaving a think white border and put my pieces aside while I worked on the rest of the card.
 When you pull on the string at the top, these mice from the Be Kind stamp are revealed. Nice little surprise there, huh? The slider mechanism itself is made using the Slider Surprise die set from My Favorite Things, but you could easily do this on your own, it’s not difficult. They’re straight cut lines and just a few score lines.
 I wanted a little texture to my white cardstock, and used the Stitched Ripple Backdrop die from Lawn Fawn, which creates these faux stitch lines across the panel. In hindsight, I realize I probably should have dry embossed it only and not die cut it, because where the stitched lines intersect with the die cut edge of the part that folds up, it kind of snags a little. It’s not a huge deal, but it’s enough to make me think simply dry embossing would have been enough.
 In the opening, I added a piece of Gold Foil Pinstripe washi tape from Altenew for the mice to have a little bit of a grounding element, then adhered the mice using liquid glue. The top die cut panel is mounted on foam tape, and everything adhered to a top fold card base I created from Melon Berry cardstock from Papertrey Ink.
 Probably the simplest color palette I’ve ever used on a card.

 I decided to cut off about half of the bench. Since I’m only using one of the kids, I didn’t need the whole thing. If you want, there’s also a
  I adhered my panel directly to a card base I created from Green Parakeet cardstock from Papertrey Ink. I stamped a sentiment from Norsk Stempelblad AS onto a strip of the same color cardstock using Green Apple ink from Simon Says Stamp and put the sentiment aside while I worked on the rest of my card.
 I die cut the word hipp 8 times from Tropical Teal cardstock from Papertrey Ink using a die from Kort og Godt, and created two stacks of four each for a dimensional look. I adhered my stacked die cuts to the card and put the green cardstock strip on top of the bottom hipp.
 To finish off the card I added a few enamel dots from Papirdesign. I decided to go for orange ones to pick up the color from the little boy’s ice cream.
 It’s a fairly simple card, but the clouds add a little something to the white space, and the die cuts and dots add dimension.
 For such a small image, I used a lot of colors.
 Isn’t this the cutest elephant image you ever did see? Saying hello to his little ladybug, I just couldn’t resist. I colored in the image with my Copics and used a stitched border die from Lawn Fawn to create a little interest to the top and bottom of my panel.
 I put foam tape on the back and was initially planning on a big die cut word, but it didn’t really work for the card, so I stamped a small sentiment in the grass instead, using Sour Apple ink from My Favorite Things. The sentiment itself is from InkyWings.
 Onto a quarter piece of white cardstock from Papertrey Ink, I stamped the Scattered Triangles Background stamp from My Favorite Things using Sour Apple ink near the bottom and Blue Yonder ink, also from My Favorite Things, near the top. I adhered my stamped background onto a top fold card base I created from Stamper’s Select White cardstock from Papertrey Ink and mounted my colored panel on top.
 This cute elephant might be even cuter because I colored him blue. There’s a reason blue’s my favorite color, everything just looks better when it’s blue.
 I decided not to add any embellishments to the card, I really wanted the elephant to be the star.
 Simple color palette for this one. I also used B90 for the elephant, which is a color I’ve created myself.

 I used the largest die in the A2 Double Stitched Rectangle STAX die set from My Favorite Things to give the edges of the panel a little bit of detail. Onto a white top fold card base, I adhered a quarter panel of Blueberry cardstock from My Favorite Things. I put foam tape on the back of my colored, die cut panel, tied some Blueberry divine twine from Whisker Graphics around the panel and adhered it to the center of the blue card front, before finishing off with a few enamel dots from Papirdesign.
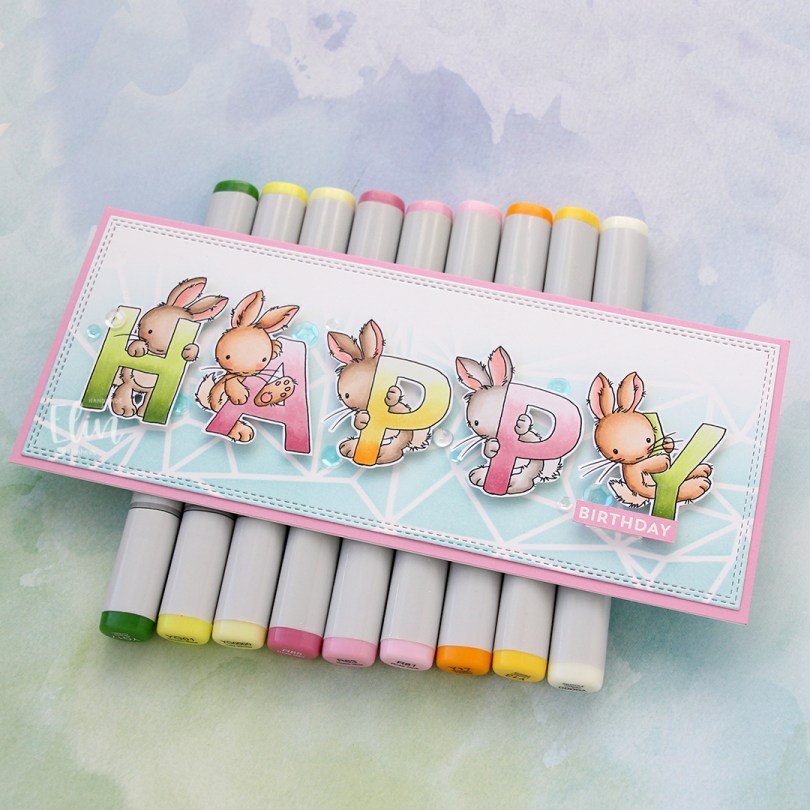
 This set offers so many possibilities for customizing your card to suit your needs. I colored the letters to spell happy and fussy cut them, leaving a thin white border and put them aside while I worked on the rest of the card.
 Onto a piece of Stamper’s Select White cardstock from Papertrey Ink, I ink blended Sno Cone ink from My Favorite Things using the Geometric Landscape stencil from Altenew. It’s a 6×6″ stencil, but it was easy to create a longer section with a little bit of masking and moving the stencil. I then diecut the panel using the Slimline Double Stitched Rectangle STAX die set from My Favorite Things and adhered it to a card base made from Cotton Candy cardstock, also from My Favorite Things.
 I popped my colored, fussy cut letters on foam tape in the center of the card, heat embossed a sub sentiment from the Bitty Birthday Wishes stamp set from My Favorite Things and finished off the card with drops and sequins from the Ice Water mix from Little Things from Lucy’s Cards.
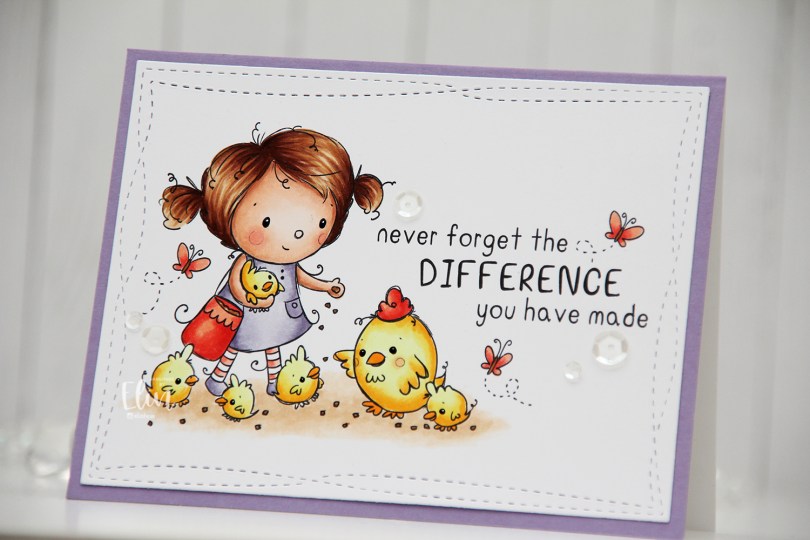
 I did fairly simple Copic coloring for this, die cut my panel and added it to a white card base I’d covered with a quarter sheet of Winter Wisteria cardstock from Papertrey Ink.
 This image with its sentiment deserved to steal the show on its own, so I embellished very sparingly with a few sequins from the White Orchid sequin mix from Little Things from Lucy’s Cards.
 This image is super fast and easy to color. It’s just a head, a hat and a couple of mittens. I wanted a green and gold card, so I colored her hat and mittens green and fussy cut her.
 Onto a white top fold card base, I adhered a panel of brushed gold cardstock. Actually I cheated a bit and only added a frame. I die cut the center out of it, so I can use that for something else. No one will ever know I cut a chunk out of it to save for later.
 Using the Stitched Snowflake Backdrop die from Lawn Fawn, I created a snowflake background from white cardstock. Once I’d die cut, I ran the panel through my Gemini Jr a second time with an embossing mat to add extra depth to the texture the die made. It really makes a huge difference, as opposed to just running it through once with the die.
 I used the Merry Christmas die from My Favorite Things to die cut from the same gold cardstock I used on the base. I die cut six additional layers from white cardstock, adding three of those behind the gold and three behind the shadow I cut from heavyweight translucent vellum from My Favorite Things. All these layers add a ton of dimension to an otherwise simple card.
 I added my image to the card using foam tape. Her hands hover just above the merry, it’s like she’s peeking in from behind the sentiment.
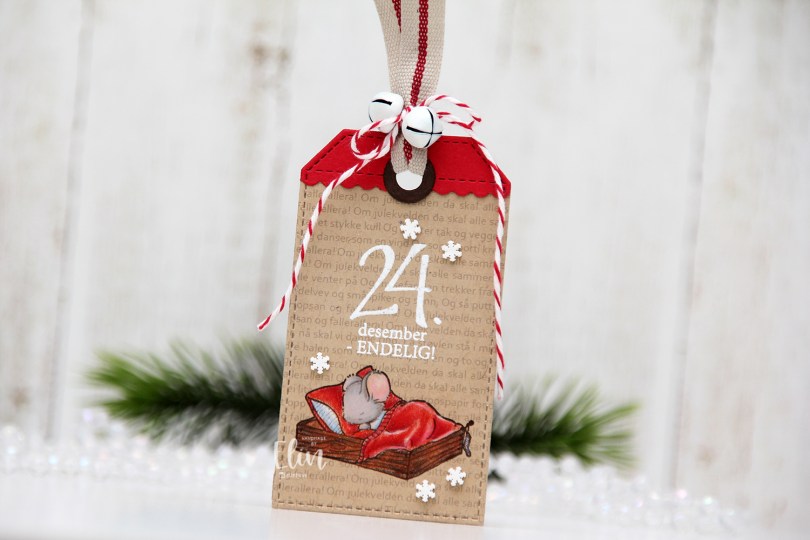
 I stamped the cute mouse using Memento Rich Cocoa ink onto Classic Kraft cardstock from Papertrey Ink, before covering the image with a mask and running the cardstock through my printer to add the lyrics to a Norwegian Christmas song all about mice. I thought it was a fitting background. I colored the image with Prismacolor pencils (not Copics, I know, it’s rare), heat embossed a sentiment from the B04 stamp set from Norsk Stempelblad AS above the cutie and used a die from the Stitched Traditional Tag STAX die set from My Favorite Things to turn it into a tag. I then die cut a label from the Everyday Gift Box die set (also MFT) from Wild Cherry cardstock from My Favorite Things, and used the tag die again to turn it into the top piece of my tag. I also used a reinforcer die from the Fold-Up Tags die set (also from MFT) and die cut that from Dark Chocolate cardstock from Papertrey Ink. I added a ribbon, a couple of bells and some Cherry twine from Whisker Graphics to the top of the tag, before adhering a few snowdrift sprinkles from Little Things from Lucy’s Cards to finish.
 I added a bunny to the top of the teacup stack and colored the image with Copics, before fussy cutting, leaving a thin white border around the edge. I used a black glaze pen from Sakura to add shine and a tiny bit of dimension to the bunny’s eyes, then a white dot of Gelly Roll 05 on top of the black, once the black was dry. The glaze pen dries fairly quickly once applied, so I didn’t have to wait long.
 I adhered a panel of Blueberry cardstock from My Favorite Things to my white card base. Using a die in the A2 Double Stitched Rectangle STAX die set, also from My Favorite Things, I die cut a piece of patterned paper from Sunny Studio to adhere on top of the blue. This patterned paper is from the Subtle Grey Tones pack, and it really is subtle.
 I realized I hadn’t made any of my signature clusters in a while, and decided to pull out my die cut scraps of patterned paper and have a play. These patterned papers are from Sunny Studio (more from the subtle grey pack), Kaisercraft (light blue with dots), Papirdesign (dark blue with smaller dots) and Maja Design (pink floral), all die cut using a combination of the Happy Days Ticket Stubs die from XCut and the Fishtail Flag Frames dies from My Favorite Things. I used a mini paper doily from Doodlebug to mat my little clusters, and embellished with sequins from Pretty Pink Posh and Simon Says Stamp.
 The sentiment is from the Coffee and Chocolate stamp set from hÄnglar & Wings, white heat embossed on a strip of the same color cardstock I used for the card front. I then die cut it using one of the dies in the Itty Bitty Banners die set from My Favorite Things.
 The interactive element that I mentioned at the beginning of the post is actually the image. As you can see in this photo, it sits pretty high off the base. The reason for that is that it’s on an action wobble, so it’ll shake and move once you help it along a tiny bit.
 Fairly simple color palette for this one.
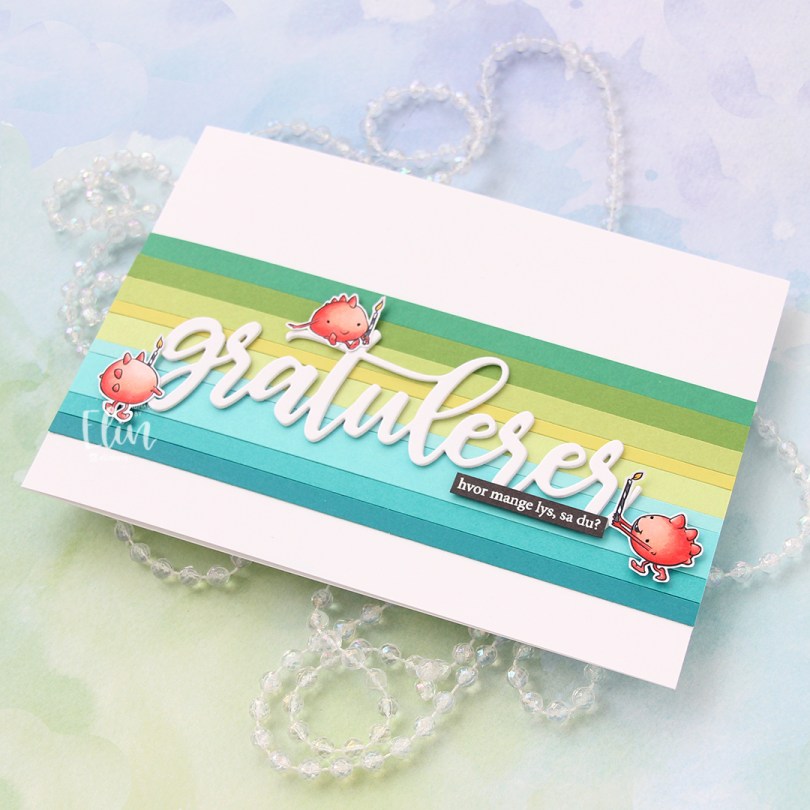
 I colored my monsters with Copics and fussy cut them leaving a thin white border. I covered my A7 card base with a band of solid colored cardstock strips. From top to bottom they are Concord & 9th Clover, Concord & 9th Parsley, Papertrey Ink Green Parakeet, Papertrey Ink Limeade Ice, Concord & 9th Sprout, My Favorite Things Summer Splash, Papertrey Ink Hawaiian Shores, Concord & 9th Oceanside and My Favorite Things Tropical Teal.
 I die cut the word gratulerer three times from white cardstock using the Flasketag, gratulerer die set from Papirdesign. The cardstock I used is Stamper’s Select White cardstock from Papertrey Ink, which is the same cardstock I used for my card base. I want my whites to match, and this is the perfect white cardstock, I love it.
 I added my stacked white die cut to the center of the striped background, mounted the monsters on foam tape and white heat embossed a sentiment from the A06 stamp set from Norsk Stempelblad AS onto Smokey Shadow cardstock from Papertrey Ink and adhered it to the stacked die cut word to finish the card. I decided against adding embellishments, I wanted the monsters to really steal the show.
 Very limited Copic selection for this one.