Treat yourself {Mo’s Digital Pencil}

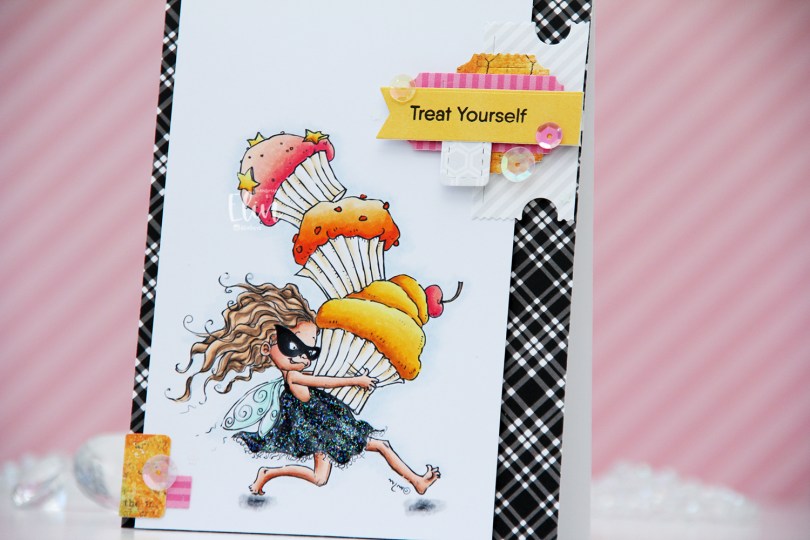
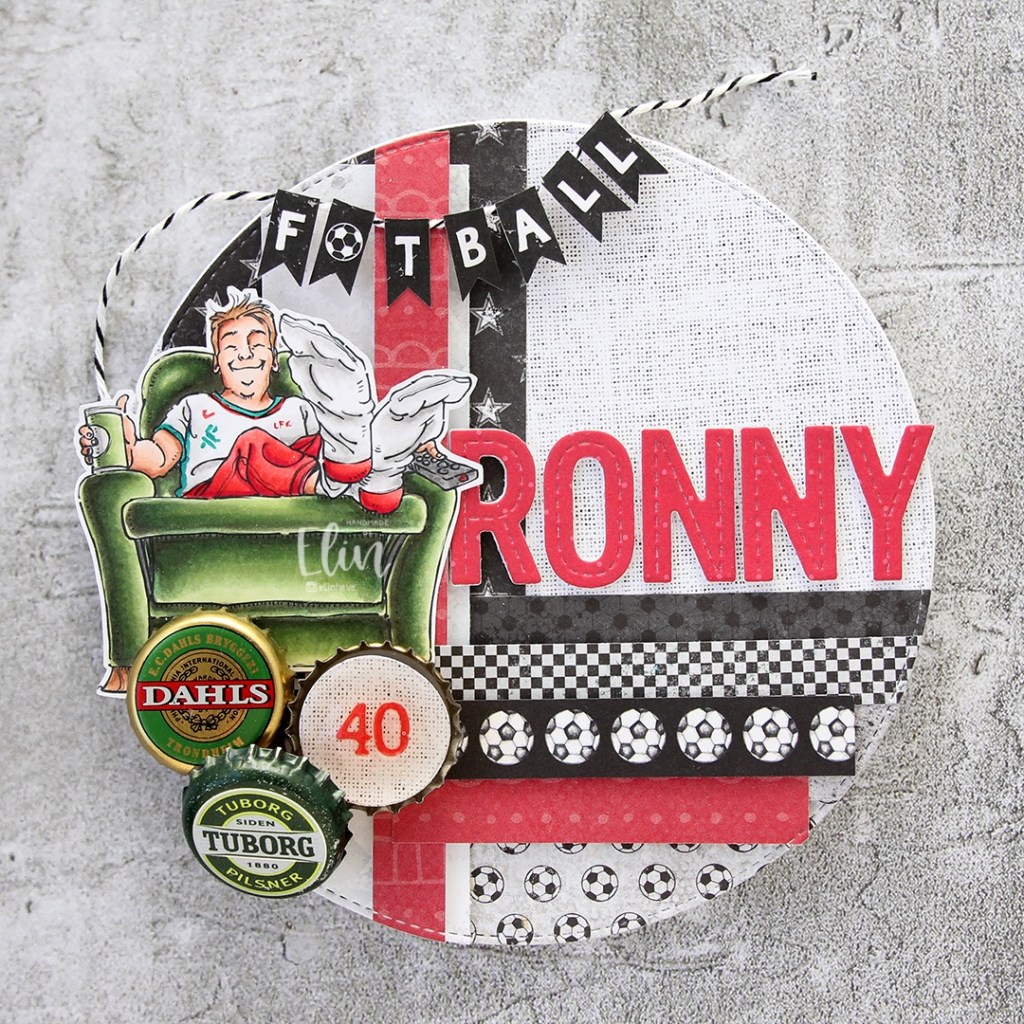
Hi, crafty friends! I haven’t shared one of my “signature cluster” cards in a while, so I thought it was about time. I thought the Cupcake Thief image from Mo’s Digital Pencil would be perfect for the occasion, and by opting for a black dress, I could pair the image with a recently acquired black and white patterned paper pad that I’ve wanted to use for a while.

This is Cupcake Thief. I’ve used the image once before. This time, I flipped it so she’s facing right, it’s one of the many advantages of using digital stamps. I colored her with Copics and cut my panel down to a width of 3 1/2″. I put it aside, covered a white card base with the black and white plaid patterned paper from My Favorite Things, then mounted the colored panel on foam tape, leaving a little bit of the patterned paper showing on one side, and more showing on the other.

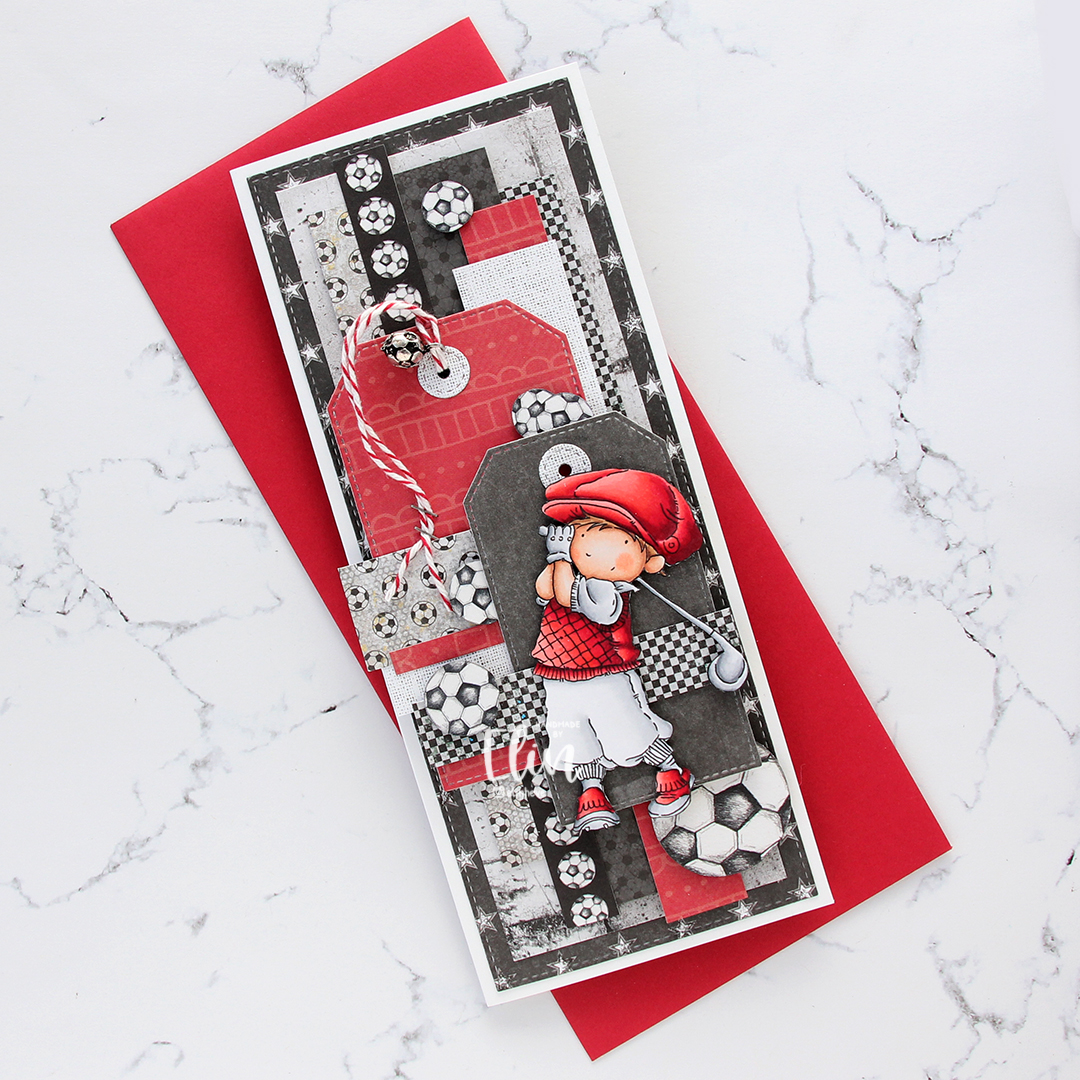
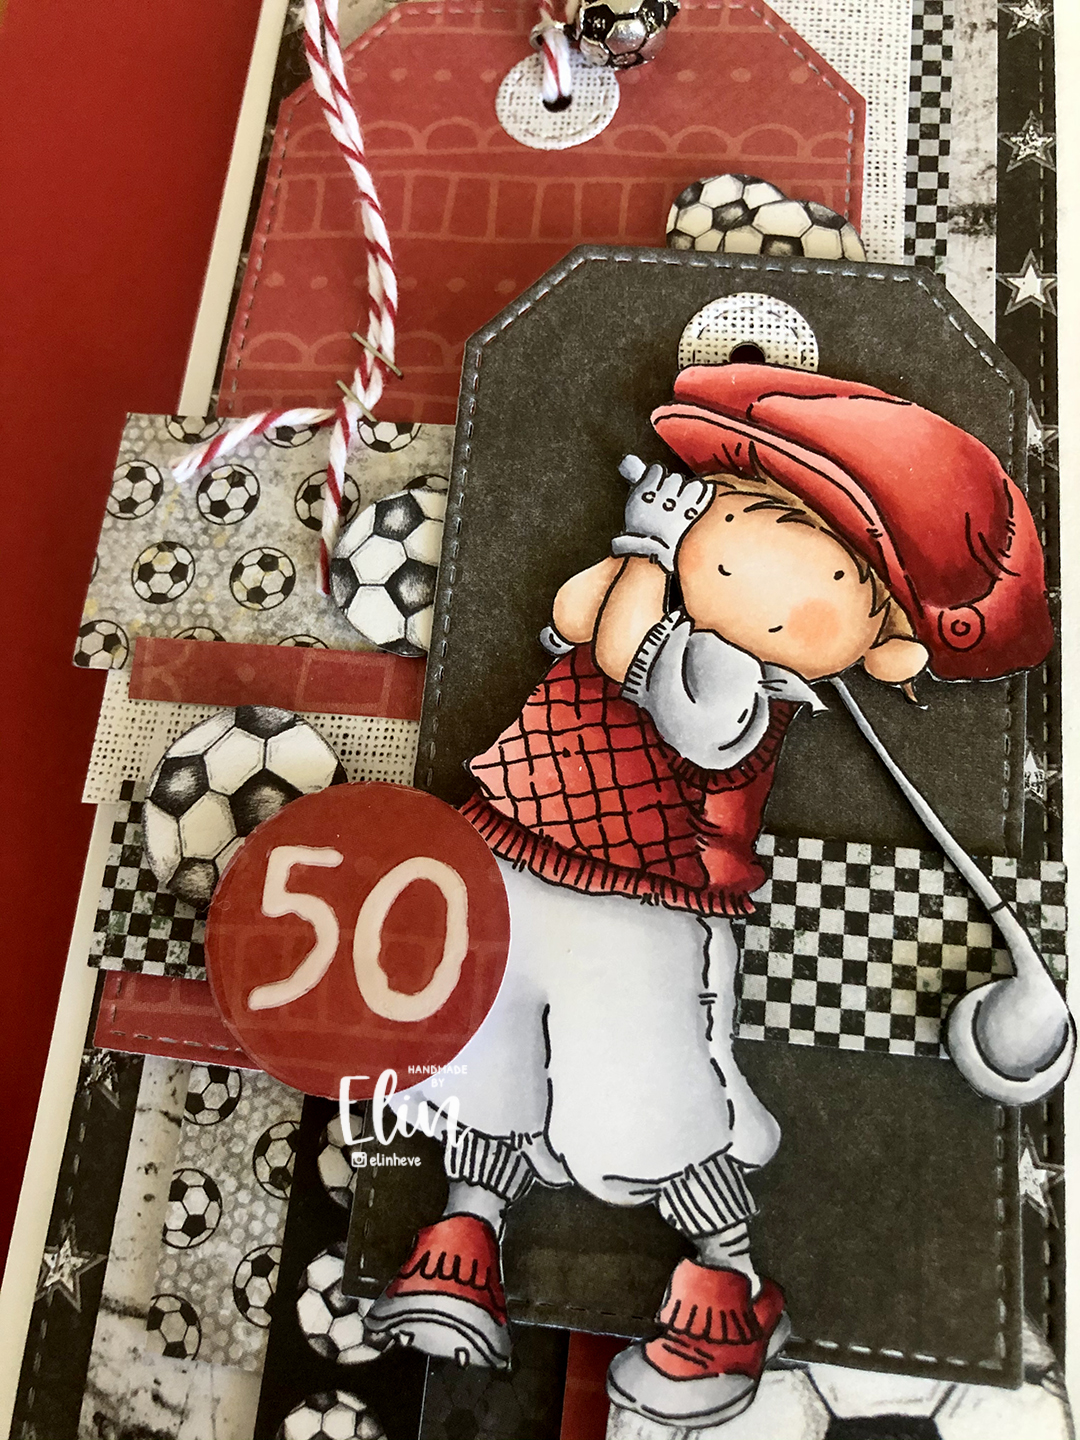
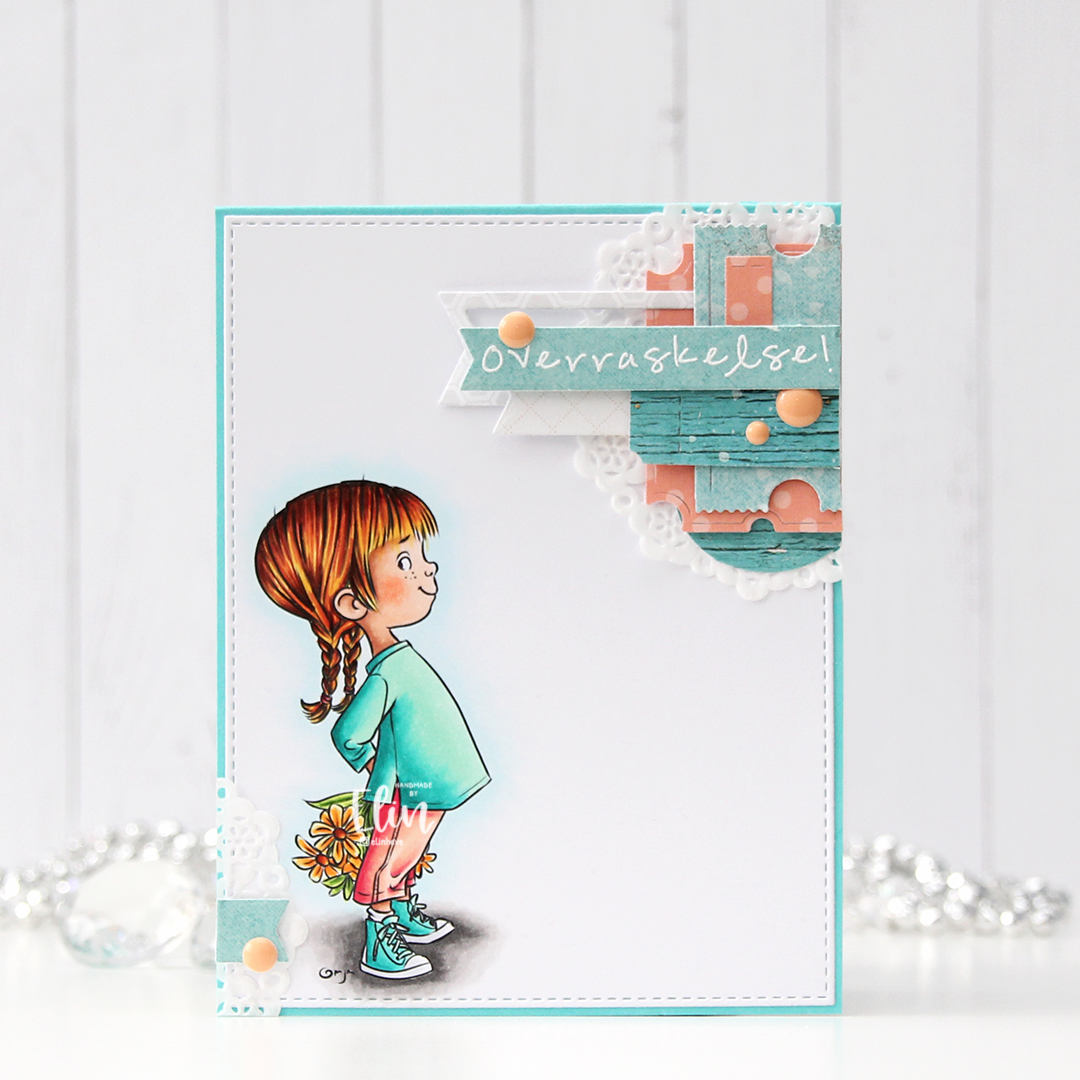
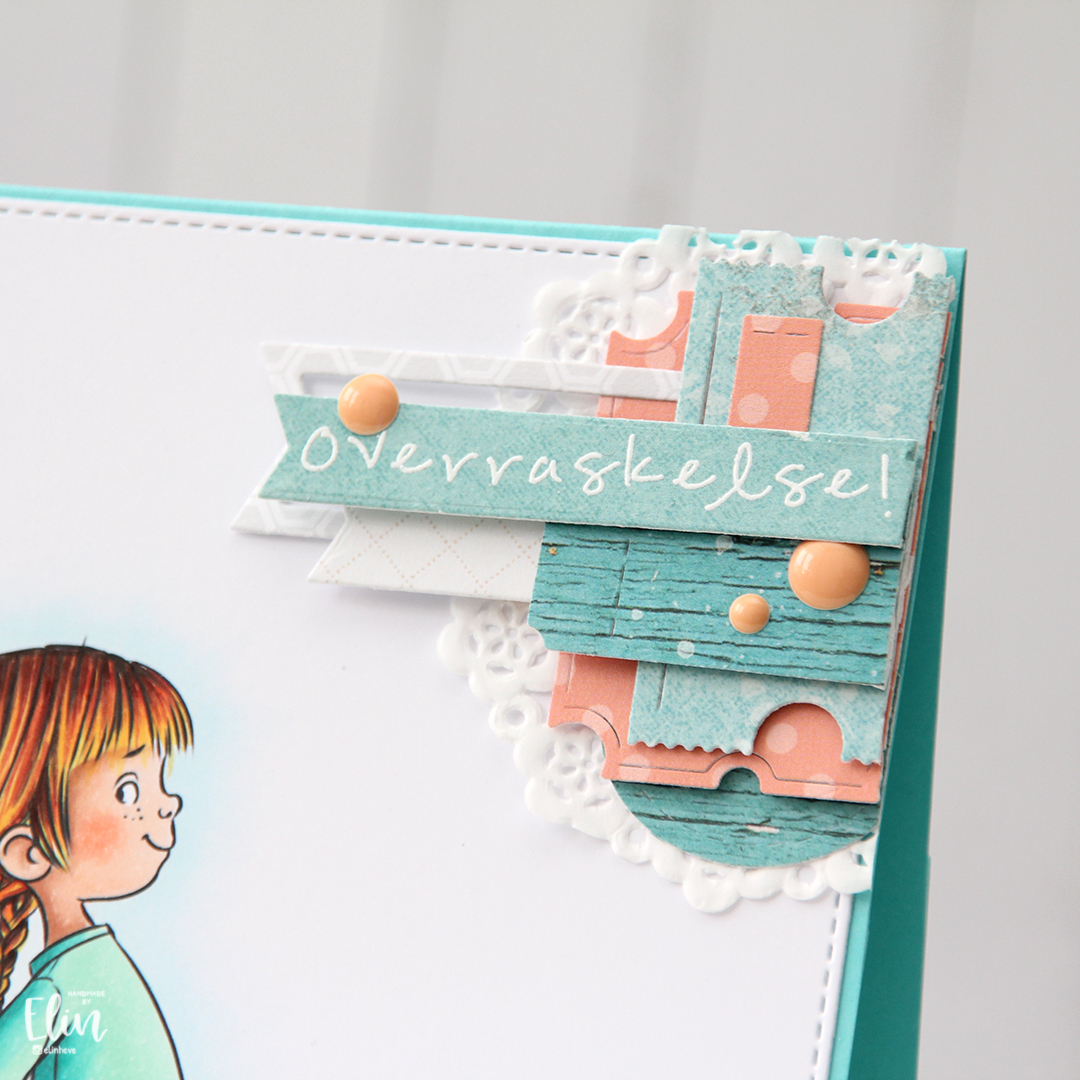
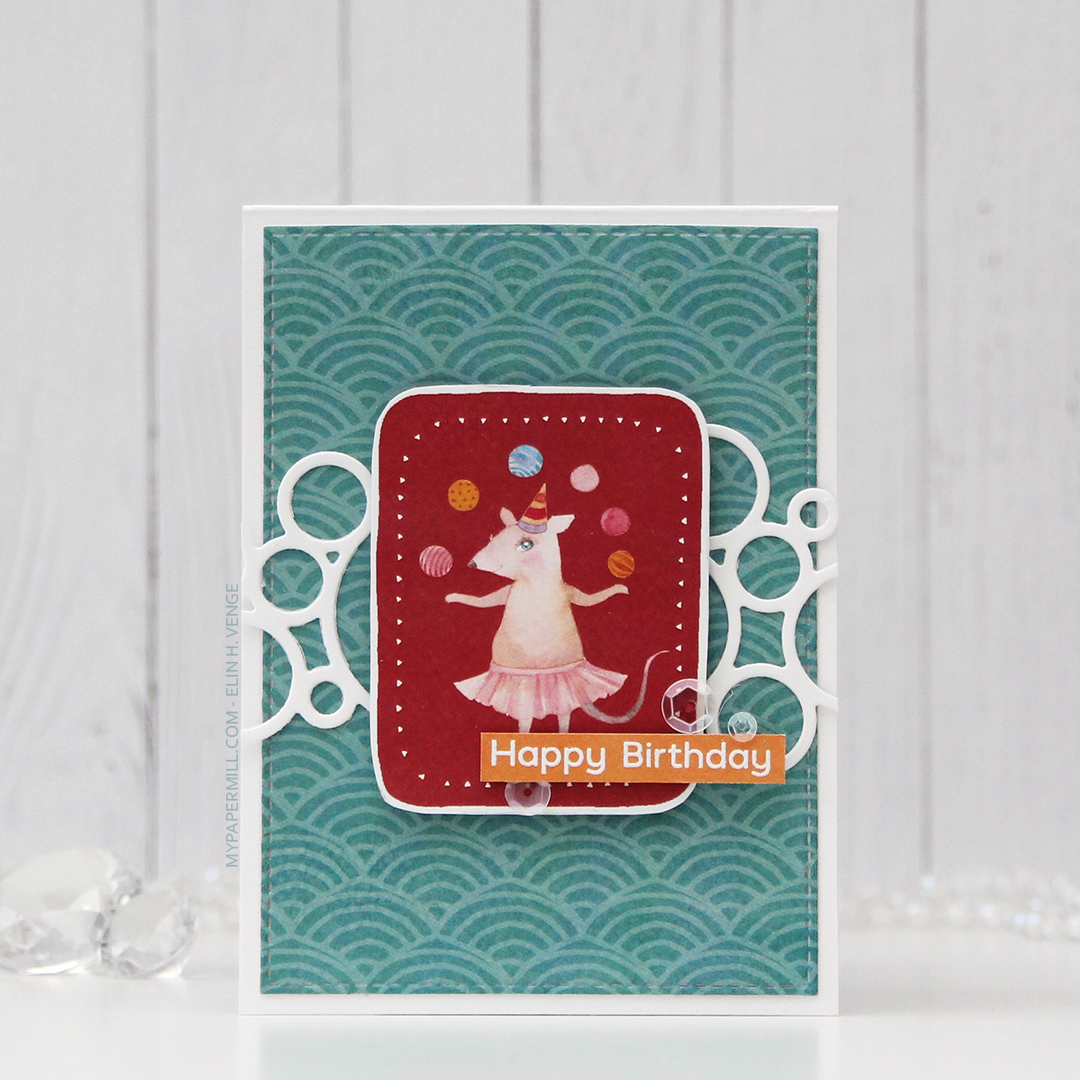
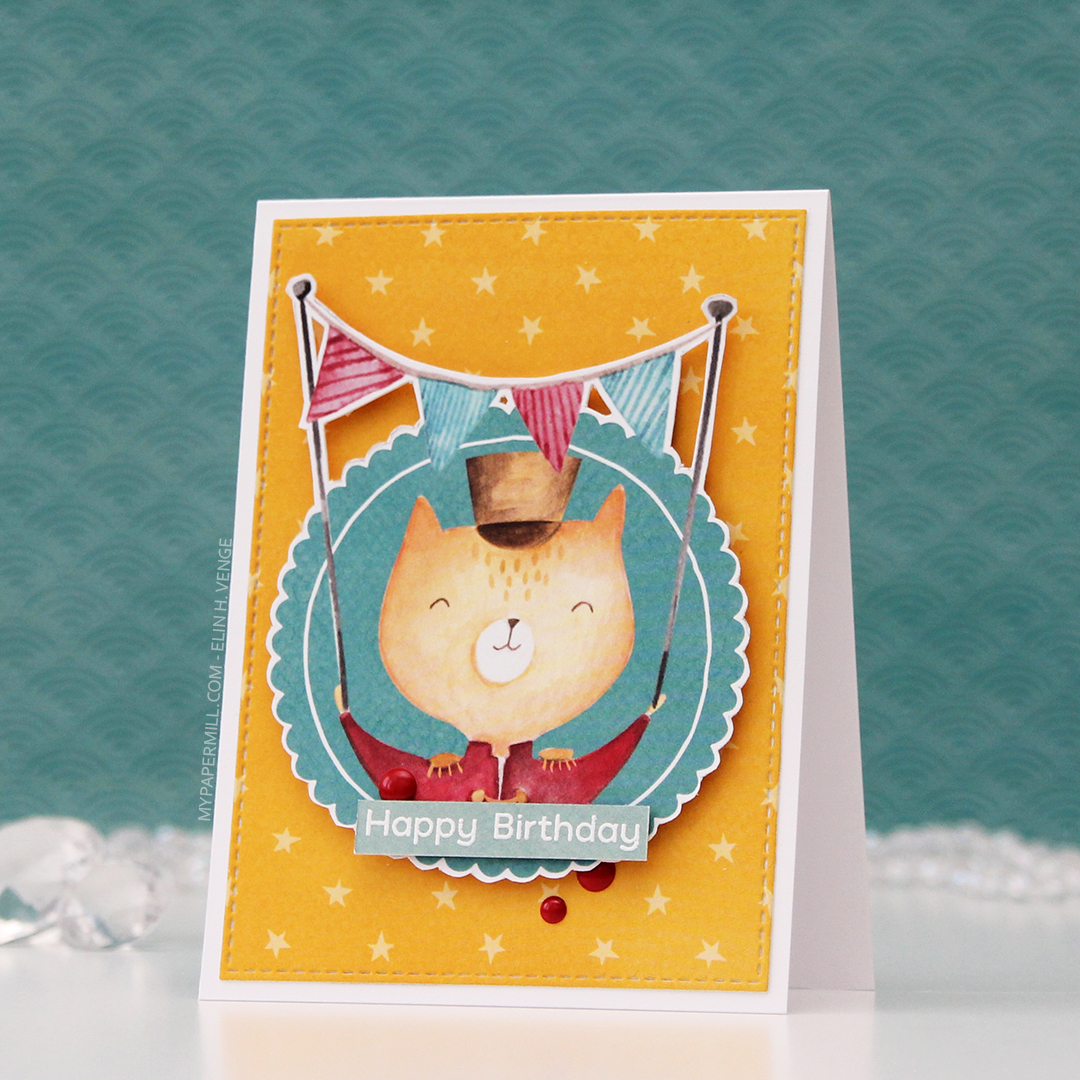
On my desk, I keep storage pockets of die cut patterned paper scraps that I use on my cards. I keep them organized by color family, and pulled out the pink, orange and yellow ones for this, as well as a grey/white/neutral one. The great thing about this system is that everything’s already die cut (using the Happy Days Ticket Stubs die from XCut [which cuts 9 different tickets with one die] and the Fishtail Flag Frames die set from My Favorite Things), so I just play with sizes, colors and composition of the different pieces until I’m happy with the result. For this particular card I used a combo of patterned papers from Sunny Studio, P13 and Bo Bunny. Onto one of the die cut banners I stamped a sentiment from the Little Birthday Notes stamp set from My Favorite Things using Obsidian ink from Altenew. I finished off the card with a few sequins from the Sweet Shop mix from Little Things from Lucy’s Cards and some Stardust Stickles to the dress.

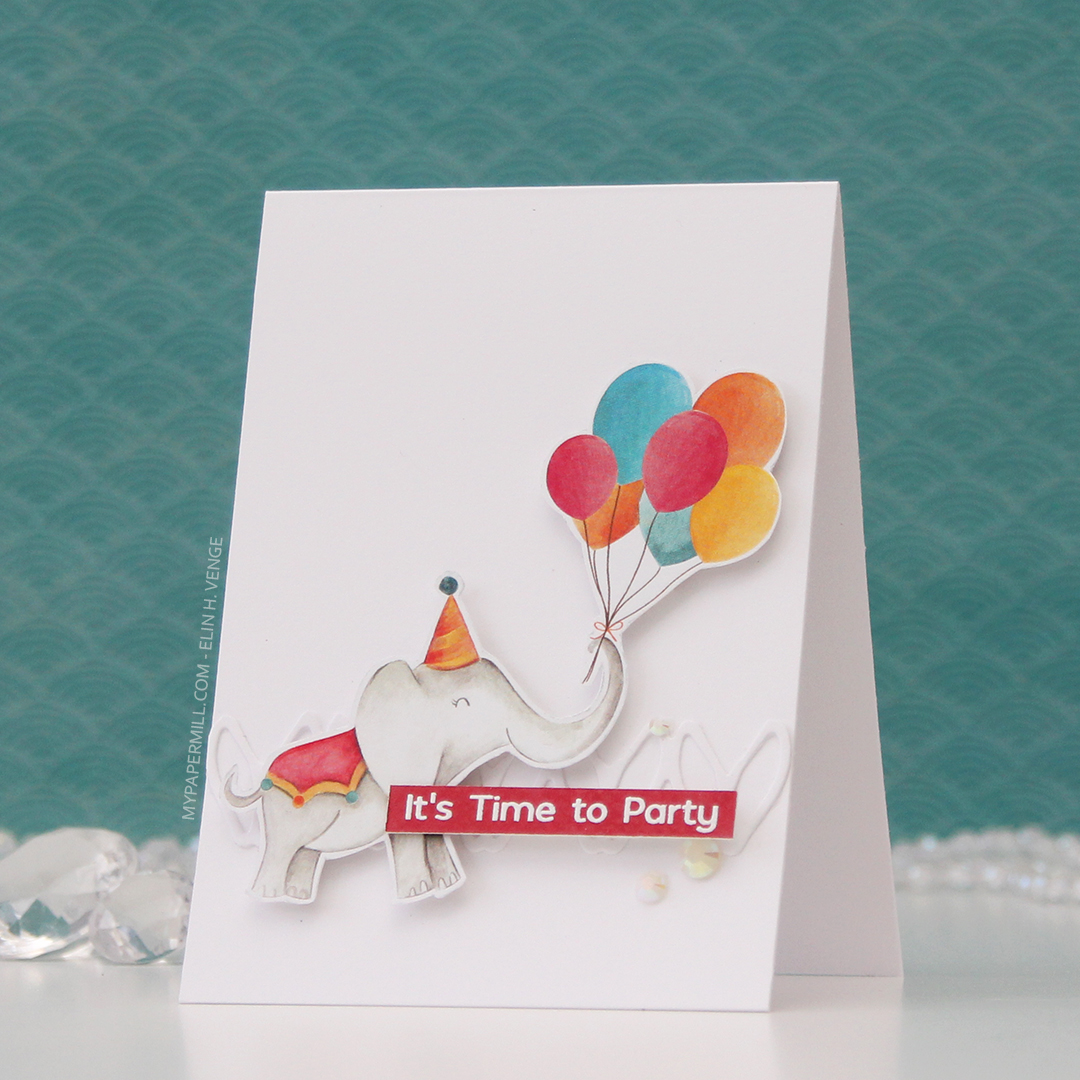
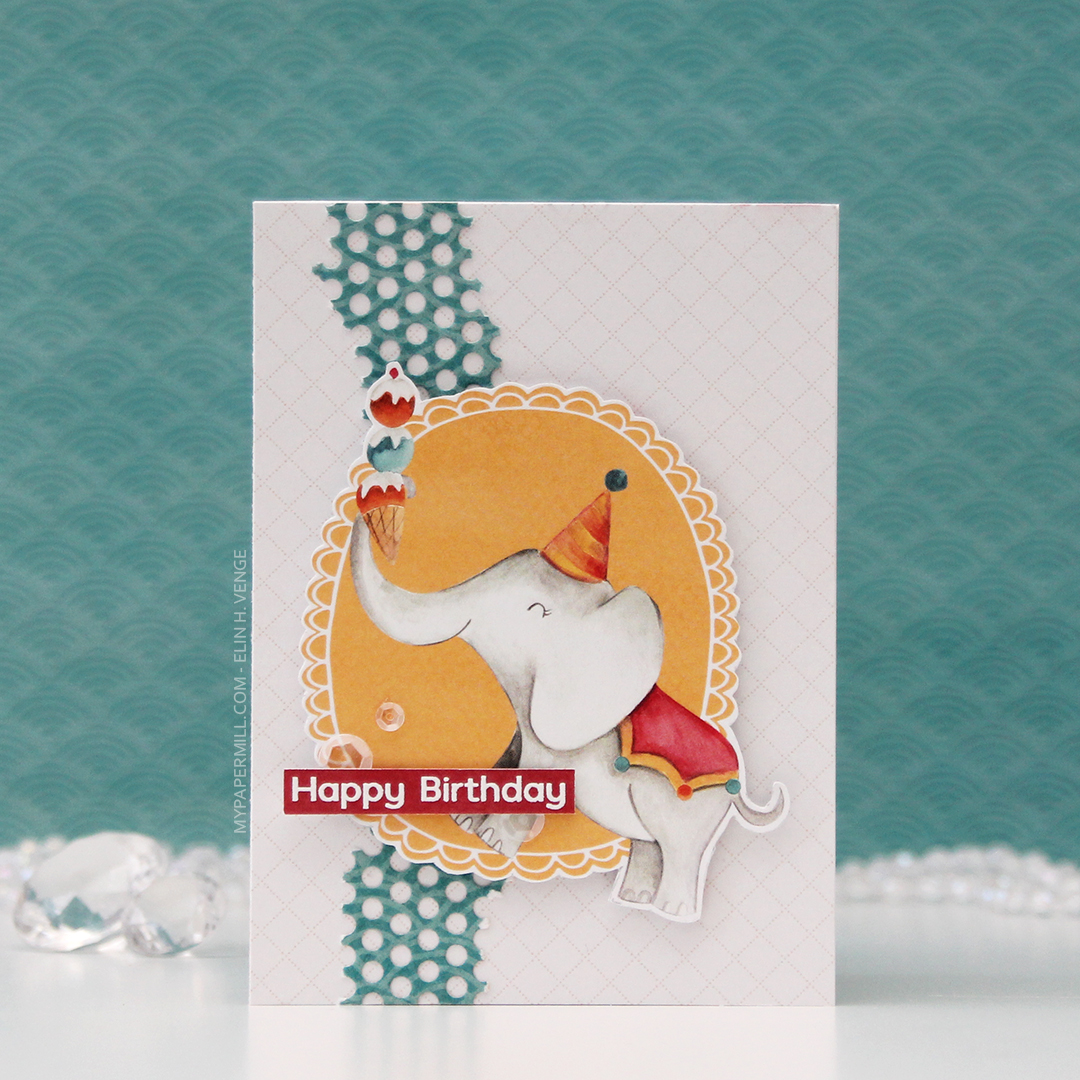
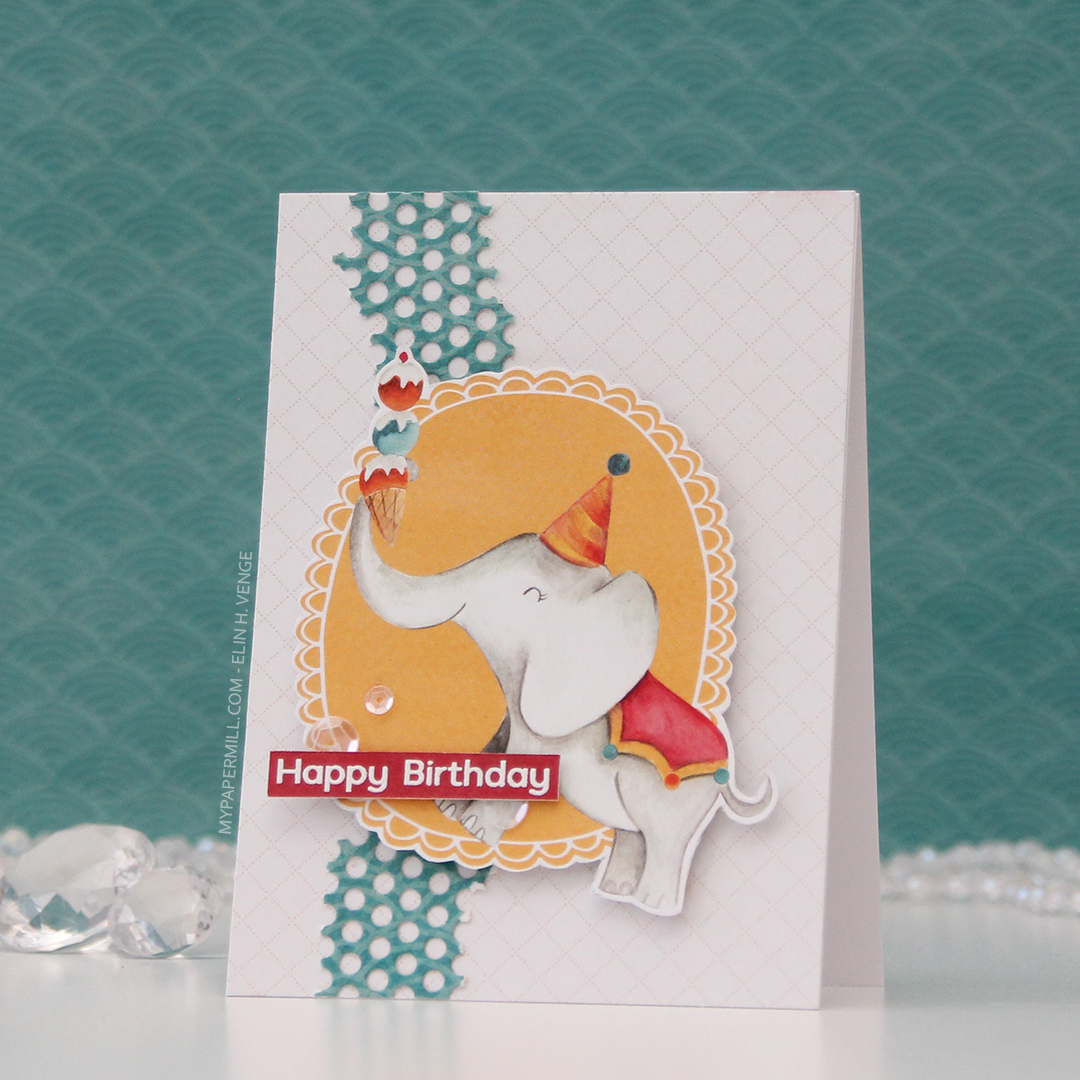
Quite a few Copics for this one. I also used B90, which is a color I’ve made myself, for a subtle hint of a sky.

Hello friend {Mo’s Digital Pencil}

Hi, crafty friends! I have one of my “clean and simple cluster” cards to share today, featuring Tweetie from Mo Manning. I think this image is so sweet, and not only is it the perfect friendship image, it’s also perfect for the summer season.

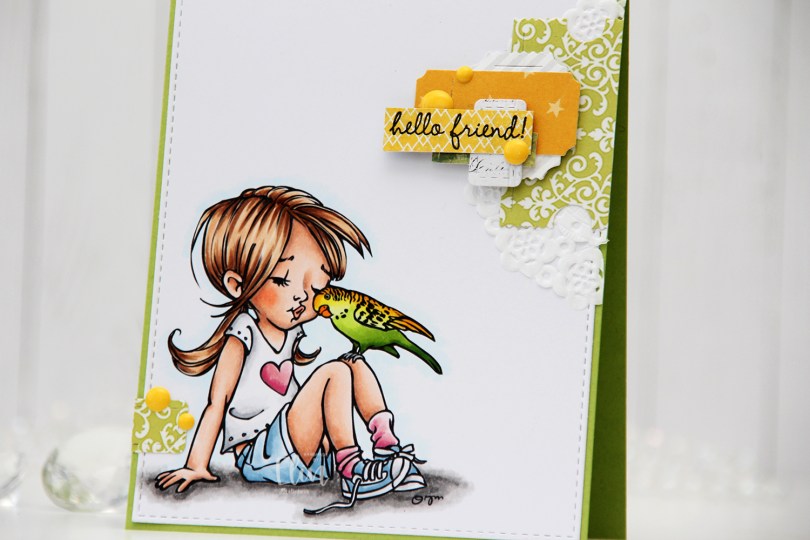
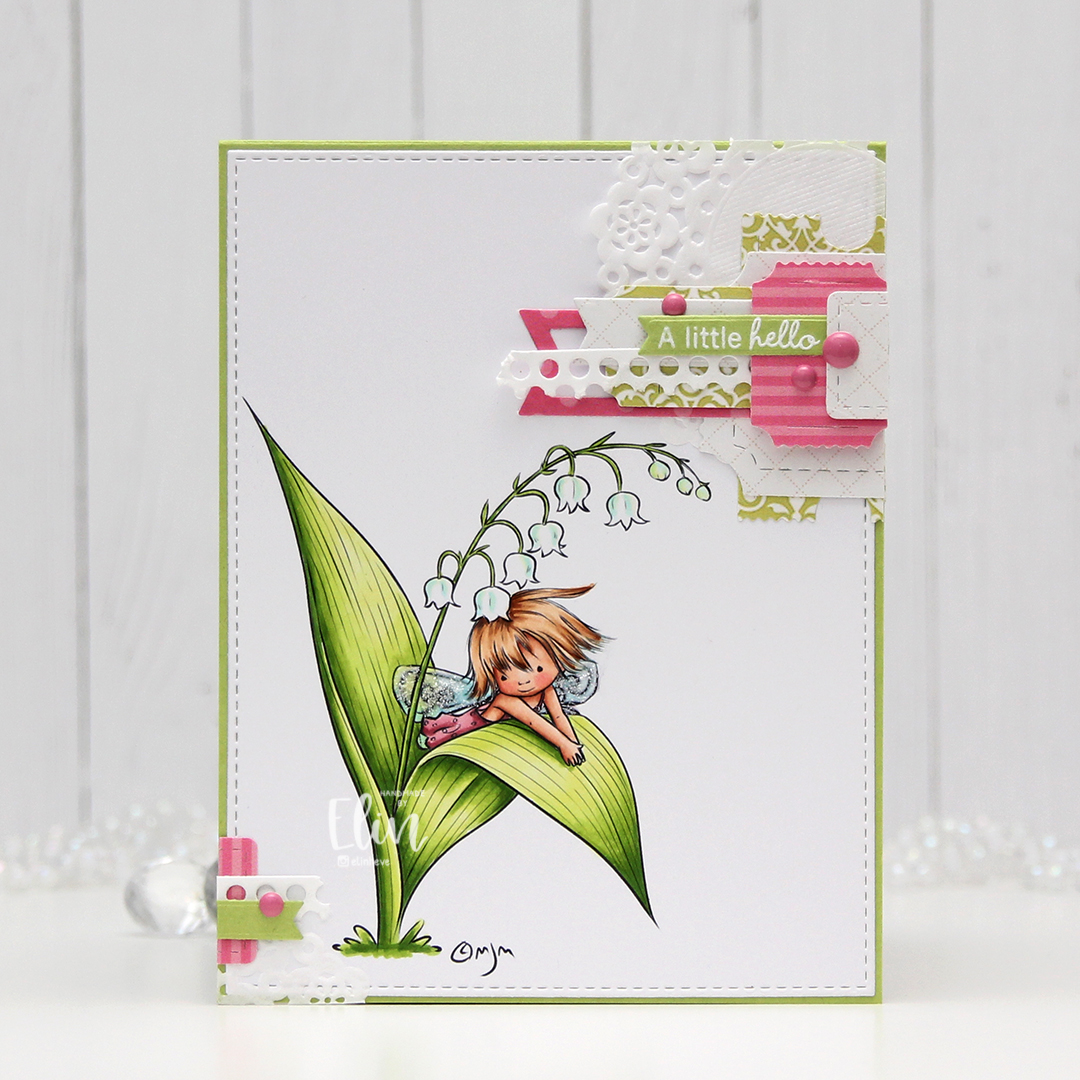
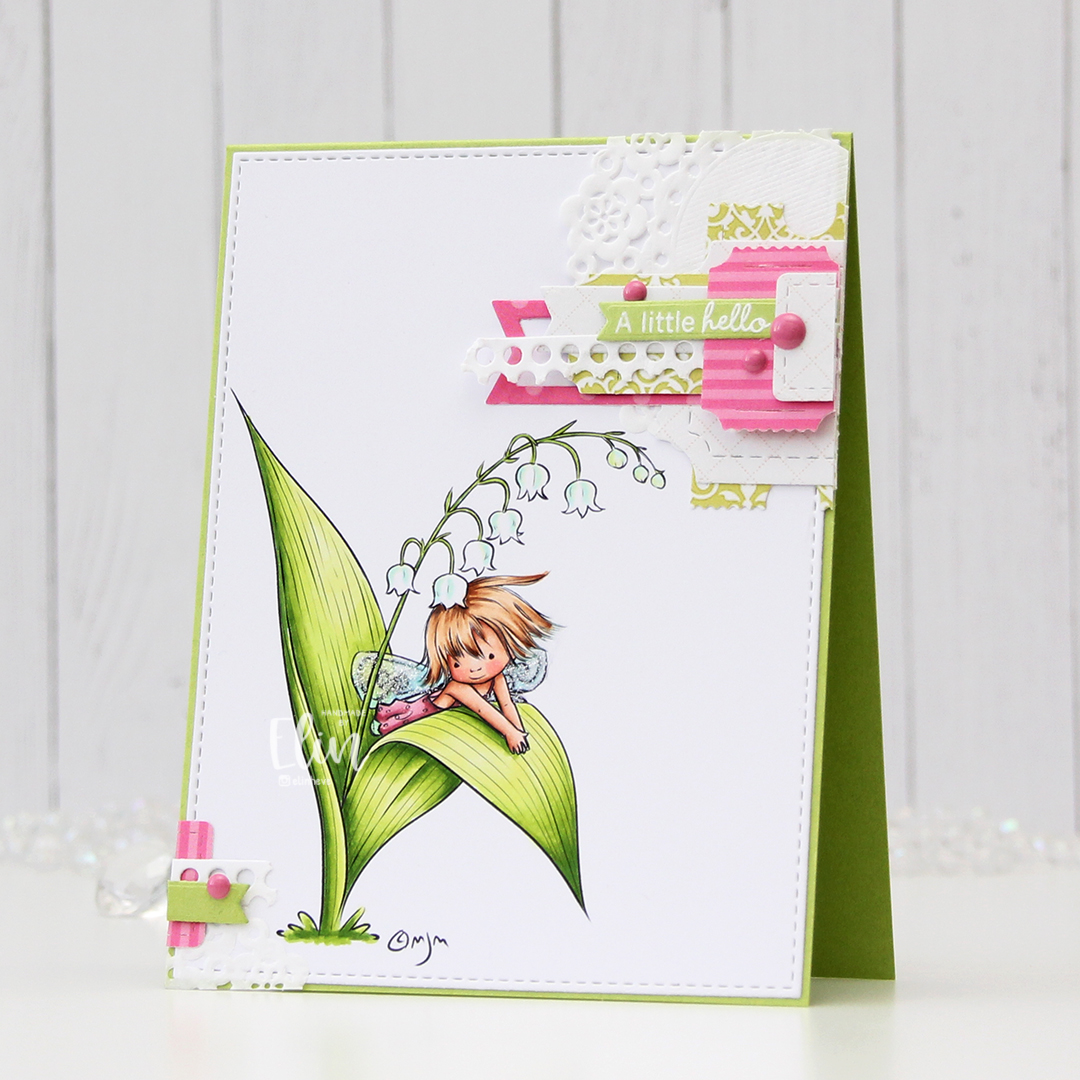
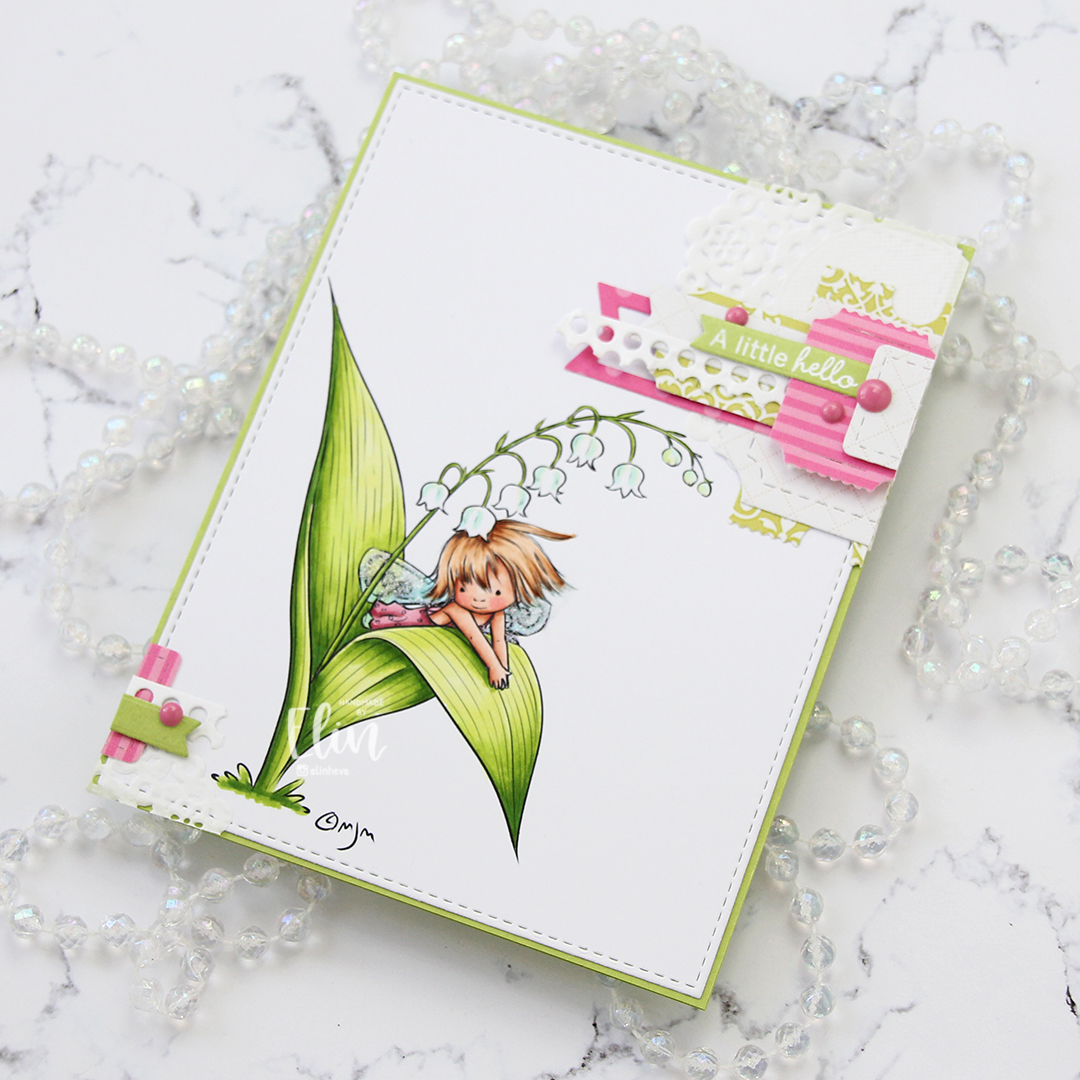
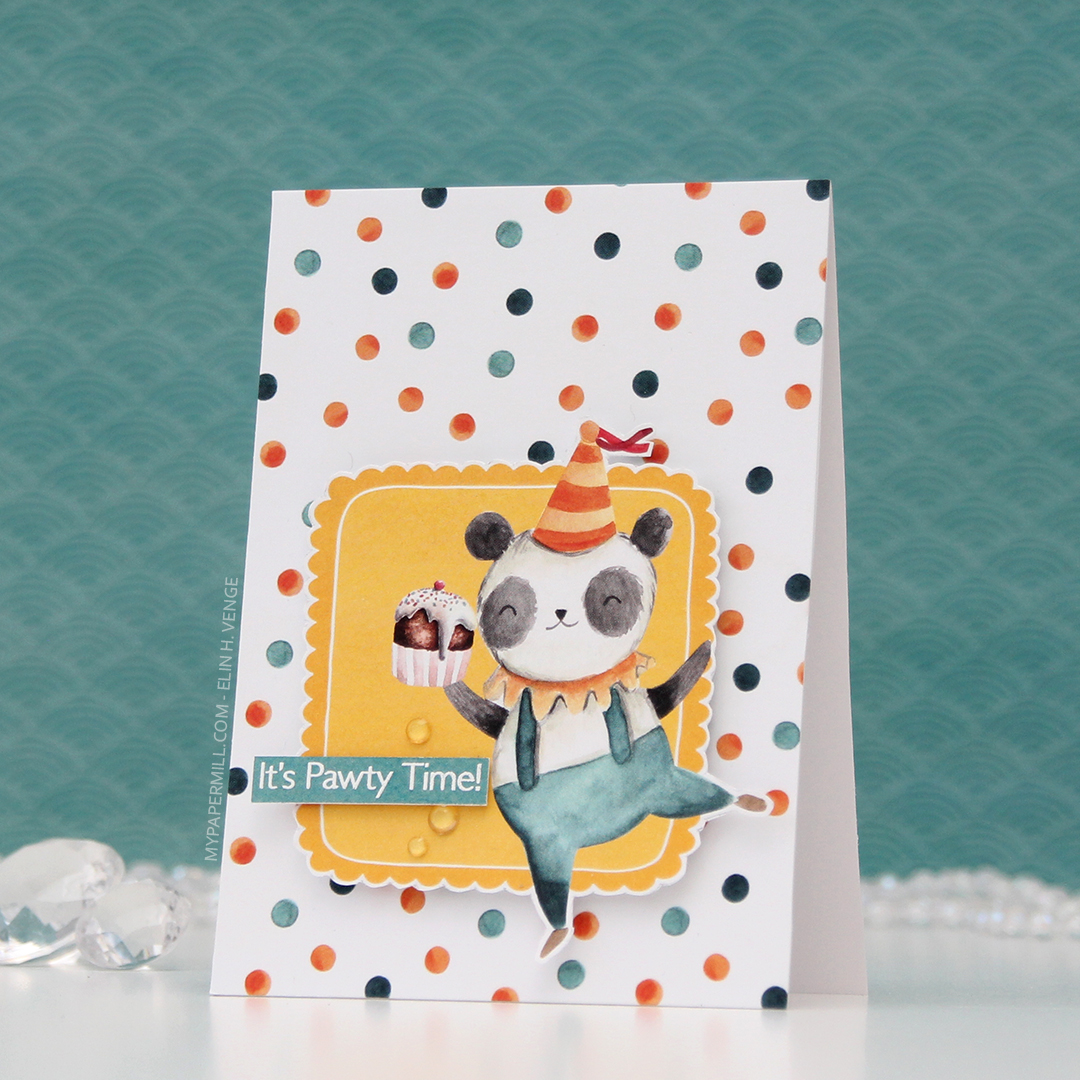
I colored the image with Copics and die cut the panel using the largest die in the A2 Stitched Rectangles STAX 1 die set from My Favorite Things, before adhering it to a card base I created from Sour Apple cardstock, also from My Favorite Things.

On my cluster cards, I usually choose two to three colors from the image to create scraps from. This time I chose green and yellow with a little bit of gray. Neutrals are always a good thing to add. I keep die cut scraps in stamp storage pockets on my desk, sorted by color. Whenever I want to create a cluster, I choose the storage pockets with the colors I want, dump the contents on my desk and start PLAYING.

For this card I wound up using scraps from 3ndypapir, Karen Foster, Sunny Studio, P13, Magnolia and Papirdesign. By limiting the size and colors of my clusters, the design stays harmonious and you can’t tell that I’ve used patterned paper from 6 different companies. I adhere some directly to the layer below, some using foam squares. As a base, I used half a doily from Doodlebug Design that I had in a drawer. I love these tiny paper doilies, they’re perfect for this.

Using VersaFine Onyx Black ink, I stamped a sentiment from the Sweet Summer Sentiment Set from Purple Onion Designs onto a strip of patterned paper from Papirdesign. I finished off the card by adding a few enamel dots from the Pocketful of Sunshine pack of enamel dots from Altenew.

These cluster cards are so fun to make. They make my piles of scraps shrink EVER so slightly, but anything’s better than nothing, and I love the dimension they add to the card.

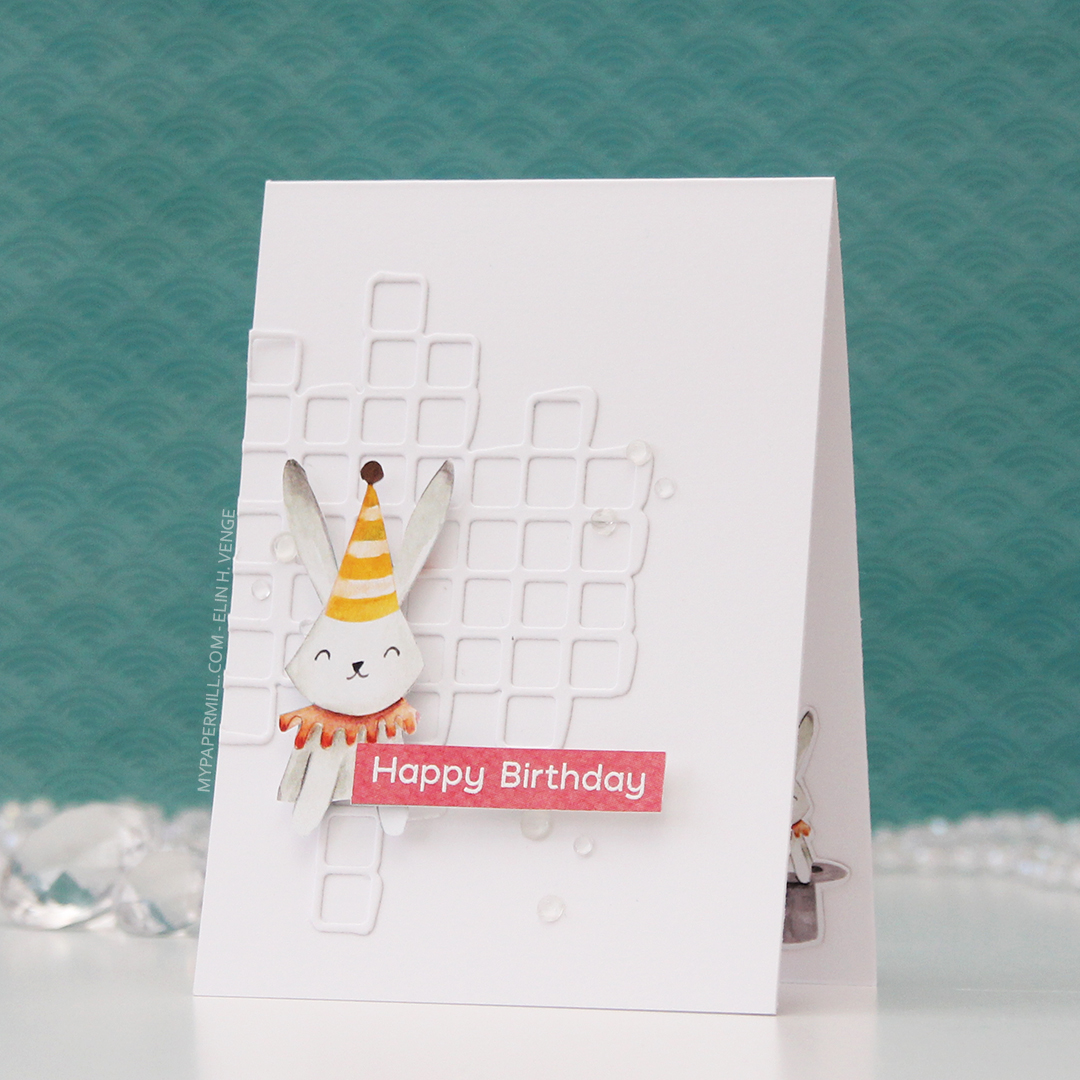
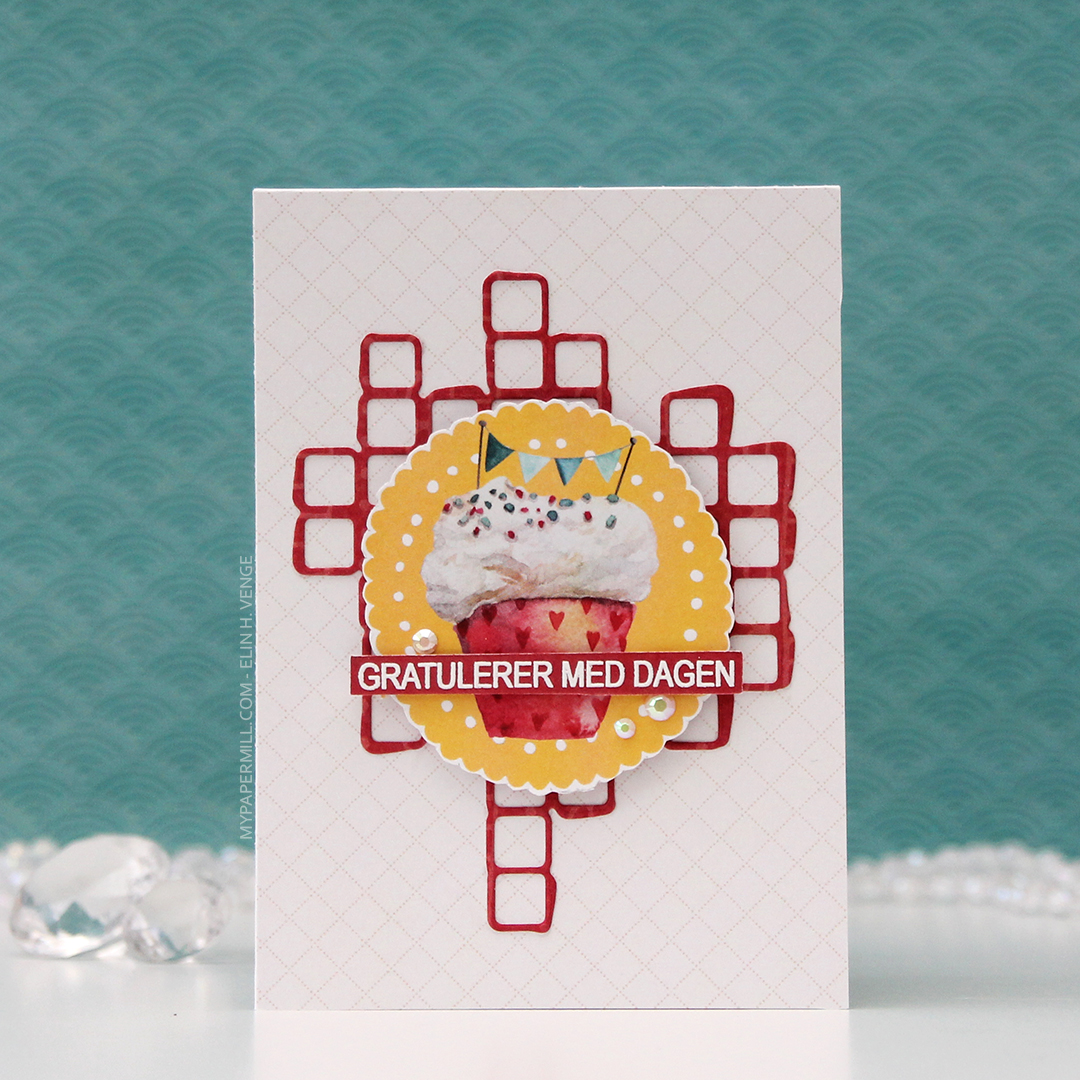
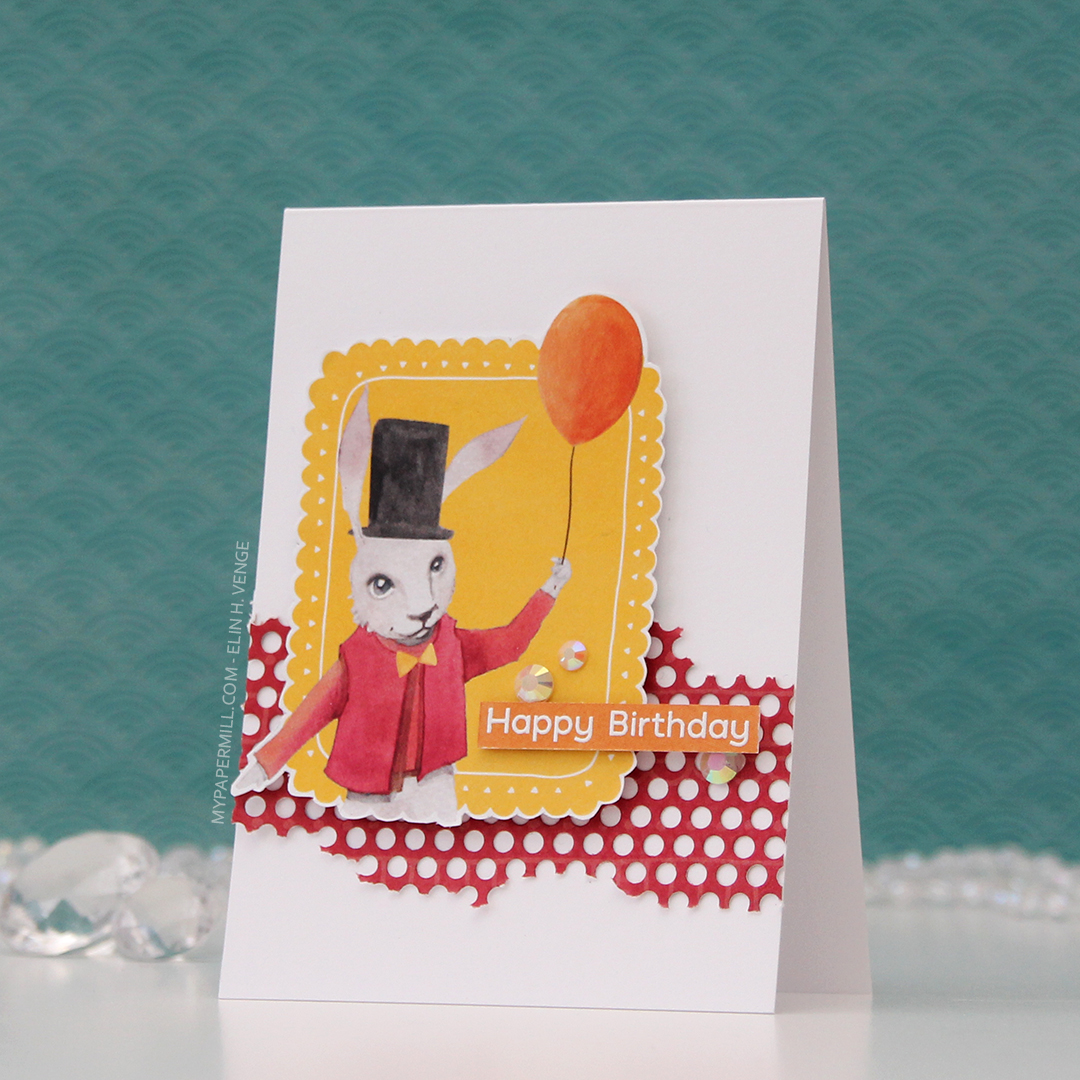
I used quite a few colors for this one.

King for the Day {Mo’s Digital Pencil}

Hi, crafty friends. I have a different kind of card to share today, featuring this King for the Day image from Mo Manning.

It’s a circle card!!! I received an order for a birthday card for a huuuge Liverpool fan. I don’t have a lot of red patterned paper, but came up with the idea to create a circle card to mimic the shape of a football.

I colored the image to somewhat match the Liverpool team colors. Their uniforms are solid red, but I felt like I needed something besides just red, so I gave the guy a white T shirt with a couple of logos on it in proper team colors. I fussy cut the image and rummaged through my patterned paper looking for red and/or football themed papers. I found some football themed scraps and some neutral papers from Papirdesign, as well as some red scraps from P13. I used a stitched circle die set from My Favorite Things to create my card base and also to give the patterned paper scraps the rounded shape on the edge with that nice faux stitch border. I glued some pieces directly to the card base, adding layers of cardstock on the back of others for dimension and interest.

I used the In Stitches Alpha uppercase die set from My Favorite Things to die cut the recipient’s name a few times from white cardstock, adding a layer of red patterned paper from Waffle Flower on top to include more red on the card. I was told the birthday “boy” likes beer, so I added a couple of bottle caps, flipping one of them upside down so I could add his age inside. I used the Alfabet 3 die set from Scrapmagasinet to die cut the numbers, added them to a 1” circle and covered it with Glossy Accents for some shine.

On the inside I printed the lyrics for You’ll Never Walk Alone in red ink and added a couple of circular elements, including a football I fussy cut from patterned paper from Papirdesign. The right side has plenty of space to write a personal message.

On the back of the card I added a few more strips of patterned paper and stamped a sentiment from the Til mannen stamp set from Norsk Stempelblad AS using Wild Cherry ink from My Favorite Things.

I didn’t have an envelope to fit this very dimensional 5 1/2” circle card, so I created one from patterned paper from Papirdesign. The paper is covered with footballs on one side with a few specks of red here and there (how perfect is that?), and football pitches on the back.

Fairly simple color combination for this one.


Hello friend {Mo’s Digital Pencil}

Hi, crafty friends. I have a simple card to share today, featuring this I like you image from Mo Manning. It’s an image that is quick and easy to color. I wasn’t sure what colors to use for her clothing, I thought about teal, but then I googled the image and remembered I’d already used a teal(ish) color on a previous card I made with the same image (blog post here), so I was kind of stuck for color ideas. My color buddy Lisabeth came to my rescue, suggesting green and white, so that’s what I wound up with. Thanks, Liz!!

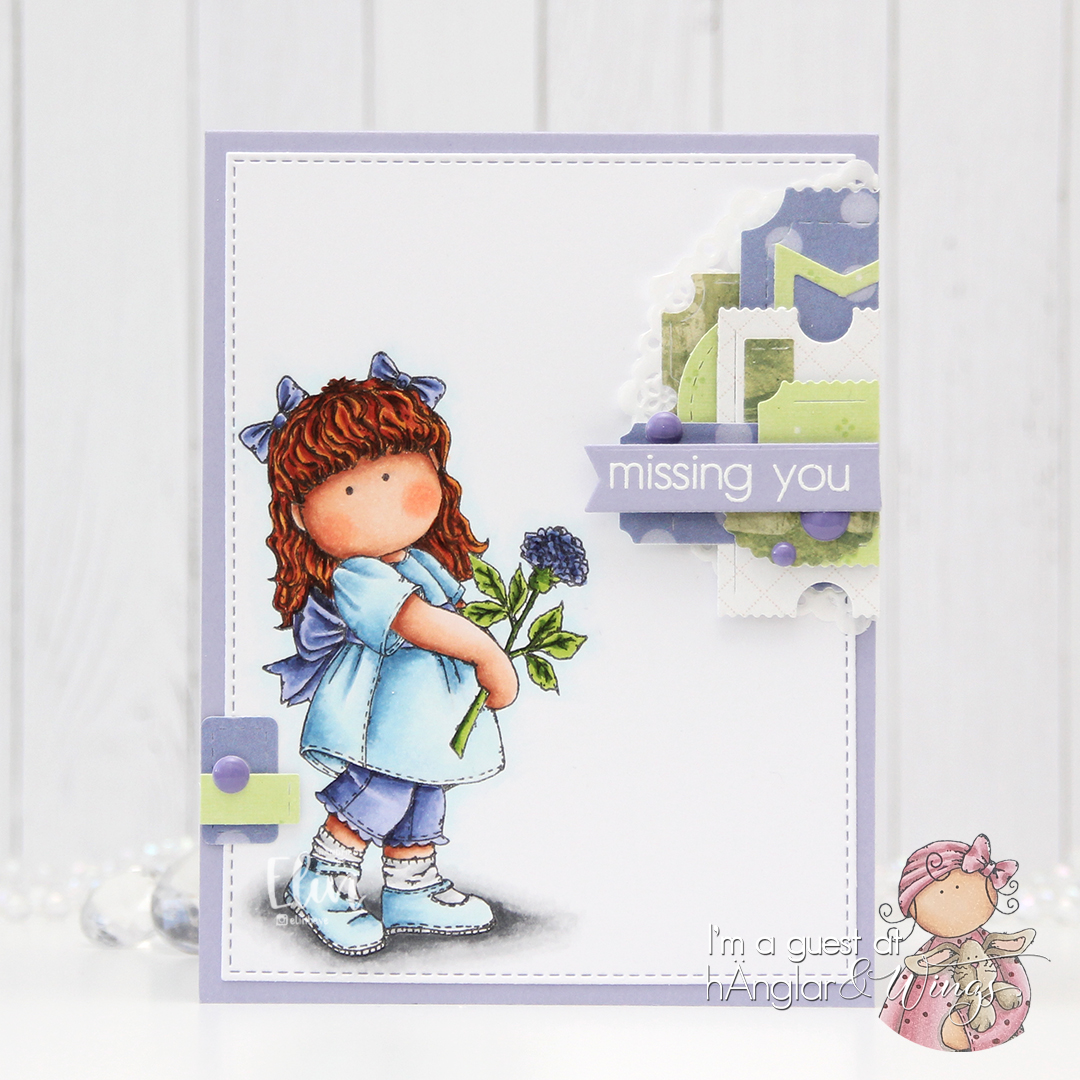
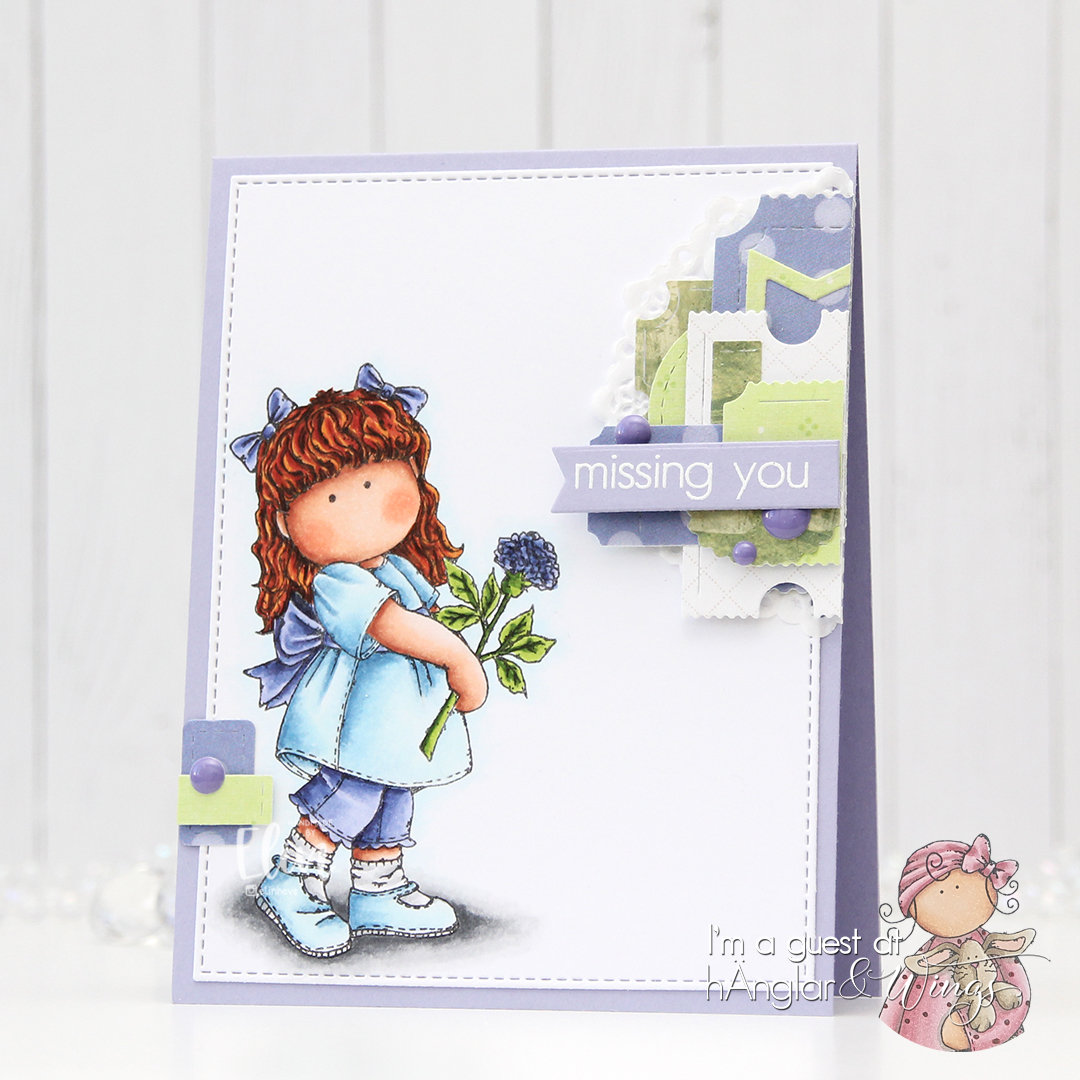
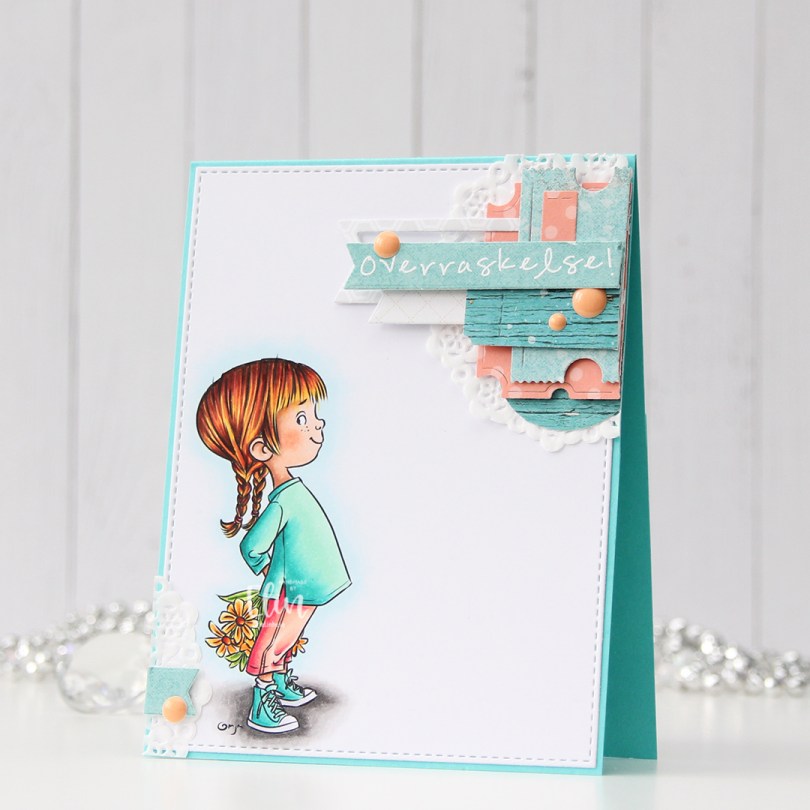
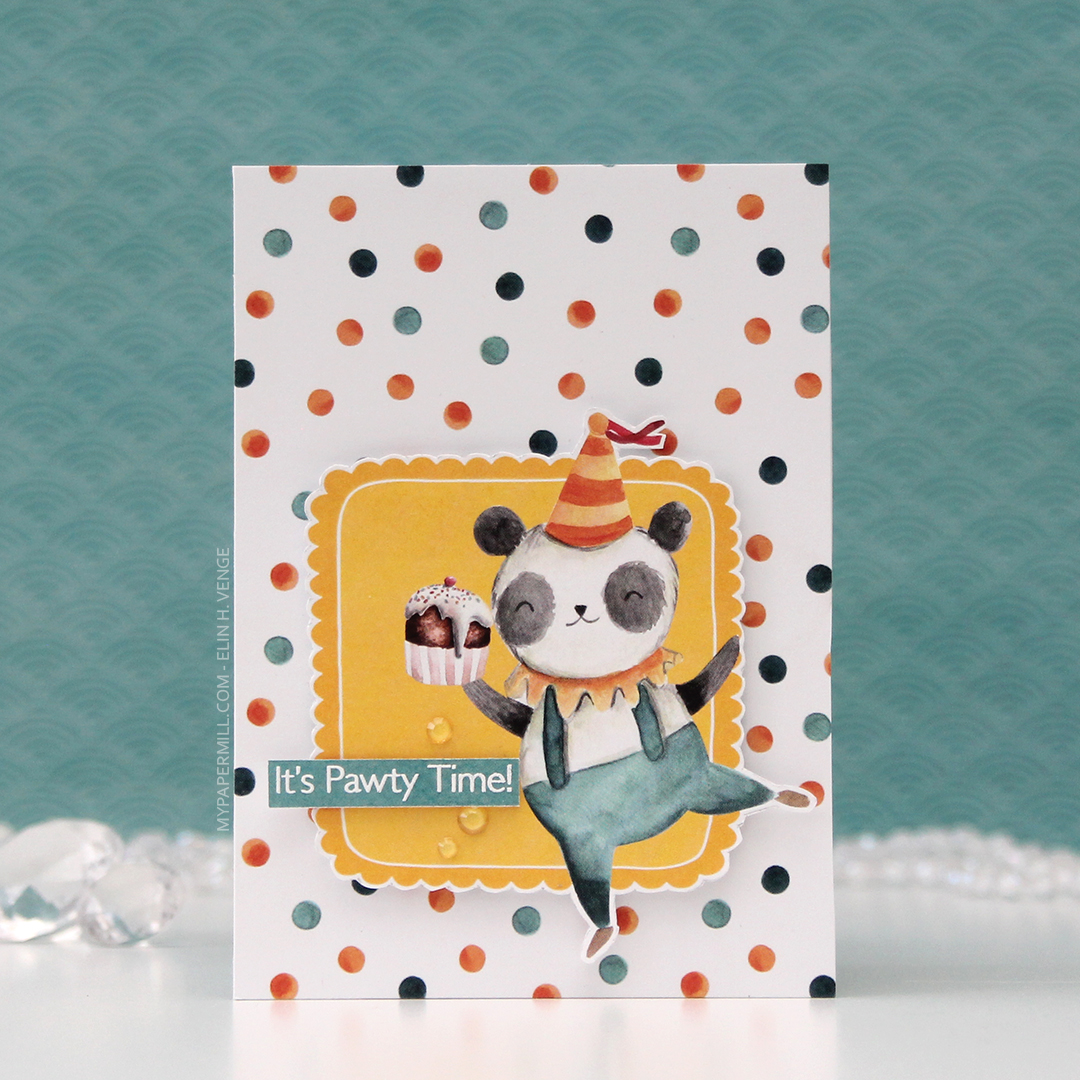
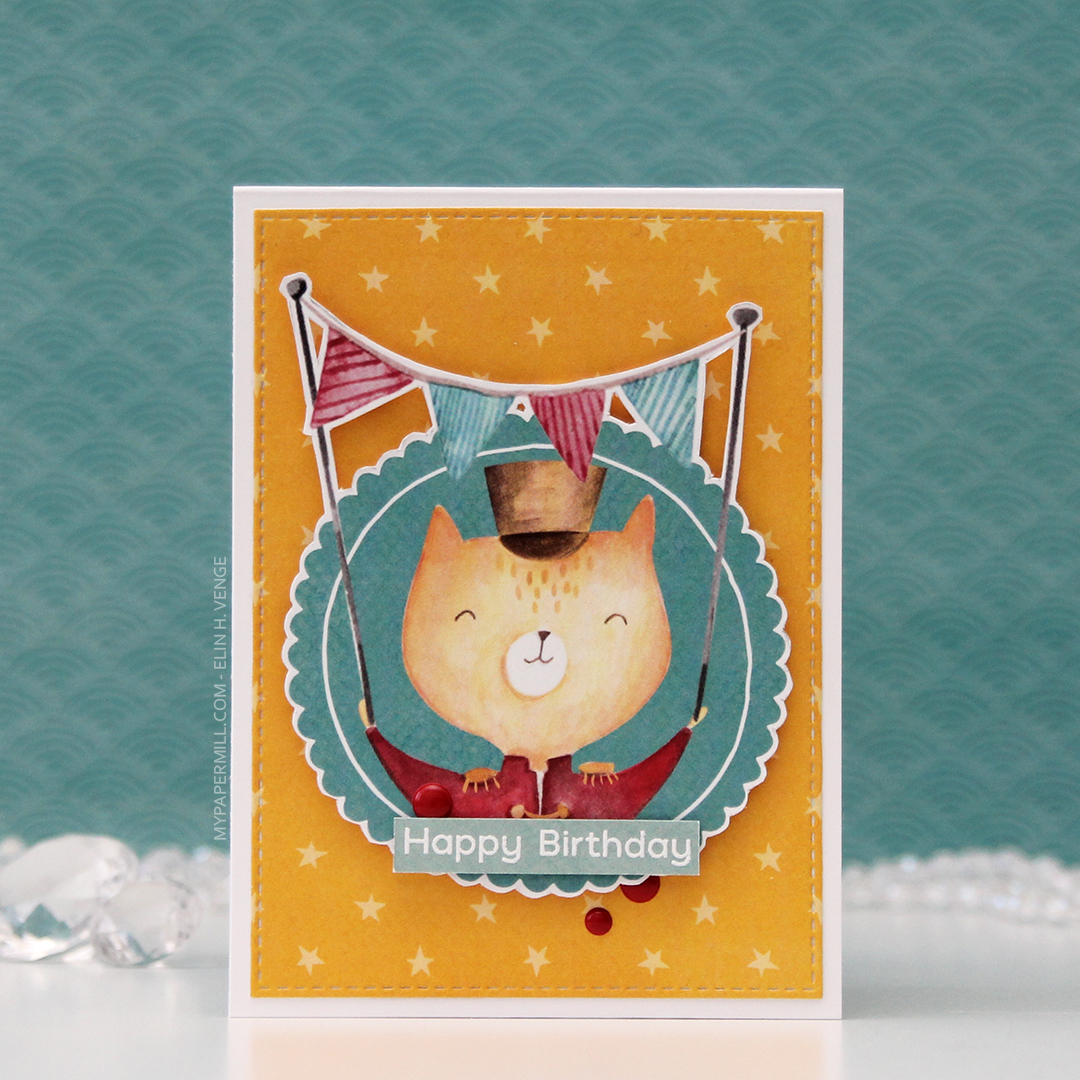
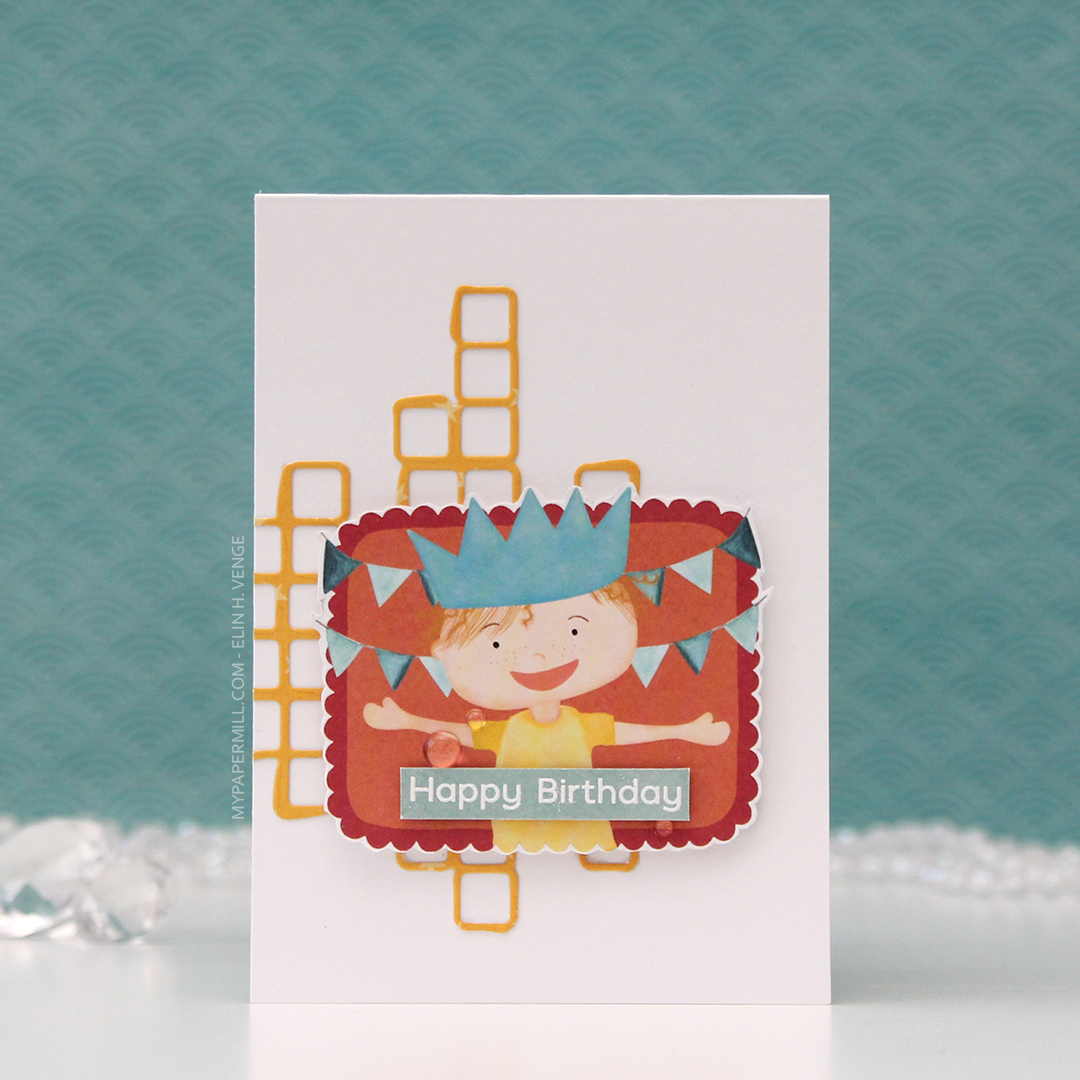
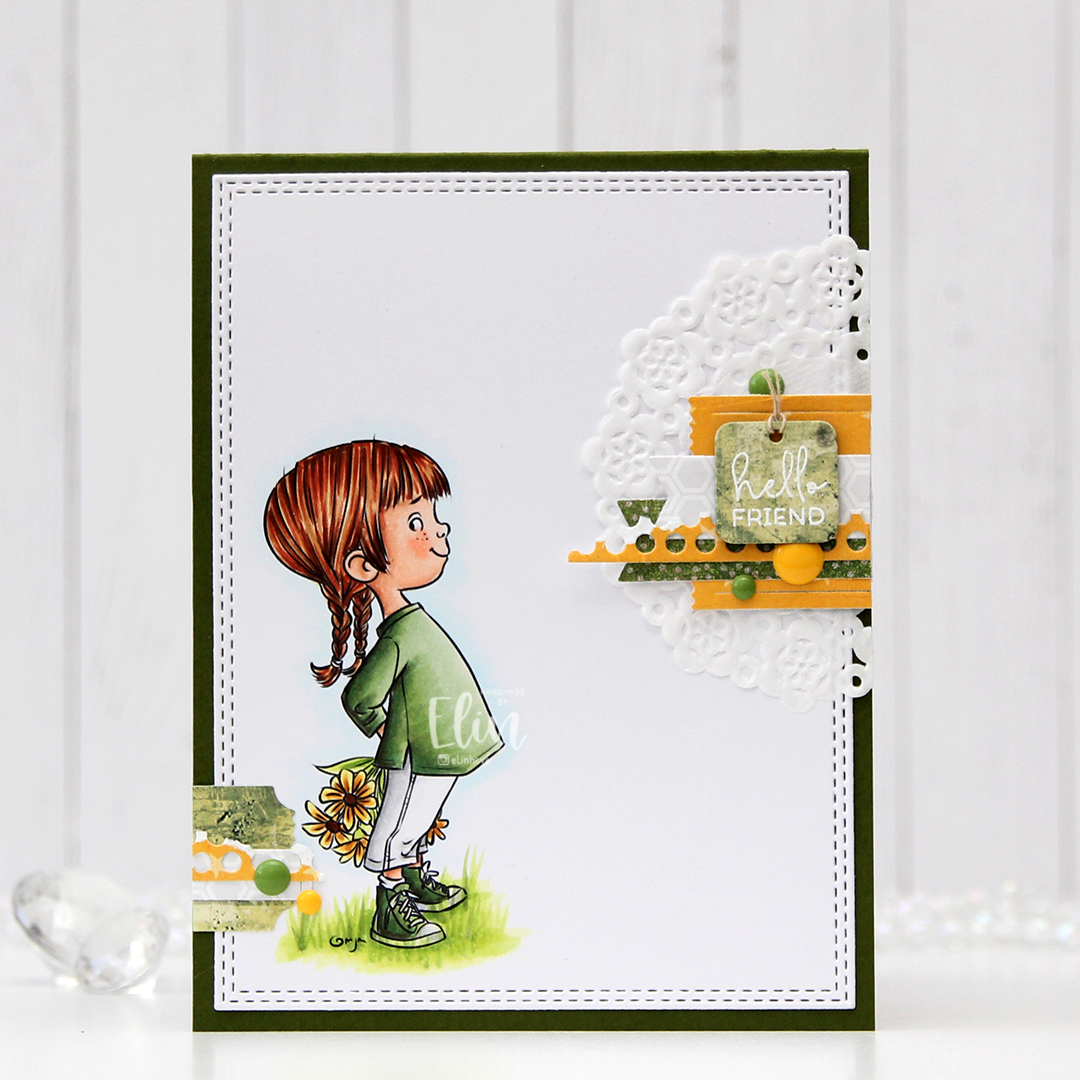
I printed the image near the bottom left corner of a panel of X-Press It blending card, before coloring it with Copics and using the largest die in the A2 Double Stitched Rectangle STAX die set from My Favorite Things to create a finished look with the nice faux stitching details that I love to add to my cards. I adhered it to a cardbase I created from Jalapeño Popper cardstock, also from MFT, and I had my base ready for some play with scraps.

I love creating these clusters of die cut scraps on my cards, and I have stamp storage pockets with little die cut patterned paper scraps sorted by color. That way I can rummage through these when I create my cards instead of having to find lots of patterned paper to match my card, then die cut it. It usually takes several different patterned papers of one color to create the dynamic look I want for my cards, but for this one, I actually kept it simple with one yellow (P13), one white and gray (Sunny Studio) and only two green ones (Basic Grey and Karen Foster Design). They’re all different shapes, which still keeps it interesting. Some are glued directly to the card, some with foam tape for a little bit of dimension. Using VersaMark ink, I stamped a sentiment from the Mini Messages stamp set from Mama Elephant onto one of these die cut pieces (it happened to be a tag) and heat embossed it using Super Fine Detail embossing powder from Ranger. I used part of a mini paper doily from Doodlebug Design behind my main cluster, and added a few enamel dots (green from Papirdesign, yellow from Altenew) to embellish.

Lots of green for this color palette.

Missing you {hÄnglar & Wings}

Hi there! A few months ago I was asked to guest design for hÄnglar & Wings. I have a hard time saying no to guest design gigs no matter how busy I am, and today I’m sharing the first of two cards I made with the stamp set I chose. Part of me wanted to choose a Christmas set (I loooove creating Christmas cards), but I went completely opposite in the end and chose a stamp set with a couple of very summery girls called Bästa Vänner.

hÄnglar & Wings - Bästa Vänner missing you front

For this first card I decided to create a card that is very typical for me. Colored image, die cut panel with faux stitch edge and an embellishment cluster with a sentiment.

hÄnglar & Wings - Bästa Vänner missing you front skrått

I colored the girl from the Bästa Vänner stamp set with my Copics, and used a die from My Favorite Things to turn it into a panel with the aforementioned faux stitch edge that I love so much. I adhered it to a card base I made out of Wild Wisteria card stock (sadly, a discontinued color) from My Favorite Things.

hÄnglar & Wings - Bästa Vänner missing you flatlay

I love creating these embellishment clusters with die cut patterned paper scraps. I have a tub of these die cut scraps on my desk, sorted by color so I don’t have to go through the whole tub for each card. I typically choose two or three colors that go with the colors in my image and play with sizes and directions of my scraps until I come up with a design I’m happy with. It’s my favorite way to use up my patterned paper scraps. Back in the day I used a ton of patterned paper, and I still have lots left as I don’t use much of it anymore, but this method makes my scrap pile shrink ever so slightly with each cluster.

hÄnglar & Wings - Bästa Vänner missing you flatlay høyre

For this cluster I used paper from P13, Imaginisce, Scenic Route and Karen Foster. I put a mini paper doily from Doodlebug Design at the bottom and built up my cluster with a little bit of foam tape here and there for dimension. The sentiment comes from the Bästa Vänner stamp set, embossed in white on a die cut piece of the same color card stock that I used for my cardbase. To finish off the card, I added a few enamel dots from Altenew.

hÄnglar & Wings - Bästa Vänner missing you Copics

Not a whole heap of colors used for this one.

Teeing off! {Lili of the Valley}

Hi! I have a 50th birthday card to share today, featuring the Teeing Off image from Lili of the Valley that was released a few weeks ago.

Lili of the Valley Teeing Off Roy 50 flatlay

The card was made on order for a golf-playing tinsmith whose favorite football team (European football) is Liverpool. I wanted to include as many of the elements as possible, and made a slimline card with patterned paper from Papirdesign, P13 and 7 Dots Studio.

Lili of the Valley Teeing Off Roy 50 flatlay skrått

I used lots of foam tape for dimension, and varying widths of the patterned paper layered and criss-crossed across the card. I used the Slimline Starter die set from My Favorite Things and also the Stitched Trad. Tag STAX dies to create the tags. The reinforcers are made with the Tag Builder Blueprints 6 die set, also from MFT.

Lili of the Valley Teeing Off Roy 50 flatlay section

Through one of the reinforced holes, I pulled a piece of Cherry twine from Whisker Graphics and dug through my stash to find a ball charm, perfect for a football fan. I wanted to include a little bit of metal because of his profession, and started by stapling the twine to the tag. I also fussy cut a few footballs from patterned paper from Papirdesign that I scattered across the front.

Lili of the Valley Teeing Off Roy 50 flatlay detalj

I fussy cut my golfer and added him to the front of the card using foam tape.

Lili of the Valley Teeing off Roy 50 med 50

I created a circle with the recipient’s age and covered it with a thick layer of Glossy Accents. Glossy Accents takes a long time to dry, so I made this little piece before starting on the rest of the card and put it somewhere safe to dry for a few hours. Once it was time to put the card together, I’d completely forgotten about this little 1″ circle, and only found it after I’d handed the card over to the woman who ordered it. Thankfully, I was able to meet up with her the following day to add it to the card, but of course, all my photos were already taken, so I snapped this super quickly with my phone just to show what the card should have looked like all along.

Lili of the Valley Teeing Off Roy 50 innsider

I was asked to try to put the Liverpool team song somewhere on the card, and I figured that one of the insides had just enough space. The other inside has plenty of room for a personal message to the recipient.

Lili of the Valley Teeing off Roy 50 bakside

On the back of the card I used more patterned paper, more fussy cut footballs and also a sentiment from Norsk Stempelblad AS stamped in Memento Ladybug ink.

Lili of the Valley Teeing off Roy 50 bakside zoom

I also added my personal stamp to the back of the card, on a white football with splatters. Back in February, Create a Smile had a two week collaboration with Sommerabend where you could order personal stamps. I got this one and an address stamp. I’ve been creating cards for over 10 years, but never had a personal stamp until now, and I’m so happy with how they both turned out.

Lili of the Valley Teeing Off Roy 50 med konvolutt

I felt like I hadn’t hit the brief in terms of the tinsmith part, so I decided to die cut the letters of his name in foil sheet and add to the front of the envelope. I put a couple of layers of plain card stock die cuts behind each foiled letter for dimension, and used an old hammer from Tim Holtz to add a little texture to the letters. A few footballs on either side of his name to complete the look.

Lili of the Valley Teeing off roy 50 Copics

Not a whole lot of Copics required for an image that mostly reads as red and white.

A little hello {Mo’s Digital Pencil}

Hi there! I love lily of the valley, and as soon as I saw Lily Fairy from Mo Manning, I knew it was an image I needed. They’re at their peak right now, and they smell so divine. I’ve picket two bouquets, I just wish they lasted longer than a couple of days in a vase. Hopefully, my card will last longer than the actual flowers.

Mo Manning Lily Fairy front rett

I colored up my image with Copics. I chose a very light, bright combo for the green. The leaves on a lily of the valley are much darker than this, but I really like this combo, and with the fairy hanging out between the leaves, I didn’t really care too much about realism anyway. I chose to color her dress pink for a pop of a different color, and you can actually get real lilies of the valley that are pink, so I thought it was the perfect fit.

Mo Manning Lily Fairy front skrått

After using a die from My Favorite Things to add the faux stitch lines around the edge of my colored panel, I added Frosted Lace Stickles from Ranger to her wings for a little bit of sparkle. I adhered my panel onto a top fold card base I made from Sour Apple card stock from My Favorite Things.

Mo Manning Lily Fairy detail

Embellishment clusters have become a signature of mine, and I have five things that I pretty much always use to create them:

  1. White mini paper doily from Doodlebug Design.
  2. The Fishtail Flag Frames die set from My Favorite Things.
  3. The Happy Days Ticket Stubs die from XCut.
  4. Scraps of patterned paper.
  5. Enamel dots or sequins.

I keep a tub on my desk with die cut patterned paper scraps where I’ve used the two die sets I mentioned. The other day I even took the time to sort through them and divide them by color, which will make it easier to pull the ones I need for future cards. For this one I used two additional dies: a hole pattern die from Papirdesign and a die from the Itty Bitty Strips die set from My Favorite Things for the sentiment.

Mo Manning Lily Fairy flatlay

The sentiment is from a stamp set from InkyWings, heat embossed in white onto Sour Apple cardstock from My Favorite Things. I’ve added 1 mm foam squares between some of the layers in my cluster for a little bit of dimension, and I even put a mini cluster in the opposite corner, using scraps from the bigger cluster. I really like using as much of my cardstock and patterned paper as I possibly can, and by doing it this way, very little goes to waste. The patterned paper I used for these clusters is a mix of 3ndypapir, P13 and Sunny Studio, and I found the perfect color of enamel dots from Papirdesign as a finishing touch.

Mo Manning Lily Fairy Copics

Very limited color palette for this one.

Surprise {Mo’s Digital Pencil}

Hi, there! I can’t believe it’s May and the last month of spring already. It doesn’t really feel like spring, though, it’s still really cold with snow in the forecast for today. What do I do when it’s cold? I escape by coloring summery images, like this I like you image from Mo’s Digital Pencil.

Mo Manning I like you front

For someone who claims that her favorite color is blue, I haven’t really used a lot of blue lately. It might have something to do with the fact that I associate blue with Christmas, but it might also be that I’ve found myself a new favorite. A double favorite, even. I’ve used the combination of teal and peach on so many of my cards lately, I might have to put away those markers for a bit and try some other colors. 😉

Mo Manning I like you front skrått

I changed up my teal combo a little bit for this girl and even introduced a green in my combo, making her shirt super light in the highlight areas. I even tried a new combo for her hair, which matched surprisingly well with those yellow flowers she’s holding. Once I was done coloring, I used the largest of the A2 Stitched Rectangles STAX dies from My Favorite Things to turn my colored piece into a panel with nice faux stitch edges.

Mo Manning I like you cluster

On my desk I keep a tub of die cut paper scraps that I use for my embellishment clusters. I dug through it and found various pieces that I thought would fit this card well. They’re from a mix of companies: Maja Design, Studio Light, P13 and Sunny Studio. I love creating these clusters, they’re so fun to put together, and a great way to make use of scraps (not that my pile of scraps shrinks too much with each card). At the bottom is part of a mini paper doily from Doodlebug, and I added some enamel dots from the Warm and Cozy set from Altenew to finish.

Mo Manning I like you flatlay

I white heat embossed the sentiment from the Hilsninger stamp set from Norsk Stempelblad AS and die cut that using the smallest of the fishtail flag frames dies from My Favorite Things. After chopping off the overhang, I had a little piece of that doily left and the end of the sentiment banner, which I adhered in the bottom left corner of the card. I like not wasting my scraps, and this is a great way to use them.

Mo Manning I like you flatlay venstre

Most of the pieces in my embellishment cluster are mounted on 1 mm foam squares for dimension. Foam without a ton of dimension is key for this, otherwise the card gets super thick from all the layers.

Mo Manning I like you Copics

Quite a few Copics for such a simple image.

Birthday card galore {Hobbykunst}

Hi, there! Remember the 4 bar birthday cards I shared a couple of weeks ago? Well, I have another batch today. Still using the Happy birthday collection from P13, still all 4 bar cards.

HK P13 Happy Birthday kanin med hatt front

I’m starting with what’s probably the simplest one, certainly the cleanest one. I die cut a wonky grid from white card stock and adhered it directly to the card base, before adding the fussy cut bunny with foam tape.

HK P13 Happy Birthday kanin med hatt front skrått

I stamped and white heat embossed a sentiment from the Bitty Bears stamp set from My Favorite Things and popped it up using foam tape, before adding some clear crystals from Little Things from Lucy’s Cards in clusters to the background. I even fussy cut another, smaller bunny and glued him to the inside of the card, which you can sort of see in this photo.

HK P13 It's Pawty Time panda med cupcake front

This card looks a little bit busier, simply because I added some patterned paper to the background. Once again I adhered the fussy cut image using foam tape.

HK P13 It's Pawty Time panda med cupcake front skrått

I white heat embossed a sentiment from the Pawty Time stamp set from My Favorite Things, added it with foam tape and finished off with a few clear crystals from Little Things from Lucy’s Cards.

HK P13 Sjonglerende mus front

This is probably the most involved of the cards, simply because I created a faux stitch rectangle from the patterned paper in the background, instead of just leaving it plain and letting it cover the entire card base.

HK P13 Sjonglerende mus front skrått

I used a Papirdesign die to create the white die cut going across the center of the card, and added my fussy cut piece using foam tape. The sequins used for this card are from the White Orchid Sequin mix from Little Things from Lucy’s Cards.

HK P13 It's Time to Party elefant med ballonger front

An elephant with some balloons, ready to party is next up. I used part of a die cut to span across the card for a little texture in the background, before adding the elephant with foam tape.

HK P13 It's Time to Party elefant med ballonger front skrått

The sentiment is from the Bitty Bears stamp set from My Favorite Things, and I added a few pearl white crystals from Pretty Pink Posh for a finishing touch.

HK P13 Happy Birthday katt tiger med vimpler front

Die cut patterned paper in the background for this one, with that faux stitching I love so much. Once again, lots of foam tape behind the image.

HK P13 Happy Birthday katt tiger med vimpler front skrått

Sentiment from the Bitty Bears stamp set added using 1 mm foam squares, with a few Papirdesign enamel dots to finish.

Quick, simple birthday cards {Hobbykunst}

Hi, everyone! I have a few cards to share today, mostly focusing on patterned paper from P13 and their Happy birthday collection. All the cards are 4 bar size, and they’re all pretty similar, using sheets 1-6 from the collection from P13. They number their patterned papers, they don’t name them.

HK P13 Go BIG on your birthday front

My first card is the only landscape one. I covered the card base with that yellow patterned paper and added a white die cut on top. I fussy cut the boy with the present and mounted the image on foam tape, before adding a sentiment strip with additional pieces of foam tape for even more dimension. The sentiment is from the Pawty Time stamp set from My Favorite Things. I finished off the card with a few sequins from the White Orchid Sequin mix from Little Things from Lucy’s Cards.

HK P13 Gratulerer med dagen cupcake med banner front

Card number 2. Covered up the card base again, this time with a patterned paper that barely even has a pattern on it. It’s white with a dotted grid printed in yellow. I die cut the wonky square grid pattern from some of the red patterned paper and adhered it in the center of the card.

HK P13 Gratulerer med dagen cupcake med banner front skrått

I mounted a fussy cut image onto foam tape in the center of the card, and a sentiment strip on top of that with even more foam. The sentiment is from Mathia, heat embossed in white on a piece of red pattened paper. I added a few Pearl White crystals from Pretty Pink Posh to finish the card.

HK P13 Happy Birthday barn med krone front

This one is pretty similar to the last one. I die cut the wonky grid from yellow patterned paper, and adhered it directly to the card base on the left hand side of the card, before adding the fussy cut image with foam tape.

HK P13 Happy Birthday barn med krone front skrått

I stamped and white heat embossed a sentiment from the Bitty Bears stamp set from My Favorite Things and added it with foam tape on top of the image, before finishing off with some raindrops from the Crystal Collection from Little Things from Lucy’s Cards.

HK P13 Happy Birthday elefant med is front

How festive is this elephant balancing an ice cream cone? I used the white patterned paper with the yellow dotted grid lines for this one as well as a die cut hole pattern that I tore at the egdes.

HK P13 Happy Birthday elefant med is front skrått

I adhered the fussy cut elephant using foam tape, and a sentiment strip using some 1 mm foam squares, before finishing off with a few sequins from the White Orchid Sequin mix from Little Things from Lucy’s Cards.

HK P13 Happy Birthday kanin med ballong front skrått

This last one also has the hole pattern with torn edges, I think it adds a little more playfulness and interest to these very simple cards. I adhered the fussy cut image with foam tape for this one too. I like that little bit of dimension. I even used my thick foam tape for the sentiment on this one, so this card is extra dimensional.

HK P13 Happy Birthday kanin med ballong front

Heat embossed sentiment strip once again, and as with so many of the other cards, I used the Bitty Bears stamp set for that. Finished off with a few Pearl White crystals from Pretty Pink Posh.