Thanks a bunch {Purple Onion Designs}

Hi, there! I have another card to share today featuring new goodies from the latest release over at Purple Onion Designs.

Purple Onion Designs Junie thanks a bunch front

Isn’t this bunny with her bouquet of flowers adorable? Look at that sweet smile. I love Stacey Yacula’s illustration style, she really brings her characters to life. This is Junie. I colored her with my Copics and decided to fussy cut her.

Purple Onion Designs Junie thanks a bunch front angled

I pulled out a piece of patterned paper from the Dots & Stripes Pastels pack from Sunny Studio and cut it down to a strip, using one of the Stitched Borders dies from Lawn Fawn on both sides for a nice finished look. I die cut a white card stock circle using a die from My Favorite Things, and mounted it on foam tape.

Purple Onion Designs Junie thanks a bunch flatlay

I stamped and white heat embossed one of the sentiments in the “Around the Town” sentiment set on a piece of Melon Berry card stock and mounted it on foam tape, before adding my bunny with some 1 mm foam squares on top of the white circle.

Purple Onion Designs Junie thanks a bunch detail

I finished my card by adding some Pretty Pink Posh sparkling clear sequins in a visual triangle around the circle and bunny.

Purple Onion Designs Junie thanks a bunch Copics

Small image equals a limited color palette.

Are you sure you’re a year older? {Mo’s Dream Team}

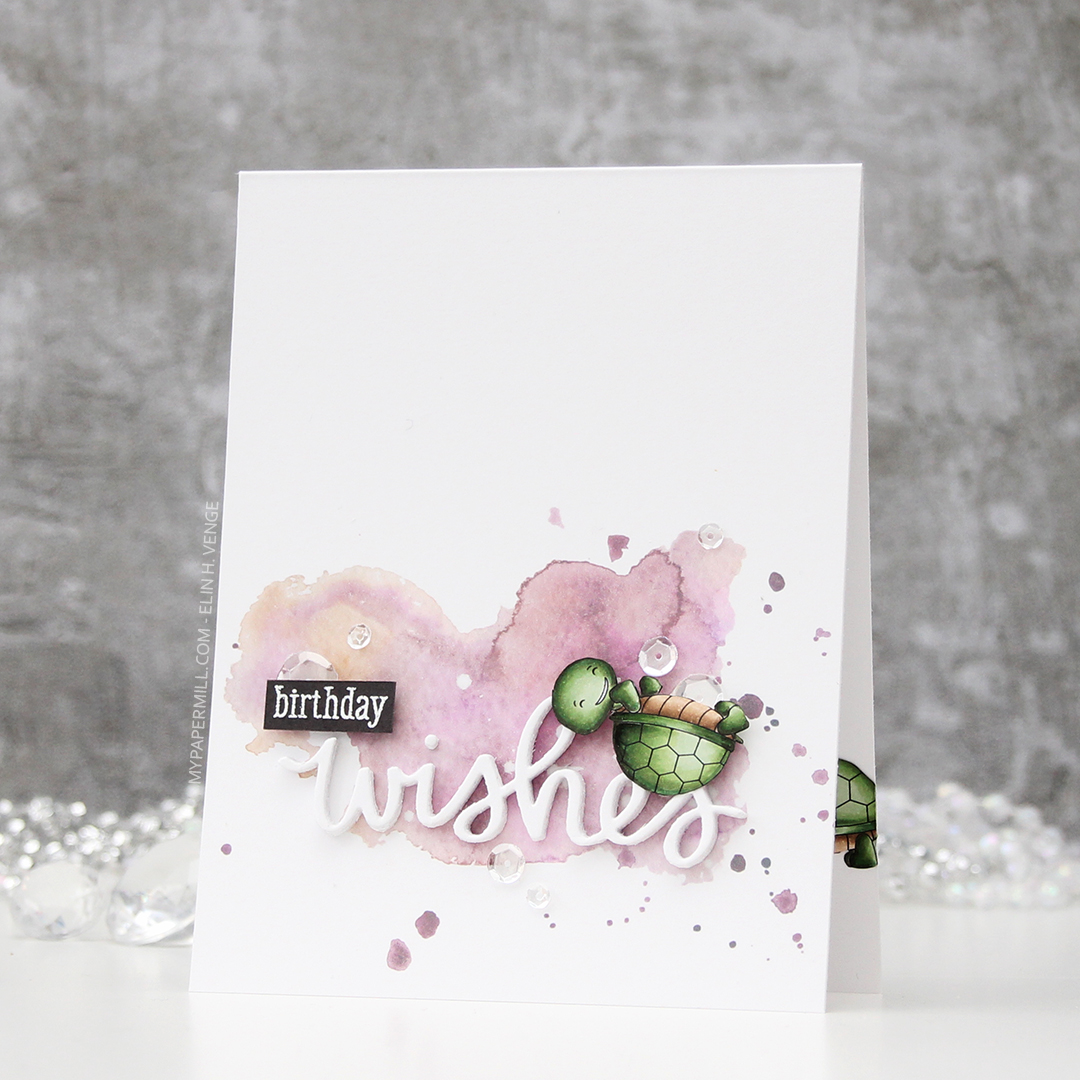
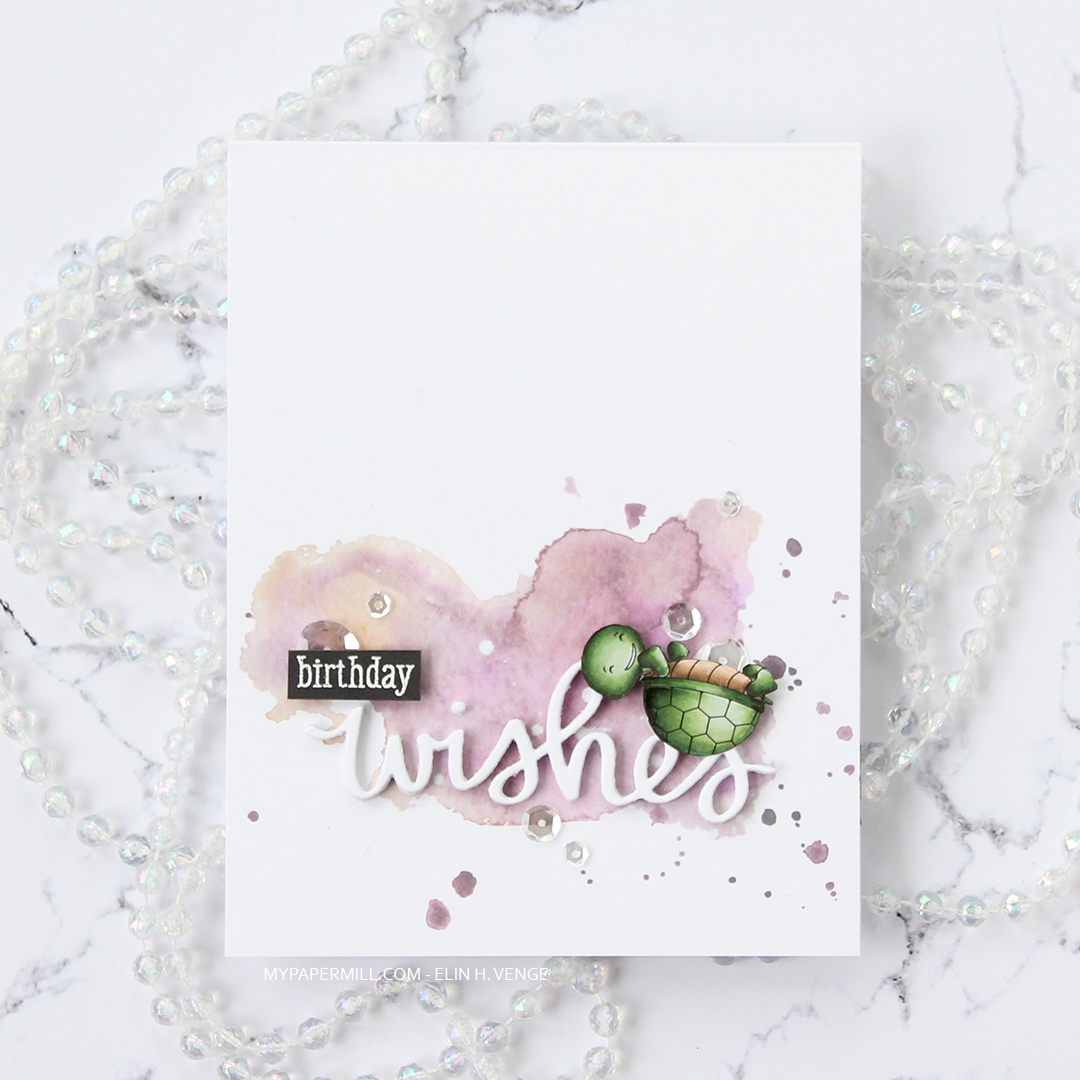
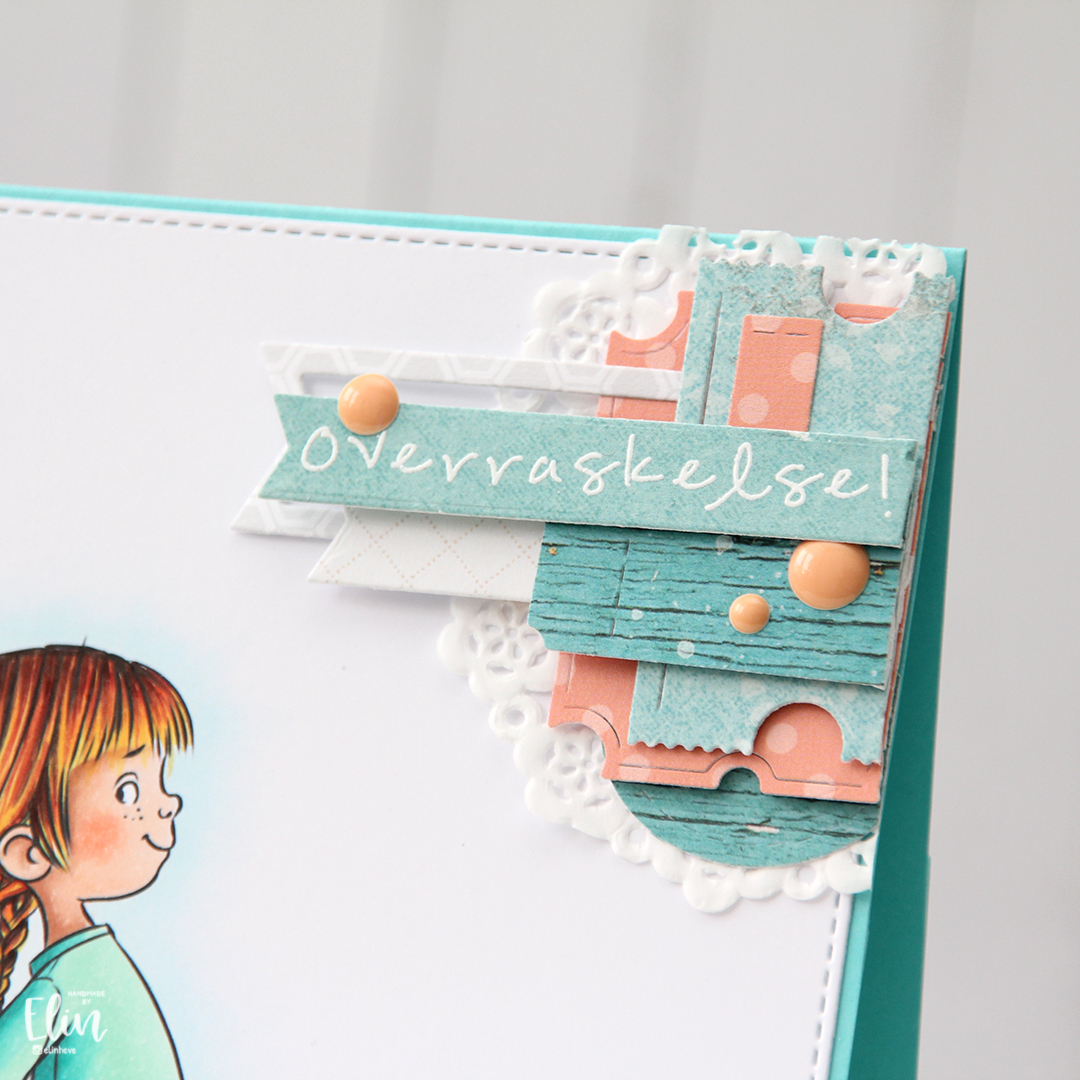
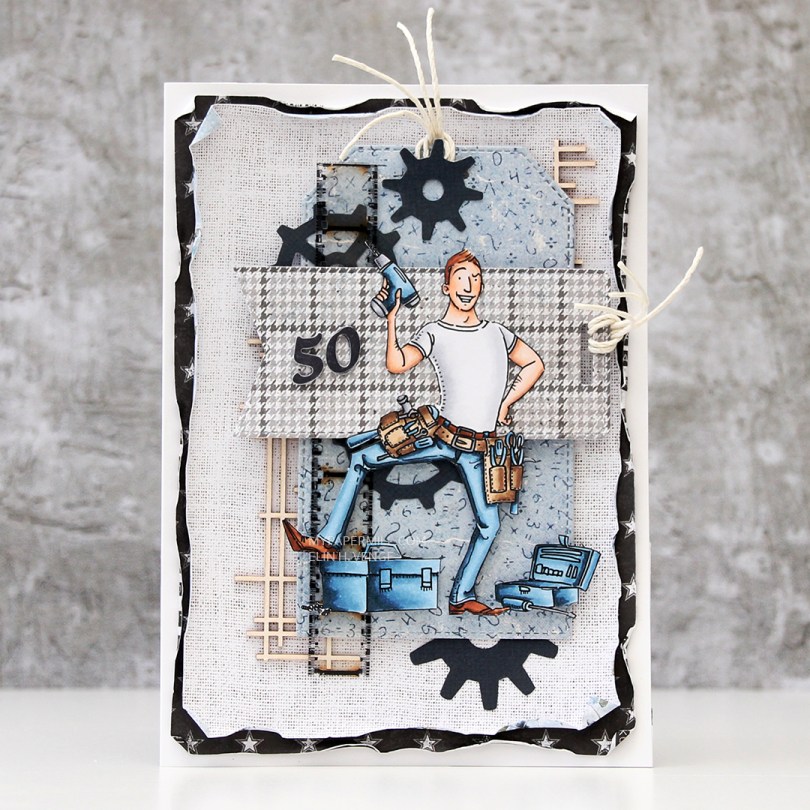
Hi, there! It’s Wednesday again, and you know what that means. Time for another Mo Manning creation around here. This time, I’ve kind of gone back to my roots, but not really. It’s a layered card, which used to be the norm for me, but the image is fussy cut, which most certainly has never been my signature.

Mo Manning Mr Fixit Morten 50 front

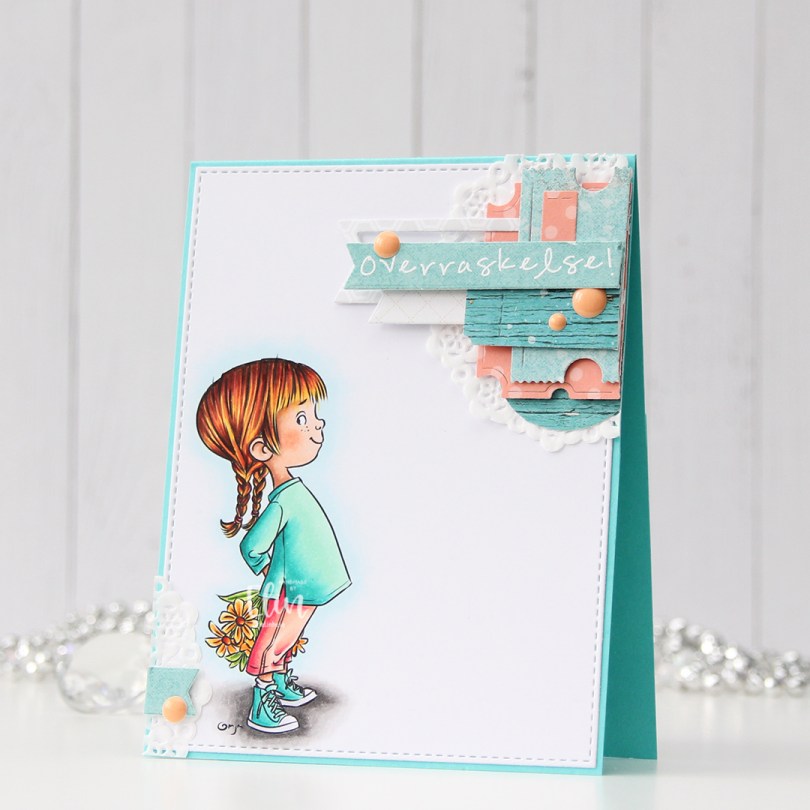
I received an order for a 50th birthday card for an electrician. The card needed to be “messy”, which is kind of difficult for me. My usual style is pared back and very simple, I just don’t have enough elements on my cards to be able to make a mess of any kind. Thus going back to my roots of using lots of patterned paper. I colored up Mr. Fixit in my favorite colors and fussy cut him.

Mo Manning Mr Fixit motiv

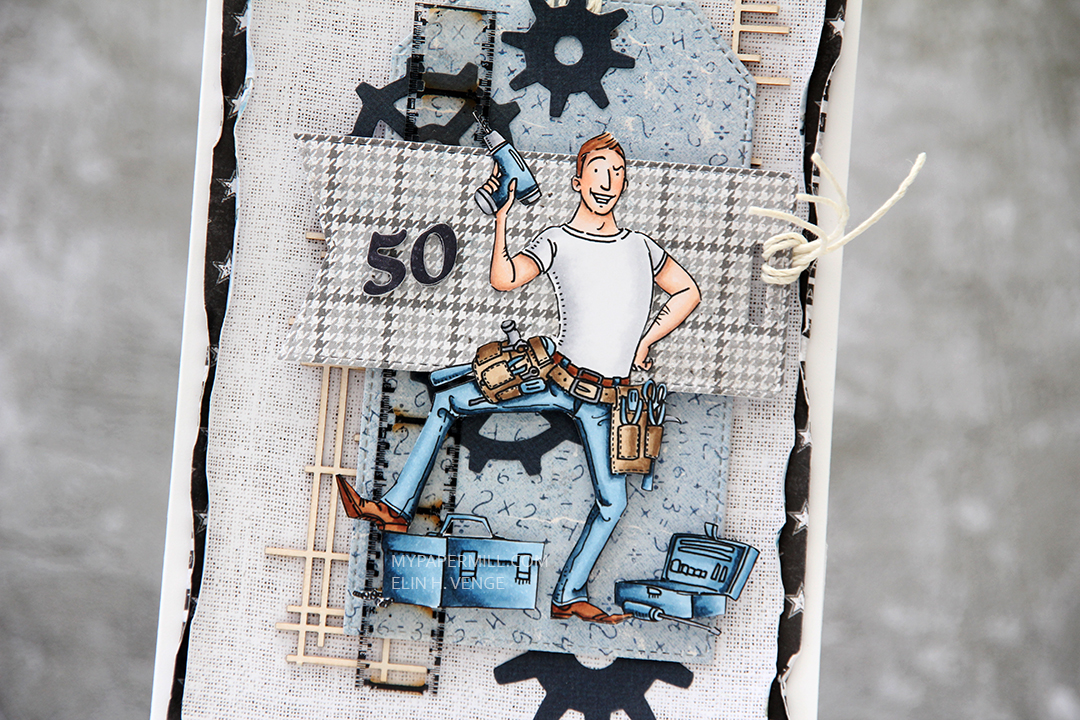
I had to go looking for inspiration online. The last “old style” card I made was in June of last year, which means I’m rusty. I found a card I liked and used it as a guide to create this one, which is actually an A7 card (5×7″). I dug through my patterned papers, both 12×12″ sheets and scraps, and found a few from Papirdesign, Maja Design and a small scrap from My Mind’s Eye that I used to die cut the gears and numbers. I arranged all the elements on my card, some using foam tape and others adhered straight down, and wound up with this. I used old dies from Sizzix for the gears, forcing me to pull my BigShot out of retirement for a few minutes. Those dies are too thick for my Gemini Jr., which is the machine I use for nearly all my die cutting. The last time I used my BigShot was over two years ago, so there’s a reason it’s retired in the closet. I added a piece of Snip Art chipboard and a film strip piece from Tim Holtz for a little bit of added interest and something that wasn’t just made of paper.

Mo Manning Mr Fixit Morten 50 innside

On the inside, I adhered left over pieces of the gears, just to use it all, and stamped a sentiment from Norsk Stempelblad AS using Dark Indigo ink from Papertrey Ink. There’s plenty of room on the right for a personal message, this is a side fold card (another anomaly from me, I prefer top fold).

Mo Manning Mr Fixit Morten 50 bakside

On the back of the card, I repeated a lot of the elements that I used on the front. The tag dies I used are from My Favorite Things, and I used my recently acquired personal stamp from Create a Smile on one of the die cut tags, stamped in Dark Indigo ink.

Mo Manning Mr Fixit Morten 50 Copics

Not a lot of Copics used for this one, I mostly stuck to blues.

You cake my day! {Rachelle Anne Miller Creative Studios}

Hi, there! I have a simple card to share today, featuring the Birthday Cake image from Rachelle Anne Miller.

Rachelle Anne Miller Birthday Cake front rett

I colored up the image with Copics in super bright colors. I used a border die from Lawn Fawn to add faux stitching above and below the image, and put lots of foam tape on the back.

Rachelle Anne Miller Birthday Cake front skrått

I used the quilted backdrop die (also from Lawn Fawn) to die cut from a piece of Raspberry Fizz card stock from Papertrey Ink. The piece I used wasn’t big enough to cover a regular size card front, so I adhered it to a white top fold card base and cut off the excess white, before adding my colored piece on top. The card measures around 5 1/8 x 4″. I added a few clusters of 2 mm and 3 mm pearls from Kort & Godt to the colored panel, a little bit of Lemon divine twine tied in a bow at the fold, and my card was finished. Super simple, right?

Rachelle Anne Miller Birthday Cake Copics

A nice little Copic selection.

Christmas time {Mo’s Digital Pencil}

Hi, there! Another Wednesday’s come around, which means another Mo Manning creation. Today, I actually have a Christmas card to share. Christmas is only 8 months away, time will fly.

Mo Manning Winter Delivery front

I’m getting close to the end of the alphabet of my previously unused images from Mo Manning. I have close to 400 digital stamps from Mo, and it’s a pretty good feeling to have used nearly all of them. This is Winter Delivery, a cute hatted squirrel carrying a bag of acorns through the snow.

Mo Manning Winter Delivery flatllay venstre

I colored the image with my Copics, before taking out my most used cluster dies and scraps of patterned Christmas paper from Maja Design (and that sentiment strip from Papirdesign) to create a tiny cluster in the top right corner. I used part of a Doodlebug doily at the bottom, a branch die cut with a Papirdesign die, as well as tickets die cut using the Happy Days Ticket Stubs die from XCut (Docrafts) and the Fishtail Flag Frames dies from My Favorite Things. I used another favorite MFT die to die cut the panel with the squirrel, before adding it directly to a side fold landscape card base made out of Soft Stone card stock from Papertrey Ink. I rarely make side fold cards, but I had a piece of card stock already cut to 4 1/4 x 11″, and it made more sense to fold that down the middle rather than pulling out a new sheet to make a top fold card.

Mo Manning Winter Delivery Copics

Simple color palette today.

Precious baby boy {Lili of the Valley}

Hi, there! I have a baby card to share today, featuring the Baby Swing image from Lili of the Valley.

Lili of the Valley Baby Swing front rett

I colored in the image with Copics and put it aside while I worked on the rest of the card. I had an old discarded panel of Aqua Mist card stock from Papertrey Ink that I’d already dry embossed using the Quilted Backdrop die from Lawn Fawn, and decided it would be perfect for this card. I used the largest of the A2 Stitched Rectangles STAX dies from My Favorite Things to turn it into a panel with a nice edge, and I used the Selfie Square die, also from My Favorite Things, to create my window.

Lili of the Valley Baby Swing front skrått

Using a craft knife, I cut into my colored panel so I could get the legs of the bunny on the outside of my window panel, which I added to my card base using lots and lots and lots of foam tape. Dimension is life!

Lili of the Valley Baby Swing flatlay venstre

I die cut a few clouds from white card stock using a die set from Papertrey Ink, and stamped a sentiment from Norsk Stempelblad AS onto one of the clouds in Hawaiian Shores ink, also from Papertrey Ink.

Lili of the Valley Baby Swing flatlay høyre

I added the clouds using foam squares, and embellished ever so slightly with sequins and confetti stars from the Sea Glass mix from Little Things from Lucy’s Cards to finish my card.

Lili of the Valley Baby Swing Copics

Simple color palette for this one.

Miss you, my friend {Streamside Studios}

Hi, there! I’m sharing a very simple card today, featuring this rainbow image from Streamside Studios.

Streamside Studios Rainbow front rett

I colored in the image with a whole bunch of different Copics, I kind of went overboard for this one. I knew I wanted a frame around the image, so I colored the background as well.

Streamside Studios Rainbow front skrått

I stamped and white heat embossed a sentiment from the Leaf Clusters stamp set from Altenew on the heart. The red color is dark enough for the white to stand out, and the size of the stamp was perfect. I dry embossed the card base using the Watercolor Stripes stencil from Altenew, I wanted a little interest in the background, without it being too distracting.

Streamside Studios Rainbow flatlay venstre

I die cut one of the dies in the Stitched Rectangle Scallop Edge Frames die set (that’s a mouthful) from My Favorite Things four times from white card stock and stacked them for a dimensional frame on top of my colored panel, and adhered the frames with the colored panel in the center of the card front.

Streamside Studios Rainbow flatlay høyre

I added Wink of Stella to the stars in the stamp, but I forgot that I’d put water in my brush, and the printed lines of the stamp started bleeding. I was not about to start over, so I dug through my stash of card stock and found a scrap of Harvest Gold card stock from Papertrey Ink that I die cut using the stars in the Say What? Gift Tags die set from Lawn Fawn. I stacked the stars for dimension and added a little bit of Copic Y17 and Y00 to them, so they have a little bit of a gradient and don’t look too flat.

Streamside Studios Rainbow Copics

Like I said – lots and lots of Copics!

I adore you {Lili of the Valley}

Hi, there! I have a simple card with a fun technique to share today, featuring the pencil sketch version of Grace Beauty from Lili of the Valley. I love the pencil sketch versions of these images, and I’ve done some faux watercoloring for this one.

Lili of the Valley Grace Beauty front rett

I printed the image onto Fabriano Artistico Extra White watercolor paper and did some Copic coloring. Yes, this is done with Copics, but not with the markers. Copic markers and watercolor paper are a bad match, the paper will ruin the nibs. I thought these sketchy images would be perfect with watercolor, but my printer and watercolor aren’t a good match either. That, and my watercolors still scare me. What never scares me are my Copics, so I filled a little bit of Copic blender solution into a water brush (one that I’ve designated for use with Copics) and used that as my paint brush, picking up drops of refill in various colors from a smooth, slick surface.

Lili of the Valley Grace Beauty front skrått

It’s not as precise as regular Copic coloring, but it’s a pretty fast, forgiving technique, and it’s a lot of fun to get more uses out of the markers (and the refills). It ticks all the boxes for me. I get the watercolor look that I like, without having to wait for things to dry (because the alcohol in the Copics evaporates a lot faster than water does), I can “watercolor” digital images with Copics because the ink won’t bleed. You don’t need a lot of colors either, and if you don’t have the refills, you can use the actual marker to scribble onto an acrylic block or another slick, non absorbent surface. One of these days I’ll practice coloring regular stamps with my actual watercolors, I just have to carve out the time. Even though they scare me, my watercolors don’t deserve to just be sitting unused in their palette, that’s not the reason I bought them.

Lili of the Valley Grace Beauty flatlay venstre

I wanted to let the image shine and kept the card pretty simple. I used a rectangle die to cut a window in the center of a panel, mounting the negative on foam tape to frame the image.

Lili of the Valley Grace Beauty flatlay høyre

I glued a couple of pieces of a mini doily from Doodlebug into the corners of my colored piece. I just wanted a little something. These go well with the soft look I was going for. I stamped a sentiment from the Leaf Clusters stamp set from Altenew in Soft Granite ink from Hero Arts onto a scrap piece of Sweet Blush card stock from Papertrey Ink, and added it in the top left corner, along with some pearls from Little Things from Lucy’s Cards. The pearls are the perfect matching color, they were a sampler pack in a big order I placed from her a while back, so unfortunately, I don’t know the color name.

Lili of the Valley Grace Beauty Copics

When I do normal Copic coloring I tend to go overboard and use a ton of colors to achieve the look I’m after. With faux watercolor, it’s the opposite, the color palette is always very limited, because I can get a lot of gradient with just one color, depending on how much I dilute it with the blender solution in the water brush. The pink on her dress, the bows in her hair and the flowers is all made with just R43, I’d never be able to achieve this ombré effect using just one color with the markers themselves.

Christmas greeting

Hi, there! You probably aren’t thinking of Christmas cards yet. We’re still in early April and Easter just ended, but I looooove making Christmas cards all year and have one to share today. Not very traditional with a sheepdog on the front, but I know just who to send this to.

Mo Manning Christmas Sheepdog front rett

I colored up Christmas Sheepdog (with hat) very quickly using my Copics. There’s also a version without the hat. I colored the fur uneven and streaky on purpose. I didn’t want to take the time to do real fur, but I also didn’t want it completely flat.

Mo Manning Christmas Sheepdog front skrått

After die cutting my colored piece to a rectangle with faux stitching around the edge using a die from My Favorite Things, I adhered it directly to a top fold card base made out of Soft Stone card stock from Papertrey Ink. Initially, I wanted green, but none of my green card stock colors were a good match (green is tricky), and this grey from Papertrey Ink is beautiful!

Mo Manning Christmas Sheepdog flatlay

I pulled out my usual cluster supplies – mini paper doily from Doodlebug Design, the Happy Days Ticket Stubs die from XCut and my Fishtail Flag Frames dies from My Favorite Things. They’re staples whenever I make embellishment clusters.

Mo Manning Christmas Sheepdog front høyre

Rummaging through my drawer of Christmas patterned paper scraps, I found these lovely green ones from the Christmas in Norway collection from Pion Design, and used the dies to cut out a few pieces to go on my card. I also used a die from Papirdesign to die cut a pine branch, just to add something different to the mix.

Mo Manning Christmas Sheepdog flatlay venstre

I stamped a sentiment from Norsk Stempelblad AS onto one of the banners, heat embossing it in white, before assembling my cluster and adding it to the card with foam squares to build up the layers. I added a few snowdrift sprinkles from Little Things from Lucy’s Cards, and the card was finished.

Mo Manning Christmas Sheepdog Copics

Very limited color palette for this one.

Hello my friend {Hobbykunst}

Hi! I have a floral card to share today, featuring a gorgeous magnolia blossom from My Favorite Things.

mHK My Favorite Things Magnolia Blossoms front rettI stamped the flowers in fadeout ink from Inkon3, before coloring them in with Copics and fussy cutting up to the line.

HK My Favorite Things Magnolia Blossoms front skråttI splattered some white liquid watercolor from Hero Arts onto a panel of Soft Stone card stock from Papertrey Ink, before adding the panel onto my card base using lots of foam tape. I put 1 mm foam squares behind the flowers and adhered them onto the gray panel.

HK My Favorite Things Magnolia Blossoms flatlay venstreI die cut Hello three times from white card stock and stacked the die cuts for dimension. The die is from a die set that came with my Gemini when I bought it two years ago, and this is the first time I used it. It has a swirl going down at the bottom of the H that connects to the o, but I chopped that off. 

HK My Favorite Things Magnolia Blossoms flatlay rettI stamped and white heat embossed a sub sentiment (from the Leaf Clusters stamp set from Altenew) onto Smokey Shadow card stock from Papertrey Ink, and added an additional two strips of card stock behind it for dimension, I wanted it flush with the die cut word above it. 

HK My Favorite Things Magnolia Blossoms flatlay høyreI added sequins from the White Orchid Sequin mix from Little Things from Lucy’s cards on or near the flowers and the sentiment, and my card was complete.

My Favorite Things Magnolia Blossoms CopicsJust a few Copics for this one. 


Birthday wishes {Purple Onion Designs}

Hi, there! I have a wintery slimline birthday card to share today, featuring an adorable hedgehog from Purple Onion Designs.

Elin Venge - Timothy and Snow Day Hill birthday wishes

Timothy is part of the Sweetest Little Town collection released back in October, and I think he’s just the cutest little guy. I colored him up months ago, and my plan was to turn him into a gift tag. Plans change, and instead of a small gift tag, I went big with a slimline card instead, keeping the colors on the rest of the card subdued to really make him shine.

Elin Venge - Timothy and Snow Day Hill birthday wishes detail2

I stamped the Snow Day! Hill background onto a piece of X-Press It blending card using Stormy Sea ink from Papertrey Ink. The panel was wider than the stamp, so I repeated the very left part of the stamp to extend my background scene, also re-stamping the smaller cloud. I also selectively stamped and white heat embossed the word “birthday” from the Warming Winter Thoughts stamp set onto a piece of Stormy Sea cardstock to form part of my sentiment.

Elin Venge - Timothy and Snow Day Hill birthday wishes detail1

I used the slim card basics die set from Mama Elephant to die cut the background. I added three layers of card stock behind the frame, inlaying the “window” pieces so they’re set back, before adding the hedgehog with foam tape on top of one of the windows.

Purple Onion Designs Timothy Snow Day Hill die cut

I die cut the wishes die from Mama Elephant to create the rest of my sentiment. It’s four layers of Stormy Sea card stock, and another three layers of white card stock in the part of the word that spans across the windows.