Hi, crafty friends. We’re getting closer and closer to Christmas, and I think I’ve made more Christmas cards than I need this year (such a luxury to not have to scramble last minute), but I thought I’d sneak in another one anyway. This one features the Penguin Friends image from Lili of the Valley. You know I can’t resist penguins!
 I colored up my penguins with Copics, using a combo of red and teal for their hats and scarves. I’m not a fan of complementary colors, and I do my best to avoid using green with red, but teals, blues and greys all work well.
 I didn’t really have a card idea in mind when I printed my image, but I printed it towards the bottom of a 4 1/4 x 5 1/2″ piece of X-Press It blending card. Once I sat down with my colored panel to actually create the card, an idea formed straight away. It doesn’t always happen like that, but I’m grateful every time it does. I created a card base from Summer Splash cardstock from My Favorite Things, cut down my panel to 4 x 5 1/4″ and adhered it to the card base.
 Using a snowflake border die from Papirdesign, I die cut a snowflake border above their heads. I used the same X-Press It blending card for this as I wanted the whites to match. I die cut an additional two pieces, and glued them together for a stacked look. The die is actually meant for slimline cards, but it worked really well for this.
 I used the Sending You Hugs die from My Favorite Things to die cut my sentiment twice from Summer Splash cardstock. I used the negative piece of the die cut for placement, and layered my letters together for a little bit of dimension. On a piece of Amarena Cherry cardstock from My Favorite Things, I stamped and white heat embossed the word holiday from the Itty Bitty Holiday stamp set, also from MFT. I cut it down to a thin strip, added another layer of Amarena Cherry cardstock behind it for a bit of dimension and stability, and glued my little strip to the H in hugs, before finishing off the card with a couple of sequins from the Sparkling Clear mix from Pretty Pink Posh.
 I could have gone crazy with tons of colors for the accessories on these cute penguins, but I limited my color palette by keeping the coloring simple.
I haven’t joined any challenges in a while, but I really like the challenges from MFT, and this week’s sketch is a fun one. I hope most of the elements and placements from the sketch are recognizable in this card, so I thought I’d join the challenge.
 I colored in the image with my Copics, used the second largest die from the A2 Stitched Rectangles STAX Set 1 die set from My Favorite Things to create the wonderful stitching on the border of the colored piece and adhered it to a card base I created from Harvest Gold cardstock from Papertrey Ink. I clear heat embossed the Happy Birthday background stamp from MFT on the card base. I stamped a sentiment from the Scripty Bday set from Mama Elephant in VersaFine Onyx Black ink and clear heat embossed, turned it into a circle using a nesting die and adhered it to the card using foam tape, before finishing off the card with a few Sparkling Clear sequins from Pretty Pink Posh.
 I printed my image onto X-Press It blending card and colored the penguins with Copics, before sprinkling on chunky white embossing powder from Stampendous for a snowy look. I then die cut the Mega Snowflake Cover die from Mama Elephant three times; twice from white cardstock, once from Sno Cone cardstock from My Favorite Things. I glued them together and added my penguins to the back, before adhering everything onto a top fold A2 cardbase I created from Stamper’s Select White cardstock from Papertrey Ink.
 To keep the rest of the colors soft, I diecut the letters for HUGS three times from white cardstock using the Sending You Hugs die from MFT. I glued them to the bottom center of my card, and added a secondary sentiment that I stamped and white heat embossed on a strip of Cotton Candy cardstock, also from My Favorite Things. I added two more strips of cardstock behind for dimension and stability, before finishing off the card with a few Sparkling Clear Sequins from Pretty Pink Posh.
 I used probably way more gray markers than I needed to to create these penguins, but sometimes, that’s what I do.
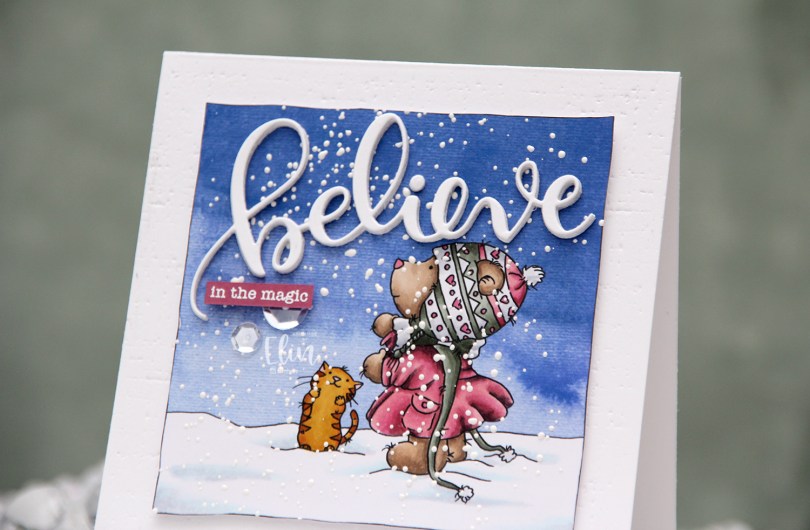

 I created a 4 1/2 x 4 1/2″ card base from Stamper’s Select White cardstock from Papertrey Ink and used an impression plate, also from PTI, to create subtle texture to the base. I put a few extra layers of cardstock behind my image and adhered it in the center of the card. I die cut the word believe using an older die from Simon Says Stamp four times from white cardstock and glued them together for a stacked, dimensional look in the sky above the bear. I finished off with a sentiment from Mama Elephant that I white heat embossed onto a strip of Autumn Rose cardstock from Papertrey Ink and embellished with a couple of Sparkling Clear sequins from Pretty Pink Posh.
 Super simple color palette. I don’t usually do reds or pinks for my holiday cards, but this muted pink combo has become a favorite of mine.
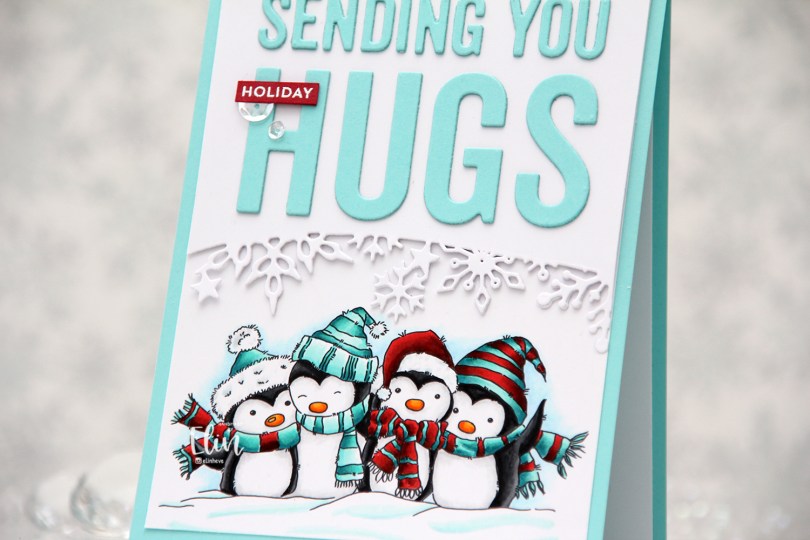

 I started by creating a watercolor background in Photoshop using a png from Lili of the Valley, before I added the Dinosaur Friends on top. No fuss and no masking, I love how easy it is to work with digital files. I printed my critters and background onto X-Press It blending card before I did Copic coloring. I wanted to match my coloring to the colors in the background.
 I used the largest die in the A2 Stitched Rectangles STAX 1 set from My Favorite Things to create a nice finished edge around my coloring, before I did partial die cutting using the Sending Big Hugs die, also from My Favorite Things. I made sure to only die cut the word HUGS from my colored panel, and die cut 3 more from white cardstock. I layered my white die cuts together, adhering the colored piece on top of each letter. I adhered my scene to a side fold cardbase I created from Amethyst Allure cardstock from Papertrey Ink, and puzzled each of the letters into their place.
 The letters are a bit chameleon like. You can’t see them very well from head on, but if you look at them from an angle, they pop into view a lot better. I added a layer of Glossy Accents to the letters so they would shine and stand out a bit more.
 Stacked die cut inlay is a great technique when you want to add a big sentiment without distracting too much from the focal point of the card. This HUGS word is pretty big, but because of the inlay, what you really notice are the colored critters.
 I added some Sparkling Clear sequins from Pretty Pink Posh to finish off the card. These are my favorite sequins; they go with everything, and my stash is running low, so I need to buy a new bag soon. They also last forever, I’ve had mine for years, used them a ton and am only now running low.
 Simple color palette for this one. Those BGs blend effortlessly!
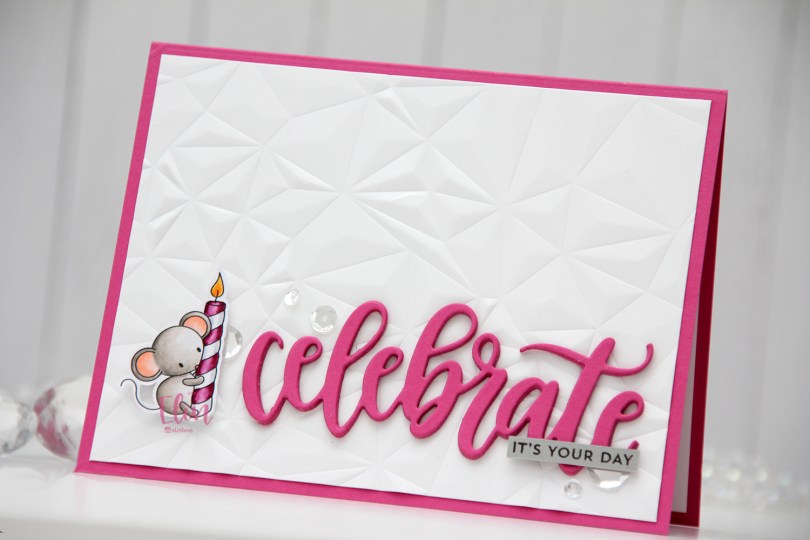
 In this stamp set there are five mice in different poses, there’s a giant piece of cake, a few accessories and some sentiments. I decided to focus on the mouse with the birthday candle for my card today. I usually color larger images, but these small ones from Streamside Studios are perfect for playing with different layouts for my cards.
 I colored the mouse very simply with my Copics, and did some fussy cutting, leaving a white border around the image. I usually prefer cutting right up to the lines, but with the tail and the wick on the candle being thin, single lines, that wasn’t going to happen.
 I created a top fold landscape cardbase from Ripe Raspberry cardstock from My Favorite Things and used the Crystal Distortion embossing folder from Simon Says Stamp on a piece of Stamper’s Select White cardstock from Papertrey Ink to create a textured background for all my elements to sit on.
 I die cut the Celebrate die from My Favorite Things four times from the same Ripe Raspberry cardstock that I used for the cardbase, and stacked them for a dimensional look. I stamped a sentiment from the Itty Bitty Birthday set from My Favorite Things using Smokey Shadow ink from Papertrey Ink onto a piece of Cement Gray cardstock from My Favorite Things and trimmed it down to a strip that I glued to my die cut word.
 I popped up the mouse using foam tape, and added sequins from the Sparkling Clear sequin mix from Pretty Pink Posh to finish my card. Super simple.
 Not a lot of Copics for this tiny image.
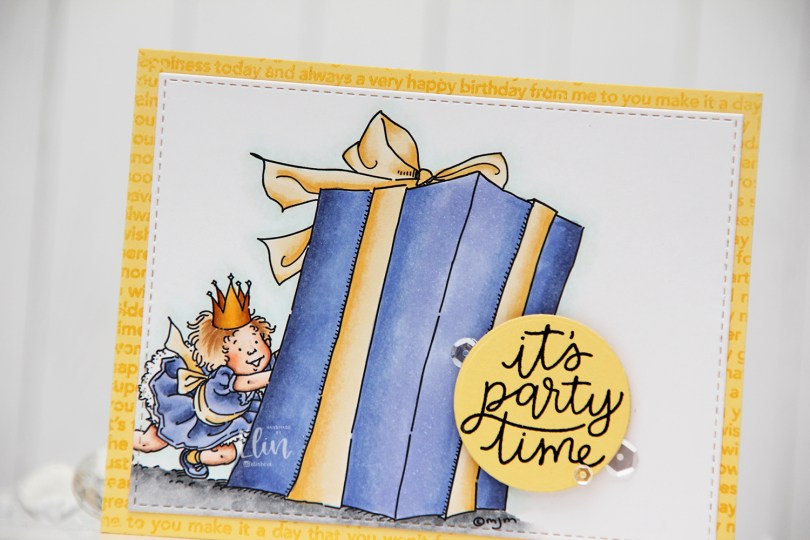
 I colored the image using a very soft color palette with my Copics. I didn’t write the colors down, so unfortunately, I have no fancy graphic to show you at the end of this post. I wish I did, though, because I really like the colors I used for this.
 I used the largest of the A2 Stitched Rectangles STAX 2 dies to turn my colored piece into a nice panel with the faux stitch edge I love so much. I decided to adhere it directly to my top fold card base, that I made from Berry Sorbet cardstock from Papertrey Ink. The color matches the darkest parts of her dress very well.
 Onto a separate piece of Berry Sorbet, I stamped and white heat embossed part of a sentiment in the
  I die cut part the word wish using a die from Mama Elephant. The die actually die cuts the word wishes, but I cut off the tail end of the word so I was left with just wish. I die cut four more from Grapefruit cardstock from Concord & 9th, and added them behind the top die cut for dimension. This makes the word lighter (and it makes it match the lighter parts of the dress) from the sides. I did the same with the sentiment strips above, making the strip and the stacked die cut flush.
 I finished off the card by adding a few sparkling clear sequins from Pretty Pink Posh. I used my scissors to cut the largest sequin in half to tuck it behind the sentiment strip.