Hi, crafty friends! Brace yourselves for a text heavy post. Every year, I seem to make more than enough Christmas cards to send out, but I always scramble last minute to get gift tags done. Not this year, I’ve made quite a few, and here are a couple more, featuring snowmen from the Snow Much Fun digi stamp set from Streamside Studios.
 For these tags (I’ll have more to share later), I did compartmental crafting. Tim Holtz always raves about this, but I usually sit down and create my cards from start to finish in one sitting. Actually, that’s not entirely true, I do prefer coloring one day and making the rest of the card another day. Coloring takes a while, and once I’m done with that, I’m not really in actual making and assembly mode.
For these tags I did things a little differently. I colored lots of snowmen at once using my Prismacolor Premier pencils. I usually use my Copics, they’re so much faster, but for this I wanted a less bright look, and printed my snowmen onto Rustic White cardstock from Papertrey Ink. In another crafty session, I used various stencils with different pastes to create textured backgrounds, which I later cut down to tags. For these two I used the Falling Snow slimline stencil from Simon Says Stamp and the Snowflakes stencil from Ciao Bella, both using Light & Fluffy Modeling Paste from The Crafter’s Workshop onto Classic Kraft cardstock from Papertrey Ink. Both of these stencils are fairly large, so I got several tags out of each of the backgrounds I created.
In yet another crafty session I stamped and heat embossed a bunch of different small sentiments from Norsk Stempelblad AS, as well as a god jul seal from Poppydesign, the seals in Gilded embossing powder from Brutus Monroe and the sentiments in White super fine detail embossing powder from Ranger. I used green cardstock from the Christmas in Norway collection from Pion Design, which is an older collection, and it was a great opportunity to shrink my pile of scraps a little bit. Most of the patterned paper pieces I’ve used for these tags are from the same collection, with a few being even older. I used my Happy Days Ticket Stubs die from XCut to create the small pieces that I clustered together. This is the same die I pretty much always use for my clusters on my cards. It’s one die that cuts out nine tickets, and it’s my favorite die to use for my scraps. They don’t look like scraps when they’re die cut. I also just cut some strips using my trimmer and tore the edges for an uneven look, and used a die from Altenew to create small die cut pieces of solid color to tuck behind my other elements to break up all the perpendicular angles a bit.
I used foam tape on some of my elements, but not all, and die cut a reinforcer from green cardstock using a die from My Favorite Things. To finish off I tied May Arts natural twine through the holes and added a charm to each of the tags.
 For the back of the tags I used a tag die from My Favorite Things to die cut from more of that Classic Kraft cardstock from Papertrey Ink. I die cut a bunch of tags in one session, so I’d have many to do at once when I did the actual assembly. I stamped an older Inkido stamp using Jalapeño Popper ink from My Favorite Things, and even did some second generation stamping. I also used a couple of stamps from the Distressed Patterns stamp set from MFT to add additional spatter beyond the 24.12 stamp. I used more of the scraps I die cut and cut with my trimmer, and stamped a to/from stamp from Inkido onto scraps of Pion Design patterned paper using Dark Chocolate ink from Papertrey Ink. First generation stamping on one, second generation on the other for a softer look. It was fun to break out acrylic blocks to use with my stamps again, I use my Misti for pretty much everything, but this didn’t have to be perfect or straight, so I just played and had fun!

 I started by ink blending directly on the card base. I used the Window Panes stencil from My Favorite Things, and Scattered Straw and Mustard Seed Distress inks.
 I stamped the image and sentiment using Obsidian ink from Altenew and did some very light pencil coloring using my Prismacolor Premier pencils. I used Goldenrod (1034), Yellow Ochre (942) and Cream (914) for the yellow, and Olivegreen (911) and Limepeel (1005) for the green. I decided not to add embellishments, so this is truly a one layer card, as everything is done on the card base itself.
 I stamped the wreath on a piece of Rustic Cream cardstock from Papertrey Ink, before coloring with pencils. Yes, you read that right, I broke out my Prismacolors and did pencil coloring. I don’t use my pencils very often. Copics are my “go to” coloring medium, but every now and then, I shake things up.
 I fussy cut around the finished piece, leaving a white border along the edge and cutting the open part at the top right as if my colored panel was a circle. I didn’t want to cut away the interior, and this seemed faster, easier and better. I created a 4 1/4″ square card base and used the Caleidoscope embossing folder from Simon Says Stamp to create a little bit of texture in the background, before mounting the wreath on foam tape.
 I stamped and white heat embossed a sentiment from the Mini Messages stamp set from Mama Elephant onto a piece of Cornflower cardstock from My Favorite Things, before using a nested circle die to turn it into a circle. I put a few foam squares behind it and adhered it to a part of the wreath where it wouldn’t cover up too many of the flowers.
 To finish the card, I added a generous amount of Papirdesign pearls for some shine.
 The process for creating this one was identical to the first ones I shared in
  There’s lots of texture and visual interest on this tag because of all the layers of paper, the foam tape to add dimension and the stenciled background. The accessories on the snowman are in a brighter green color than everything else on the tag, which still makes him stand out against the other elements.
 For the back of the tag I used a couple of stamps from Inkido, as well as more of the white heat embossed sentiments from Norsk Stempelblad that I created lots of in one of my compartmental crafty sessions. These tags were heaps of fun to put together like this.
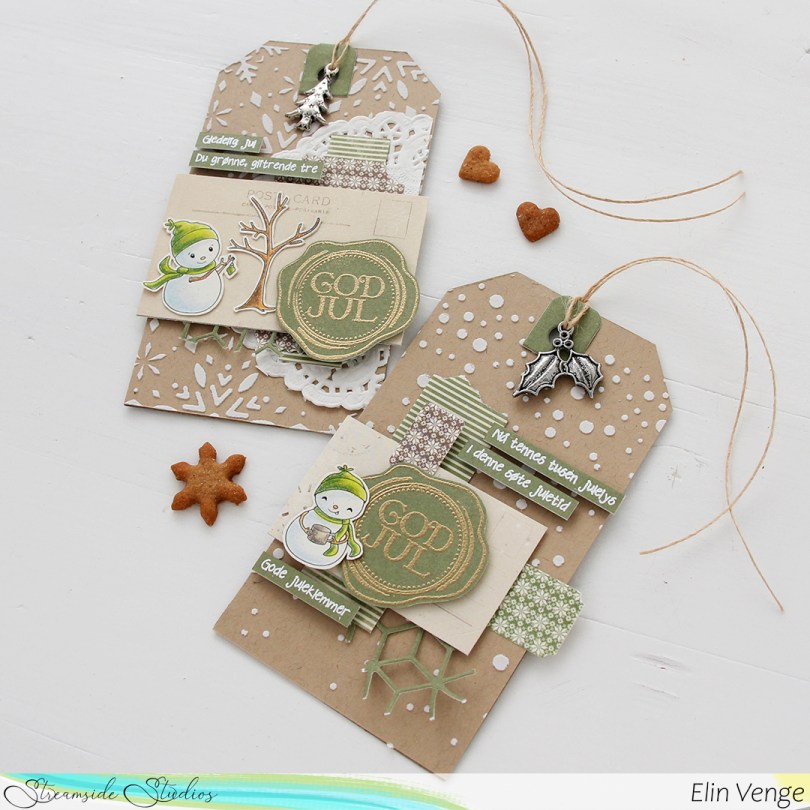

 I actually colored this in May last year. I keep my colored image in stamp storage sleeves from Tim Holtz. They’re super sturdy and you can put a lot of colored images in one pocket. They come five in a pack, which is perfect for me, that way I can dedicate each sleeve to one design team, since I’m currently on five design teams. Sometimes, I just want to color without having to turn it into a card right away, and sometimes I just want to make a card, but don’t feel like coloring, or simply don’t have time to do both. Compartmental crafting for the win.
 I mounted my colored panel using foam tape and adhered it to the center of the card. I felt like it was missing something and needed a little bit extra. Mini paper doilies from Doodlebug Design to the rescue. I love these mini doilies, I use them often. And you don’t need the whole doily, either, I just used two small pieces for this card, and there are 75 doilies in one pack, they last forever. Onto a piece of Blue Breeze cardstock from MFT I stamped a Norsk Stempelblad AS sentiment using Blueberry Sky ink from Papertrey Ink. I cut it down to a 1″ circle using a circle punch from EK Success, added it to my card using foam tape and finished the card with a few pink enamel dots from Papirdesign.
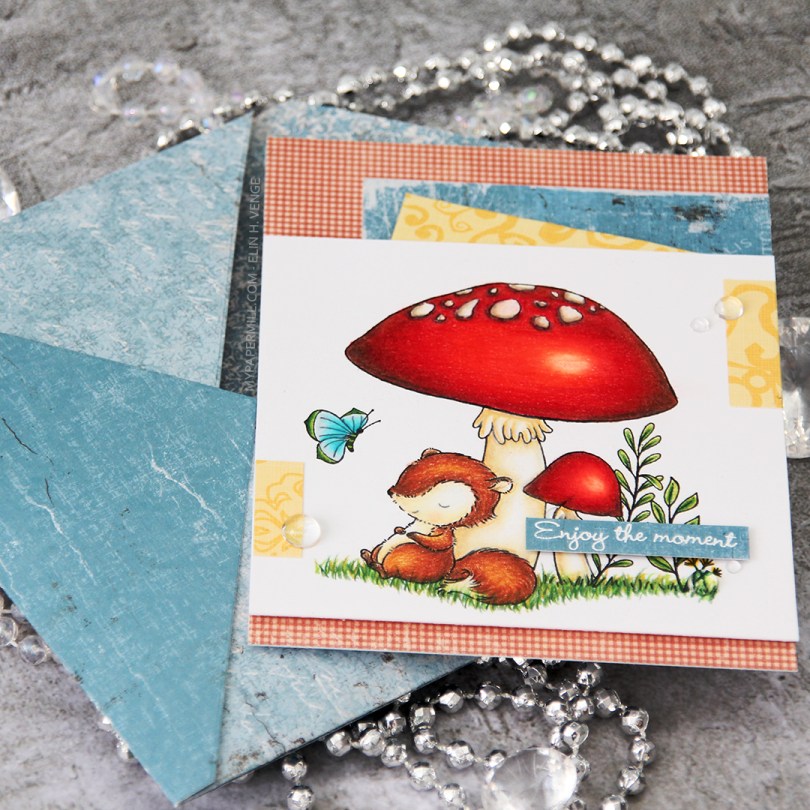
 This little fox scene is from the Always Bring a Smile set, designed for My Favorite Things by Stacey Yacula. I really love her characters, they’re so full of life, and this little guy looks like he’s taking a well deserved nap against the stem of that big mushroom. I actually stamped this on Stamper’s Select White cardstock from Papertrey Ink and pulled out my Prismacolor pencils to color him in for day 2 of the current round of Kathy Racoosin’s 30 day coloring challenge.
 I found some scraps of patterned paper in my stash (the red is from Pion Design, the tealy blue from Maja Design and the yellow from Chatterbox) and added them here and there on my card, before propping my panel with the cute fox onto the card front using foam tape. Lots of foam tape, I wasn’t shy! I stamped and white heat embossed a
  I added a few raindrops from Little Things from Lucy’s Cards around my sentiment and near those small yellow bits, and called it done. I had enough of those Maja Design scraps to make a matching envelope using the A2 V flap envelope dies from Simon Says Stamp.
 I don’t usually do anything to the back of my clean and simple (it’s somewhat clean and simple, this one?), but I recently bought this
 I printed
  Once I’d finished coloring, I went back in with a 0.03 black Copic multiliner to bring back the original linework that was covered in layers of pencil, before stamping a sentiment (Enjoy every second of your day) from Mathia design in VersaFine Onyx Black ink. And that finishes my card. A one layer card, even, I don’t make many of those, but I really wanted that image to shine.
 This is one of Mo’s birthday fairies. Her name is Dee, and you can find it in the store
  I diecut my panel using the largest of the faux stitch rectangle dies from My Favorite Things. I think it’s the perfect size as it creates a 1/16″ border when I add it to my cardbase. The color scheme might not be typical of me, but the layout definitely is. I added half a mini paper doily from Doodlebug Design, diecut some scraps of pink patterned paper to go with my image using another favorite MFT die set (Fishtail Flag Frames) and stamped a Norsk Stempelblad AS birthday sentiment using Papertrey Ink Hibiscus Burst ink. The ink matches the cardstock, which is also Hibiscus Burst from Papertrey Ink.
 I added my banners using foam tape and embellished very simply with some sequins from Pretty Pink Posh. I even used my scissors on one to cut a little bit off and tucked it underneath that sentiment banner. Laura Bassen would be proud, haha.
 I dag slår jeg et slag for alle småstemplene. Ofte i et stempelsett finnes det i tillegg til de litt større stemplene noen mindre som fyller ut plassen på stempelplaten. Disse blir ofte glemt, da vi gjerne kjøper stempelplatene for de store stemplene. I dag har jeg brukt flesteparten av småstemplene i et stempelsett fra Pretty Pink Posh og stemplet dem over hele fronten av kortet mitt.
 Å stemple såpass mange stempler tar litt tid. Ikke bare skal de stemples, men for at det hele skal se litt vilkårlig ut til slutt stemples de ikke i noe mønster, og hvert stempel må derfor plasseres på nytt for hver stempling. Jeg brukte vel omtrent en time på å stemple alle disse småstemplene, før jeg fargela dem med Prismacolor-blyanter.
 Jeg prøver så godt jeg kan å bruke rester av mønsterark på kortene mine, så her fant jeg noen Maja Design-rester i farger som matchet fargeleggingen min. Det rødstripete er fra Home for the Holidays-kolleksjonen, mens det øverste er fra Vintage Frost Basics-serien, som kom ut helt tilbake i 2013. Jeg er jo ikke akkurat kjent for å være den som bruker mest ark på kortene mine, så det minker ikke så fort av restelageret, men litt og litt er bedre enn ingenting.
 Jeg brukte et
  Jeg avslutter med fargene jeg har brukt. Veldig uvant å bruke Prismacolor-blyantene mine istedenfor Copics (tregere går det selvfølgelig også), men jeg prøver å bli flinkere til å bruke det jeg har, og det er jo litt synd om de bare blir liggende i en skuff uten å bli brukt, ikke sant?
 Kraft og hvitt syns jeg funker veldig bra til julekort, det gir et mye roligere utseende enn rødt. Jeg stanset ut en
  Rammen fungerer også fint som et holdepunkt for blomsten min. Jeg stemplet blomsten med kraftfarget blekk, fargela veldig enkelt med en hvit blyant, og stemplet og embosset over i hvitt. Dette gjorde jeg på flere blomster, og til slutt klippet jeg dem så jeg fikk laget en lag på lag-blomst med lave 3D-puter mellom lagene. Til slutt sprutet jeg