Hi, crafty friends. I’m back today with another card featuring the new stamp sets from Lili of the Valley, which are now available on Etsy.
 I can’t resist a good penguin, and the Snow Cute stamp set has many of them, I love this little guy with reindeer antlers. I colored him with Copics and fussy cut right up against the stamped lines and put him aside while I worked on the rest of my card.
 Last fall, I made a bunch of snowy backgrounds using an old Falling Snow stencil from Simon Says Stamp, some modeling paste from The Crafters Workshop and Rock Candy Distress Glitter for some sparkle. If you sprinkle on the glitter while the paste is still wet, it will adhere nicely. I didn’t use all my backgrounds last year, and dug this one out of a drawer in my craft room. The cardstock is Rustic Cream from Papertrey Ink, which is a nice cream color. It’s got the right amount of color to let the falling snow show without being too distracting. It also has these little flecks of darker color here and there, giving it a rustic feel, it’s really nice.
 I adhered my snowy background to a top fold card base I created from Amarena Cherry cardstock from My Favorite Things, before die cutting the word MERRY (Stacked Merry die from My Favorite Things) four times from Classic Kraft cardstock from Papertrey Ink, which I stacked and then adhered to the snowy background using liquid glue.
 I put foam tape behind the penguin and added him to the card, before using one of the words from the Christmas Greetings stamp set to complete my sentiment. This greetings stamp set has every sentiment you could possibly want for the holiday season. It includes 26 small sentiments, 6 large words with a handwritten look (Christmas, Hugs, Merry, Snow, Wishes, Winter) and 14 smaller words to create all kinds of Christmas greetings. I’ve been on the lookout for a good sentiment stamp set for Christmas, and this set has everything, I don’t need to look any further.
 I used a black glaze pen to add shine and dimension to the penguin’s eyes. Once the black was dry, I added a dot of white Gelly Roll 05 over the top.
 These penguins are quick and easy to color and don’t require a whole lot of markers.

 As usual, I colored the image with Copics. I didn’t use very dark colors for this one, because I wanted the coloring to look soft. I purposely colored the owl in colors that wouldn’t stand out. By using the same colors that I used for the tree, they’re somewhat hidden and go well with the sentiment, which was my plan.
 I created a top fold A2 card base from Jalapeño Popper cardstock from My Favorite Things, cut down my colored panel to 3 5/8 x 4 7/8″ and mounted it on foam tape in the center of my card.
 From the same color cardstock, I used the Connected alphabet die set from My Favorite Things to die cut the letters to spell the word FRIENDS. I die cut each of the letters three times and stacked them for a dimensional look. Using Jalapeño Popper ink from My Favorite Things, I stamped the rest of the sentiment using the Bella Letters stamp set from Mama Elephant onto a strip of white cardstock from Papertrey Ink. I took my time stamping, I wanted this to look pretty straight, and if you’ve ever stamped a sentiment with individual letter stamps, you know that you just can’t rush it.
 I added an additional two layers of white cardstock strips behind my stamped sentiment. I added my dimensional white strip onto a slightly wider green strip, before adhering it directly to the colored image, before finishing up the card with some sparkly sequins from the Seaglass mix from Simon Says Stamp.
 Lots of dimension going on here. Dimension is life, after all 🙂 I added a tiny dot of black to their eyes with a Glaze pen to make them pop.
 Very simple color palette for this one.
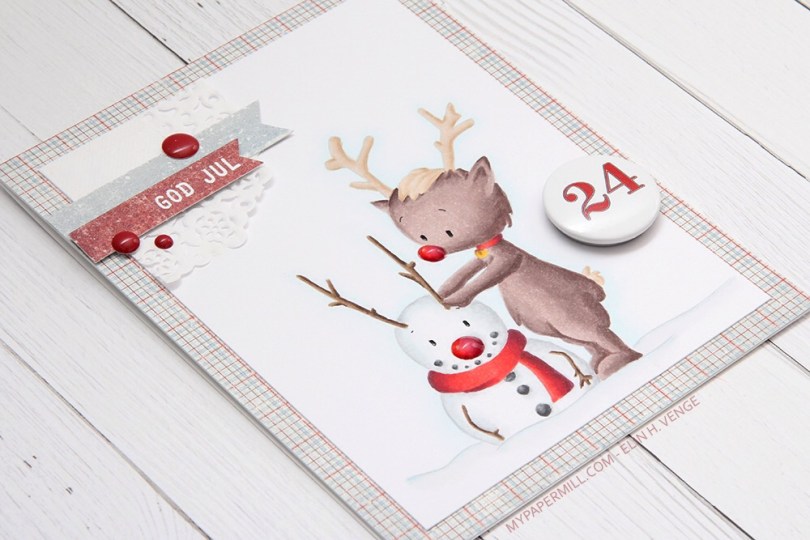
 This cute image with the penguin, reindeer and bear peeking up from behind something stole my heart. It’s from the Snow Cute set, which includes another one of these peeking images and six individual penguins. I colored a winter sunset behind them before coloring the critters, used a black Glaze pen to make their eyes extra black and shiny and also put a dash of Glossy Accents to Rudolph’s nose. Once the layer of Glaze was dry, I added white dots using a 05 Gelly Roll pen.
 I fussy cut the image at the bottom and added my narrow panel to a white cardstock panel. At the bottom of the panel I stamped the word Christmas from the sentiment set using Ocean Tides ink from Papertrey Ink. I adhered the white panel to a top fold landscape card base I created from Ocean Tides cardstock, also from Papertrey Ink.
 I white heat embossed a sub sentiment from the sentiment set onto Ocean Tides cardstock, cut it down to a strip and adhered it to the card with a few extra layers of cardstock behind it for dimension.
 I decided to keep the card very simple and added a few snowdrift sprinkles from Little Things from Lucy’s Cards to finish.
 The sprinkles add a little bit of dimension to the card. So does the sub sentiment. In this photo you can even see that Rudolph’s nose sticks out a little because of the Glossy Accents.
 I used a lot of Copic colors for this image.
 Meet
Meet  I’ve probably mentioned this in a previous post, but I love the quality of rubber stamps and their ability to include very thin, detailed linework. The lines in these images are all very thin, and they stamp so beautifully in a way only rubber can. I love it.
 I colored my scene with Copics, then stamped a sentiment from the
  I wanted some sparkle to my ice, and added Stickles. I didn’t like the look of the Stickles, so I scraped most of it off and switched to liquid glue with a sprinkling of Distress Glitter Rock Candy instead. I made sure not to spread it perfectly, but to create streaks to emphasize the streaky look of the ice I created with my markers.
 I added a dot of a black glaze pen to their eyes to make them pop, and I love that this card is versatile enough to work as a general card in the winter months or even a birthday card. It’s a bit of an odd size, about 5 7/8 x 4 1/2″, but I made the size of the card fit my scene, not the other way around. I’ll create a custom envelope for this, and it’ll be good to go in the mail.
 Lots of Copics used for this one!

 I don’t often create red Christmas cards, but when I can pair that red with a tealy blue, a light blue or a gray, I can make red work. I printed and colored the image onto a 3 1/4 x 6 1/4″ panel of X-Press It blending card, before sprinkling on lots of chunky white embossing enamel from Stampendous to make my scene extra snowy.
 The patterned papers are all die cut from the 6×6″ Home for the Holidays paper stack from Maja Design. I love their patterns and their colors, and the colors in this stack are SO good, I couldn’t resist.
 Mini slimline cards are fun to make. I really should make my envelopes as I go, but I’m not very consistent with that, I’m afraid, and will have lots of envelopes to create once we get a little closer to Christmas (we’ve got less than 100 days to go, by the way).
 I stamped and white heat embossed a sentiment from the Itty Bitty Holiday stamp set from My Favorite Things onto a scrap piece of patterned paper from that stack from Maja Design, and die cut that with the coordinating Itty Bitty Strips die.
 I added a few snowdrift sprinkles from Little Things from Lucy’s Cards, and the entire panel is adhered onto a card base I made from Wild Cherry cardstock from My Favorite Things. I love their cardstock!
 As usual, I finish with my colors. Not a whole lot for this image.
 These badgers are the
  I adhered my colored panel to a top fold card I made from Bright Buttercup cardstock from Papertrey Ink. I added a strip of that same cardstock below my image and left tons of white space. I printed a sentiment from the
  Simple color palette, of course with a pop of yellow in there.
 I colored in all the critters using Copics, before masking them off and creating clouds behind them using a
  I colored the penguins with Copics and used the coordinating die to die cut this cute little waddle for the front of my card.
 The waddle of penguins actually opens up so you can write a personal message on the inside, and there’s a few more die cuts under there for dimension and a little bit of stability.
 I glued my penguins to a panel made from Aqua Mist card stock from Papertrey Ink. I used the Paint Splatter background stamp from My Favorite Things with VersaMark ink, poured White Satin Pearl embossing powder from Hero Arts on top and heat embossed it. I know the stamp is supposed to be paint splatter, but I think it looks like snow, which makes the stamp even more versatile, and it’s a great way to add some subtle interest to a background. I added the Aqua Mist panel onto a slightly larger panel of Stamper’s Select White cardstock from Papertrey Ink.
 The Penguin’s Waddle die set comes with a big word die “Oh so merry”. I die cut it several times from white cardstock, cut the “oh so” away to use just merry on my card and spritzed some sparkly sheer shimmer spray on top, which you can kind of see in this photo if you look closely. I stamped and white heat embossed the word Christmas from the Christmas Cheer stamp set from My Favorite Things onto Berry Sorbet cardstock from Papertrey Ink, then used my Cut-align ruler from Misti to make sure I’d cut the little strip straight. In this photo you can also see the shine in the penguins’ eyes. I added a little bit of black glaze pen to the eyes, and also a little bit of clear Wink of Stella to certain elements.

 Laura er veldig flink til å ha elementer som stikker ut fra “hull” på kortene sine, og det er det jeg har gjort her.
 Jeg har svertet Distress Oxide Ink på bakgrunnen min (Salty Ocean, Cracked Pistachio og Twisted Citron bak den gule dragen, Cracked Pistachio, Twisted Citron og Fossilized Amber bak den rosa drgen og Fossilized Amber og Picked Raspberry bak den blå dragen). Tanken var å ha kalde farger bak motiver i varme farger og motsatt, samtidig som jeg ville at det skulle se ut som om overgangene var naturlige fra den ene sirkelen til den neste.
 Hele det hvite panelet på fronten er satt på 3D-puter, alle dragene, som er fra Magical Dragons-settet til My Favorite Things er fargelagt med Copics, klippet ut og satt på 3D-puter. Jeg har laget øynene ekstra skinnende og svarte med en Glaze-penn og alle vingene har fått et strøk med Wink of Stella glitterpensel, det syns såvidt på den rosa vingen på bildet, men vises bedre i virkeligheten. Til slutt har jeg satt på en tekst fra Papertrey Ink embossed i hvitt på svart kartong.