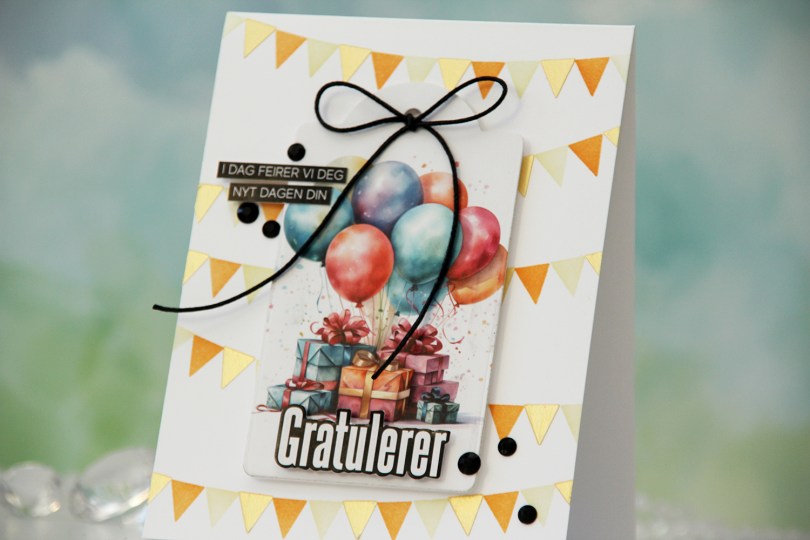
Hi, crafty friends! I’m sharing a fairly simple birthday card today with goodies from Kort & Godt, as well as a fun stencil set I bought at a craft fair last weekend.
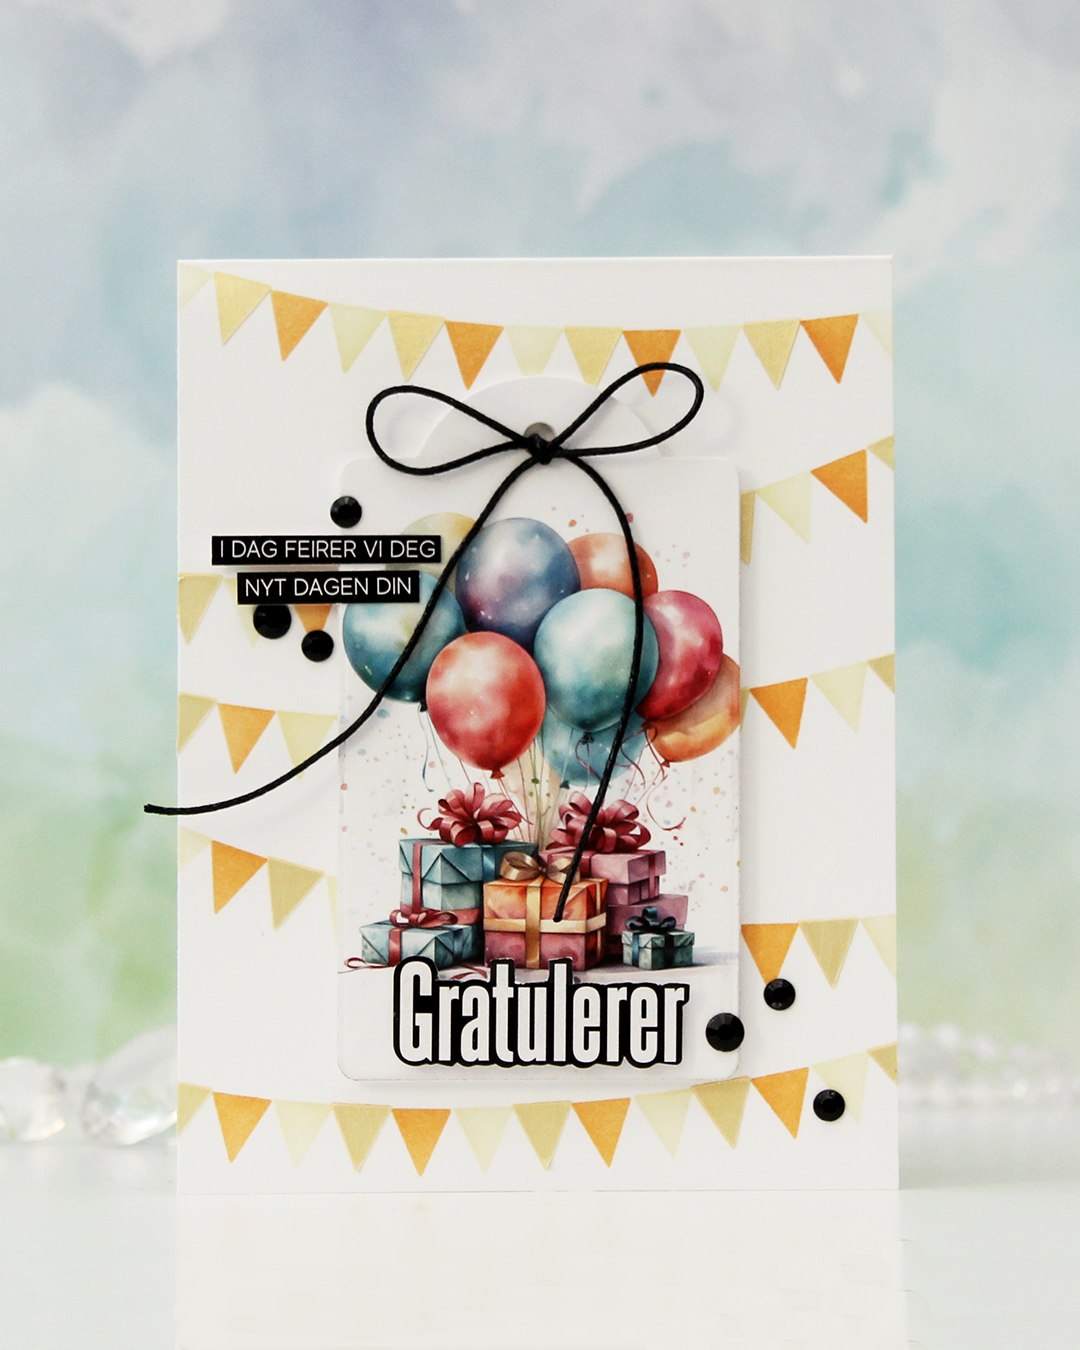 To start, I die cut this focal image with a tag die. I die cut another in white to put on the back for a little strength and put my tag aside while I worked on my card base.
 I used the Wimpelkette stencil set from Create a smile to create the pennants in the background. The set consists of 3 stencils that layer and create an easy pennant background. I used Peachy Glow and Amber Blaze inks from Altenew with two of the stencils, and through the third one, I added a layer of Solar Paste in the Golden Hour color. It creates a little bit of shine and some texture.
 I mounted the tag with foam tape in the center of the card, used 1/16″ foam squares on the back of the Gratulerer word sticker to make it stand out a little, then trimmed down the sentiment strips slightly and adhered them to the tag.
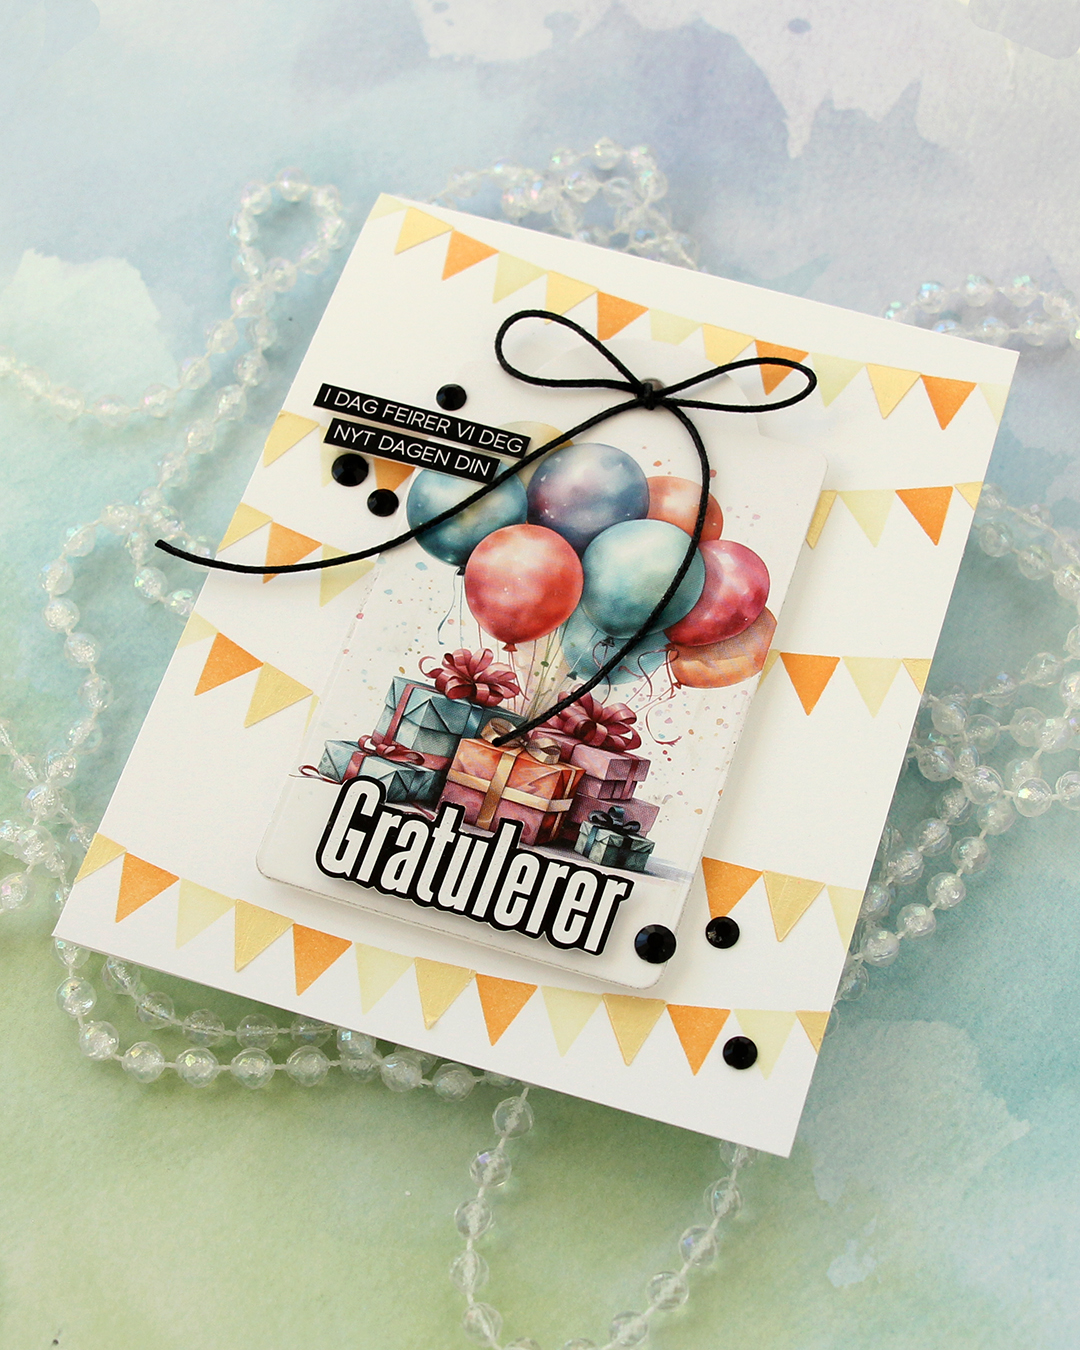 To finish off the card I added a few black gems and tied a bow using black cotton thread from Kort & Godt.
Kort & Godt products used:
MA1008 – image
BE107 – black gems (small size)
ST208 – black gems (larger size)
ST1002 – Word and sentiment sticker strips

 I separated the image into two, so I could create staggered postage stamps on my final card. I colored the images with Copics, and used the Postage Collage die from Waffle Flower to turn them into postage stamps. I also die cut a third postage stamp and stamped the sentiment in the center of it using Obsidian ink from Altenew. The sentiment itself is from the Easter Bunnies stamp set from Simon Hurley. Once I knew the sentiment was dry, I masked off the edges of the postage stamp and ink blended the center rectangle using Grapefruit ink from Concord & 9th.
 I cut down a sheet of Powder cardstock from Concord & 9th to fit the front of an A2 card, and used the Linen & Canvas impression plate from Papertrey Ink to add some subtle texture to the background. I adhered it to a white top fold card base and arranged my postage stamps, adding various thicknesses of dimension behind each for some interest, before finishing off with a few pearls from Little Things from Lucy’s Cards.
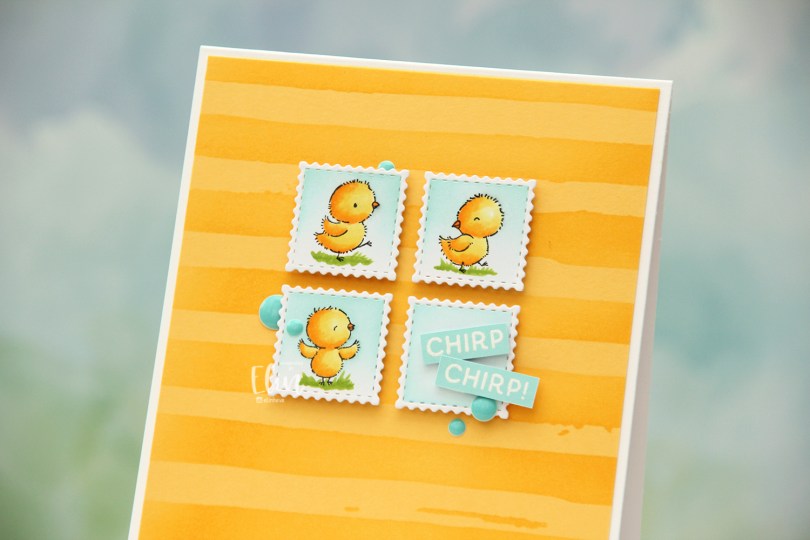
 These little chicks are so cute. And since they’re so small, they’re very easy to color. I did quick Copic coloring, before using the 1″ square die in the Postage Collage die set from Waffle Flower to cut them out. I then quickly scribbled on some grass so they’d have something to stand on, then masked off the chicks and the outer perimeter of each postage stamp, before ink blending the sky using Aqua Sky ink from Concord & 9th.
 Onto a panel of Buttercup cardstock from Concord & 9th, I ink blended with the same ink color using the Watercolor Stripes stencil from Altenew. I cut the panel down slightly, and adhered it to a card base I created from Stamper’s Select White cardstock from Papertrey Ink.
 I mounted my postage stamp chicks in the top center of the card, and also an additional fourth square that I ink blended in the same way. I stamped and white heat embossed a sentiment from the Easter bunnies stamp set from Simon Hurley Create and ink blended over the top using more of that Aqua Sky ink from Concord & 9th. I cut the sentiment into two small strips and mounted them on foam tape on the top of the bottom right square, angling them for a playful look, before finishing the card with a few enamel dots from the Cool Summer Night pack from Altenew.
 I love the dimension behind these postage stamps, it looks like these chicks are floating.
 Super simple color palette for this one.
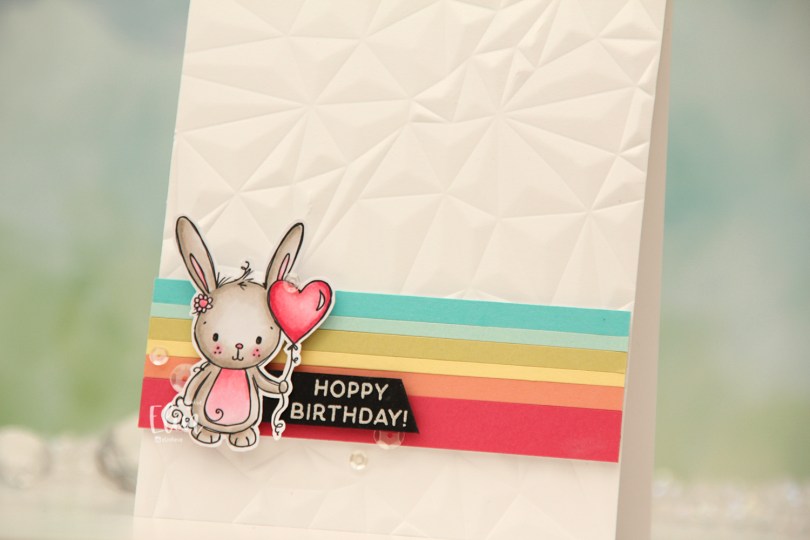
 I colored the bunny with my Copics (I actually only used 6 Copics for this card) and fussy cut around it, leaving a white trim to prefer the whispy lines and squiggles that are so characteristic of Rachelle’s images. I created a card base from Stamper’s Select White cardstock from Papertrey Ink and ran it through my die cutting machine with the Crystal Distortion embossing folder from Simon Says Stamp to create some texture.
 Onto a piece of scrap paper, I adhered strips of solid colored cardstock. I didn’t measure, they’re all different widths for a playful look. The colors are (bottom to top) Honeysuckle and Grapefruit, both from Concord & 9th, and then Lemon Tart, Spring Moss, Aqua Mist and Hawaiian Shores, all from Papertrey Ink. I put a few layers of cardstock behind my strips and adhered them near the bottom of the card. I stamped and white heat embossed a sentiment from the Easter bunnies stamp set from Simon Hurley onto a piece of True Black cardstock from Papertrey Ink, cut it down to a strip and used a craft knife (I don’t trust scissors) to create the angle at the end. I glued the piece left of the sentiment to the back of the bunny, put 2mm foam squares behind everything and adhered it on top of the colored strips, before finishing off with a few sequins from the White Orchid Sequin mix from Little Things from Lucy’s Cards.
 Color palettes don’t get much simpler than this.
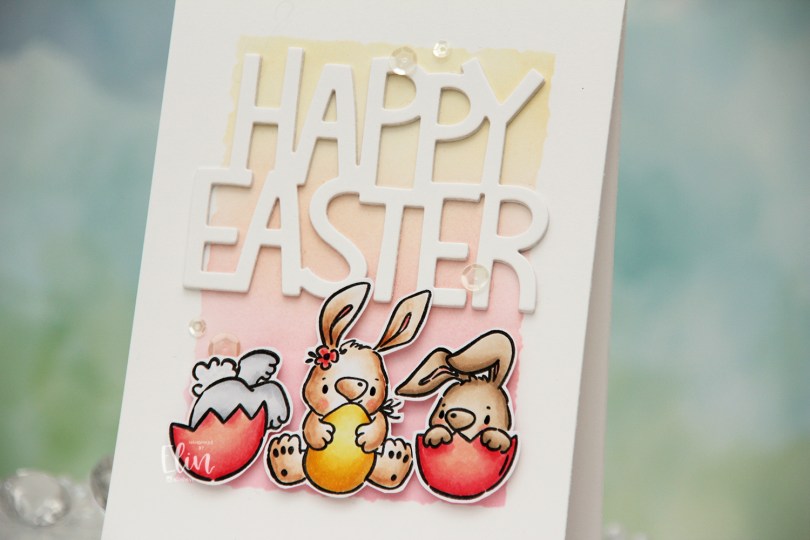
 The Easter Bunnies stamp set from Simon Hurley was the perfect one to teach with. It’s a stamp set with lots of images to choose from. They’re all small, easy to color and very beginner friendly, as there aren’t any big areas to fill in. Once colored, we fussy cut the bunnies. There’s a coordinating die set for this stamp set, but these are pretty easy to fussy cut.
 I did some simple ink blending on the background. I used the Watercolor Rectangle stencil from My Favorite Things and ink blended from the bottom to the top using Worn Lipstick distress ink, Pink Pearl ink from Altenew and Scattered Straw distress ink. These colors went well with the Copics I used for the bunnies, and it creates a little bit of interest to the background. I used the Giant Happy Easter die from Lawn Fawn and die cut that four times from white cardstock, before gluing them all together for a stacked look. I adhered the sentiment in the top center of the card, mounted the bunnies on foam tape and added a few sequins from the White Orchid Sequin mix from Little Things from Lucy’s Cards. I also used a black Glaze pen for the eyes, which the attendees really enjoyed, as it creates a little bit of dimension and shine very quickly and easily.