Hi, crafty friends. I’m usually pretty good at making Christmas cards all year. What I’m not usually so good at is creating Christmas tags to go on presents. It’s often one of those things I do last minute, even after the gifts are wrapped. I’m trying to be better, though, and today I have three tags to share featuring the Snow Cute stamp set from Lili of the Valley, I just can’t get enough of this set.
 These penguins are about 4 cm tall, which makes them the perfect size to create gift tags from. By stamping them on a sheet of X-Press It blending card (or your cardstock of choice) with a little bit of space between them, you can die cut some and fussy cut the remaining ones. I decided to fussy cut the one in the center, while using dies for the other two.
 I colored all the penguins with Copics and used a black glaze pen to create a little bit of shine and dimension to their eyes. Once the black was dry, which didn’t take long, I used a white Gelly Roll 05 on top of the black to put the white back into their eyes.
 I’m starting with this fussy cut penguin. In a drawer, I had a scrap of a snowy background that I created last fall using Rustic Cream cardstock from Papertrey Ink, the Falling Snow stencil from Simon Says Stamp, modeling paste from The Crafter’s Workshop and Rock Candy distress glitter from Ranger. I decided to put it to use and die cut it using the 210 die from Kort & Godt, I really like the heart shaped hole it creates at the top. I mounted the penguin using foam tape and added a sentiment strip below. The sentiment is from the Christmas Greetings stamp set from Lili of the Valley, it’s got heaps of great sentiments for the holidays. I used a bit of red lace ribbon, a couple of bells and a piece of thread to the top of the tag to embellish it a little.
 On the back, I added die cut letters to spell the words to and from. The words are from the Tag Builder Blueprints 6 die set from My Favorite Things, die cut from Amarena Cherry cardstock, also from MFT.
 Simple color palette for this one.
 Next up is the circular tag. I used the Tag Builder Blueprints 6 die set for this one as well, as well as another sentiment from the Christmas Greetings stamp set from LOTV. I added Divine Twine in the color Cherry to the top, a bell charm and a few red enamel dots from Papirdesign to finish it off.

On the back, I used the to/from circle die that I used for the first tag, but for this one, I used the negative of the die cut, popping in the centers of the o’s to complete the look. I figured it would be easier to see the writing on white cardstock instead of the red in the dim light on Christmas Eve when we open our presents, so this is meant to be practical too.
 A few additional colors for this one, I wanted to ground my penguin and also needed some color on that candy cane.
 For the blue one, I used the Fold-Up Tags die set from My Favorite Things to create my tag. I made sure not to cut off his scarf by fussy cutting that and putting it behind the die as I ran it through my die cutting machine. I used a piece of Blue Breeze cardstock from My Favorite Things to create the reinforcing element near the top, added some Divine Twine in the color Blueberry, a couple of white bells from UiT Hobby and some thread that’s actually meant to use with a loom (it’s super strong). Once again, I used the Christmas Greetings stamp set for the sentiment, and scattered a few snowdrift sprinkles from Little Things from Lucy’s Cards to finish.
 On the back, I used that same die from the Tag Builder Blueprints 6 die set from My Favorite Things that I used for the other two tags, this time die cut from Enchanted Evening cardstock from Papertrey Ink.
 Once again, simple color palette. These were such fun to make. I want to make more, and have a bunch on hand when it’s time to wrap Christmas presents, so I’m not rushing last minute to get the tags done.

 I stamped the wreath on a piece of Rustic Cream cardstock from Papertrey Ink, before coloring with pencils. Yes, you read that right, I broke out my Prismacolors and did pencil coloring. I don’t use my pencils very often. Copics are my “go to” coloring medium, but every now and then, I shake things up.
 I fussy cut around the finished piece, leaving a white border along the edge and cutting the open part at the top right as if my colored panel was a circle. I didn’t want to cut away the interior, and this seemed faster, easier and better. I created a 4 1/4″ square card base and used the Caleidoscope embossing folder from Simon Says Stamp to create a little bit of texture in the background, before mounting the wreath on foam tape.
 I stamped and white heat embossed a sentiment from the Mini Messages stamp set from Mama Elephant onto a piece of Cornflower cardstock from My Favorite Things, before using a nested circle die to turn it into a circle. I put a few foam squares behind it and adhered it to a part of the wreath where it wouldn’t cover up too many of the flowers.
 To finish the card, I added a generous amount of Papirdesign pearls for some shine.
 Aren’t these bunnies cute? I paired the three bunnies in the Teacup Bunnies stamp set with a digital sentiment. The sentiment will be a freebie digi, along with a few others in the same style and sub sentiments to pair with it.
 I colored the bunnies and letters with Copics and did some fussy cutting, leaving a thin white border to preserve the “fuzzies” that are part of the signature Lili of the Valley style. I used a black glaze pen for their eyes to make them pop and shine, and once dry, added a tiny white dot to each eye using a white Gelly Roll 05 pen.
 I used the Crystal Distortion Embossing folder from Simon Says Stamp on a piece of Lemon Tart cardstock from Papertrey Ink to create a little bit of interest in the background. Below the yellow panel, I added a strip of Sprout cardstock from Concord & 9th for a little bit of extra green.
 I adhered the cardstock pieces to a white top fold card base and mounted the teacup bunnies and sentiment on foam tape for dimension, before finishing off with a few enamel dots from the Tropical Forest set from Altenew.
 I colored my image with Copics, before using one of the stitched rectangle dies from My Favorite Things to create a nice faux stitching detail along the edges of the panel. I then sprinkled on a generous amount of chunky white embossing enamel from Stampendous and melted the granules from the back of the panel.
 I created a card base from Vintage Timber cardstock from My Favorite Things and mounted my colored panel in the center using foam tape. Using the Believe die from Simon Says stamp, I die cut four white believe that I glued together for a stacked look and added one more on top that I colored with blue Copics (B91 and B0000) before die cutting. It gives the word a little bit of added interest. I stamped and white heat embossed a sentiment from the Holiday Messages stamp set from Mama Elephant onto Wild Cherry cardstock from My Favorite Things and cut the sentiment down to strips, adding a few extra layers of cardstock behind for dimension and strength.
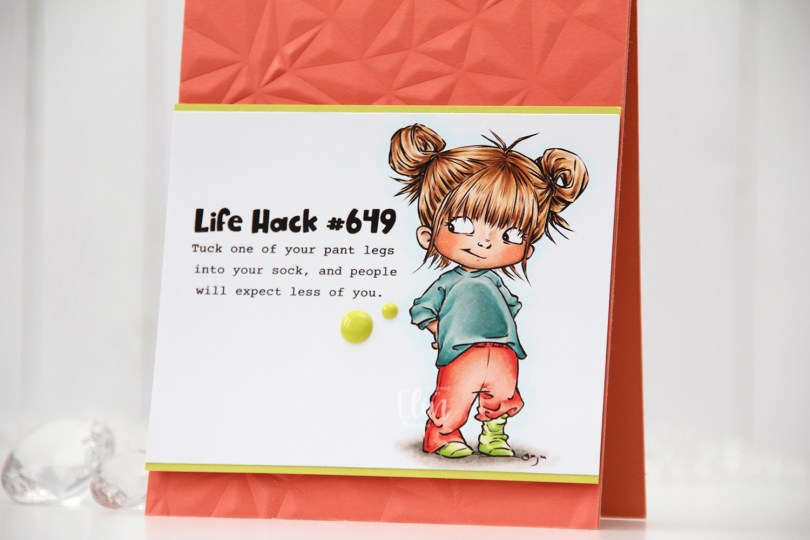
 I have a coloring/card making buddy in Liz Vefall and sometimes ask her for suggestions when I’m stuck and/or can’t make up my mind. I always run with her ideas and the cards usually end up looking great, but I seem to have lost the ability to turn her suggestions into a final product that I’m happy with. The black pants and the brown card base were both suggestions from her, and I’m not comfortable with the end result, somehow. Diecutting the white word with a little bit of blue at the bottom was also her suggestion, and I wound up loving that, so I ended on a positive, at least
 Fairly standard Christmas color palette, with a couple of odd ones thrown in there for good measure.
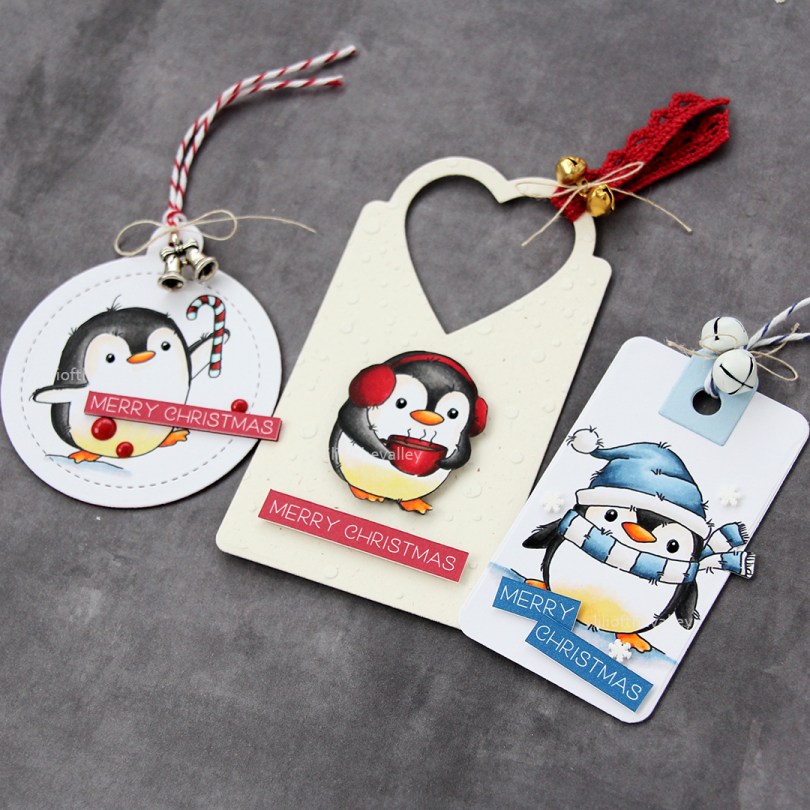
 Meet
Meet  I colored the image with Copics, trimmed my panel down and added a thin strip of Limeade Ice cardstock from Papertrey Ink above and below for a little bit of extra color and definition.


 I used more Copics than I thought I would for this. I even used BG71, which is a color I’ve created myself.
 I can’t resist a good penguin, and the
  Last fall, I made a bunch of snowy backgrounds using an old Falling Snow stencil from Simon Says Stamp, some modeling paste from The Crafters Workshop and Rock Candy Distress Glitter for some sparkle. If you sprinkle on the glitter while the paste is still wet, it will adhere nicely. I didn’t use all my backgrounds last year, and dug this one out of a drawer in my craft room. The cardstock is Rustic Cream from Papertrey Ink, which is a nice cream color. It’s got the right amount of color to let the falling snow show without being too distracting. It also has these little flecks of darker color here and there, giving it a rustic feel, it’s really nice.
 I adhered my snowy background to a top fold card base I created from Amarena Cherry cardstock from My Favorite Things, before die cutting the word MERRY (Stacked Merry die from My Favorite Things) four times from Classic Kraft cardstock from Papertrey Ink, which I stacked and then adhered to the snowy background using liquid glue.
 I put foam tape behind the penguin and added him to the card, before using one of the words from the
  I used a black glaze pen to add shine and dimension to the penguin’s eyes. Once the black was dry, I added a dot of white Gelly Roll 05 over the top.
 These penguins are quick and easy to color and don’t require a whole lot of markers.
 As usual, I colored the image with Copics. I didn’t use very dark colors for this one, because I wanted the coloring to look soft. I purposely colored the owl in colors that wouldn’t stand out. By using the same colors that I used for the tree, they’re somewhat hidden and go well with the sentiment, which was my plan.
 I created a top fold A2 card base from Jalapeño Popper cardstock from My Favorite Things, cut down my colored panel to 3 5/8 x 4 7/8″ and mounted it on foam tape in the center of my card.
 From the same color cardstock, I used the Connected alphabet die set from My Favorite Things to die cut the letters to spell the word FRIENDS. I die cut each of the letters three times and stacked them for a dimensional look. Using Jalapeño Popper ink from My Favorite Things, I stamped the rest of the sentiment using the Bella Letters stamp set from Mama Elephant onto a strip of white cardstock from Papertrey Ink. I took my time stamping, I wanted this to look pretty straight, and if you’ve ever stamped a sentiment with individual letter stamps, you know that you just can’t rush it.
 I added an additional two layers of white cardstock strips behind my stamped sentiment. I added my dimensional white strip onto a slightly wider green strip, before adhering it directly to the colored image, before finishing up the card with some sparkly sequins from the Seaglass mix from Simon Says Stamp.
 Lots of dimension going on here. Dimension is life, after all 🙂 I added a tiny dot of black to their eyes with a Glaze pen to make them pop.
 Very simple color palette for this one.
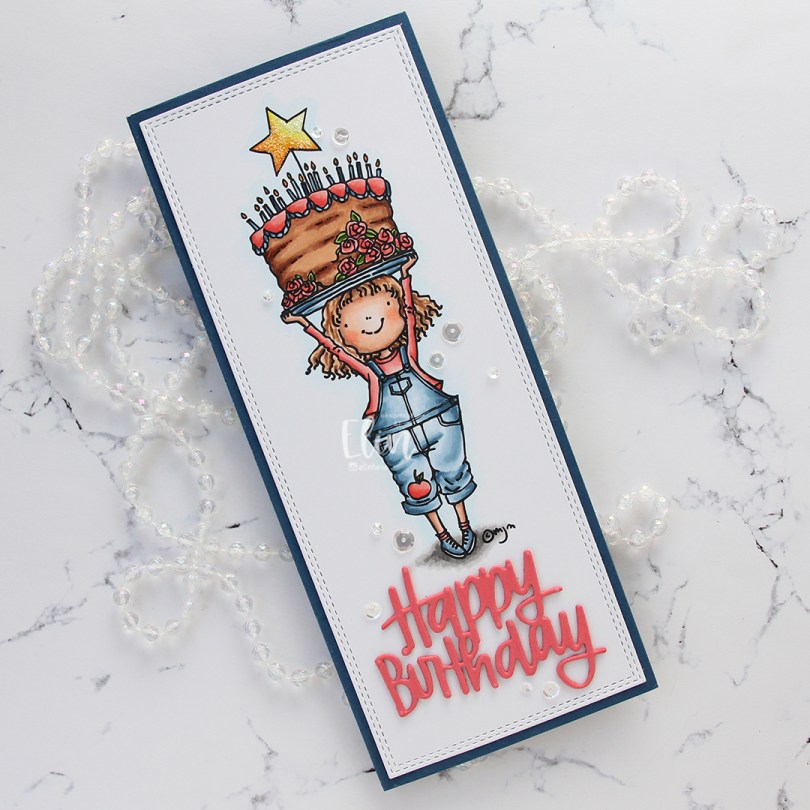
 I colored the image with Copics and used the largest die in the Slimline Double Stitched Rectangle STAX die set from My Favorite Things to cut it down to the perfect size panel to go onto a slimline card. I adhered it directly onto a card base I created from Enchanted Evening cardstock from Papertrey Ink.
 From Berry Sorbet cardstock from Papertrey Ink, I die cut the Happy Birthday Brush Script die from Simon Says Stamp three times and stacked the diecuts for a dimensional look, before adhering them below the image on my card. I added a layer of Frosted Lace Stickles to the star on top of the cake and scattered a few chosen sequins from the Seaglass mix of sequins from Simon Says Stamp to finish the card.
 Lots of Copics for this one.
 I decided to create a full card shaker this time. They’re fun to make, and a lot easier than you’d think. Even easier (and way faster) than regular shaker cards! At least they are to me.
 This is the
  This cool, deep pink is so much fun to use for Christmas cards, it’s unexpected and fun, and matches the Autumn Rose color cardstock from Papertrey Ink sooo well.
 I created my shaker pocket from half a stamp storage pocket from Avery Elle. I created score lines and folded so my panel would fit inside, used score tape on the back of the bottom and sides of the pocket and filled it before folding over the top flap and sealing it shut.
 I used the Icicle Sequin mix from Hero Arts to fill my pocket. This mix has clear sequins, matte white sequins and iridescent star confetti, just enough to create interest, while not being too distracting. It’s a perfect mix for wintery shaker cards.
 For the die cut word, I used the Believe die set from Simon Says Stamp. I die cut the shadow from Stamper’s Select White cardstock from Papertrey Ink and the word itself from Autumn Rose cardstock, also from Papertrey Ink. I adhered the two together and then directly onto the shaker pocket. If you’ve never created a full card shaker before, I urge you to try, it’s so much fun!
 I’ve made a slimline card this time, with images from a Stamptember collaboration set from Mama Elephant and Simon Says Stamp that I colored up in November 2020. These have been sitting on my desk for a while, and I always planned on creating this window design with them – Get Cracking on Christmas is the perfect opportunity to execute plans you’ve had for a while, but not had time for.
