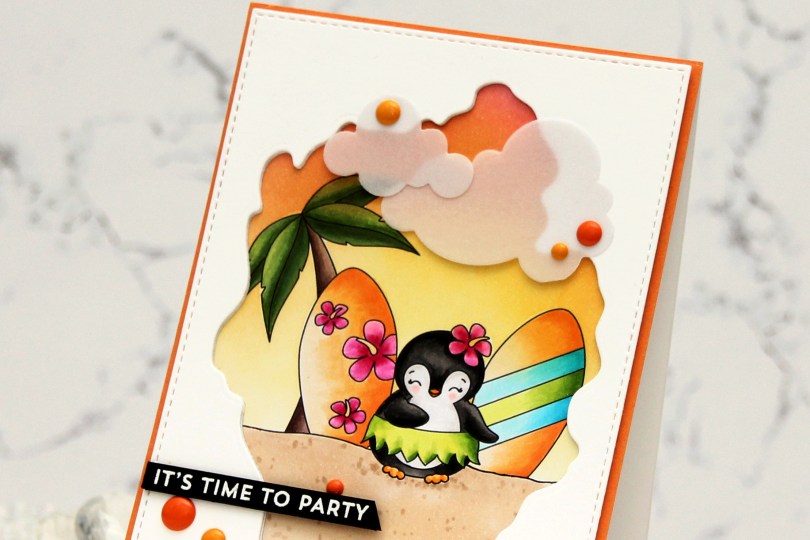
Hi, crafty friends. I have a beach card to share with you today, made with the Beach critters digi stamp set from Streamside Studios. So far, this summer has been cold and wet, so I’m using this card to dream of warmer weather.
 I created my little scene with the palm tree, a couple of surfboards and a penguin. I can never resist a penguin, and this one has a hula skirt – I was sold! I colored my scene with Copics, and the plan I had initially went out the window. I was going to color the base of the surfboards in a light yellow, almost white, but then I came up with this soft orange combo and totally changed everything else to fit. Instead of a soft blue sky, I ink blended a sunset using Honeysuckle, Clementine and Buttercup inks from Concord and 9th. I then used the largest die in the A2 Stitched Rectangle STAX 1 set from My Favorite Things, along with the Watercolor Wash Free Form die, also from MFT, to create a rectangular panel with a fun window. I die cut a couple more to stack behind the front panel to create a little bit of dimension, before adhering it all to my colored image.
 I adhered a quarter sheet of Clementine cardstock from Concord & 9th directly to a top fold card base and glued my scene in the center. This created a bit of an orange border around the image. I then die cut Cloud 1 & 2 from Papertrey Ink out of Heavyweight Translucent vellum from My Favorite Things. I love die cut vellum clouds. This vellum is super thick, so the glue I put behind it doesn’t even show through, but I still placed enamel dots strategically on top. Old habit, I guess. These enamel dots are actually from a Halloween pack from Papirdesign. Onto a piece of True Black cardstock from Papertrey Ink, I stamped and white heat embossed a sentiment from the Bitty Birthday Wishes stamp set from My Favorite Things. I cut it down to a strip, added a couple of extra layers of cardstock behind it and adhered it to my card.
 I used quite a few Copics for this one.

 I’ve had this duck colored for quite a while, but sometimes, life just gets busy. I fussy cut him, leaving a white border around the edge and did the same with the butterflies and the balloon from the same stamp set. I ink blended clouds on a piece of Stamper’s Select White cardstock from Papertrey Ink using Harbor ink from Concord & 9th and the Rolling Clouds stencil from My Favorite Things. I die cut my panel using the largest die in the Blueprints 27 die set, also from MFT.
 I covered my white card base with a piece of light pink glitter cardstock from Kort & Godt. I added a few layers of cardstock behind my die cut panel to give it a little lift and adhered it in the center, before placing stacked die cut words on top. I used the Hipp hurra die set from Kort & Godt to create these, cutting four of each words from white cardstock and the top from the same pink glitter cardstock I used to cover the front of the card. I threaded black sewing thread through the balloon and the wing of the duck. I added a bow to the balloon using the same thread and mounted both the duck and the balloon onto the card using foam tape. I adhered the butterflies above the balloon, before heat embossing a sentiment from the A06 stamp set from Norsk Stempelblad AS. I cut it down to a strip, put a few additional layers of cardstock on the back of it and adhered it below my die cut sentiment, before finishing off with a few gems from the
  Yellows and pink and nothing else for this one.
 Once I had enough images to cover a background, I printed it onto X-Press It blending card and chose a few Copics to color in the images. I went with flat color for most of these, only adding dimension in the coloring of the balloons.
 I cut my panel down and mounted it onto a top fold card base I created from Vintage Cream cardstock from Papertrey Ink. I die cut the sentiment using the Happy Birthday Brush Script die set from Simon Says Stamp, using Heavyweight Translucent Vellum from My Favorite Things for the shadow layer and black glitter cardstock from Kort & Godt for the words themselves, backed with a few layers of plain black cardstock (True Black from Papertrey Ink) for dimension. Behind the vellum, I die cut the word dies from a few layers of white cardstock to make the vellum “float” above the images.
 I adhered the greeting in the top center of the card and added enamel dots from the Forest Trail pack of enamel dots from Altenew to finish. I paired the card with a Sour Apple envelope from My Favorite Things.
 Just a few Copics for this one.


 Very simple color palette for this one.
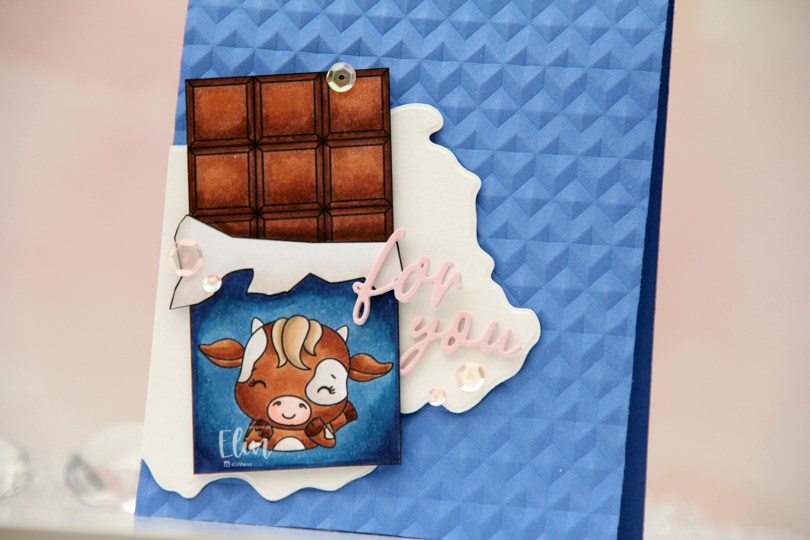
 I colored my chocolate bar with Copics and fussy cut right up against the black stamp lines. Most of these lines are straight, which made it super easy to use a steel ruler and a craft knife to get precise cuts.
 The Stratos cow is a very happy blue card, so it’s not entirely the same, but I don’t think it’s too much of a stretch with the blue wrapper and the cow on the card.
 I created the card base from Something Blue cardstock from My Favorite Things. I used the Angled Mosaic 3D embossing folder from Altenew to give it some texture and interest.
 I used the Watercolor Wash Free Form die from My Favorite Things and die cut from white cardstock. I think the free form makes it look like spilled milk, and it was the perfect grounding element for the chocolate.
 I used the Sweet Sentiments die set from Altenew to die cut the sentiment. I stacked four die cuts of each word for strength and dimension, the top one from Ballet Slipper cardstock from Concord & 9th, added the sentiment to the card and finished off with a few sequins from the She’s So Lovely mix from Little Things from Lucy’s Cards.
 Simple color palette.
 I colored up the penguins with my Copics and fussy cut them right up against the black lines. These are very simple shapes and easy to fussy cut. I put the penguins aside while I worked on the rest of my card. Onto a card base I created from Blue Breeze cardstock from My Favorite Things, I stamped tiny snowflakes from North Star Design using Spring Rain ink from Papertrey Ink for a subtle tone on tone look. This is super subtle, my ink pad needed reinking, but I went with it and didn’t reink until after the project was complete, I didn’t want to stop half way.
 I used the Stitched Snowflake Backdrops die from Lawn Fawn to create an impressed snowflake pattern on a piece of Stamper’s Select White cardstock from Papertrey Ink. I added a few extra layers of cardstock behind it and adhered it to the card base. Using the Postage Collage Die and coloring stencil from Waffle Flower, I created postage stamps for my penguins to sit on. I stamped the snowflakes on these as well, and ink blended a little in from the edges to define them a tiny bit. It’s still subtle, I hadn’t reinked my ink pad at this point. I added dimension behind each of the postage stamps, adhered them to the card and mounted the penguins on top. I used the Hjerte 3 die set from Papirdesign to die cut my sentiment from Berry Sorbet cardstock from Papertrey Ink. I die cut four and stacked them together for a dimensional look, before adding a
  Simple coloring for simple images.
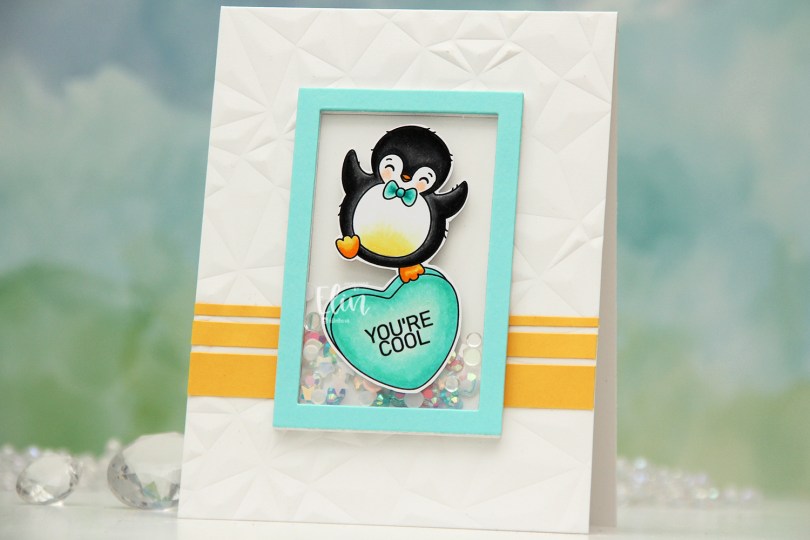
 I colored the penguin on the heart with Copics. You know me, I can’t resist a penguin stamp. I fussy cut around him, leaving a white trim around the edge and put him to the side while I worked on the rest of the card. I used the Crystal Distortion embossing folder from Simon Says Stamp to create some interest and texture to my card base, which I created from Stamper’s Select White cardstock from Papertrey Ink. I cut strips of Buttercup cardstock from Concord & 9th and added them towards the bottom of my card.
 I die cut a frame from the Classic Rectangle Frames die set from My Favorite Things several times from white cardstock (I think I have six or seven layers) and stacked them to create my shaker well, adding one of the centers back in to create a smooth back for my shaker well. I added a mix of the
 I colored the cow with Copics, before fussing cutting it, leaving a white trim around the edge. Onto a top fold fold card base, I ink blended blue inks from Altenew (Winter Lake, Icy Water and Polar Bear) through the Geometric Landscape stencil, also from Altenew, before stamping a Happy Birthday background stamp from My Favorite Things on top, using the darker two of the inks I used for the blending. I also used the stencil in the top right corner and used what was left on my ink blender brush for a soft look.
 I added Light & Fluffy modeling paste from The Crafters Workshop through the Tiny Clouds stencil from My Favorite Things. I wanted dimension to my clouds and put down a very thick layer of the paste. While that dried I worked on the rest of the card. I die cut four polaroid framed using the Precious Polaroids die set from My Favorite Things and stacked them for dimension. Onto Grapefruit cardstock from Concord & 9th, I stamped and white heat embossed three sentiments from the Bitty Birthday Wishes stamp set from My Favorite Things and cut them all down to strips, adding a few extra layers of cardstock behind each for dimension. I adhered the polaroid frame to my card base at an angle, glued the cow on top, added my sentiment strips and finished off with sequins and gems from the
  Super simple and very neutral color palette for this one.
 I tend to choose fairly bright color combos, but this time, I wanted to shake things up with a more vintage vibe and used a very different color palette.
 I colored the wreath, then fussy cut right up against the black stamped lines in the image. I added foam tape to the back and mounted it to a top fold A2 card base i created from Rustic Cream cardstock from Papertrey Ink.
 I die cut the sentiment from Classic Kraft cardstock from Papertrey Ink using a die from Papirdesign. I stacked three die cuts for a little dimension and adhered the letters at a bit of an angle inside the heart wreath, before finishing off with a few faceted pearls from Kort & Godt.
 The foam tape on the back of the wreath makes it look like it’s floating above the card front.
 Vintage color scheme!
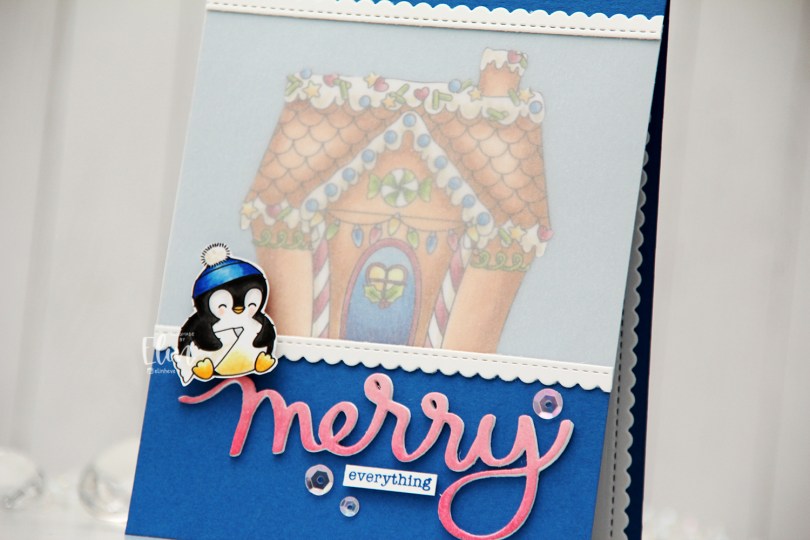
 This penguin is from the
  I adhered the light blue panel to a top fold card base I created from Cornflower cardstock from My Favorite Things, and die cut a scallop border using the Stitched Rectangle Scallop Edge Frames die set from My Favorite Things. I cut the frame apart and added one strip to the top and one to the bottom of my light blue panel. I used the Merry Script die from Mama Elephant to die cut three layers from white cardstock and one layer from X-Press It blending card that I colored pink with Copics. I stamped the word everything from the Holiday Messages stamp set from Mama Elephant onto white cardstock using Cornflower ink from My Favorite Things, added a few layers of cardstock behind it for dimension and embellished with a few pink sequins from the She’s So Lovely mix from Little Things from Lucy’s Cards. The penguin was easy to add with a little bit of foam tape.
 I didn’t use too many colors for the penguin itself, but the gingerbread house required quite a few markers.