
Hi, crafty friends. I have a simple, yet dimensional holiday card to share today featuring this mouse from the Merry Christmouse digi stamp set from Streamside Studios.
 This little mouse is so cute, and she might be adding her name to Santa’s nice list, who knows? I colored her with Copics and fussy cut her leaving a white border.
 I covered a white card base with a panel of patterned paper from Maja Design. This is the Snowflakes pattern from the Holiday in the Alps collection. I love the design paper from Maja Design, it’s my favorite patterned paper to use! Into a panel of Stamper’s Select White cardstock from Papertrey Ink, I die cut a circle opening towards the top left and also used a stitched rectangle die from the A2 Stitched Rectangle STAX 2 set from My Favorite Things.
 I stamped God jul from the M-442 stamp set from Kort & Godt using Blue Beyond ink from My Favorite Things. I die cut trees using the Silhouette Snow Trees die set from Mama Elephant, stacked them and added Rock Candy distress glitter from Ranger for a super snowy look. With the layering of the trees, this was pretty dimensional, so I had to double up on the foam tape when I added the panel with the circle opening.
 I also added foam tape behind the mouse and this card is very thick as a result.
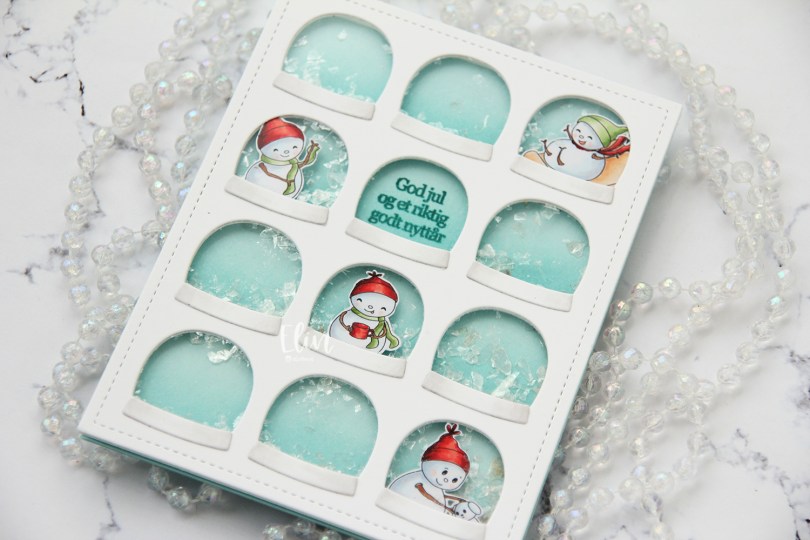
 I chose four of the snowmen in the set and scaled them to fit inside the windows on this Globies Grid Cover die from Mama Elephant. I colored them with Copics and fussy cut them leaving a thin white border.
 I die cut the cover die from Stamper’s Select White cardstock from Papertrey Ink, added acetate to the back and adhered my snowmen to the back of the acetate in a few of the windows. Onto a panel of Sno Cone cardstock from My Favorite Things, I did some very subtle ink blending at the bottom of each row of snowglobes, using Sno Cone ink, also from My Favorite Things. The ink blending adds a little gradient to each of the snowglobes. I stamped a sentiment from the Julehilsen stamp set from Norsk Stempelblad AS using Caribbean Sea ink from My Favorite Things.
 I flipped the front over, added foam tape to the back of my windows and sealed the globe with the sentiment shut so no shaker bits would be in that particular window. I added a sprinkling of Distress Mica Flakes to each of the remaining 11 windows and carefully placed my ink stamped and ink blended panel onto the exposed adhesive to close my shaker wells.
 I adhered my front to a top fold card base I created from Sno Cone cardstock from My Favorite Things. To finish the card, I die cut the bases for the snow globes from white cardstock and added a little bit of subtle shading on the edges with a T0 Copic marker, as well as the colorless blender.
 These snowmen are super tiny, it’s a miracle I used so many colors. I may have gotten carried away with the red in particular. Five colors for these tiny areas is probably way too many, but there you go.
 I colored the bear with Copics and fussy cut right up against the black stamped lines, I added shine and dimension to his eyes with a black Glaze pen, followed by a white dot using a Gelly Roll 05. I put the bear aside while I worked on the rest of my card. I printed a sentiment from the stamp set on a piece of Stamper’s Select White cardstock from Papertrey Ink that I’d cut down to fit the front of my card with a little bit of a border. I then took the single line die from the Hexagon Pops die set from My Favorite Things to cut a row of hexagons below the sentiment, before lining up the die a second time for a second row of hexagons.
 I added foam tape to the back of my die cut piece and adhered it to a top fold card base I created from Summer Sunrise cardstock from Papertrey Ink. I popped the bear on foam tape and added some sequins from the Meadow mix from Little Things from Lucy’s Cards to finish. Super simple, right?
 Simple color palette, too!
 I’ve made a cool card (pun intended) with the
  Using the Watercolor Wash Free Form stencil from My Favorite Things along with Icy Water and Frayed Leaf inks from Altenew, I did some very soft ink blending to create a little bit of interest to my background. I then ran the panel through my printer to add the sentiment, chopped off a little on each side of the panel and mounted it onto a top fold card base I created from Stamper’s Select White cardstock from Papertrey Ink.
 I put foam tape on the back of each of my popsicles and adhered them above the sentiment.
 I finished off the card with pearls, crystals and dew drops from the Fresh Mint mix from Little Things from Lucy’s Cards.
 Soft color palette for this one.
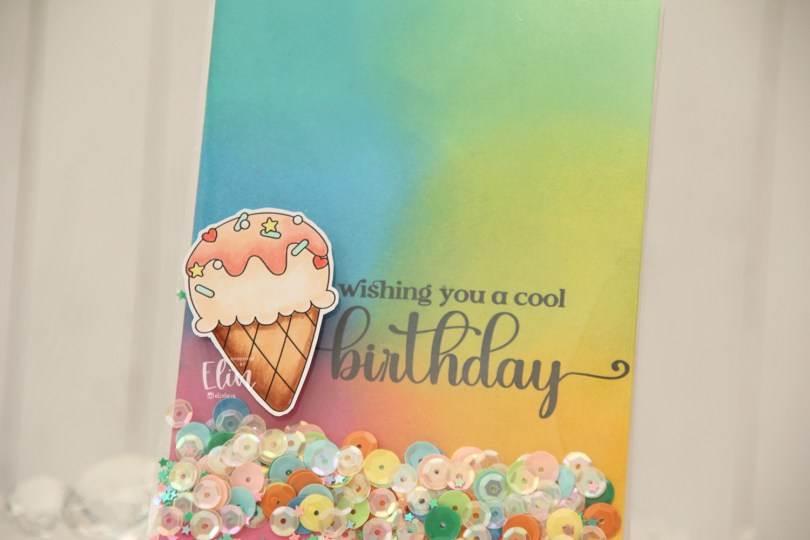
 Everyone loves ice cream, right? I colored up this one using my Copics, and fussy cut around it leaving a thin white border. The border makes it stand out against the colorful ink blended background.
 Speaking of backgrounds – I ink blended Distress Oxide Inks (Peacock Feathers, Cracked Pistachio, Twisted Citron, Fossilized Amber, Picked Raspberry and Salty Ocean) across a quarter sheet of Stamper’s Select White cardstock from Papertrey Ink. I heat set the panel to make sure it was dry, before running it through my printer to add the sentiment.
 The large stamp storage pockets from Avery Elle are 5 1/2″ wide, making them perfect for full A2 size shaker cards. I cut slivers off the panel to make it go in a little easier, then turned it on its side and put it at the bottom of the storage pocket. I cut the pocket down to about 5″, scored at the 4 1/4″ mark and folded it over. I actually cut the back of the storage pocket at the 4 1/4″ point to make it easier to fold. I cut the corners of the remaining flap, filled the pocket with sequins and confetti and glued the pocket shut on the back, before adhering it to a top fold card base I created from Stamper’s Select White cardstock from Papertrey Ink.
 I added the ice cream on top of the shaker pocket using foam tape, and that finishes the card. The sequins and confetti I used are a mix of different brands. The opaque ones are from Studio Calico, and I’ve probably had them for almost 10 years, the same with the iridescent cream colored sequins. Those are from UiT Hobby, and the little star confetti is from Søstrene Grene, they’ve also been in my stash for many years.
 Simple color palette for this one.
 Small images in stamp sets often get neglected, but they’re so fun to create backgrounds from, and that’s exactly what I’ve done with this candy cane image from the
  Using a die from Kort & Godt, I created my sentiment from gold glitter cardstock, with three extra layers of white die cuts behind for dimension. The sentiment kind of got lost against my busy background, though. Vellum to the rescue. I cut a strip that was the perfect height for my sentiment and added some detail using a stitched border die from Lawn Fawn. I added my die cut letters on top, popped up the vellum panel and finished off with a few gold gems from Kort & Godt.
 Super simple color palette today.
 I decided to use the macaron from the stamp set. There’s actually a large and a small one in the set. I used the large one, and I stacked seven on top of one another, so I could add lots of different colors to them. It’s an odd rainbow, but I think it works, and I kept the coloring very simple. I fussy cut my stack of macarons, leaving a thin white border and put it aside while I worked on the rest of my card.
 I cut down a piece of patterned paper from the Ink Drops – Vivid paper pad from Craft Consortium. I chose this particular sheet because the colors I used for the macarons are well represented in the paper. I printed the sentiment directly onto the patterned paper and adhered it to a top fold card base I created from Stamper’s Select White cardstock from Papertrey Ink. I die cut the largest frame in the Classic Rectangle Frames die set from My Favorite Things 9 times from white cardstock. I stacked them and adhered them to the card front, before adding sequins and gems to the well. The sequin mix I used is the Vanilla Kiss mix from Little Things from Lucy’s Cards. I adhered a few around my sentiment to keep them from falling to the bottom, then sealed my shaker well with a piece of acetate from Simon Says Stamp. I added one final white die cut frame on top of the acetate for a clean look and also adhered the stack of macarons to finish the card.
 By creating thick walls for my well, the sequins, gems and pearls really have a lot of space to shake around. I made sure to place the large pearls and gems the right side up before I added the acetate, so they wouldn’t turn around on me. The smaller ones do, but as long as the big ones show their good side, I’m okay with that.
 Very sherbety color palette for this one. Three colors for each macaron.
 I colored my snowman with Copics and fussy cut him leaving a thin white border. I put him aside while I worked on the rest of the tag. Onto some white cardstock (Stamper’s Select White from Papertrey Ink), I ink blended distress inks in the colors Picked Raspberry, Spiced Marmalade and Scattered Straw for a soft background. I then used a die set from Hero Arts (Snowflake and Ornament) to die cut the ornament from my background and the snowflake circle twice from white cardstock. I adhered the two white die cuts together for a smidge of dimension, before adhering them to the base.
 I mounted the snowman on foam tape and white heat embossed a sentiment from Norsk Stempelblad AS onto a strip of Enchanted Evening cardstock from Papertrey Ink, mounted that on foam tape and added diamonds from Kort & Godt to the centers of the snowflakes, before finishing off the tag with a piece of ribbon, some thread and a couple of bells from UiT Hobby.
 Super simple color palette for this one.
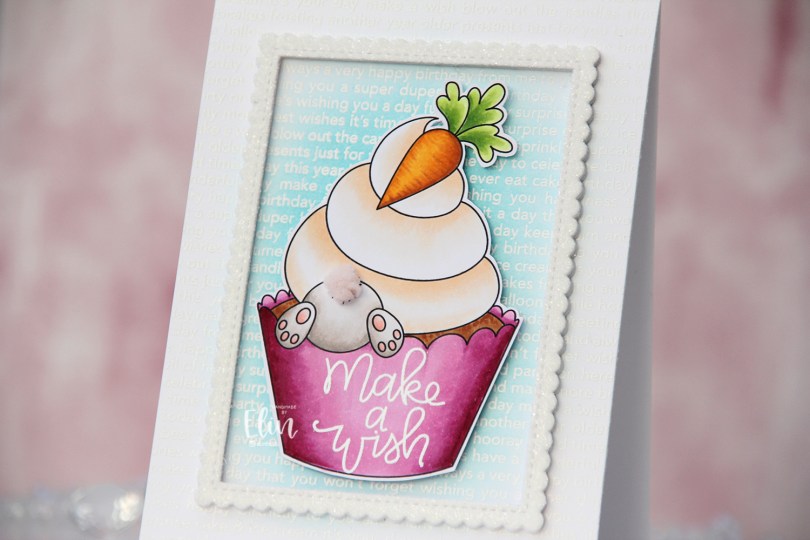
 When I first saw the
  I just knew this bunny had to be digging for treasure somewhere and decided to pair it with the carrot cupcake. I colored my image with Copics, stamped and white heat embossed a sentiment from the Scripty Bday stamp set from Mama Elephant, before adding a fluffy tail from part of a ribbon from Papirdesign. I felt the soft pink worked with the rest of the image. I fussy cut around my colored piece leaving a thin white border and put it aside while I worked on the rest of the card.
 Onto the card base, I stamped and white heat embossed the Happy Birthday background stamp from My Favorite Things, before ink blending in the center with a blender brush and Summer Splash ink, also from My Favorite Things.
 Using a die from the Stitched Rectangle Scallop Edge Frames die set from My Favorite Things, I die cut 5 frames from white cardstock and stacked them for dimension. I covered a sheet of white cardstock with a double sided adhesive sheet from Altenew, before using the same frame die to die cut one more from that. I added it on top of my stacked frames, removed the release paper from the top and covered it with rock candy distress glitter from Ranger for a bit of sparkle.
 I centered the frame on my card base and added my colored image in the center using foam tape. This card is fairly simple, and that tail totally steals the show.
 There’s something about the
  I printed my image on a quarter of an A4 sheet of X-Press It blending card. A4 is narrower and taller than lettersize, so my quarter panel doesn’t quite cover an A2 card front. By letting a strip of the card base showing as a result, it adds a design element to the card.
 Once my coloring was complete, I ink blended Berry Sorbet and Melon Berry inks into one of the openings in the Say Anything stencil from My Favorite Things, before stamping a sentiment from the Anything-but-Basic Birthday Wishes stamp set (also from MFT) using VersaFine Onyx Black ink.
 I adhered the panel directly to the card base (Melon Berry cardstock from Papertrey Ink) and added a few confetti stars from the Rosy Glow mix from Little Things from Lucy’s Cards.
 The stars are matte gold, but they still shine in the light. And because they’re flat, and everything else on this card is also flat, this card is very mail friendly, which is a rarity for me.
 Quick, simple color palette.