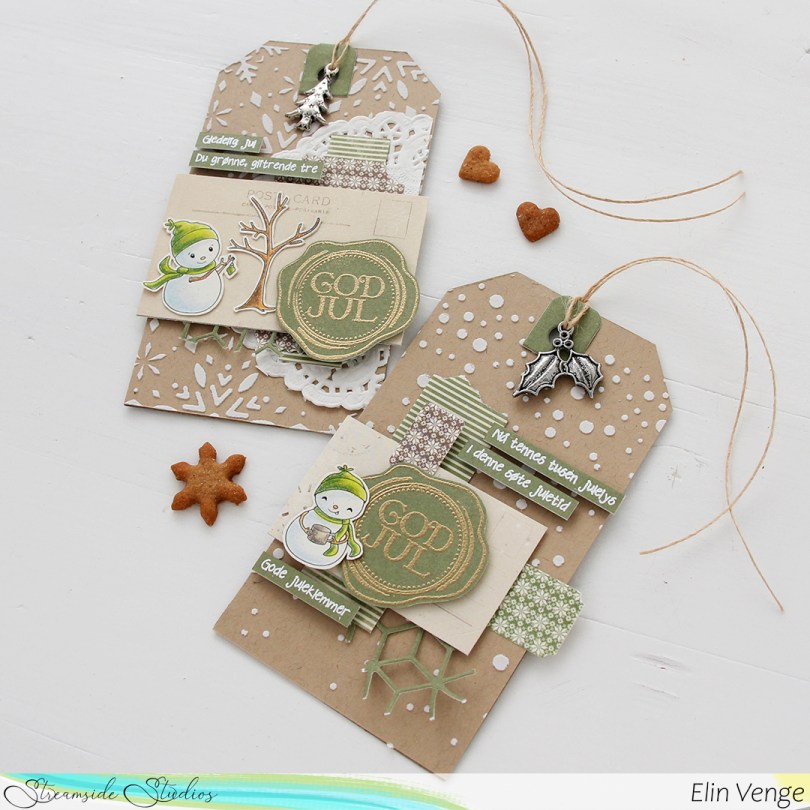
Hi, crafty friends! Brace yourselves for a text heavy post. Every year, I seem to make more than enough Christmas cards to send out, but I always scramble last minute to get gift tags done. Not this year, I’ve made quite a few, and here are a couple more, featuring snowmen from the Snow Much Fun digi stamp set from Streamside Studios.
 For these tags (I’ll have more to share later), I did compartmental crafting. Tim Holtz always raves about this, but I usually sit down and create my cards from start to finish in one sitting. Actually, that’s not entirely true, I do prefer coloring one day and making the rest of the card another day. Coloring takes a while, and once I’m done with that, I’m not really in actual making and assembly mode.
For these tags I did things a little differently. I colored lots of snowmen at once using my Prismacolor Premier pencils. I usually use my Copics, they’re so much faster, but for this I wanted a less bright look, and printed my snowmen onto Rustic White cardstock from Papertrey Ink. In another crafty session, I used various stencils with different pastes to create textured backgrounds, which I later cut down to tags. For these two I used the Falling Snow slimline stencil from Simon Says Stamp and the Snowflakes stencil from Ciao Bella, both using Light & Fluffy Modeling Paste from The Crafter’s Workshop onto Classic Kraft cardstock from Papertrey Ink. Both of these stencils are fairly large, so I got several tags out of each of the backgrounds I created.
In yet another crafty session I stamped and heat embossed a bunch of different small sentiments from Norsk Stempelblad AS, as well as a god jul seal from Poppydesign, the seals in Gilded embossing powder from Brutus Monroe and the sentiments in White super fine detail embossing powder from Ranger. I used green cardstock from the Christmas in Norway collection from Pion Design, which is an older collection, and it was a great opportunity to shrink my pile of scraps a little bit. Most of the patterned paper pieces I’ve used for these tags are from the same collection, with a few being even older. I used my Happy Days Ticket Stubs die from XCut to create the small pieces that I clustered together. This is the same die I pretty much always use for my clusters on my cards. It’s one die that cuts out nine tickets, and it’s my favorite die to use for my scraps. They don’t look like scraps when they’re die cut. I also just cut some strips using my trimmer and tore the edges for an uneven look, and used a die from Altenew to create small die cut pieces of solid color to tuck behind my other elements to break up all the perpendicular angles a bit.
I used foam tape on some of my elements, but not all, and die cut a reinforcer from green cardstock using a die from My Favorite Things. To finish off I tied May Arts natural twine through the holes and added a charm to each of the tags.
 For the back of the tags I used a tag die from My Favorite Things to die cut from more of that Classic Kraft cardstock from Papertrey Ink. I die cut a bunch of tags in one session, so I’d have many to do at once when I did the actual assembly. I stamped an older Inkido stamp using Jalapeño Popper ink from My Favorite Things, and even did some second generation stamping. I also used a couple of stamps from the Distressed Patterns stamp set from MFT to add additional spatter beyond the 24.12 stamp. I used more of the scraps I die cut and cut with my trimmer, and stamped a to/from stamp from Inkido onto scraps of Pion Design patterned paper using Dark Chocolate ink from Papertrey Ink. First generation stamping on one, second generation on the other for a softer look. It was fun to break out acrylic blocks to use with my stamps again, I use my Misti for pretty much everything, but this didn’t have to be perfect or straight, so I just played and had fun!
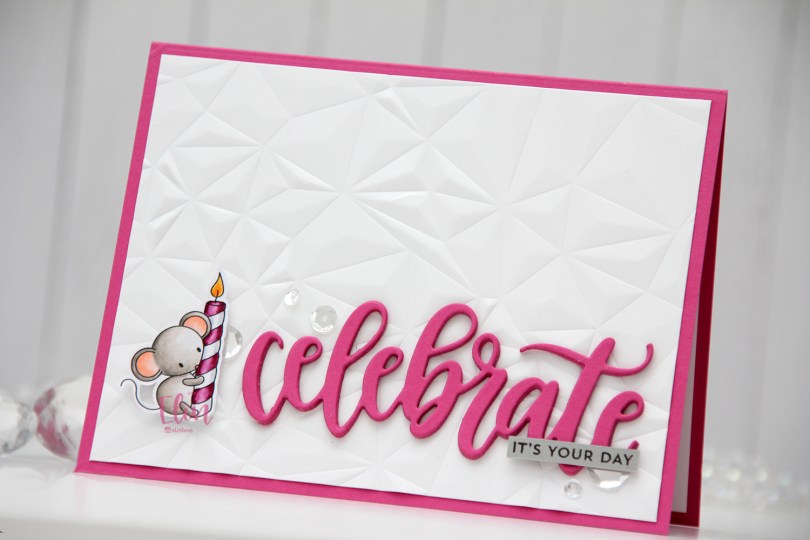
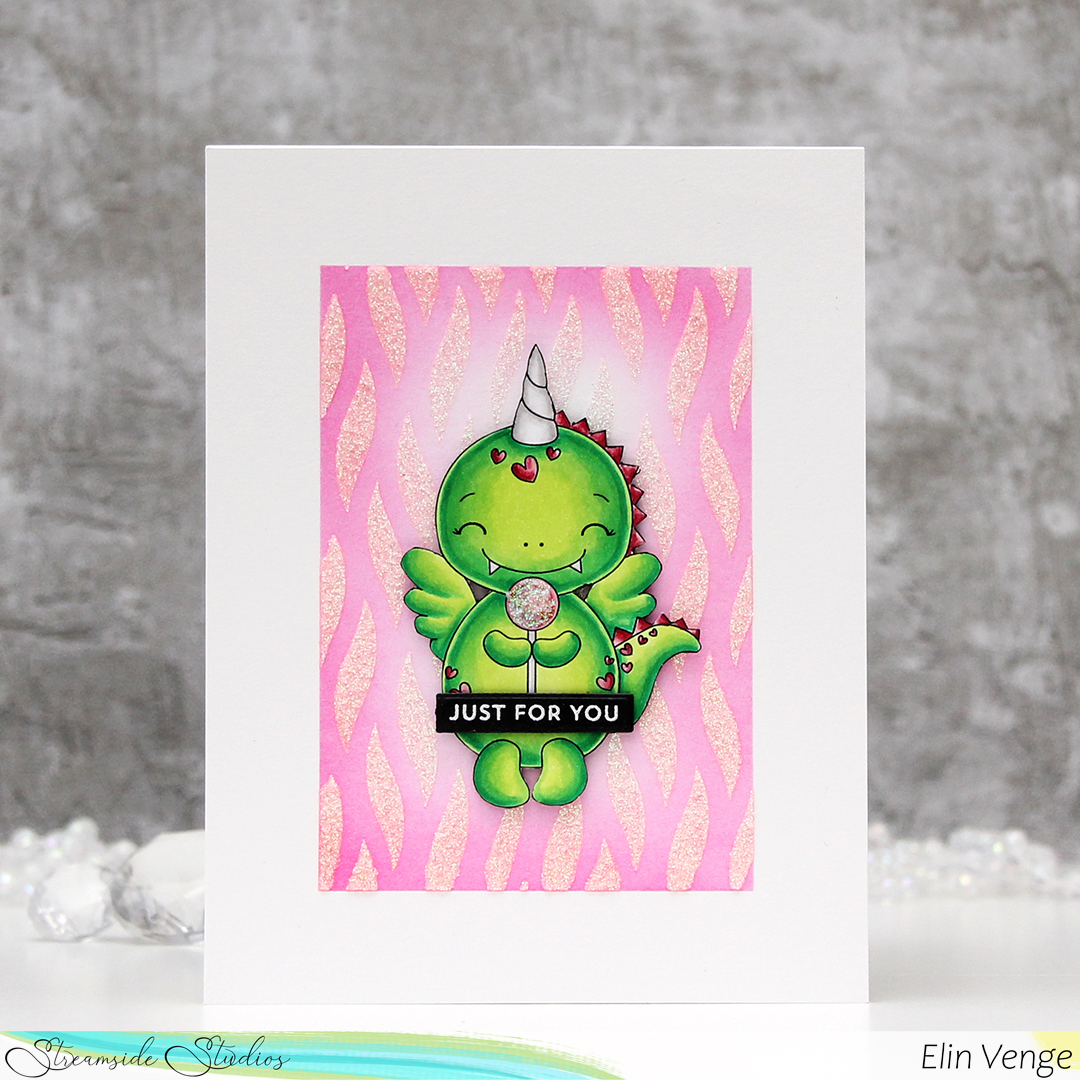
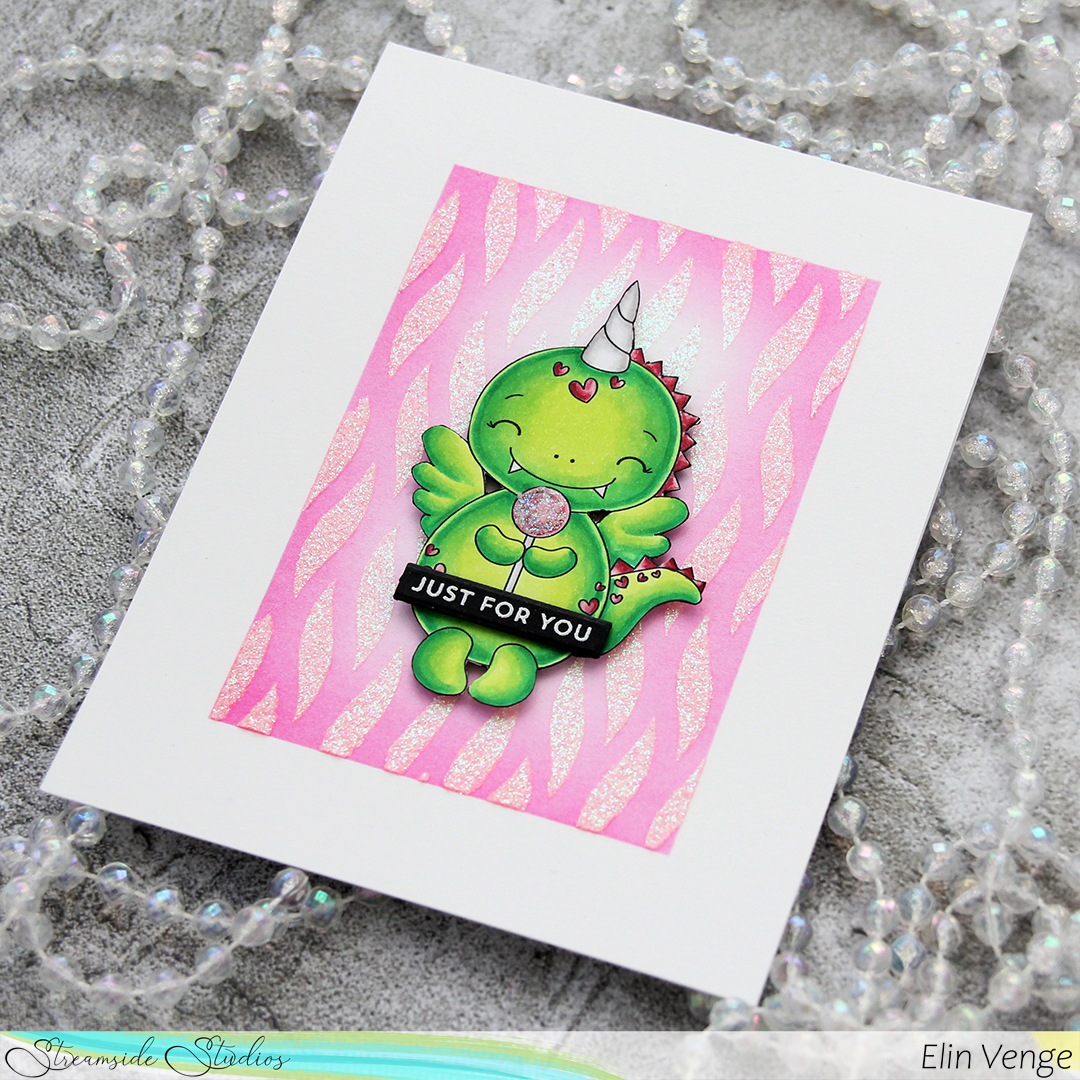
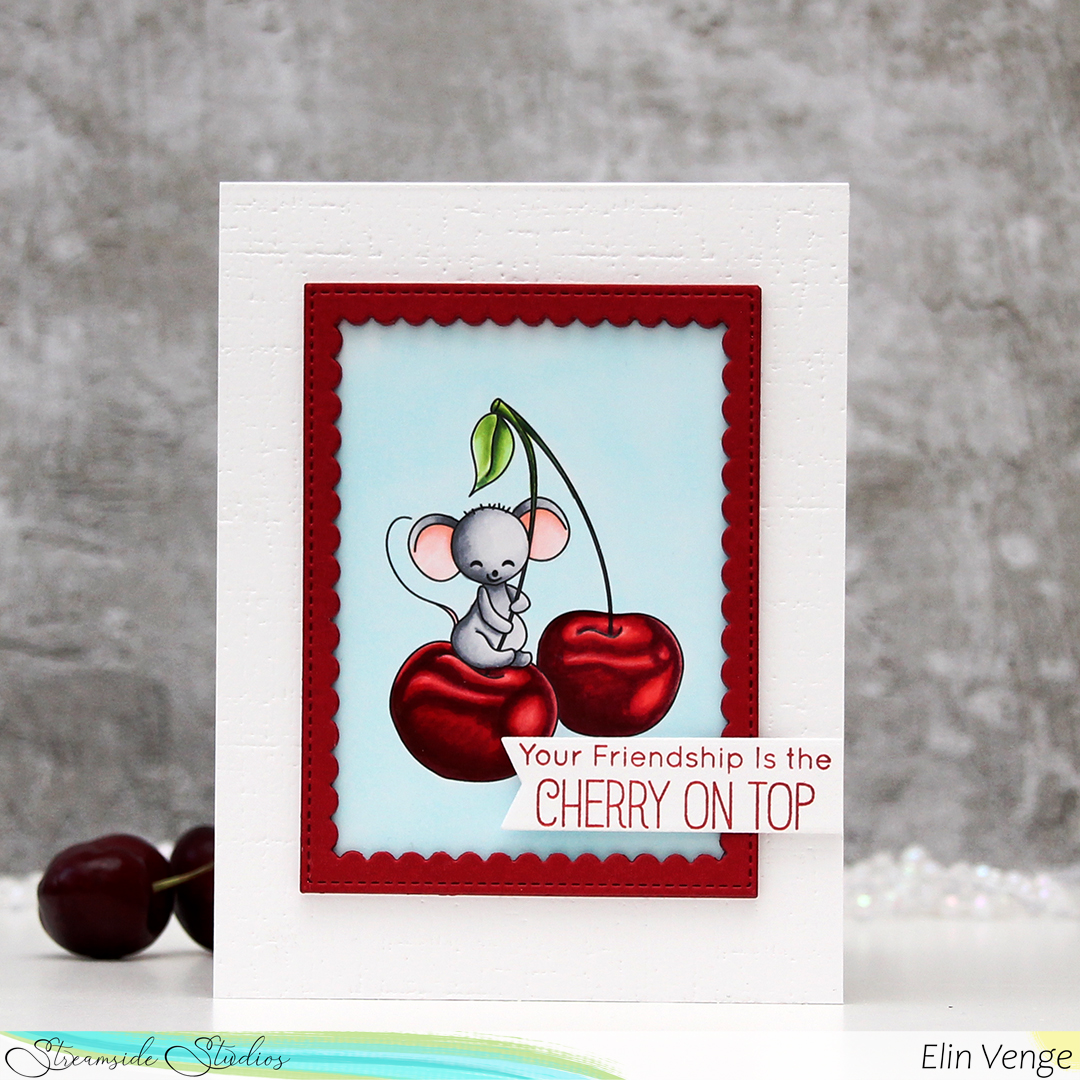
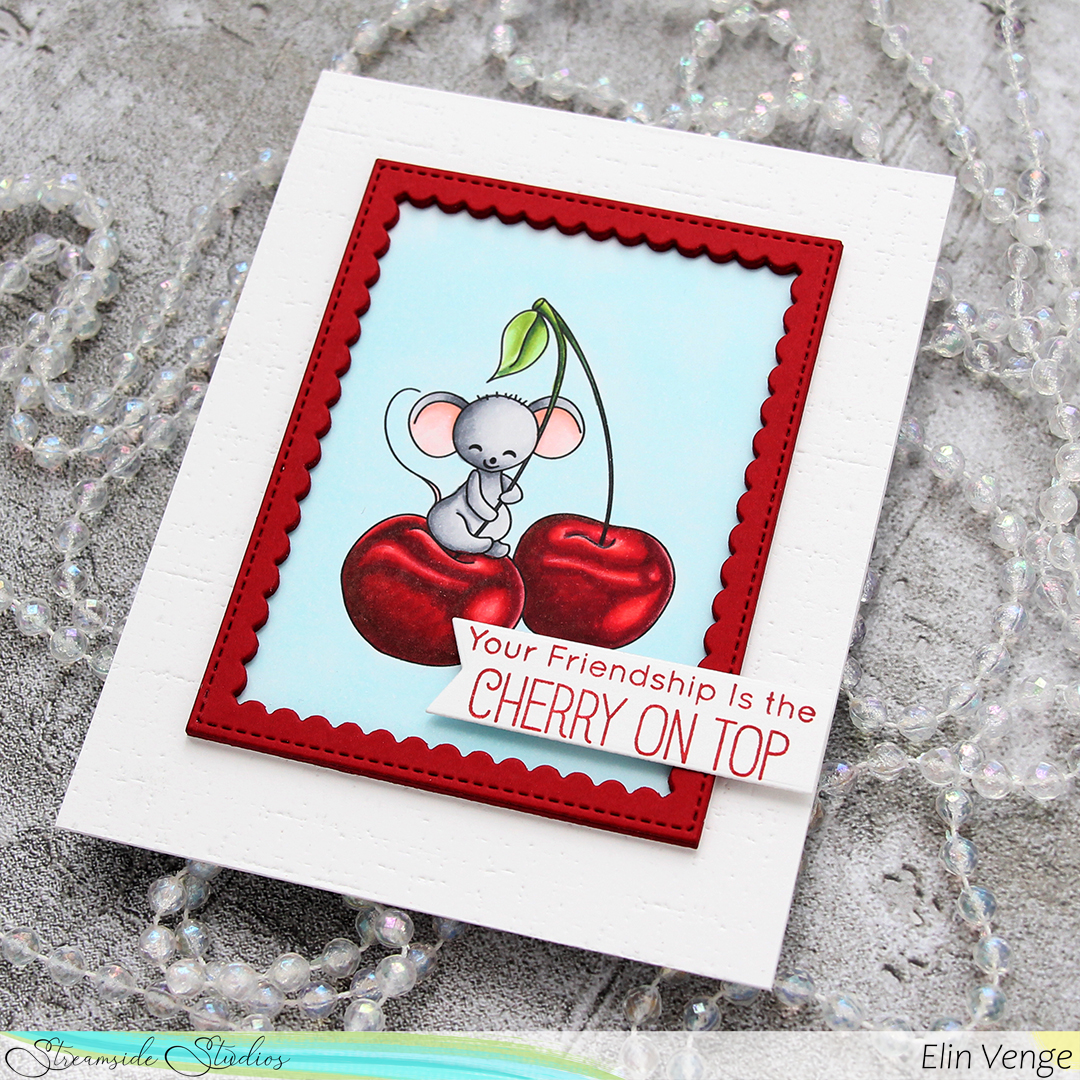
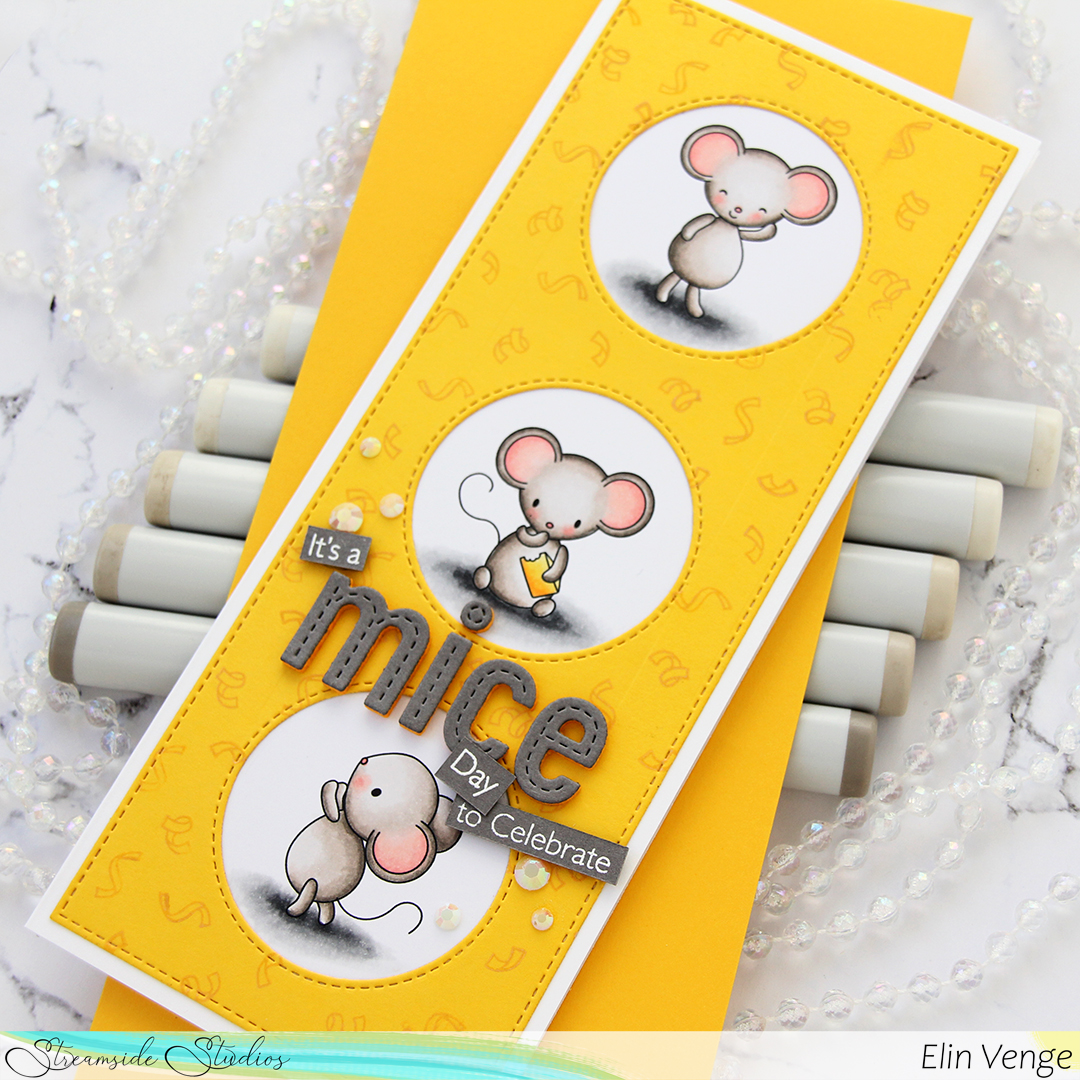
 In this stamp set there are five mice in different poses, there’s a giant piece of cake, a few accessories and some sentiments. I decided to focus on the mouse with the birthday candle for my card today. I usually color larger images, but these small ones from Streamside Studios are perfect for playing with different layouts for my cards.
 I colored the mouse very simply with my Copics, and did some fussy cutting, leaving a white border around the image. I usually prefer cutting right up to the lines, but with the tail and the wick on the candle being thin, single lines, that wasn’t going to happen.
 I created a top fold landscape cardbase from Ripe Raspberry cardstock from My Favorite Things and used the Crystal Distortion embossing folder from Simon Says Stamp on a piece of Stamper’s Select White cardstock from Papertrey Ink to create a textured background for all my elements to sit on.
 I die cut the Celebrate die from My Favorite Things four times from the same Ripe Raspberry cardstock that I used for the cardbase, and stacked them for a dimensional look. I stamped a sentiment from the Itty Bitty Birthday set from My Favorite Things using Smokey Shadow ink from Papertrey Ink onto a piece of Cement Gray cardstock from My Favorite Things and trimmed it down to a strip that I glued to my die cut word.
 I popped up the mouse using foam tape, and added sequins from the Sparkling Clear sequin mix from Pretty Pink Posh to finish my card. Super simple.
 Not a lot of Copics for this tiny image.
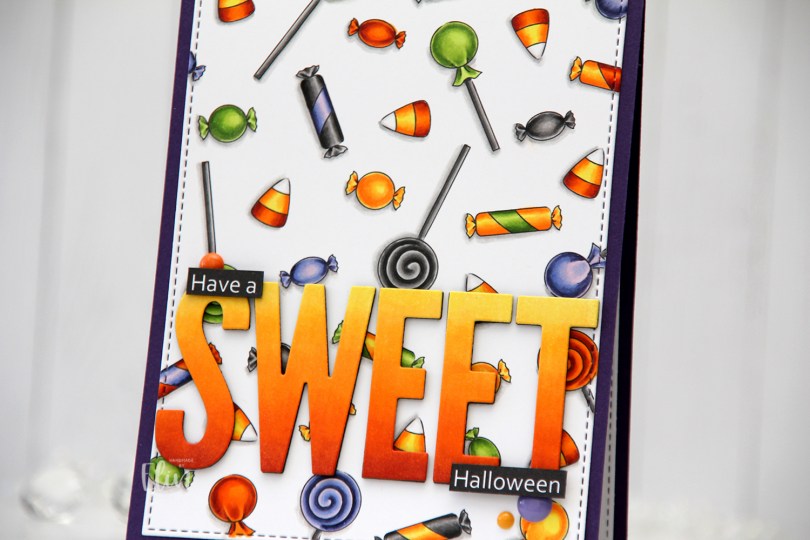
 In the stamp set, there are three fairies, a few ghosts, an adorable bat (yes, it’s adorable) and various accessories. Among them are different candies. I created a panel of these candies, and colored them in with my Copics using very Halloween-y colors. That was last year.
 I wasn’t sure what to do with my colored background, but I didn’t want to cover too much of it, and opted for a very simple design. Using the largest die from the A2 Stitched Rectangles STAX 2 set from My Favorite Things, I turned my colored piece into a panel with a nice faux stitched edge. I love these faux stitch dies from MFT and use them for nearly every card I make. It adds such a wonderful detail. It’s all in the details, to paraphrase a famous German architect.
 I adhered my die cut panel onto a card base I created from Royal Velvet cardstock from Papertrey Ink. It’s a deep purple that goes well with the coloring.
 I created the remainder of my sentiment in Photoshop and printed it, cut it down to two strips and added them on top of the letters with an extra strip of black cardstock behind for a little added dimension and stability. I added three enamel dots from Papirdesign (yellow and orange) and Altenew (purple) to finish my card.
 Not a lot of colors for this one, and yet they’re very Halloween-y.
 I wanted a really dark, intense moon to illuminate and cast shadows in my scene. Once I’d placed all the different images where I wanted them in Photoshop, I drew a large circle to create the edges of my moon. I set the opacity very low, so I could use it as a guide when I did the actual coloring to get a perfect circle and not have any black lines around the edges.
 My original plan when I colored this scene (which was actually last year) was to create a shaker card where the tombstone was the actual shaker recessed into the card, while everything else was popped up. Plans change, though, and when I sat down to actually make the card I decided to go for a very simple approach. I glued my colored panel onto a card base made from Sour Apple cardstock from My Favorite Things, and that was it. No embellishments, no nothing. Some people might call this a one layer card, but to me, a one layer card is one where everything is done on the card base. This is adhered to the card base, so I wouldn’t technically call it a one layer card. What do you think? One layer or not? What’s your definition of a one layer card?
 Not a whole lot of Copics, given the fact that the entire front panel is colored in.
 This cute vampire is from the My Little Pet Ghost stamp set. There’s also a witch in the same set that I used for a similar treat bag, which you can read all about in
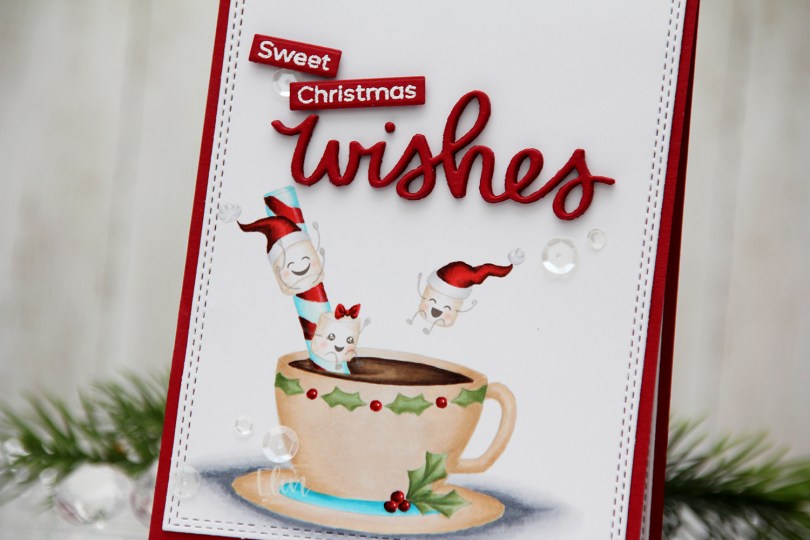
 I printed my image with gray lines so I could do no line coloring. Whenever I do this, I like keeping facial features black or a dark brown, so I don’t have to free hand draw them back in once I’m done coloring. It’s a neat little trick.
 I die cut my colored panel using the largest die in the A2 Double Stitched Rectangle STAX die set from My Favorite Things and adhered it directly onto a cardbase I created from Amarena Cherry cardstock, also from My Favorite Things.
 I die cut the word wishes five times from my red cardstock using a die from Mama Elephant. I stacked the words for a dimensional look and also stamped and white heat embossed the words Sweet and Christmas onto separate pieces of the same color cardstock. The stamped words are from two separate sentiments from the Bitty Bears stamp set from My Favorite Things. I love using pieces of sentiments from stamp sets to create new sentiments, it makes them more versatile.
 I felt like I had to add a little something to this, so I pulled out my White Orchid Sequin mix from Little Things from Lucy’s Cards and added them in a visual triangle on my card. This mix is one of my favorites, it’s right up there with the Sparkling clear mix from Pretty Pink Posh.
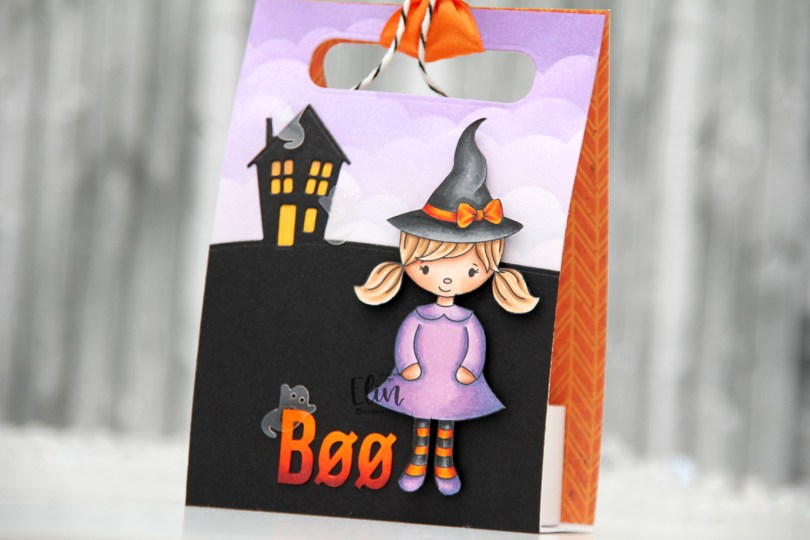
 This cute witch is part of the
  I did ink blending on this one, using the Slimline Cloud Edges stencil from My Favorite Things and inks from Altenew in the colors Deep Iris, Lavender Fields and Soft Lilac. I used the House on the Horizon die from Simon Says Stamp and die cut that from True Black cardstock from Papertrey Ink and adhered it directly onto my ink blended piece. Using a yellow Copic marker, I quickly colored in the windows and door of the house. I colored some white letter stickers from Papirdesign to match the orange on the girl, and adhered the letters next to her feet, before finishing off with a few ghosts from the Candy Corn mix from Little Things from Lucy’s Cards. I put a scrap piece of patterned paper on the inside back for a little extra visual interest, die cut holes through both layers and added a piece of ribbon and some twine to finish.