
Hi, crafty friends! There’s a new release coming next week from Rachelle Anne Miller which has me super excited. It has a theme I love and a type of critter I simply can’t resist – a little tease for you there. Today’s card, however, is created using an oldie, but goodie stamp. This is the Animal Parade, and I know I keep saying so many of Rachelle’s images are among my favorites, but they really are, and this is another one. I’ve used this image once before on this card. This time I cut the image apart and used the critters individually to create postage stamps on my card.
 I colored the images with Copics, then used the Postage Collage die from Waffle Flower to create stamps.
 I added Solar Paste in the Golden Hour color onto Lemon Tart cardstock from Papertrey Ink using the Merry Go Round stencil from Memory Box. I wanted a little bit of interest in the background, but nothing too distracting, and this worked really well. I added the panel to a top fold white card base I created from Stamper’s Select White cardstock from Papertrey Ink.
 I added scraps of cardstock behind my die cuts to give them a little lift off my card and adhered them pretty much in the center of the card.
 I stamped a sentiment from the Anything-but Basic Birthday Wishes stamp set from My Favorite Things onto Spring Rain cardstock from Papertrey Ink using Obsidian ink from Altenew. I cut the sentiment down to a strip and added a few layers of cardstock behind it before adhering it to the card.
 I finished off with a few sequins from the White Orchid Sequin mix from Little Things from Lucy’s Cards.
![]() Fairly muted color palette for this one.
Fairly muted color palette for this one.

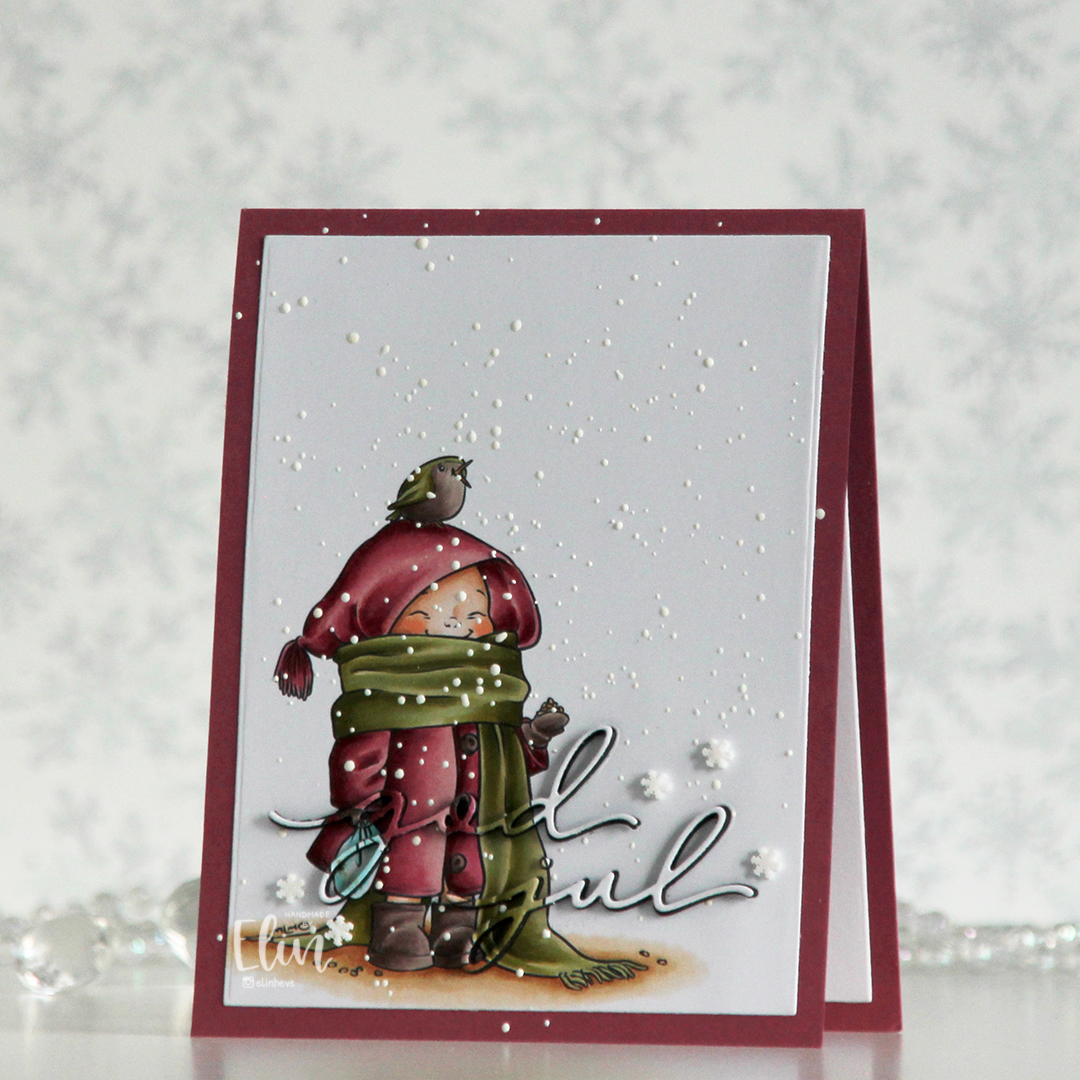 I printed the image on a piece of X-Press It blending card, colored it with my Copics and used a die in the Additional A2 Layers die set from Waffle Flower to trim the rectangle down a bit. You could also use a trimmer for this. Into the panel, I die cut the words god jul using dies from Kort & Godt. The two words are actually from separate die sets, but work perfectly together like this.
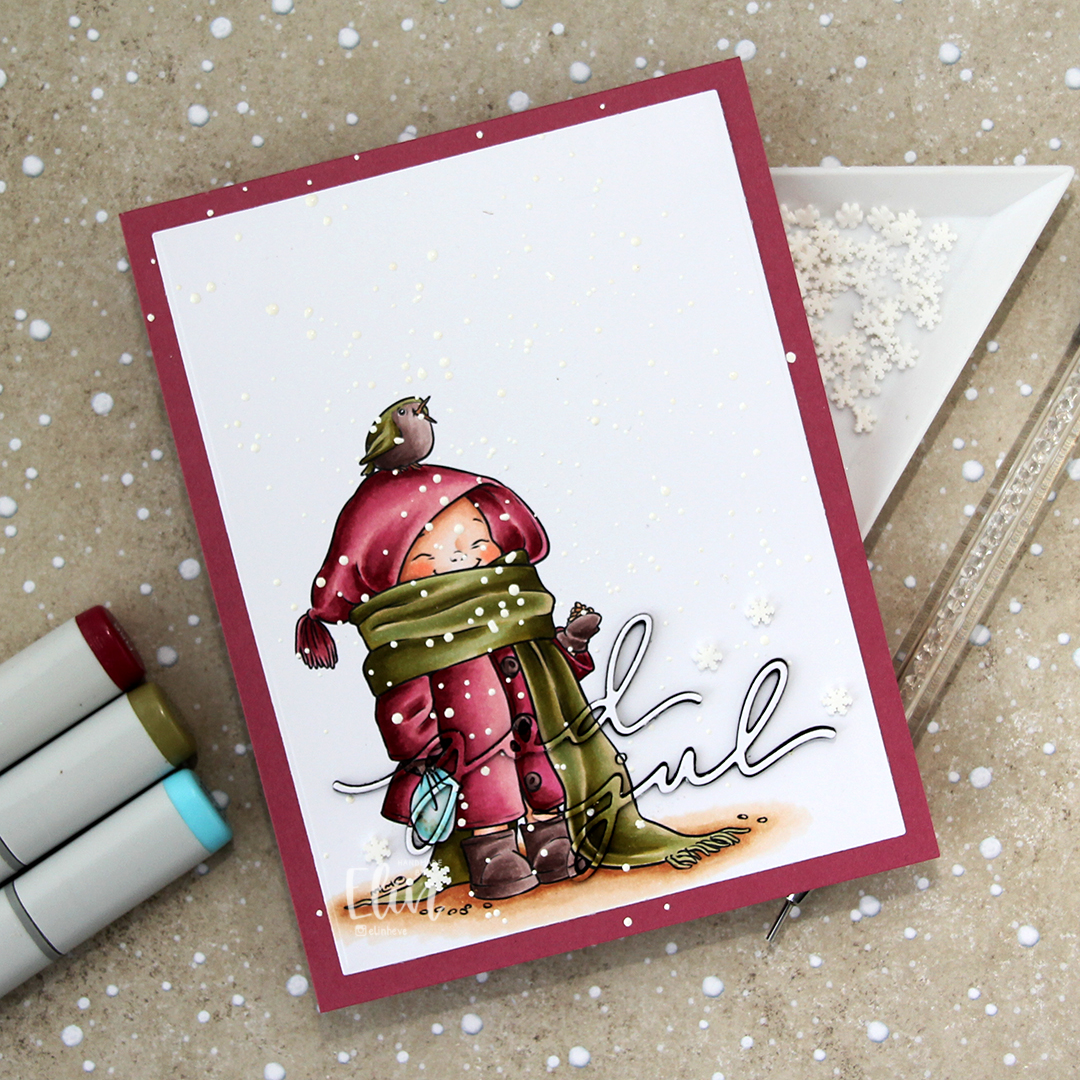 I adhered my panel to a top fold card base I created from Autumn Rose cardstock from Papertrey Ink, paper pieced the counters back into place, sprinkled on Chunky White embossing enamel from Stampendous and heated the granules from the back. I should have done this before adhering my panel to the card base to spend less time with the heat gun (melting the powder through two layers of cardstock takes significantly longer than doing it through just the one layer), but I honestly forgot about it. It does work through two layers, it’s just a matter of patience.
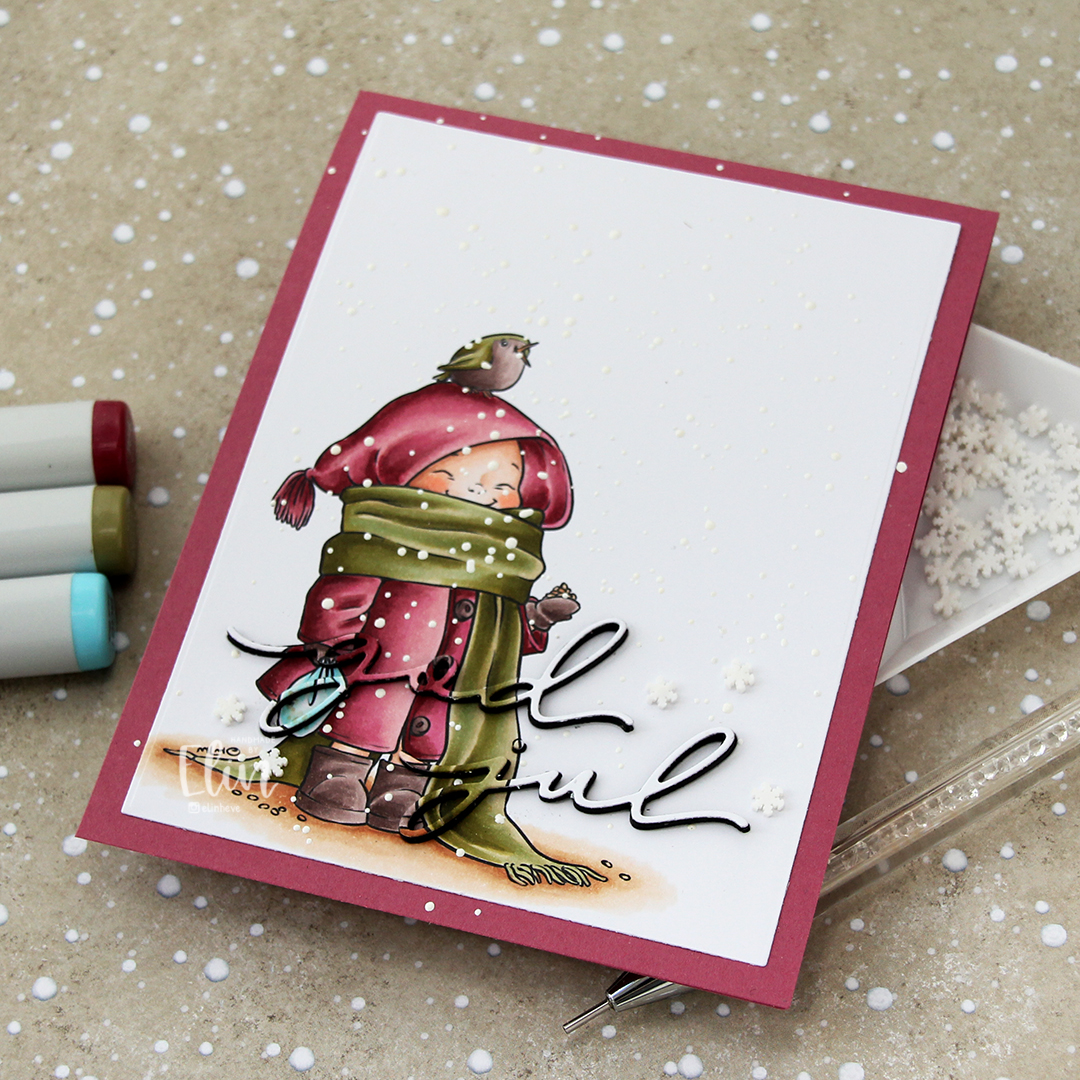 Once my snow was in place, I die cut four layers of each of the words from black cardstock. I stacked them, added the colored one on top and puzzle pieced them in where they belonged, before adding a few Snowdrift sprinkles from Little Things from Lucy’s Cards to finish the card.
 Pink and dirty green. This is about as close as I (willingly) get to using red and green together on a card.
 I colored the image with my Copics before cutting out a couple of quick masks for the deer and bunny. I ink blended a soft blue circle behind them, using the Watercolor Circle stencil from My Favorite Things and ink (Harbor ink from Concord and 9th) that was left on my light blue blender brush from my last project. Using a die in the Additional A2 Layers die set from Waffle Flower, I cut my panel down, added four layers of cardstock behind it for dimension and put it aside while I worked on the rest of my card.
 To a top fold white card base, I adhered a piece of patterned paper from the Watercolor Wash 6×6 paper pad from My Favorite Things and added my stacked panel in the center. Using a die from the Sweet Sentiments die set from Altenew, I die cut for you twice from white cardstock and once from the patterned paper. I stacked the die cuts and glued my sentiment right above the deer. The green patterned paper is very soft, but by stacking the die cuts, the sentiment still stands out a little. I added a bit of black Glaze pen to the eyes and finished off the card with pearls from the Fresh Mint mix from Little Things from Lucy’s Cards.
 I separated the image into two, so I could create staggered postage stamps on my final card. I colored the images with Copics, and used the Postage Collage die from Waffle Flower to turn them into postage stamps. I also die cut a third postage stamp and stamped the sentiment in the center of it using Obsidian ink from Altenew. The sentiment itself is from the Easter Bunnies stamp set from Simon Hurley. Once I knew the sentiment was dry, I masked off the edges of the postage stamp and ink blended the center rectangle using Grapefruit ink from Concord & 9th.
 I cut down a sheet of Powder cardstock from Concord & 9th to fit the front of an A2 card, and used the Linen & Canvas impression plate from Papertrey Ink to add some subtle texture to the background. I adhered it to a white top fold card base and arranged my postage stamps, adding various thicknesses of dimension behind each for some interest, before finishing off with a few pearls from Little Things from Lucy’s Cards.


 Very simple color palette for this one.
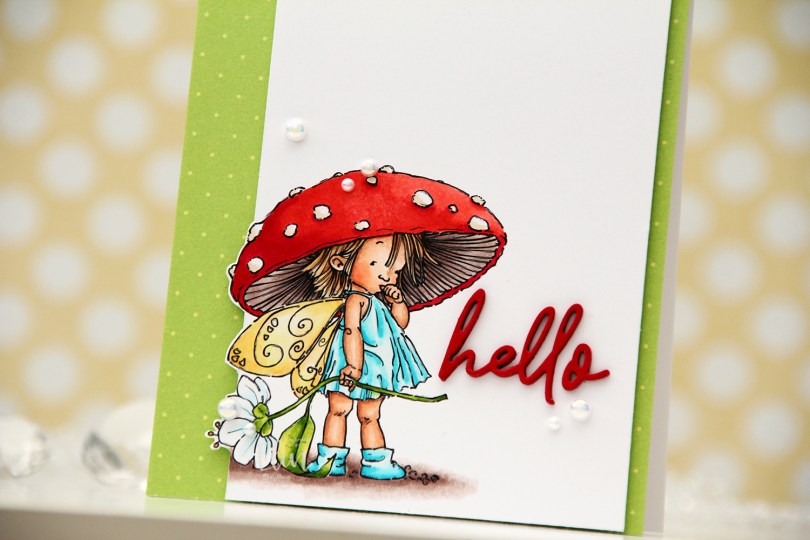
 I colored the image with my Copics, cut my panel way down and even cut a little bit around the image for a fun effect.
 I decided to cover the card base with patterned paper. This one is from Waffle Flower, it’s from their dot pattern in the Christmas color scheme. It’s not too distracting, the colors work well with the colors I’ve used and the dots work well with this amanita mushroom hat.
 I mounted the panel with my image using foam tape and adhered it left of center on the card, so a little bit of the patterned paper would peek out on the right, and a lot of it would peek out on the left.
 I die cut the word hello from the Sweet Sentiments die set from Altenew using Pure Poppy cardstock from Papertrey Ink. I die cut four layers and stacked them together for dimension. This is a very fine lined die cut, and I’ve found that using microdot adhesive is a good way to go. Even liquid glue in a fine tip bottle will ooze out the sides on this one, it’s so fine.
 I finished off with a few pearls from the Glossy Porcelain mix from Little Things from Lucy’s Cards.
 This is such a bright, happy color palette.
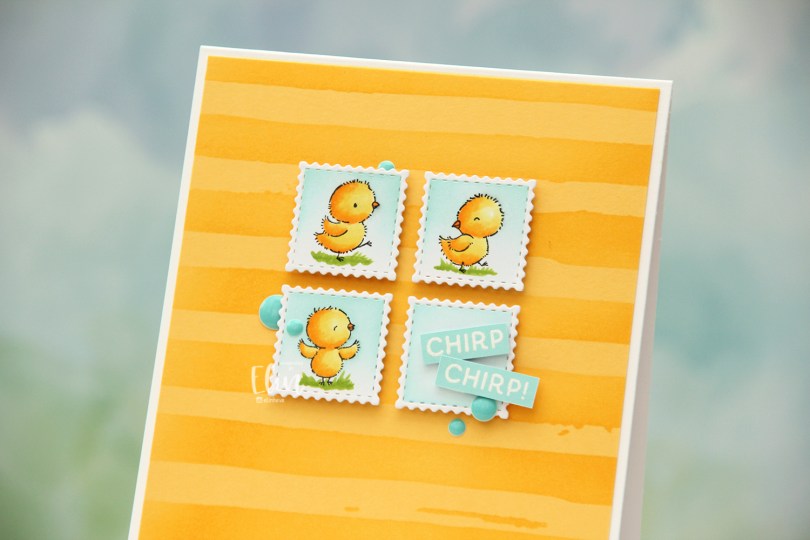
 These little chicks are so cute. And since they’re so small, they’re very easy to color. I did quick Copic coloring, before using the 1″ square die in the Postage Collage die set from Waffle Flower to cut them out. I then quickly scribbled on some grass so they’d have something to stand on, then masked off the chicks and the outer perimeter of each postage stamp, before ink blending the sky using Aqua Sky ink from Concord & 9th.
 Onto a panel of Buttercup cardstock from Concord & 9th, I ink blended with the same ink color using the Watercolor Stripes stencil from Altenew. I cut the panel down slightly, and adhered it to a card base I created from Stamper’s Select White cardstock from Papertrey Ink.
 I mounted my postage stamp chicks in the top center of the card, and also an additional fourth square that I ink blended in the same way. I stamped and white heat embossed a sentiment from the Easter bunnies stamp set from Simon Hurley Create and ink blended over the top using more of that Aqua Sky ink from Concord & 9th. I cut the sentiment into two small strips and mounted them on foam tape on the top of the bottom right square, angling them for a playful look, before finishing the card with a few enamel dots from the Cool Summer Night pack from Altenew.
 I love the dimension behind these postage stamps, it looks like these chicks are floating.
 Super simple color palette for this one.
 I colored up the penguins with my Copics and fussy cut them right up against the black lines. These are very simple shapes and easy to fussy cut. I put the penguins aside while I worked on the rest of my card. Onto a card base I created from Blue Breeze cardstock from My Favorite Things, I stamped tiny snowflakes from North Star Design using Spring Rain ink from Papertrey Ink for a subtle tone on tone look. This is super subtle, my ink pad needed reinking, but I went with it and didn’t reink until after the project was complete, I didn’t want to stop half way.
 I used the Stitched Snowflake Backdrops die from Lawn Fawn to create an impressed snowflake pattern on a piece of Stamper’s Select White cardstock from Papertrey Ink. I added a few extra layers of cardstock behind it and adhered it to the card base. Using the Postage Collage Die and coloring stencil from Waffle Flower, I created postage stamps for my penguins to sit on. I stamped the snowflakes on these as well, and ink blended a little in from the edges to define them a tiny bit. It’s still subtle, I hadn’t reinked my ink pad at this point. I added dimension behind each of the postage stamps, adhered them to the card and mounted the penguins on top. I used the Hjerte 3 die set from Papirdesign to die cut my sentiment from Berry Sorbet cardstock from Papertrey Ink. I die cut four and stacked them together for a dimensional look, before adding a
  Simple coloring for simple images.
 I created a mini slimline card this time. I figured it would go well with the tall, skinny image. This particular mini slimline measures 3 1/8 x 6 1/8″. I colored the image with Copics and used a die from the Stitched Mini Slimline STAX die set from My Favorite Things before I went over it with the Bokeh Elements Stencil Duo set from Waffle Flower and Rose Quartz ink from Altenew to create a soft background behind the chicks. I didn’t even bother masking them off, the pink ink was so light. I then trimmed down a piece of Lemon Tart cardstock from Papertrey Ink and used the Diagonal Stripe stencil from Simon Says Stamp with Scattered Straw Distress Ink to create some interest to the base as well. I stamped a sentiment from an Easter stamp set from Papirdesign (PD18390 Påske) using Obsidian ink from Altenew, and the card was complete.
 I colored my image with Copics and used a fancy border die from Papirdesign (Snøkrystall ramme 2) to create trees and snowflakes along the edge. I wanted to do something different, and actually created a card base from vellum. I have heavyweight translucent vellum from My Favorite Things, and it’s a very thick, sturdy vellum that can handle being a card base.
 I sprinkled on chunky white embossing enamel from Stampendous both on my colored piece and on the vellum base, before adhering the two together. I decided to create a white panel with the same die cut border for the inside of the card, as the vellum is very slick and not well suited for writing a personal message.
 I stamped and white heat embossed a sentiment from the B05 stamp set from Norsk Stempelblad onto Autumn Rose cardstock from Papertrey Ink. I used the Wax Seals die set from Waffle Flower to turn it into a faux seal and mounted it onto my card using foam tape.
 The vellum and die cut border create unexpected elements, the embossing enamel creates texture and you get a little bit of dimension with the sentiment seal. They all contribute and make this simple card a special one.
 Not a whole lot of Copics for this, and a fairly muted color palette.