Lili of the Valley has a new release out today, and I was lucky enough to play with it a couple of days ago. There are penguins. Lots of penguins. You guys know how much I love penguins. I had a hard time deciding which ones to use, there are so many good ones. There’s a slew of birthday penguins and a whole bunch of others, as well. Not only that, but they’re also releasing inky backgrounds. All kinds of shapes and colors. There’s pastels, brights, basically the entire rainbow, whole washes for backgrounds, splatters, stripes and every little inky thing your heart could want. I love the look of inky backgrounds, but 1 – I don’t like getting my fingers inky, and 2 – I prefer my whites to match. Watercolor paper and X-Press It don’t go well together. This is the perfect solution. You can print on any paper you want and get that unique watercolor look without getting your fingers inky or warping your paper, it’s brilliant!
 For this card I chose a tealy green/blue watercolor splash background and a penguin with a camera in his hand. I knew I had to use this one as soon as I saw it, and an idea formed in my mind as to how my card would look in the end. The files are in png format, so they’re good quality and very easy to use together. I simply added my penguin to the splash background in Photoshop and printed. It couldn’t be easier. I love that I now have a watercolor look, but the paper is bright white, smooth and perfect for Copic coloring.
 I diecut my panel with a faux stitch rectangle die from My Favorite Things, and glued it to a cardbase made from Tropical Teal cardstock from Papertrey Ink. I used a polaroid die, also from My Favorite Things, to diecut the frame four times out of that same Tropical Teal color and once from the same white cardstock I used for the rest (X-Press It blending card, btw). I stacked them all on top of each other for dimension. “Dimension is life”, as Laura Bassen always says. She’s my cardmaking hero.
 A side look at that frame. You can see the colored cardstock from the sides, which gives such a fun look to a panel that is predominantly white.
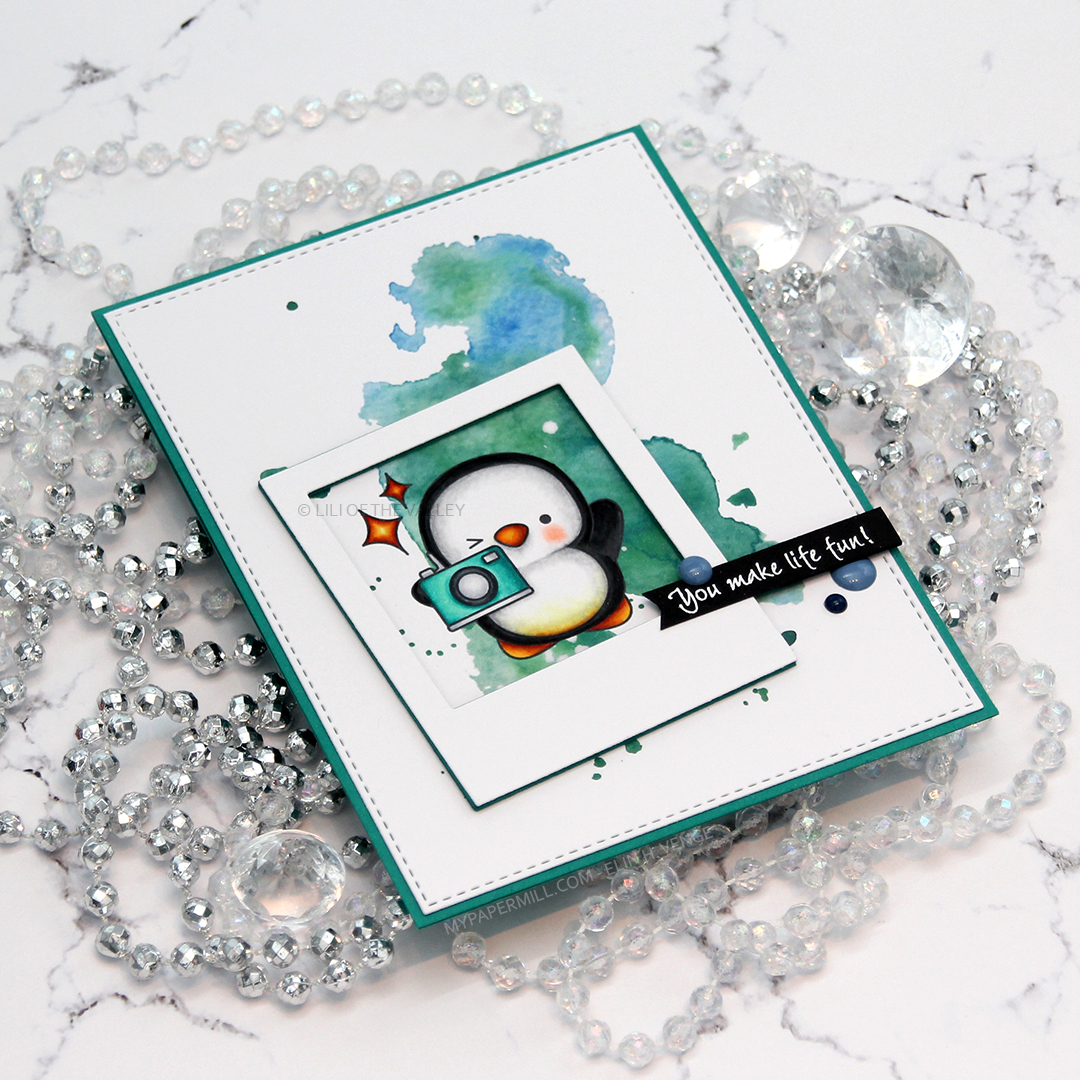 I finished off my card with a white heat embossed Inky Wings sentiment on black cardstock. I also popped that up, because dimension really IS life. A few blue enamel dots from Papirdesign to get a tiny more blue in there to embellish.
 There are two bundle packs with penguins. One has birthday penguins, and the other one is all other occasions, which is the pack I used for this card.
 There were also five different packs of watercolor backgrounds released. I used the Watercolour Splashes collection for this one. It comes in sooo many different colors, and it’s awesome!! There’s also the Watercolour Backgrounds pack, the Watercolour Pastels pack, the Watercolour Brights pack and the Watercolour Stripes collection.

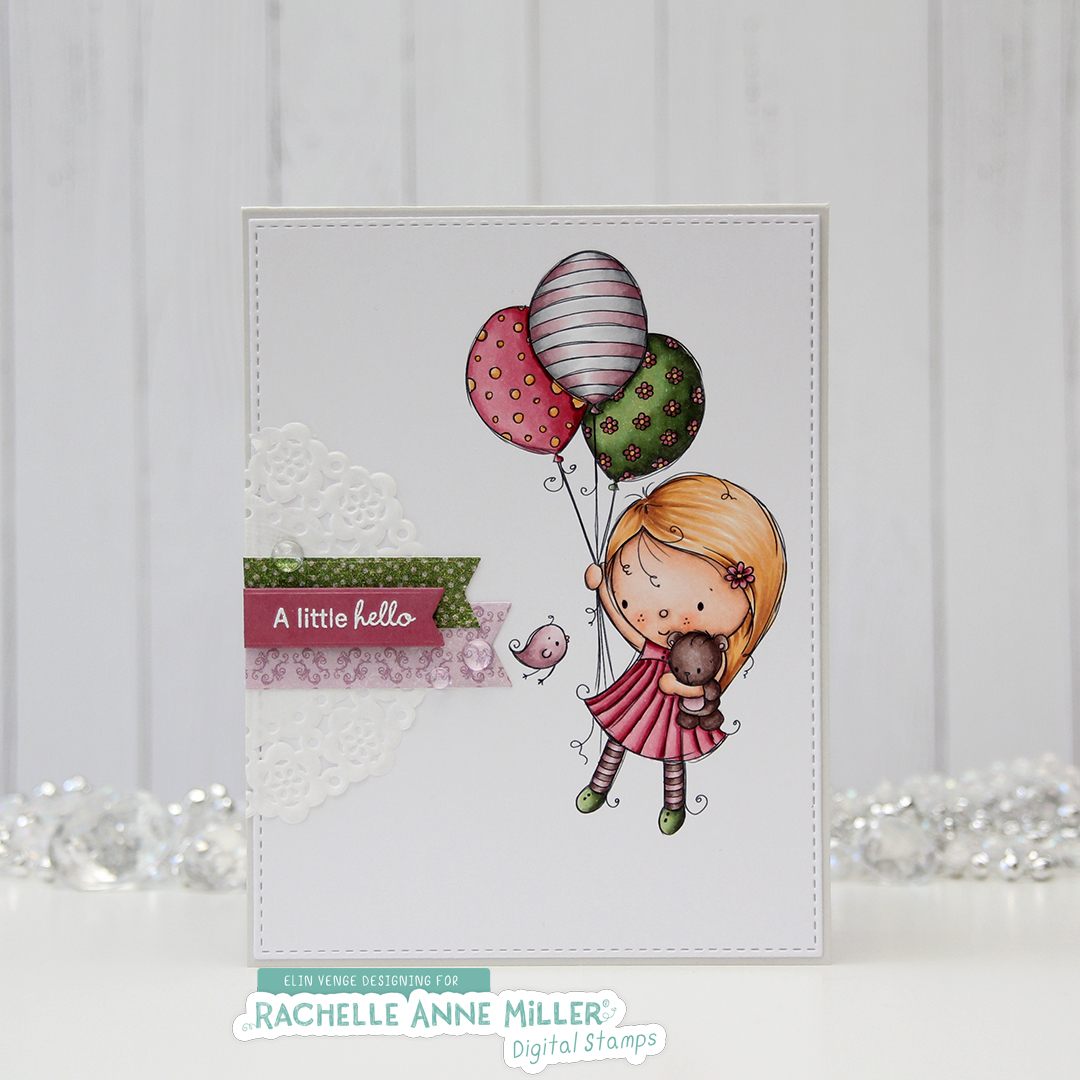
 I colored up Winter Present for day 22 of Kathy Racoosin’s 30 day challenge on Instagram and made a simple Christmas card with it.
 I used the largest of the faux stitch rectangle dies from My Favorite Things to create a nice edge for my panel. I mounted it to a cardbase I made from Soft Stone cardstock from Papertrey Ink.
 I dug through my scrap stash of Christmas themed patterned paper and got really lucky with part of a diecut ticket and some pine branches.
 I made a little cluster starting with half a Doodlebug mini paper doily, then the partial ticket stub and the pine branches. I found a fitting sentiment on the bottom of a piece of patterned paper from Papirdesign, so I cut that bit out and added foam tape behind it. I finished the card with a few snowflake sprinkles from Little Things from Lucy’s Cards.


 I diecut the panel with the image using the largest of the faux stitch rectangle dies from My Favorite Things. I glued it straight to a cardbase I created from Soft Stone cardstock from Papertrey Ink.
 I added half a Doodlebug Nini doily, some diecut scraps of patterned paper (Papirdesign and Basic Grey, btw) and a white heat embossed Inky Wings sentiment on Papertrey Ink Autumn Rose cardstock. A few raindrops from Little Things from Lucy’s Cards, and my card was finished.
 I colored up
  This type of card has become my signature card style. I haven’t however, used those Doodlebug mini doilies in a while, so it was good to pull out half of one (a little less than half, actually) for this card. I used the Fishtail Flag Frames dies from My Favorite Things to diecut a couple of banners from yellow scraps of patterned paper. The bottom one is from My Mind’s Eye, the top one from Papirdesign. I also diecut the sentiment strip after stamping and heat embossing a sentiment from an old Papertrey Ink stamp set on that piece of Hawaiian Shores cardstock, also from Papertrey Ink. I added to more layers of cardstock behind my sentiment to make it a little more dimensional.
 The last little piece of business was adding some enamel dots. I hardly ever make cards without enamel dots or sequins, and I tend to always place them near the sentiment, it draws in the eyes. Nice little trick for’ya.
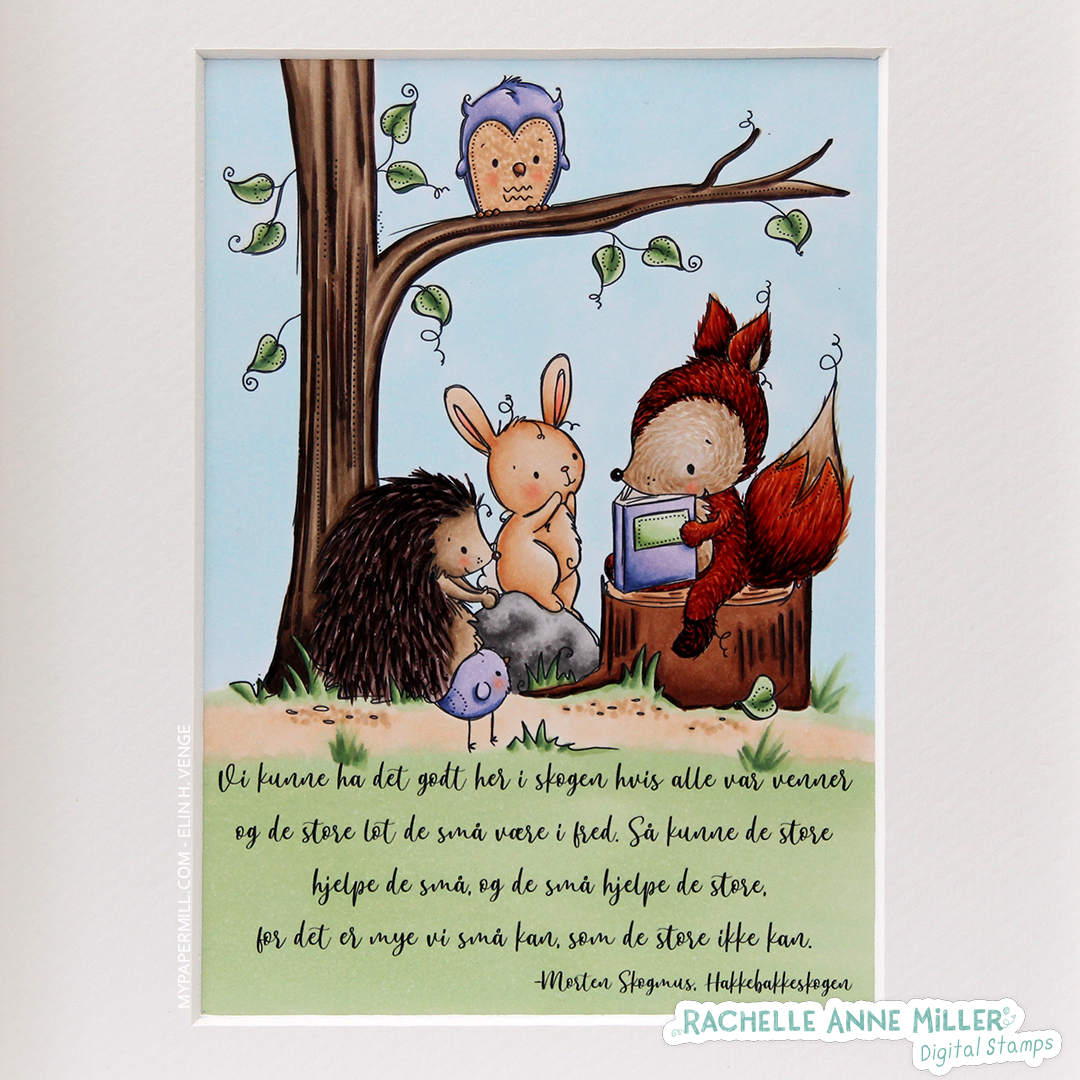 The image itself is almost square, so I had to come up with something to fill the space to make it fit in my frame. I chose a quote from a children’s book from 1953 that every Norwegian knows pretty much by heart. The English title is “Claus Climbermouse and the other animals in the Huckybucky forest”. Early on in the book, the fox, the porcupine and the owl all try eating the smaller animals, particularly the mice. The fox is pretty much always hungry because the mice keep getting away. At one point all the animals attend a meeting in the forest, held by the bear, where one of the mice suggests they pass a law that says that all the animals have to be friends, none of them can eat the others, and that the ones that are too lazy to find food themselves, aren’t allowed to steal food from others. The law is passed, even though the owl, porcupine and fox don’t entirely agree.
 I was super happy with how it turned out. What do you think? Good for a wall in a toddler’s room?
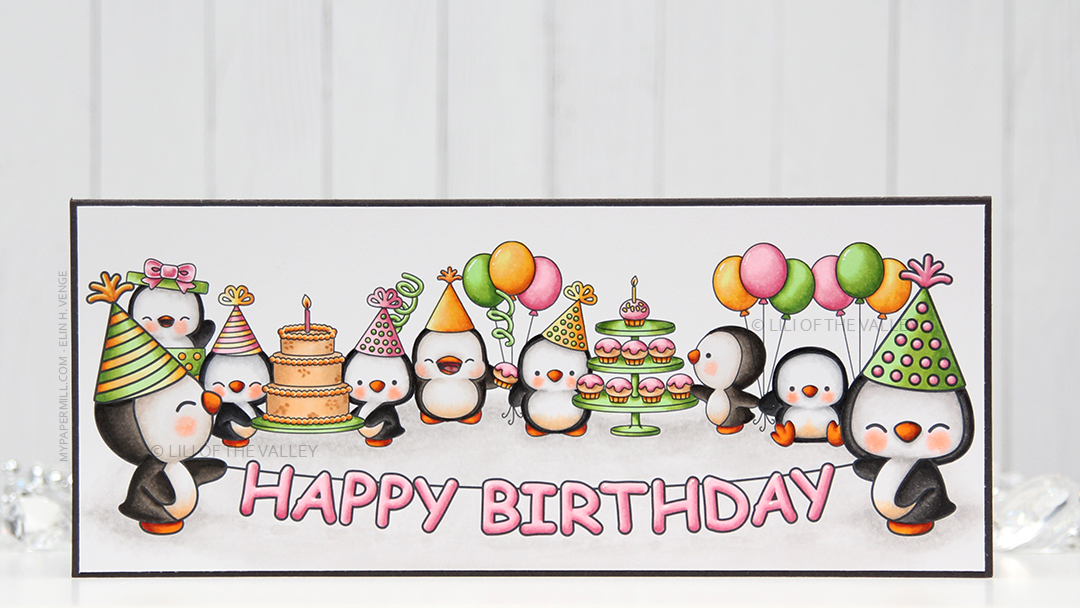 I created a scene from a penguin party using Photoshop. These files are in png format, making it very easy. Looks like a surprise party to me. On this card, I used 7 of the 9 penguin images in the set, and also a couple of party hats for the penguins in front holding the birthday banner.
 I had so much fun coloring this one, and I actually used three different gray Copic families for the different penguins. The only ones I didn’t use were the cool grays. The card itself measures 8 1/2 x 3 1/2″, and I made it very simple by just gluing on my little penguin party scene to a cardbase that I created from some Smokey Shadow cardstock from Papertrey Ink.
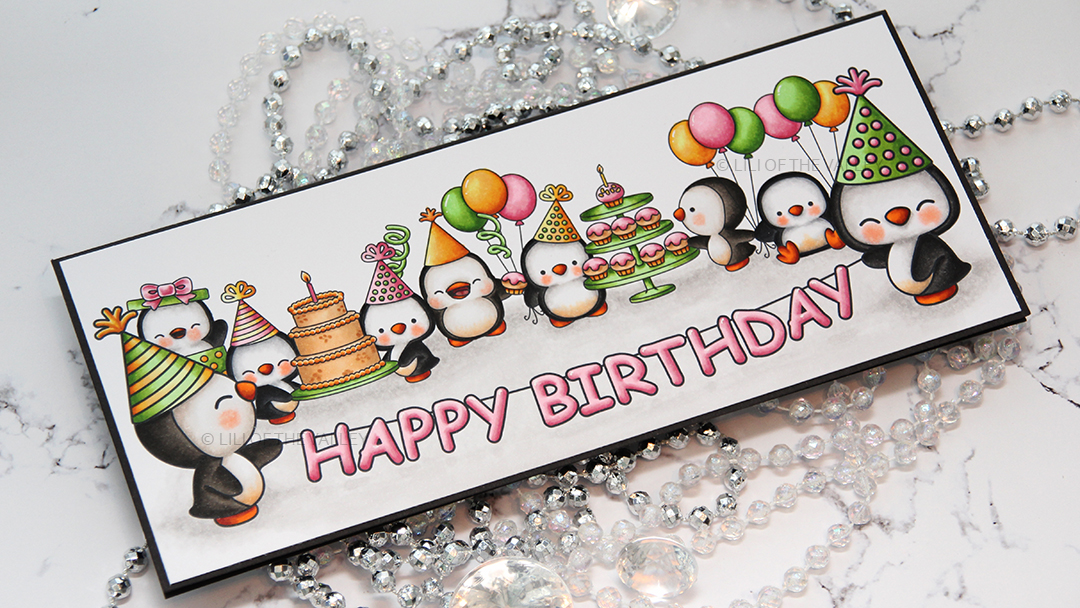 Really bright pops of color, I’m hoping you can’t help but smile when you see this one. Ten penguins in one card, that’s a whole lot of happy and a good way to kick off the weekend.
 These are just some of the penguin images in this set. You’ll find all the birthday penguins in the Lili of the Valley Etsy shop
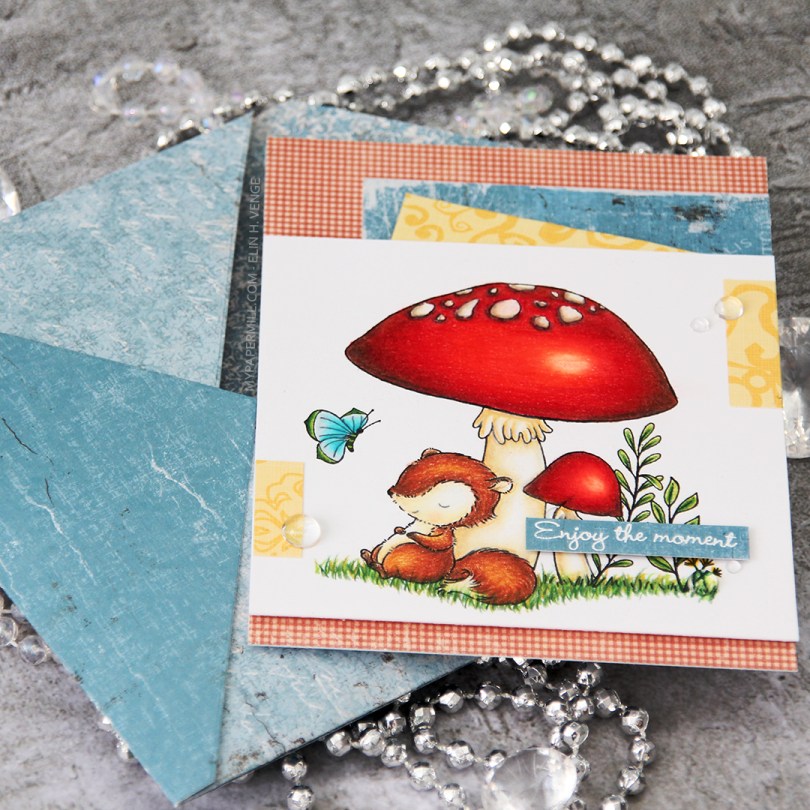
 This little fox scene is from the Always Bring a Smile set, designed for My Favorite Things by Stacey Yacula. I really love her characters, they’re so full of life, and this little guy looks like he’s taking a well deserved nap against the stem of that big mushroom. I actually stamped this on Stamper’s Select White cardstock from Papertrey Ink and pulled out my Prismacolor pencils to color him in for day 2 of the current round of Kathy Racoosin’s 30 day coloring challenge.
 I found some scraps of patterned paper in my stash (the red is from Pion Design, the tealy blue from Maja Design and the yellow from Chatterbox) and added them here and there on my card, before propping my panel with the cute fox onto the card front using foam tape. Lots of foam tape, I wasn’t shy! I stamped and white heat embossed a
  I added a few raindrops from Little Things from Lucy’s Cards around my sentiment and near those small yellow bits, and called it done. I had enough of those Maja Design scraps to make a matching envelope using the A2 V flap envelope dies from Simon Says Stamp.
 I don’t usually do anything to the back of my clean and simple (it’s somewhat clean and simple, this one?), but I recently bought this
 I try very hard not to have favorites, but I can’t help it.
  I used the largest of the Stitched Rectangles STAX dies from My Favorite Things to create the front of the shaker, then the oval dies from the Card Front Designs die set from Neat & Tangled to create the actual window and the frame around it. I doubled up on my foam tape, and used acetate from Hot off the Press to create my window. I used the Urban Chic mix from Little Things from Lucy’s Cards for my filling.
 This really shakes, those sequins have a lot of room to move freely. I stamped an InkyWings sentiment using Ocean Tides ink from Papertrey Ink (which matches the Ocean Tides cardstock SO well) on a scrap piece of X-Press It (I wanted the white to match the white in the image) and mounted it on 1mm foam squares onto the front of my card, and it was finished.
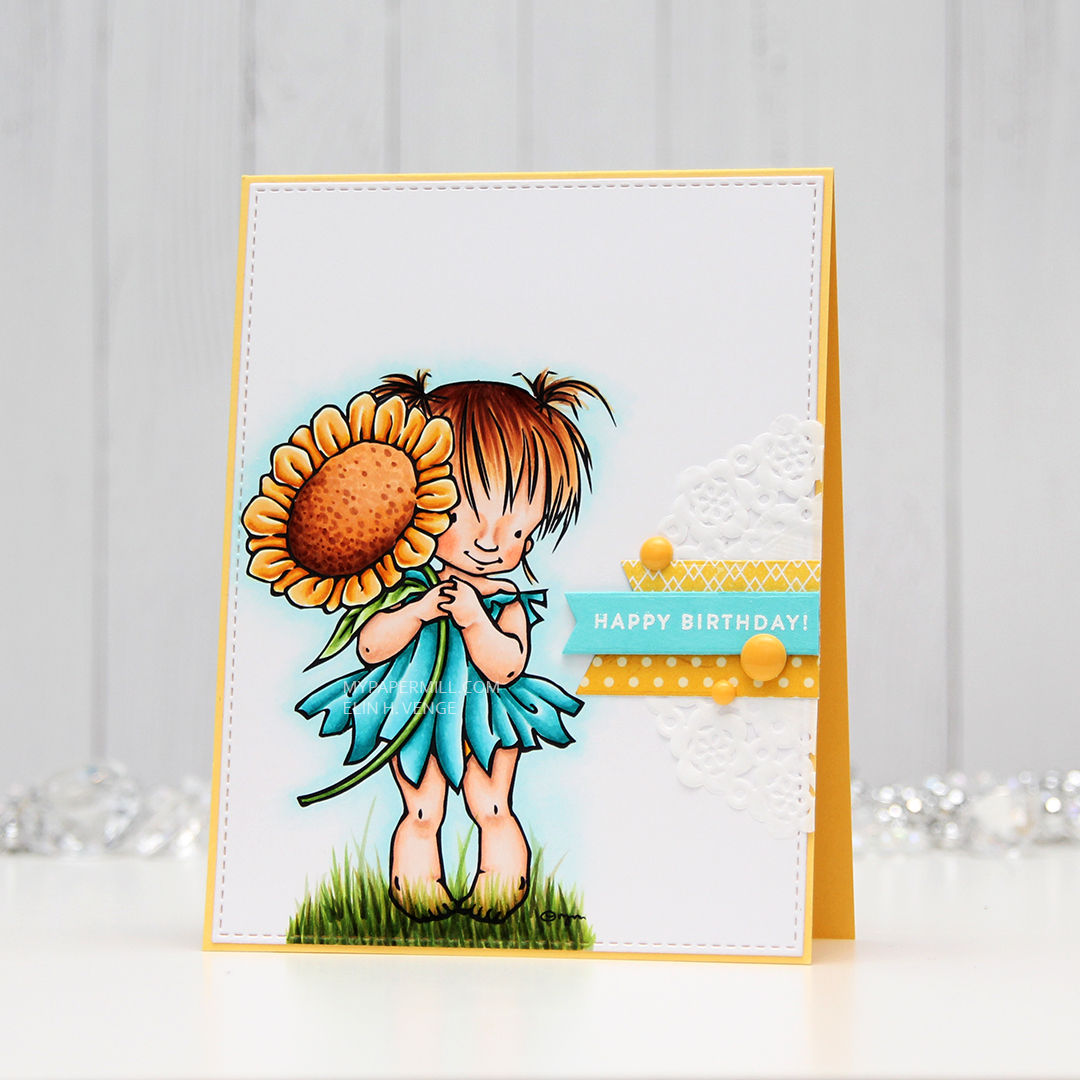
 I colored my image with my Copics, and added a scraped knee, some chocolate stains around the mouth and on the clothing and decided to create mismatched socks. That happens when kids dress themselves, right?
 I turned my image into a rectangular panel with faux stitching using one of my favorite dies – the largest in the Stitched Rectangles STAX Set 2 from My Favorite Things. It creates a 1/16″ border if you glue the panel to an A2 cardbase, which is the perfect width if you ask me. Speaking of cardbases, this one is made from Ocean Tides cardstock from Papertrey Ink. I stamped an InkyWings sentiment using Dark Chocolate Ink from Papertrey Ink and added a couple of raindrops from Little Things from Lucy’s Cards to frame my sentiment.
 I’m not the best at remembering to add envelopes for my cards, but these scraps of patterned paper from Pion Design were the perfect colors to make an envelope from. I used the A2 V flap envelope dies from Simon Says Stamp to create my envelope.