Hi! It’s time for the annual Superstar contest over at My Favorite Things. They do this every year, and I try to carve out the time to create something fun for this challenge. I tend to start with the innovation category, it’s the one where I really need to rack my brain to come up with something creative using MFT products. It’s also the most time consuming one, at least it is for me.
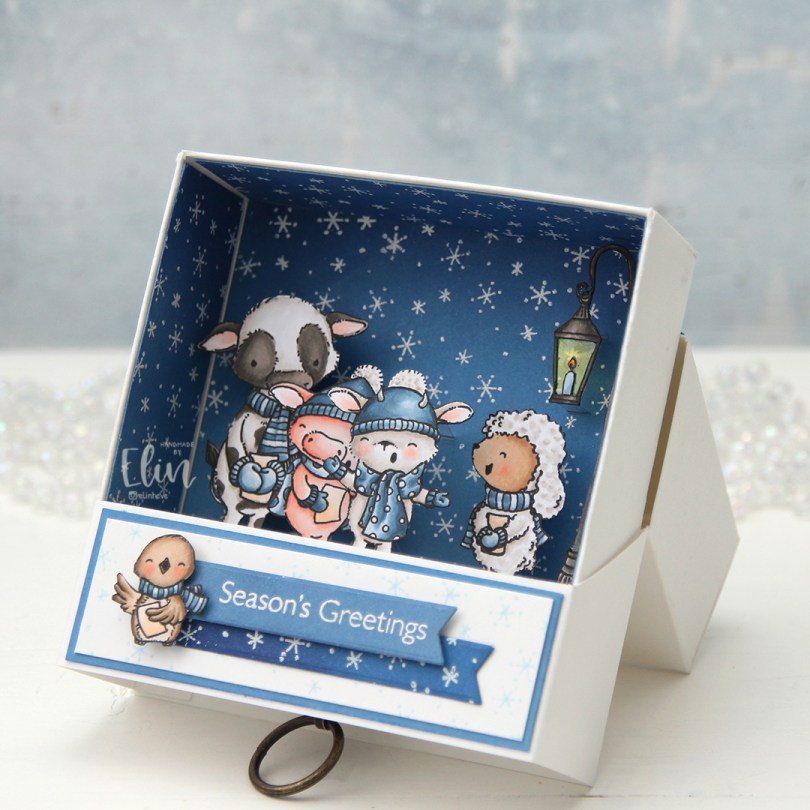
 I’ve made what looks like a pretty plain box for my Innovation Master entry this year. It measures 3 7/8 x 3 7/8″, and it’s 1 3/8″ deep. I like creating these three dimensional projects, but I prefer not having to use any specialty dies, so this project is made by scoring and folding what essentially starts out as rectangular pieces of cardstock. I’ve only used one die for this entire project, and it’s the smallest of the dies in the Fishtail Flag Frames die set to die cut the two banners that the cute little bird is sitting on.
 When you pull on the little handle at the end, you reveal a scene of more cute critters on the inside. I’ve used two stamp sets for this project. The sentiment and the stamped snowflakes are from the Flurry of Love stamp set that was released last year, all the colored critters are from the Christmas Carols stamp set that was part of this year’s September release. The snowflakes stamped in light blue on the “lid” and the ones heat embossed in white are the same ones stamped repeatedly to create backgrounds.
 The outer casing splits open and works as an easel of sorts to display this little scene on the inside. I stamped and colored all these critters with Copics, before fussy cutting them right up against the black stamped lines.
 I ink blended blue inks on the background to get a gradient of color, going from Blue Beyond at the top where it’s the darkest, then Cornflower in the middle and Blue Yonder at the bottom. The critters are more or less hiding the gradient, but it’s more visible in the die cut banner on the lid, where it goes from dark blue on the far left, to a lighter blue on the right.
 I cut away the center of the lantern and replaced it with acetate for it to be see through. I used a yellow Copic on the back of the acetate, and you can see the dark blue background and the white snowflakes through it. I added strips of acetate on the back of the critters to make a dimensional scene where the different animals are on different levels. The lamppost is at the very back, 1/4″ from the back, then the cow and sheep are both at 3/8″ from the back, the pig at 1/2″ and finally the goat at 7/8″. I’ve glued the acetate strips to the back of the background for them to be as hidden as I could. I only created small slits for the acetate to go through, you can spot a few of them behind the goat and the lamppost in this photo. I have a slit towards the top of each of the critters as well as one closer to the bottom, so they’ve all got two anchor points. The lamppost has three; one at the base and one at the top and the bottom of the actual lantern.
 As you can see, the drawer can be pulled out completely from the casing. I stamped the cobblestone image that comes in the Christmas Carols stamp set repeatedly on a piece of X-Press It blending card and colored it in, creating a ground for these critters to stand on. Here you also see the different levels of the animals better. This cobblestone image is perfect for repeat stamping, and it looks like one big stamp instead of a smaller one stamped four times. I love that you can create this effect with this stamp, because of how brilliantly it’s designed.
 I needed to place the critters fairly high up in this drawer to prevent them from being hidden behind the lid of the casing that covers it when it’s all standing up on display, so I decided to create a box within the drawer for a little surprise. It was just big enough for a small Snickers bar to fit.
 I didn’t use a whole lot of Copics for this, in spite of coloring so many images.


 Using a couple of dies in a set of nesting squares from Lifestyle Crafts, I created a frame to go around my image. I taped the two squares together, so I could run them through my die cutting machine several times and be sure that the size of the frame would be the same with each pass through the machine. I die cut 8 of these frames, I wanted a very dimensional shaker card. I stacked 7 of them, glued them to my colored piece, added lots of sequins from the Icicle sequin mix from Hero Arts and glued the last die cut frame on top.
 That’s when I ran into trouble. I wasn’t able to glue the frame onto the acetate so that it lined up with the others. I’d adhered it with score tape, so there was no way to remove it without ruining it. My solution was to die cut a new, larger frame with a slightly smaller window. I went one die larger for the outside and one die smaller for the inside for this frame, and adhered it directly onto the ones that were already there. It was a happy accident, because I’m really happy with the chunkier frame.
 I added the shaker to a 5 1/2 x 5 1/2″ card base I created from Wild Cherry cardstock from My Favorite Things, before stamping and white heat embossing a se23ntiment from Norsk Stempelblad AS to a separate piece of the same color cardstock, which I then die cut using a die from the Gemini Extra Deep Loving Tags die set from Crafter’s Companion. I adhered it directly to the inside top right corner of my shaker frame, and my card was finished.
 Not a whole lot of colors for this card, in spite of all those stripes on the snowmen’s accessories.