Hi! I’m back today with another red Christmas card. For someone who claims not to like red cards for Christmas, I’ve sure made a lot of them this year. I might need an intervention.
 I colored up these Christmas Kids from Lili of the Valley with my Copics, and used the largest die from the A2 Stitched Rectangles STAX dies from My Favorite Things to turn it into a panel with nice faux stitching around the edge. I sprinkled on chunky white embossing enamel from Stampendous, before heating the panel from the back to melt the granules. I adhered my panel to a top fold card base I made from Red Hot cardstock from My Favorite Things.
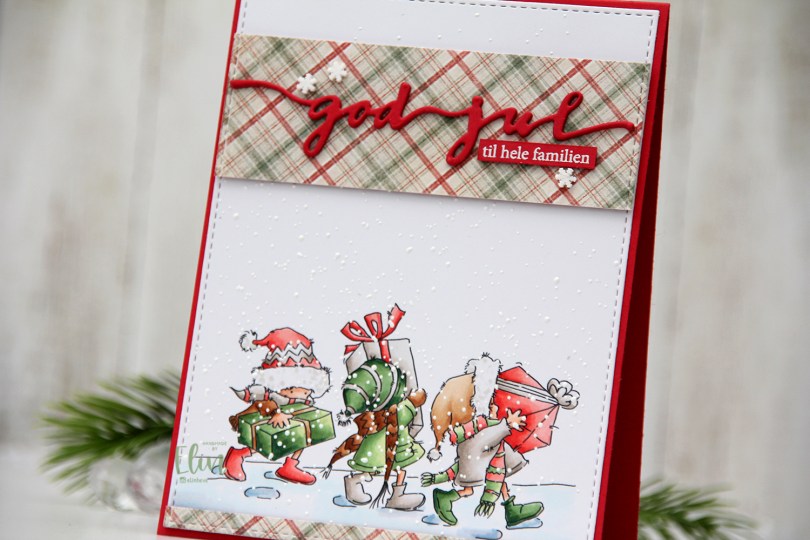
 I’m usually good at using scraps of patterned paper and rarely use a brand new sheet. Today was the day, though. I thought this patterned paper from the I wish collection from Maja Design went really well with my coloring, and I didn’t have a single scrap of this particular paper. Using the same die that I used on the white panel, I die cut my patterned paper before cutting up my die cut into pieces I could use on my card. I added two layers of cardstock behind both pieces and glued them to my card. I now have a continuous stitched border, even though some of it is my colored panel and some is patterned paper. I love little details like that. I die cut three of the god jul die from Papirdesign from red cardstock and glued them together for a stacked look. I glued my die cut to the center of the wide patterned paper before adding a sub sentiment. The sub sentiment is from Norsk Stempelblad AS, white heat embossed on the same color red cardstock and cut down to a strip, with two additional pieces of cardstock behind it to make it flush with the die cut. I added three snowdrift sprinkles from Little Things from Lucy’s Cards to the patterned paper, and my card was finished.
 Not a whole lot of colors for this one. Soft colors too (except for the darkest green, I wanted a little bit of contrast there), which is rare for me.

 I actually colored this in May last year. I keep my colored image in stamp storage sleeves from Tim Holtz. They’re super sturdy and you can put a lot of colored images in one pocket. They come five in a pack, which is perfect for me, that way I can dedicate each sleeve to one design team, since I’m currently on five design teams. Sometimes, I just want to color without having to turn it into a card right away, and sometimes I just want to make a card, but don’t feel like coloring, or simply don’t have time to do both. Compartmental crafting for the win.
 I mounted my colored panel using foam tape and adhered it to the center of the card. I felt like it was missing something and needed a little bit extra. Mini paper doilies from Doodlebug Design to the rescue. I love these mini doilies, I use them often. And you don’t need the whole doily, either, I just used two small pieces for this card, and there are 75 doilies in one pack, they last forever. Onto a piece of Blue Breeze cardstock from MFT I stamped a Norsk Stempelblad AS sentiment using Blueberry Sky ink from Papertrey Ink. I cut it down to a 1″ circle using a circle punch from EK Success, added it to my card using foam tape and finished the card with a few pink enamel dots from Papirdesign.
 This cute vampire is from the My Little Pet Ghost stamp set. There’s also a witch in the same set that I used for a similar treat bag, which you can read all about in