Hello {Purple Onion Designs}

Hi, there! I’m sharing a card that’s a little different for me today. I created a little landscape scene using three stamps from Purple Onion Designs: Chloe, Birch Tree Background and Bloom no. 2 Daisy. I did some masking and stamped my images using Extreme Black ink from My Favorite Things onto X-Press It blending card, which is what I pretty much always use for my Copic coloring. I love my X-Press It! I wanted a golden brown bunny and actually chose to color the shirt yellow. I don’t use yellow a lot in my cards, but thought it was the perfect summery color for this one. Summer solstice was yesterday, which means that even though we’re only three weeks into summer, the days are about to get shorter. I don’t want shorter days, I love it when the sun barely has time to set before rising again the next day.

Purple Onion Designs - Elin Venge - Chloe Birch Tree Background Bloom no. 2 Daisy front

I don’t make many landscape cards, and this one turned out to be a side fold card, which is even more rare for me. I love my top fold cards, but I’d already cut and scored this card base and figured I might as well use it and create a side fold card for once.

Purple Onion Designs - Elin Venge - Chloe Birch Tree Background Bloom no. 2 Daisy flatlay zoom angled

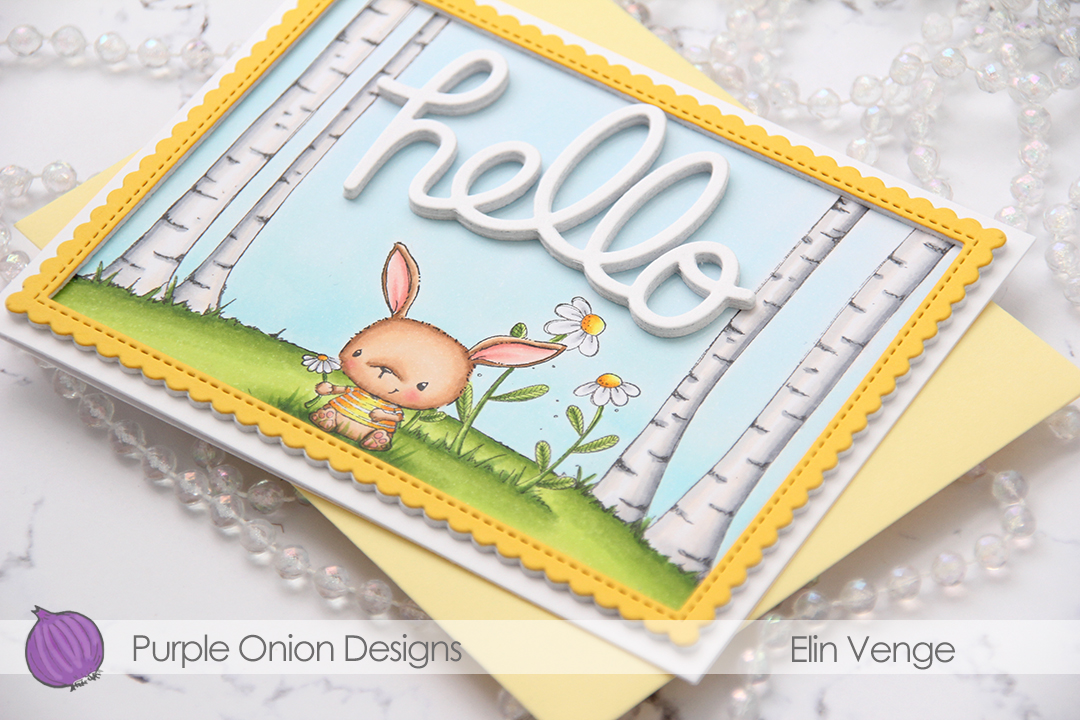
To reinforce the yellow shirt and the yellow on the flowers, I decided to add a yellow frame. I die cut the largest of the Stitched Rectangle Scallop Edge Frames dies from My Favorite Things out of Bright Buttercup card stock from Papertrey Ink and added three additional white die cut frames behind it for dimension.

Purple Onion Designs - Elin Venge - Chloe Birch Tree Background Bloom no. 2 Daisy flatlay

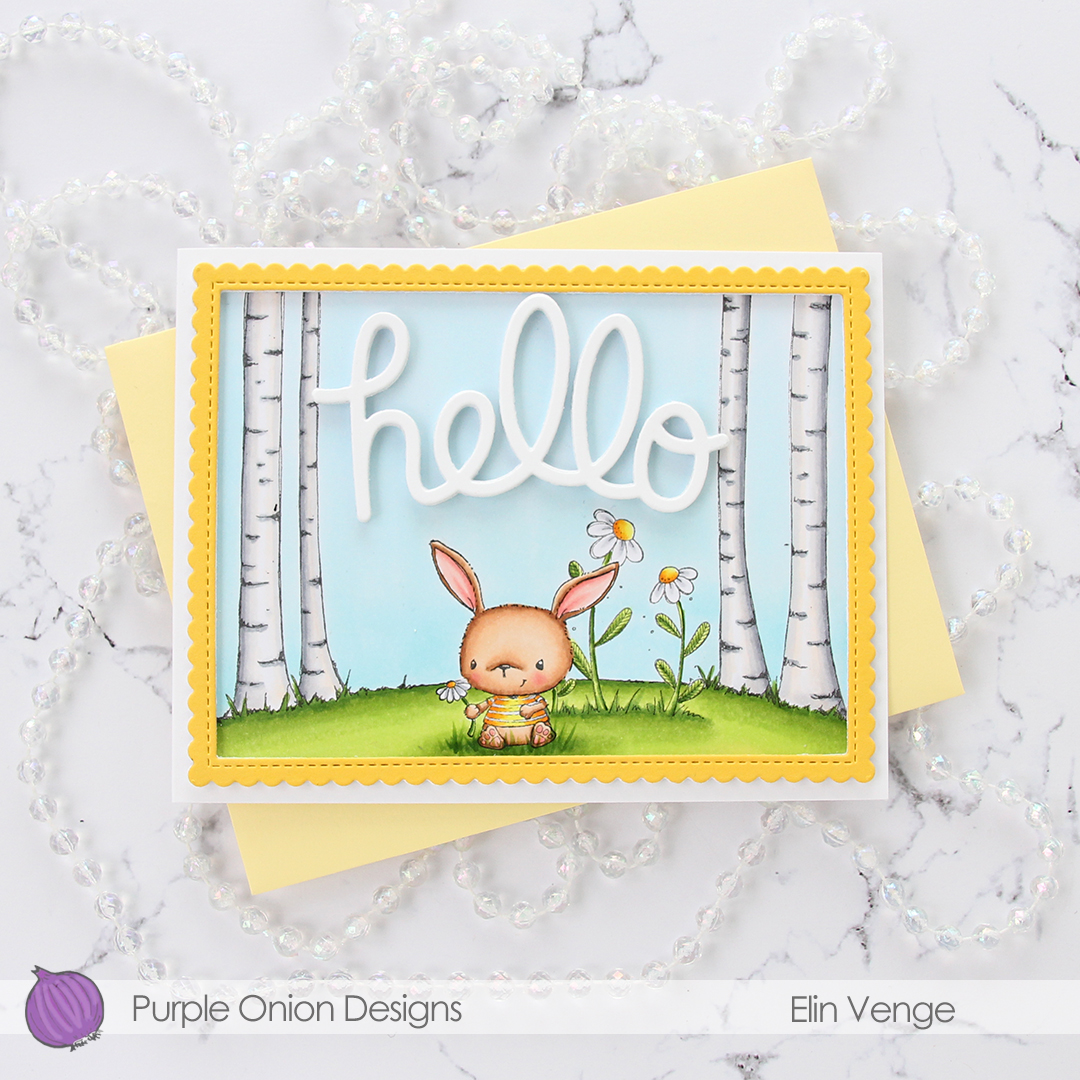
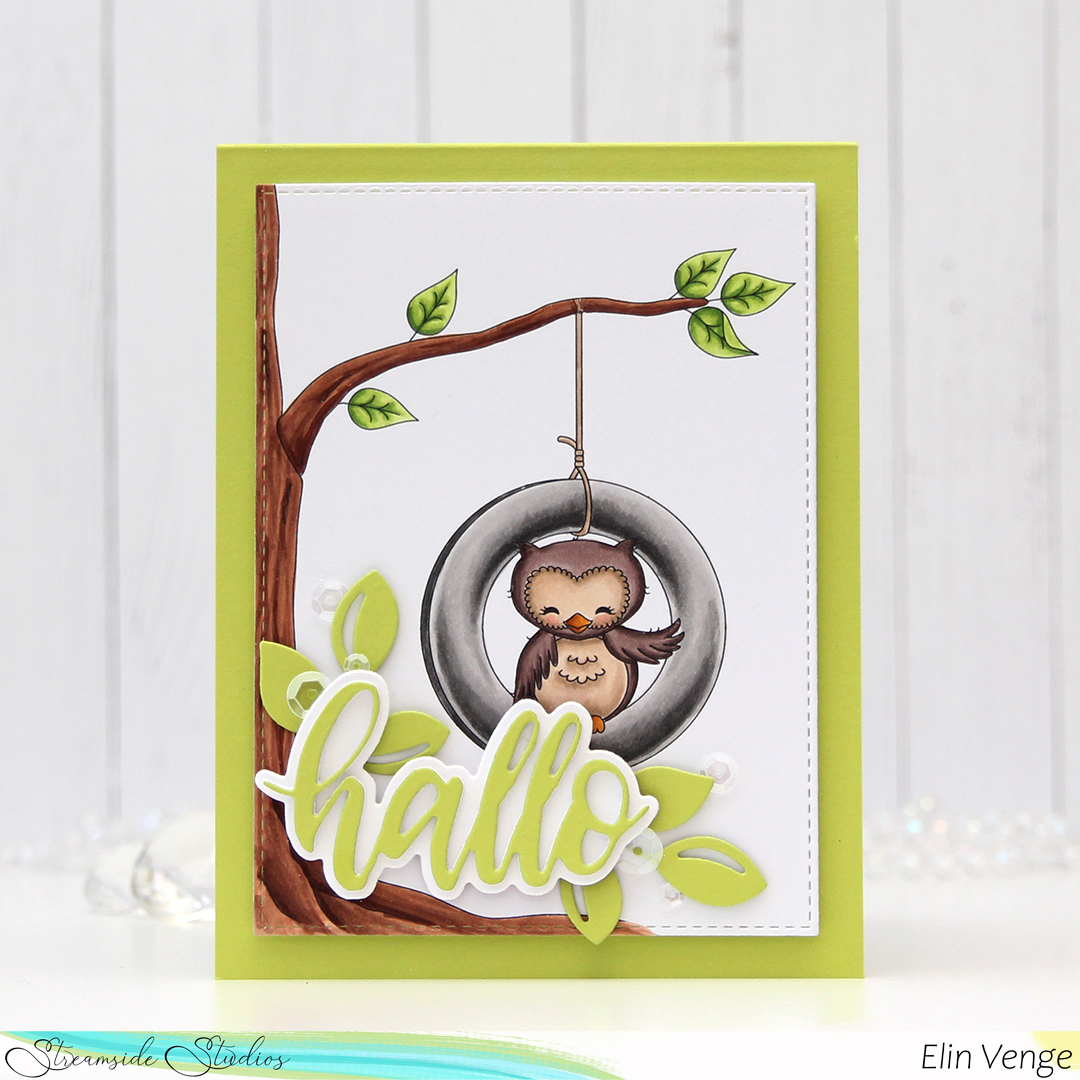
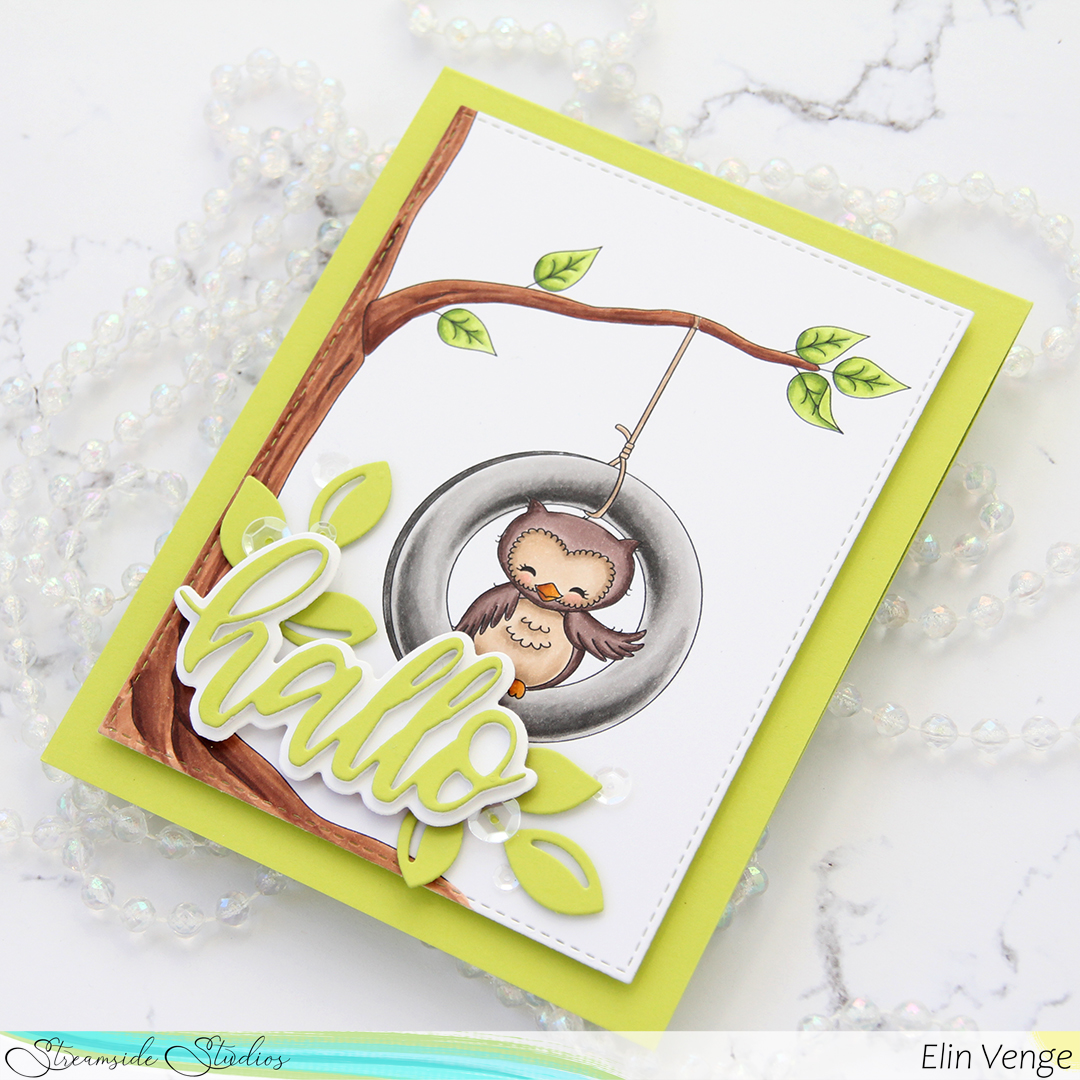
In the space between the trees I had room for a fairly large hello, die cut using the Say Hello die from My Favorite Things. It’s really a speech bubble die, but I’d used everything but the word for a different card and had the stacked hello die cut in a bowl on my desk, ready to go. There’s a ton of dimension in this die cut, it’s six layers thick.

Purple Onion Designs - Chloe Birch Tree Background Daisy Copics

Some bright, sunshiny Copics to finish off.

Showering you with birthday wishes {Purple Onion Designs}

Hi! I have a simple, yet colorful birthday card to share today, featuring the Confetti Celebration stamp set from Purple Onion Designs, illustrated by Julian Charlton.

Purple Onion Designs - Elin Venge - Confetti Celebration front

I love Elliot & Marcel, they’re such a cute pair, and so full of character!! These two don’t have a ton of detail to them, making them quick and easy to color. If detailed coloring isn’t your thing, these stamps are a great option. I colored my elephant and monkey (and umbrella and confetti) using my Copics, and I didn’t even ground these. I did, however die cut them into a panel using the largest of my A2 stitched rectangles dies from My Favorite Things.

Purple Onion Designs - Elin Venge - Confetti Celebration front angled

I adhered my colored panel onto a top fold card base I made from Lush Lagoon card stock from My Favorite Things, and added a second white panel with faux stitching to the inside of the card, giving me plenty of space to write a personal message to the recipient.

Purple Onion Designs - Elin Venge - Confetti Celebration flatlay

I stamped and white heat embossed a sentiment from the Confetti Celebration stamp set onto a separate piece of Lush Lagoon card stock and decided to cut it up, leaving out the word birthday entirely and using a die from My Favorite Things to create die cut letters instead. I used the Big Birthday Wishes die, and die cut it three times from white card stock and once from a silver glitter card stock.

Purple Onion Designs - Elin Venge - Confetti Celebration flatlay angled

I stacked my letters for a dimensional look, glued them to my card and added the rest of the sentiment above and below my die cut word. The wonky angles I used for the sentiment goes well with the playful look of the image and adds a little bit of visual interest.

Purple Onion Designs - Elin Venge - Confetti Celebration flatlay zoom

To finish off the card I added a few enamel dots from Papirdesign that match the colors I used for the confetti and the umbrella.

Purple Onion Designs - Confetti Celebration Copics

Very simple use of Copics for this one. With such a fun, simple image, you really don’t need much.

Happy birthday

Hi again! My second post for today, if you’re looking for some Mo Manning inspiration, you’ll find this morning’s post here. This one is a fairly clean and simple birthday card, featuring a cat from the Pawty Time stamp set from My Favorite Things.

HK My Favorite Things Pawty Time front rett

I colored up this cute cat with my Copics back in September last year, so it’s definitely taken me a while to turn my colored piece into a card. I’d stamped the cat in My Favorite Things Extreme Black ink in the center of a 1/4 sheet of X-Press It blending card and colored it with Copics. I may have had plans for fussy cutting, but I took out one of my faux stitch rectangle dies from My Favorite Things and turned it into a rectangular panel instead.

HK My Favorite Things Pawty Time front skrått

I cut down a 6×6″ sheet of patterned paper from the Dots & Stripes Pastels paper pack from Sunny Studio and adhered it onto a top fold card base I made out of Summer Splash card stock from My Favorite Things. The colors match very nicely, and the polka dot paper goes really well with the dots on the balloon.

HK My Favorite Things Pawty Time flatlay

I adhered my colored panel in the center of the card using foam tape for a little bit of lift and dimension.

HK My Favorite Things Pawty Time flatlay skrått

In the top left corner of my colored panel, I decided to put my remaining elements. I like putting things close together instead of spreading them out, I think the cards look cleaner and less cluttered this way. I adhered a mini paper doily from Doodlebug in the corner, and used that as a base for my other elements.

HK My Favorite Things Pawty Time flatlay høyre

I’ve had this happy wood veneer from Studio Calico for years, and decided that it was time to use it. Using liquid glue (Gina K. connect, which is the only liquid glue I like), I added it directly onto the paper doily, with just a little bit of the h hanging off the edge for added visual interest. I stamped and white heat embossed the word birthday from the Birthday Wishes stamp set from Mama Elephant onto piece of Gravel Gray cardstock from My Favorite Things and used one of the Itty Bitty Strips dies from MFT to die cut it. I added a few more layers of gray cardstock behind it for dimension, so the strip sits flush with the veneer. To finish off the card I added three enamel dots from the Sea Shore pack from Altenew.

HK My Favorite Things Pawty Time Copics

Very limited color palette for this one.

A little hello {Mo’s Digital Pencil}

Hi there! I love lily of the valley, and as soon as I saw Lily Fairy from Mo Manning, I knew it was an image I needed. They’re at their peak right now, and they smell so divine. I’ve picket two bouquets, I just wish they lasted longer than a couple of days in a vase. Hopefully, my card will last longer than the actual flowers.

Mo Manning Lily Fairy front rett

I colored up my image with Copics. I chose a very light, bright combo for the green. The leaves on a lily of the valley are much darker than this, but I really like this combo, and with the fairy hanging out between the leaves, I didn’t really care too much about realism anyway. I chose to color her dress pink for a pop of a different color, and you can actually get real lilies of the valley that are pink, so I thought it was the perfect fit.

Mo Manning Lily Fairy front skrått

After using a die from My Favorite Things to add the faux stitch lines around the edge of my colored panel, I added Frosted Lace Stickles from Ranger to her wings for a little bit of sparkle. I adhered my panel onto a top fold card base I made from Sour Apple card stock from My Favorite Things.

Mo Manning Lily Fairy detail

Embellishment clusters have become a signature of mine, and I have five things that I pretty much always use to create them:

  1. White mini paper doily from Doodlebug Design.
  2. The Fishtail Flag Frames die set from My Favorite Things.
  3. The Happy Days Ticket Stubs die from XCut.
  4. Scraps of patterned paper.
  5. Enamel dots or sequins.

I keep a tub on my desk with die cut patterned paper scraps where I’ve used the two die sets I mentioned. The other day I even took the time to sort through them and divide them by color, which will make it easier to pull the ones I need for future cards. For this one I used two additional dies: a hole pattern die from Papirdesign and a die from the Itty Bitty Strips die set from My Favorite Things for the sentiment.

Mo Manning Lily Fairy flatlay

The sentiment is from a stamp set from InkyWings, heat embossed in white onto Sour Apple cardstock from My Favorite Things. I’ve added 1 mm foam squares between some of the layers in my cluster for a little bit of dimension, and I even put a mini cluster in the opposite corner, using scraps from the bigger cluster. I really like using as much of my cardstock and patterned paper as I possibly can, and by doing it this way, very little goes to waste. The patterned paper I used for these clusters is a mix of 3ndypapir, P13 and Sunny Studio, and I found the perfect color of enamel dots from Papirdesign as a finishing touch.

Mo Manning Lily Fairy Copics

Very limited color palette for this one.

Get happy! {Mo’s Digital Pencil}

Hi, there! Today, I have a bright, sunshiny card to share featuring the We Go Together image from Mo Manning. I shared the colored image on Instagram a couple of months back, and for the card I wanted to feature the one color out of the four main ones (blue, teal, pinky peach and yellow) that I use the least. That’s definitely yellow, so I pulled out yellow cardstock, patterned paper, ink and enamel dots.

Mo Manning We Go Together front

I cut the colored piece down more than I normally would to let quite a bit of the yellow patterned paper from Papirdesign show around my image, and mounted my die cut colored piece on foam tape in the center of the card. I adhered pieces of a mini paper doily from Doodlebug to opposite corners of my die cut piece for a little bit of added texture and interest.

Mo Manning We Go Together front skrått

Onto a scrap piece of X-Press It blending card I stamped a sentiment from the Journey sentiment set from Purple Onion Designs using Fossilized Amber Distress Oxide ink. I love how well the Distress Oxide inks stamp. I cut it down to a strip using the medium sized die in the fishtail flag frames die set from My Favorite Things, and added it to the card using foam tape and foam squares. To finish off I added three enamel dots from the Pocketful of Sunshine pack from Altenew.

Mo Manning We Go Together Copics

Quite a few Copics on this one, I rarely feature four different colors in one piece.

Waving hello {Rachelle Anne Miller Creative Studios}

Hi, there! Today I have a sneak peek to share of one of the new images coming from Rachelle Anne Miller later this week. It’s a hot air balloon, and I actually saw one outside my craft room window a couple of weeks ago. They’re not too common around here.

Rachelle Anne Miller hot air balloon front rett

I printed the image on X-Press It blending card, colored it with my Copics and die cut it into a panel using the largest of the dies from the A2 Stitched Rectangles STAX 2 set from My Favorite Things. I adhered it to a card base I made from Wild Wisteria card stock from My Favorite Things and went digging through my stash looking for the perfect sentiment.

Rachelle Anne Miller hot air balloon front skrått

The girl in the basket is definitely waving hello to the little bird on the outside, so I decided to use this sentiment from Purple Onion Designs. I white heat embossed it onto a separate piece of Wild Wisteria card stock, cut it down to a strip with a nice end using the medium size of the fishtail flag frames dies from My Favorite Things and adhered it to my card using 1 mm foam squares. I finished off the card with a few sparkling clear sequins from Pretty Pink Posh.

Rachelle Anne Miller hot air balloon Copics

Not a lot of Copics for this one, this image was quick and easy to color. The first thing I colored was actually the bird using those blues, but once the rest of the image was colored too, he really stood out, so I put some pinkish purple on top of the blue.

Super simple baby cards

Hi! I have two super simple baby cards to share today, featuring images from Art Impressions. These babies were so quick and easy to color.

HK Art Impressions Little Monster front rett

The first card features this Little Monster stamp set. I stamped with Extreme Black ink from My Favorite Things and colored the baby with my Copics, then placed the piece of X-Press It blending card back in my MISTI and stamped again using VersaFine Onyx Black ink. I used the second largest die in the A2 Stitched Rectangles STAX 1 set to die cut the panel and mounted it with foam tape onto a card base I made out of Milk Chocolate card stock from My Favorite Things (side note: all these years I’ve thought that Set 2 had slightly larger dies than Set 1, and I found out today that set 1 is the larger of the two).

Hobbykunst Art Impressions Little Monster front skrått

I stamped the sentiment in the stamp set using Dark Chocolate ink from Papertrey Ink onto Classic Kraft card stock, also from Papertrey Ink. I used one of the fishtail flag frames dies from My Favorite Things to turn it into a strip with a nice finished end. I mounted it on 1 mm foam squares and finished off with some green enamel dots from Papirdesign. I die cut a panel of Classic Kraft cardstock and adhered it to the inside, for a nice space to write a personal message to the recipient.

HK Art Impressions Little Man front rett

Card number 2 features the Little Man stamp set from Art Impressions. Like I did with the first card, I stamped and colored the image, before stamping it again to get the crisp black lines. I mounted it with foam tape onto a card base I made from Classic Kraft cardstock from Papertrey Ink. Onto the cardstock I stamped the Paint Splatter background stamp from My Favorite Things using Papertrey Ink Fresh Snow hybrid ink for a little bit of added interest to the background.

HK Art Impressions Little Man front skrått

I added a strip of Milk Chocolate cardstock from My Favorite Things to the front of the card before I adhered my colored panel, to ground it a little and to add another dark element other than the circle with the sentiment. The sentiment itself is from the stamp set with the cute baby, heat embossed in white using super fine detail embossing powder from Ranger and added to the colored panel using 1 mm foam squares. I finished off the card with some enamel dots from Papirdesign.

HK Art Impressions Little flatlay

Same color schemes on both cards, similar stamps, both simple cards, yet slightly different. And I’d normally add the Copics I used to color my images, but I colored them last July for Kathy Racoosin’s 30 day coloring challenge, and I don’t remember what the colors are.

Happiness is… {Mo’s Digital Pencil}

…the art of making a bouquet of those flowers within reach. This Bob Goddard quote was the perfect phrase to put on today’s card featuring Billy Boy from Mo’s Digital Pencil. I think he looks pretty happy with the flowers in his hands. Not yet a bouquet, but I’m sure he can pick a few more.

Mo Manning Billy Boy front rett

I don’t know how I’ve done it, but this is actually the 100th card I’ve made in 2021. I usually reach 100 right before the new year starts, but this year is obviously different, we’re only at the start of June and I have plenty of cards left to create over the next seven months before the year is up.

Mo Manning Billy Boy front skrått

I colored up Billy Boy about a week ago and shared the coloring on Instagram (@elinheve), so all I had left to do was turn it into a card. I went super simple by die cutting it with the largest of the dies in the A2 Stitched Rectangles STAX set from My Favorite Things and added it to a top fold card base made out of Tropical Teal cardstock, also from MFT.

Mo Manning Billy Boy flatlay

I recently ordered a few of the new inks from My Favorite Things. My order arrived on Monday, and I tested them out on my sentiment. They’re kind of unique in that they’re dye inks, but the pad is squishy, and they’re super juicy. I stamped the Bob Goddard quote (stamp from Norsk Stempelblad AS) using Caribbean Sea (a teal leading towards green) first, and then stamped on top of that with Lazy Day, which is a blue ink. The two together create a color that’s pretty similar to Tropical Teal, which is what I was going for (the Tropical Teal ink was sold out when I placed my order, which is why I didn’t just use that). I’m not used to the squishy pads, but the ink stamped beautifully.

Mo Manning Billy Boy flatlay høyre

To finish off the card I added a few enamel dots near the sentiment. The teal ones are from the Cool Summer Night set from Altenew, the yellow from the Cambridge Court pack from My Mind’s Eye.

Mo Manning Billy Boy Copics

Last, but not least, some bright Copic colors to finish.

Hello {Streamside Studios}

Good morning! It’s the start of a new week, and if this green color doesn’t wake you up, nothing will. It’s bright!! It feels like summer’s finally on its way, and I spent a good chunk of yesterday hiking. Everything is so bright green now after what feels like the coldest, rainiest spring ever.

Streamside Studios Woodland Friends Owl front rett

I put together this little scene with an owl, a tire swing and a tree, all from the Woodland Friends digital stamp set from Streamside Studios. I did some simple Copic coloring and used a die from the A2 Stitched Rectangles STAX 2 set from My Favorite Things to turn it into a nice panel with faux stitching around the edge. I love these stitched rectangle dies, I use them so much!

Streamside Studios Woodland Friends Owl front skrått

I mounted the colored piece onto a card base made from Limelight cardstock from My Favorite Things. It’s a very bright green. I die cut some leaves from the Leafy Cover die from Mama Elephant and mounted those near the bottom left corner using some 1 mm foam squares.

Streamside Studios Woodland Friends Owl flatlay

On top of the die cut leaves I added a die cut “hallo” (hello in Norwegian) consisting of 3 white layers with the Limelight green on top, and a white shadow. I mounted this on foam squares, too, so this has a lot of dimension.

Streamside Studios Woodland Friends Owl flatlay høyre

A side view to show more of all the layers. I added some sequins from the White Orchid sequin mix from Little Things from Lucy’s Cards for a little bit of an extra detail near the die cuts.

Streamside Studios Woodland Friends ugle huske Copics

Last, but not least, the Copics I used to color my image.

Grrreetings

Hi, there. I wasn’t planning on sharing a card today, but last night Liz Vefall messaged me asking if I was up for a challenge. I’m always up for a challenge, and hers are so much fun. She wanted me to join the current color challenge over at MFT.

MFT_ColorChallenge_PaintBook_166

That wasn’t the challenging part – she wanted me to finish the card last night. I work best under pressure, and she knows it. Short deadlines are great, they force me to come up with ideas and execute them quickly. And that’s what I did, this card only took me about 2.5 hours to make, which is fast for me.

MFT Monster Sized front rett

I chose to color three of the monsters from the Monster Sized stamp set. I tried to get as close to the colors in the challenge as possible. I die cut the monsters, and added four more white die cuts behind the monsters on the sides for dimension. For the middle monster, I added eight additional die cuts behind the colored one, I wanted it to really stand out on the card.

MFT Monster Sized front skrått

I needed to incorporate the gray, and chose Gravel Gray card stock for my card base. I don’t have the Eiffel Tower color (yet), but I thought this might be close enough to work. I stamped the Four Corners background stamp onto white card stock using Soft Granite Ink from Hero Arts, and die cut the white panel with the second largest die in the A2 Stitched Rectangles STAX 2 set, mounting it on foam tape to the card base.

MFT Monster Sized flatlay rett

I adhered two of my stacked die cut monsters directly to the white panel, the one in the middle is actually hovering. It’s glued to the monsters behind it. I even added Glossy Accents to the eyes of this monster for a fun little accent.

MFT Monster Sized Flatlay høyre

I stamped and white heat embossed a sentiment from the Monster Sized stamp set onto a separate piece of Gravel Gray card stock, cut it down to a strip and adhered it below the monsters on my card. The banner actually covers the feet of the monsters on the sides.

MFT Monster Sized zoom

A quick peek at all that dimension. I think this is about 1/2″ thick at its thickest. Dimension is life 🙂

MFT Monster Sized Copics

Limited color palette. 4 Copics for each of the monsters and black for the mouths on all.