Hei og hopp i sommersola! Vi har en ny utfordring hos Papirdesign i dag – vi vil se oransje og rosa! Min fargeteoretiske hjerne sliter litt med den kombinasjonen, så jeg har dratt den oransje helt over til gult og lagt til litt turkis. Burde hatt med litt eplegrønt for balansens skyld også, men det får duge som det er – jeg har i det minste tatt med oransje og rosa!
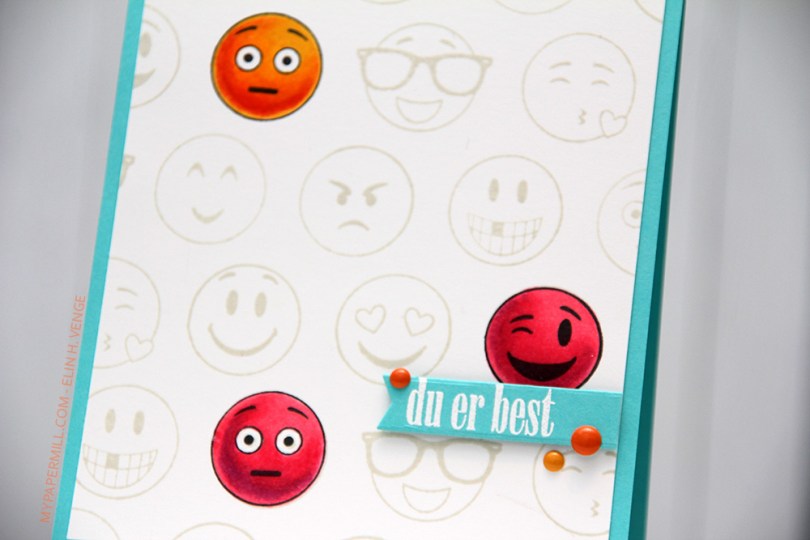
 Jeg har stemplet alle smileyene fra Smileys-platen på Stamper’s Select White kartong fra Papertrey Ink med Soft Stone blekk, også fra PTI. Jeg har fargelagt utvalgte smileys med Copictusjene mine og så stemplet over disse med Extreme Black blekk fra My Favorite Things.
 At jeg endte opp med å fargelegge to av smileyen med store øyne var helt tilfeldig, det var plasseringen av smileyene som bestemte hvilke som ble fargelagt, ikke hvilke smileyer det var snakk om. Egentlig var planen en bredere og lengre tekststripe som gikk helt bort til den nederste rosa, men den lange, brede tekststripen funket ikke. Sånn sett burde jeg sikkert ha fargelagt den med briller som er til høyre for den nederste rosa når jeg endret planen min, men da måtte jeg ha stemplet hele bakgrunnen på nytt, og det var nok presisjonsarbeid den første gangen, så jeg lot det være som det var.
 De første gangene jeg lagde CAS-kort gjorde jeg alltid noe på innsiden også, for det var det jeg var vant til fra mine lag-på-lag-kort, men etter kort tid gikk jeg bort fra det. Enkelt skal liksom være enkelt, det trenger ofte ikke noe mer enn forsiden, har jeg tenkt. Linda har fått meg litt tilbake i sporet igjen med å pynte bittelitt på innsiden også, så jeg stemplet en ekstra smiley som jeg fargela, klippet ut og limte inni kortet.
 Teksten embosset jeg på den samme turkise kartongen som jeg brukte til basen (Papertrey Ink Hawaiian Shores), stanset den ut til et banner og proppet den opp på noen lave 3D-puter. For å forankre tekststripen litt brukte jeg noen dotter i farger som matchet den ensomme, oransje smileyen øverst på kortet, for å ta igjen fargen litt. Og det er all pynten. Easy peasy. Håper jeg kanskje kan inspirere deg til å se på stemplene du har og finne nye bruksmuligheter til dem.
Papirdesignprodukter brukt:
Stempler:
Smileys PD 12687
Lille frøken PD 13764
Annet:
Dotter, oransje og gul, Nr. 866

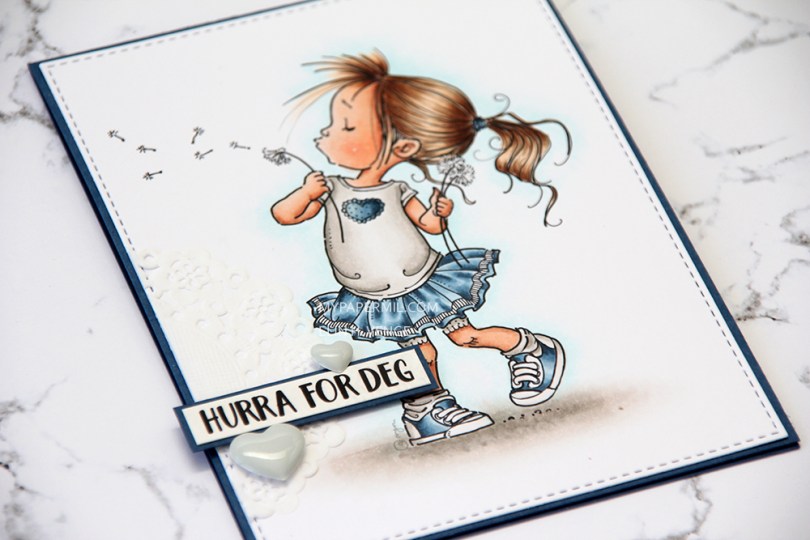
 Hi! I’ve got what I believe to be the simplest birthday card I’ve ever created today. I had to go with Bee Mine from Mo’s Digital Pencil, colored during Cathy Racoosin’s last 30 day challenge back in June.
 I colored her with my Copics in the colors shown at the bottom of this post, and diecut her using a stitched rectangle die from My Favorite Things. I added her with lots of foam tape to a piece of Papertrey Ink Aqua Mist cardstock that I embossed using a quilted backdrop die from Lawn Fawn, and added some 2 mm Kort & Godt pearls to the background for a little bit of extra interest.
 I diecut my sentiment using a small stitched circle die, also from MFT. I punched out a 1″ circle out of some Aqua Mist cardstock that I glued my stitched circle to. I stamped a Norsk Stempelblad AS sentiment in a combination of Doll Pink ink from Simon Says Stamp and Autumn Rose ink from Papertrey Ink. Neither of the colors matchet my image on their own, but together they were perfect.
 As you can see from this photo, my main panel is popped up from the rest of the card, keeping the focus on her.
 I chose another one of my favorites today –
  I diecut her using the largest of the dies in the Stitched Rectangles STAX 1 set from My Favorite Things. It cuts the perfect rectangle to use on an A2 card front and gives you a perfect 1/16″ border around it.
 I added part of a tiny Doodlebug doily and a Papirdesign sticker that I glued to a scrap of blue cardstock and popped up from the background. I embellished a tiny bit with some grey Marianne Design enamel hearts.
 For the inside of the card, I diecut another one of those rectangles, used more of that tiny doily and added another Papirdesign sticker – in blue this time. I thought I’d used a different sentiment for the inside, but I didn’t realize that I’d used the same one twice until the card was finished. There was no way I was removing (and destroying) either of the stickers, so they both get to stay put.
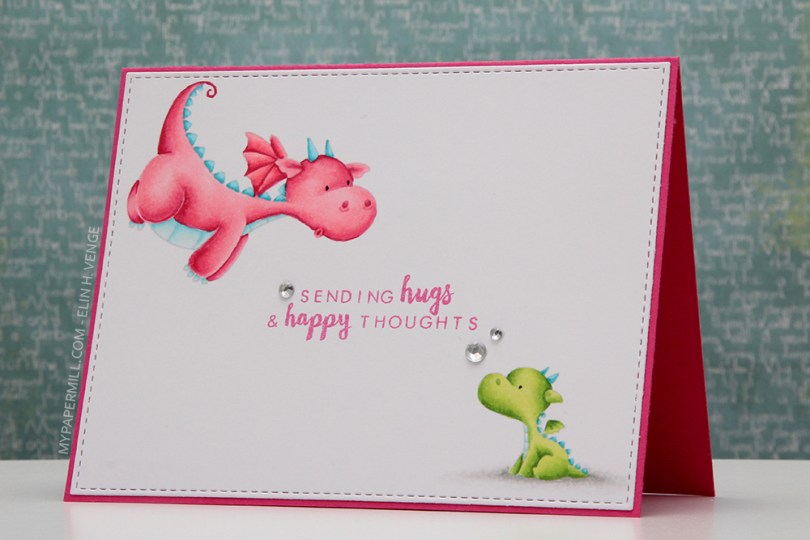
 En stykk speilvendt drage. Det var noe galt med selve stempelet, så dragen min er enøyd og mangler tuppen av det ene øret, men dette var mer for å vise at det faktisk går an.
 Over til selve kortet mitt. Her stemplet jeg med lysere blekk enn på eksempelet mitt, jeg ville nemlig fargelegge med no lines-teknikk med Copic-tusjene mine. Den lille dragen var en fryd å fargelegge, jeg slet mer med den store. Grunnen er såpass enkel at jeg var tom for de rosafargene jeg helst ville bruke, så hun fikk en annen farge enn planlagt. Nå har jeg fått tak i refiller til de riktige rosafargene, så neste gang jeg vil bruke dem går det mye bedre.
 Jeg stanset ut panelet med dragene mine med en rektangeldie (Stitched Rectangles 1) fra My Favorite Things med juksesøm og limte panelet mitt rett på kortbasen av Raspberry Fizz kartong fra Papertrey Ink. Jeg stemplet en tekst fra et stempelsett fra Altenew med Picked Raspberry Distress Oxide og embosset med klart embossingpulver fra Ranger. Til slutt limte jeg på noen krystaller fra Papirdesign.
 This time I chose
  I diecut the banners, as well as the main panel, using dies from My Favorite Things. MFT dies are my favorite, they’re so versatile. I glued part of a doily underneath my banners and stamped a Norsk Stempelblad AS sentiment on the biggest one (It says “BIRTHDAY – a special day that brings together people you love” in Norwegian).
 I used a small star punch for my yellow stars, and added a few veneer ones from Studio Calico to put something on the front that wasn’t made from paper. I added a couple of enamel dots to finish it off, simply because the pink color matched everything else perfectly.
 I put a tiny cluster on the inside. Another banner diecut using an MFT die, another veneer star and also a polaroid frame, diecut with another MFT die – told you they’re my favorite. A couple of punched little pink hearts and another Norsk Stempelblad AS sentiment (Happiness is being one year older), and my card was done.
 Jeg lagde et meget enkelt kort til artikkelen, med en blomst jeg stemplet i tre lag og så stanset ut. Jeg embosset et par blader i hvitt på lysegrå kartong, satte blomsten min på 3D-teip og stemplet en tekst nedenfor i blått. Jeg skar til det grå panelet så jeg fikk en fin ramme av den mørkeblå kartongen rundt. Kartongen er i den samme fargen som den mørkeste blå på stemplingen.
 Nærbilde av blomsten. Disse blomstene ser veldig realistiske ut når du får stemplet alle lagene.
 This time I chose
  I wanted to embellish the inside, too, but make it very simple. I took the diecut frame left from the banner on the front and glued it to my white cardstock before stamping a sentiment in red. I diecut a small yellow patterned paper circle for an extra bit of detail, and that’s it.
 I colored her with my Copics and cut my panel down. I wanted to use some scraps of Maja Design patterned paper, so I glued the plaid one and a tiny sliver of red right next to it before putting my panel on foam tape and gluing it to the front of my card.
 I stamped and heat embossed a birthday sentiment on a 1″ circle I made from the patterned paper, and glued it to my panel with a pebble on top.
 The pebble adds a little bit of shine to an otherwise simple card. So do the enamel dots I put on the left.
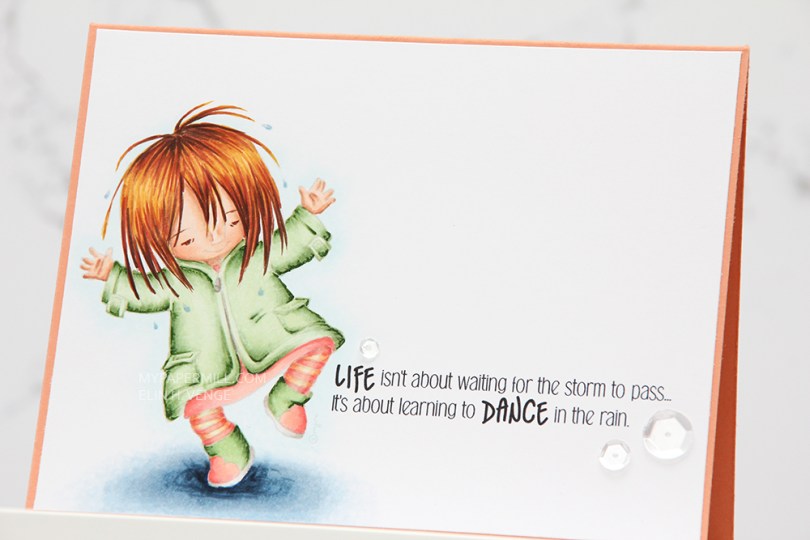
 I printed her in 10 per cent opacity from Photoshop to color her in no lines, I haven’t done that in a while, and decided that she was perfect for it.
 I printed a Vivian Greene quote next to her and colored her up with Copics. The majority of the colors I already had lying on my desk from another image I colored the previous day, so I made things easy for myself.
 I cut down 1/8″ in both directions and glued her straight onto a cardbase made from Papertrey Ink Melon Berry cardstock. I added Pretty Pink Posh sequins in various sizes around my sentiment, and that’s the finished card – pretty simple, keeping most of the focus on that no line coloring.
 I colored her up with my Copics in mainly RVs ang BGs. I diecut her with a stitched rectangle die from the Stitched Rectangles STAX Set 2 from My Favorite Things – try saying that ten times fast. I put her on lots of foam tape to a panel of Ocean Tides cardstock from Papertrey Ink, diecut with another stitched rectangle die from MFT, this time from Set 1. I added that to a Plum Pudding cardbase.
 I tend to make my cards simple with clusters of embellishments. This card is no exception. I dug through my patterned paper scraps and found some papers that matched my cardstock pretty well. The light teal is from My Mind’s Eye, the dark teal is from Pion Design, and the purple is from Papirdesign.
 I also added a doily. Well, half a doily, another signature of mine. I diecut my teal banners with a couple of My Favorite Things dies, and glued a little vine from Snip Art on top. This chipboard piece is very delicate, so I used spray adhesive on the back of it to avoid having to deal with liquid glue oosing out the sides. I added my diecut heart with some liquid glue, put a layer of Wink of Stella on top, and then Glossy Accents on top of that.
 Here you can see the Glossy Accents on the heart heaps better. I also added Wink of Stella and Glossy Accents on the heart on her shirt.