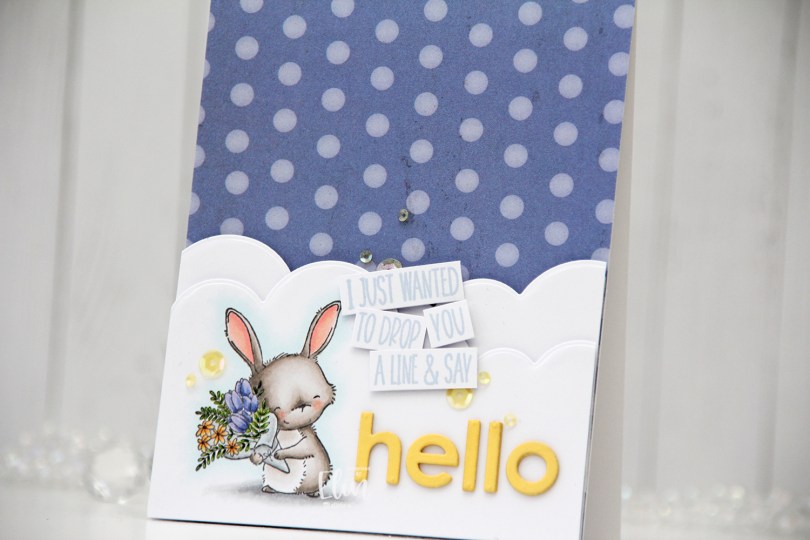
Hi, crafty friends. Today I’m sharing a card featuring the sweet Junie image from Purple Onion Designs. I love this little bunny with her bouquet of flowers.
 I stamped the image using Extreme Black ink from My Favorite Things, before coloring with my Copics. I love love love the way rubber stamps stamp even the thinnest lines. It’s great for details, and Stacey Yacula’s illustration style gets to shine. Her line work is very delicate, which pairs so well with rubber stamping, because you’re able to easily stamp all the little details.
 I used a die in the Slim Card Basics die set from Mama Elephant to create a cloud border above my stamped and colored image, and used the same die on a separate piece of cardstock. I found a scrap piece of patterned paper from Scenic Route that I added to my card base, then added my cloud pieces on top using foam tape.
 I used two sentiments from the Sunshiny Sentiment set to create my staggered sentiment. I didn’t have the right color purple ink I wanted, so I stamped once with Grapesicle ink from My Favorite Things and then right on top with Iceberg ink from Altenew to create a new color for my sentiment.
 Using the lower case Parker alphabet die set from Memory Box, I die cut each letter three times from Harvest Gold cardstock from Papertrey Ink to spell the word hello. I stacked my die cuts and adhered them to the right of Junie using liquid glue.
 To finish the card I added a few yellow sequins from Little Things from Lucy’s Cards. These are actually from the Candy Corn mix; a Halloween mix with orange, yellow and clear sequins and gems which even has a few tiny ghosts made from acetate thrown in. It’s a fun mix.
 Simple color palette for this one.


 I wanted a little bit of subtle interest to my background, and used the Garden Lattice dies from Honey Bee and die cut both the base and the top die (these are sold separately) twice from Stamper’s Select White cardstock from Papertrey Ink. By doubling up on each of the die cuts, I get lots of dimension.
 I also die cut the word hugs from the Sending Big Hugs die from My Favorite Things. I die cut two layers from white cardstock and three layers from purple (Winter Wisteria from Papertrey Ink). The purple didn’t match my coloring, so I added BV02 to the top layer, that did the trick. I stamped my sub sentiment from the Bitty Thanks & Gratitude stamp set from My Favorite Things using Grapesicle ink, also from My Favorite Things, and adhered the strip directly to the diecut HUGS word.
 I finished off the card by adding a few veneer butterflies, I thought they paired well with the butterfly on the bunny’s nose. The butterflies are from Wycinanka, and I added two Kort & Godt pearls to the center of each of the butterflies to form the body, and that finishes the card.
 Simple, yet happy color palette for this card.
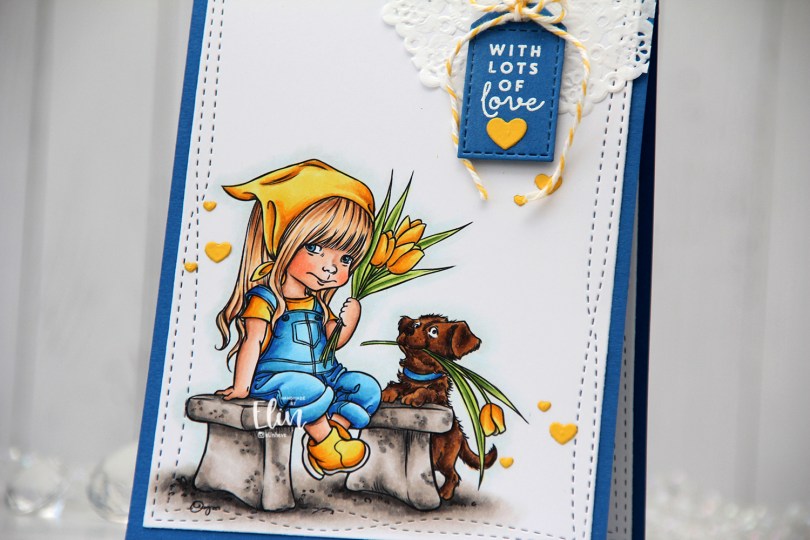
 I couldn’t choose any other colors for this card, it simply had to be blue and yellow. I colored the image with Copics, then used the largest die in the Wonky Stitched Rectangles STAX set from My Favorite Things to create a little bit of interest to the edges of the panel, before adhering it to a card base created from Cornflower cardstock from My Favorite Things.
 In the top right corner, I adhered part of a mini doily from Doodlebug using liquid glue. To the top of the card, I tied a piece of Divine Twine from Whisker Graphics in the color Lemon. I stamped and white heat embossed a sentiment from the Mini Messages stamp set from Mama Elephant on a scrap piece of blue cardstock and die cut it into a tag using a die from the Everyday Gift Box die set from My Favorite Things. I tied the ends of the twine to the tag, added a bow and put foam tape behind the tag for a little bit of dimension to my card.
 I put a small piece of Stick-it adhesive behind a scrap of Bright Buttercup cardstock from Papertrey Ink and die cut lots of tiny hearts from it using a die from the Say What? Gift Tags die set from Lawn Fawn. I adhered the hearts in three little groupings of three. They form a nice visual triangle and add more yellow goodness to the card. There’s no such thing as too many hearts!
 I’m sending lots of love to the people in Ukraine. It’s heartbreaking that certain people haven’t yet learned the lesson that war’s never the answer. Love always is. 💙💛
 Lots of Copics used for this. Thankfully, they were already out on my desk from previous projects, so I didn’t add to the pile of markers I have to clean before I put them back where they belong in my block stands.
 I printed the image near the bottom left corner of a panel of X-Press It blending card, before coloring it with Copics and using the largest die in the A2 Double Stitched Rectangle STAX die set from My Favorite Things to create a finished look with the nice faux stitching details that I love to add to my cards. I adhered it to a cardbase I created from Jalapeño Popper cardstock, also from MFT, and I had my base ready for some play with scraps.
 I love creating these clusters of die cut scraps on my cards, and I have stamp storage pockets with little die cut patterned paper scraps sorted by color. That way I can rummage through these when I create my cards instead of having to find lots of patterned paper to match my card, then die cut it. It usually takes several different patterned papers of one color to create the dynamic look I want for my cards, but for this one, I actually kept it simple with one yellow (P13), one white and gray (Sunny Studio) and only two green ones (Basic Grey and Karen Foster Design). They’re all different shapes, which still keeps it interesting. Some are glued directly to the card, some with foam tape for a little bit of dimension. Using VersaMark ink, I stamped a sentiment from the Mini Messages stamp set from Mama Elephant onto one of these die cut pieces (it happened to be a tag) and heat embossed it using Super Fine Detail embossing powder from Ranger. I used part of a mini paper doily from Doodlebug Design behind my main cluster, and added a few enamel dots (green from Papirdesign, yellow from Altenew) to embellish.
 Lots of green for this color palette.
 I printed my image onto X-Press It blending card and colored the penguins with Copics, before sprinkling on chunky white embossing powder from Stampendous for a snowy look. I then die cut the Mega Snowflake Cover die from Mama Elephant three times; twice from white cardstock, once from Sno Cone cardstock from My Favorite Things. I glued them together and added my penguins to the back, before adhering everything onto a top fold A2 cardbase I created from Stamper’s Select White cardstock from Papertrey Ink.
 To keep the rest of the colors soft, I diecut the letters for HUGS three times from white cardstock using the Sending You Hugs die from MFT. I glued them to the bottom center of my card, and added a secondary sentiment that I stamped and white heat embossed on a strip of Cotton Candy cardstock, also from My Favorite Things. I added two more strips of cardstock behind for dimension and stability, before finishing off the card with a few Sparkling Clear Sequins from Pretty Pink Posh.
 I used probably way more gray markers than I needed to to create these penguins, but sometimes, that’s what I do.
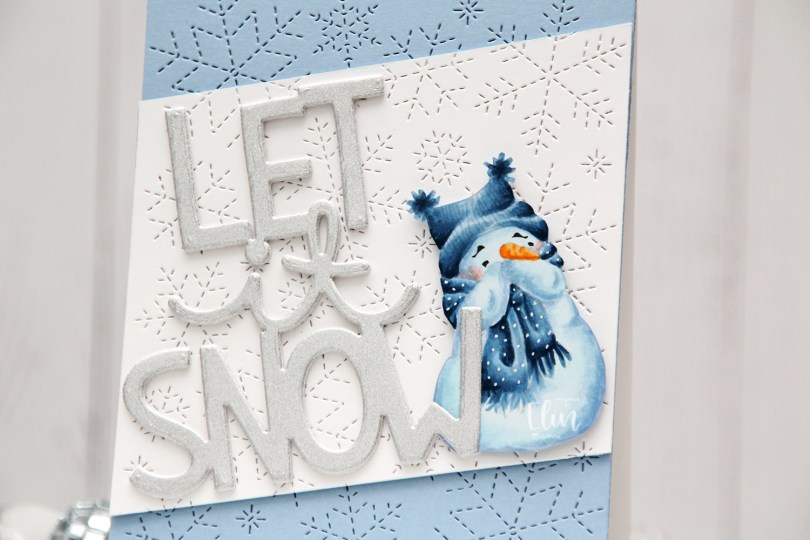
 I no line colored my snowman, but kept his eyes and eyebrows dark before I printed the image. It’s a great way to get them perfect and not have to worry about drawing the details back in when the rest of the image is colored up. I fussy cut the snowman and put him aside while I worked on the rest of my card.
 I die cut the Stitched Snowflake Backdrop die from Lawn Fawn from a piece of Blue Breeze cardstock from My Favorite Things, and adhered it directly to my card base, which I created from Stamper’s Select White cardstock from Papertrey Ink. I also cut a panel of white cardstock using the same die, cut it at an angle and glued a couple of additional layers of cardstock behind my white piece for dimension. I love the look of the continuous background across the two colors. I die cut the Giant Let It Snow die from Lawn Fawn three times from white cardstock and once from silver glitter cardstock and stacked them for dimension. I made sure not to put glue behind half of the silver glitter W, because I needed it to cover part of my snowman, or he wouldn’t fit on the card. I put foam tape behind most of him and tucked him between the white and silver of the let it snow die cut, then added glue behind the half of the W that covered my snowman, and the card was complete.
 Super simple color palette for this card.
 Meet
Meet  I’ve probably mentioned this in a previous post, but I love the quality of rubber stamps and their ability to include very thin, detailed linework. The lines in these images are all very thin, and they stamp so beautifully in a way only rubber can. I love it.
 I colored my scene with Copics, then stamped a sentiment from the
  I wanted some sparkle to my ice, and added Stickles. I didn’t like the look of the Stickles, so I scraped most of it off and switched to liquid glue with a sprinkling of Distress Glitter Rock Candy instead. I made sure not to spread it perfectly, but to create streaks to emphasize the streaky look of the ice I created with my markers.
 I added a dot of a black glaze pen to their eyes to make them pop, and I love that this card is versatile enough to work as a general card in the winter months or even a birthday card. It’s a bit of an odd size, about 5 7/8 x 4 1/2″, but I made the size of the card fit my scene, not the other way around. I’ll create a custom envelope for this, and it’ll be good to go in the mail.
 Lots of Copics used for this one!
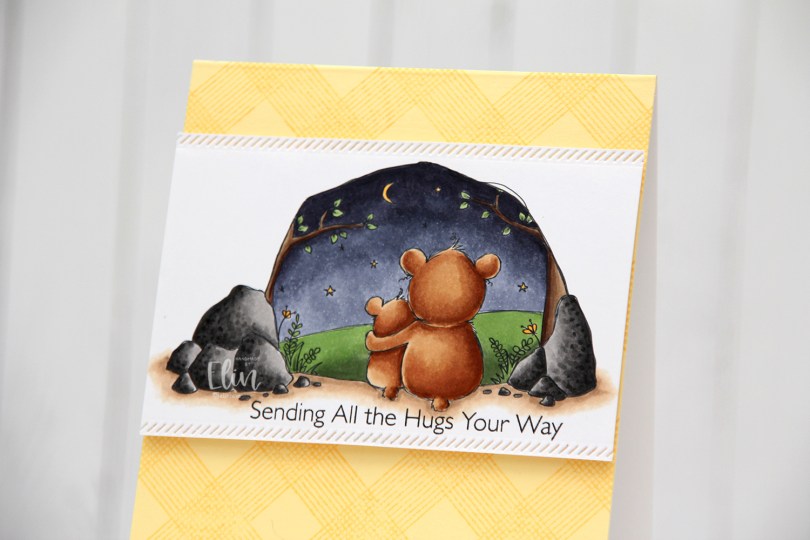
 I wanted the focus to be on the image and kept the rest of the card pretty simple. I stamped a sentiment from the Hugs Make Everything Better stamp set from My Favorite Things directly below my image using Smokey Shadow ink from Papertrey Ink. I wanted something a little bit softer than black, but I did stamp it twice, so maybe I should have used black after all. Close to the sentiment and close to the top of the scene I used one of the Stitched Borders dies from Lawn Fawn to create a decorative edge. I love faux stitching details on my cards, and this diagonal one is a fun change from the ones I normally use.
 Onto a panel of Lemon Tart cardstock from Papertrey Ink, I stamped the All Lined Up Diagonally Background stamp from My Favorite Things using Harvest Gold ink from Papertrey Ink, which is a tiny bit darker than the Lemon Tart. It adds subtle tone on tone interest to the background without distracting from the focal point of the image. I adhered the panel directly to a white top fold card base I created from Stamper’s Select White cardstock from Papertrey Ink and added my image towards the top of the card using foam tape for dimension.
 Simple color palette today. I also used BV27 for the sky, which is a color I’ve made myself.
 I colored the image using a very soft color palette with my Copics. I didn’t write the colors down, so unfortunately, I have no fancy graphic to show you at the end of this post. I wish I did, though, because I really like the colors I used for this.
 I used the largest of the A2 Stitched Rectangles STAX 2 dies to turn my colored piece into a nice panel with the faux stitch edge I love so much. I decided to adhere it directly to my top fold card base, that I made from Berry Sorbet cardstock from Papertrey Ink. The color matches the darkest parts of her dress very well.
 Onto a separate piece of Berry Sorbet, I stamped and white heat embossed part of a sentiment in the
  I die cut part the word wish using a die from Mama Elephant. The die actually die cuts the word wishes, but I cut off the tail end of the word so I was left with just wish. I die cut four more from Grapefruit cardstock from Concord & 9th, and added them behind the top die cut for dimension. This makes the word lighter (and it makes it match the lighter parts of the dress) from the sides. I did the same with the sentiment strips above, making the strip and the stacked die cut flush.
 I finished off the card by adding a few sparkling clear sequins from Pretty Pink Posh. I used my scissors to cut the largest sequin in half to tuck it behind the sentiment strip.
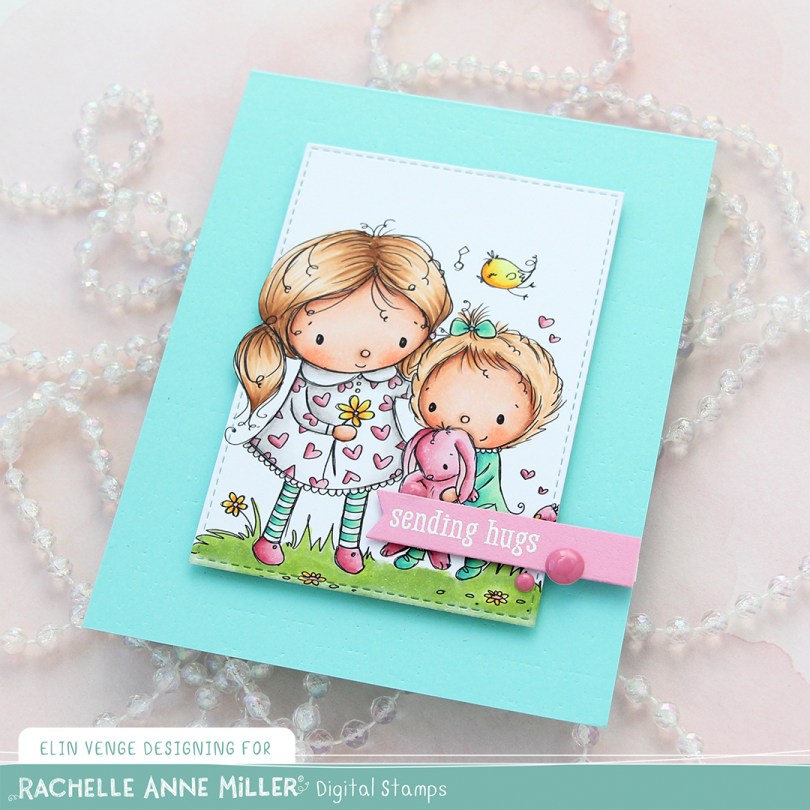
 I printed the image onto X-Press It blending card, which is my go to paper for Copic coloring. It’s bright white and can handle a lot of layers without bleeding.
 Once my image was colored, I used a die in the A2 Stitched Rectangles STAX 1 set from My Favorite Things to turn it into a finished panel of 2 7/8 x 4 1/8″. I’d printed the image a little too big for my die, so I did some fussy cutting on the side of the big sister’s head before die cutting.
 I created a card base from Summer Splash Prestige cardstock from My Favorite Things and used an impression plate from Papertrey Ink to create some subtle texture in the background. I mounted my colored, die cut panel to the center of the card front using lots of foam tape.
 Onto a piece of Cotton Candy Heavyweight cardstock from My Favorite Things, I stamped and white heat embossed a sentiment from the Monster Hugs stamp set from Simon Says Stamp and Concord & 9th, which is a collaboration set from 2018. It has a cute monster image and lots of great sentiments. I die cut my sentiment using the smallest of the dies in the Fishtail Flag Frames set from My Favorite Things and added it to the card using foam tape and 1 mm foam squares, to make it pop up slightly from the image.
 I finished off the card by adding three pink enamel dots from Papirdesign.
 Fairly simple color palette. I even experimented a little with a new teal/green combo on the little sister, and I kind of like the color combination, so I might use it again one day soon!