Hi, crafty friends. Today I’m sharing a card that’s a little bit different. It’s a criss cross card. I’ve made a few of them in the past, but it’s been a while, and they’re kind of fun to make.
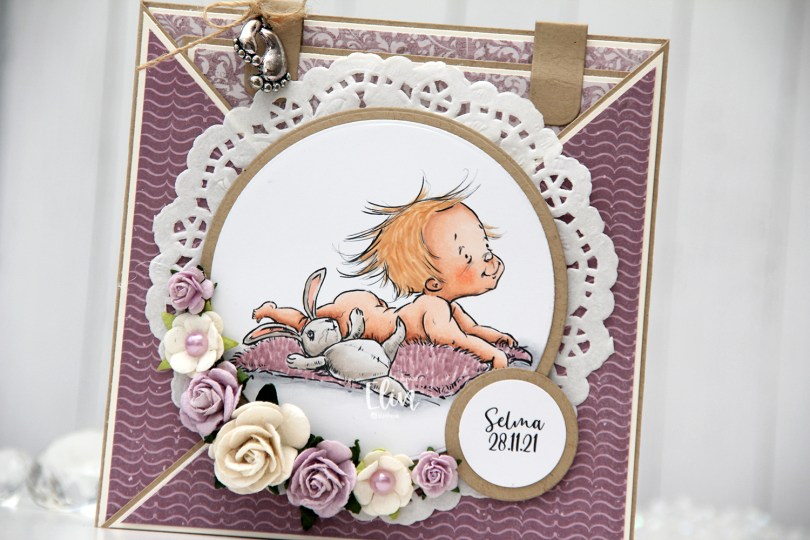
 This card was created for a little girl whose christening was this past Sunday. I think the Baby and Bunny image from Mo Manning is super adorable, and it’s an easy one to color up fairly quickly too. I chose some purplish patterned papers from Papirdesign and Maja Design and colored the image with Copics that matched.
 I die cut the image using a circle die from Lifestyle Crafts and matted it with kraft cardstock. I also printed the name and date on a piece of white cardstock that I also matted with kraft. I put a doily from Helz Cuppelditch behind my image and added flowers using a hot glue gun. I took out the yellow centers of two of the flowers and replaced them with Lavender pearls from Kaisercraft.
 On the inside tag I added a circle diecut made from white cardstock for a space to write a personal message. I used the Labels Trio die set from Spellbinders to create two “handles” from kraft cardstock. I tied a bow and attached a charm to one of them for a little added interest.
 On the back of the card I stamped a sentiment from North Star Design using Amethyst ink from Altenew.
 The card isn’t very big, it only measures 5×5″, but it’s quite dimensional and doesn’t fit in a regular envelope, so I decided it was best to create a box envelope.
 I rummaged through my 12×12″ cardstock and found a color that matched pretty well, and used my Envelope Punch Board from We R Memory Keepers to create the box. I added another Helz Cuppelditch doily for cohesion, as well as more of the patterned paper that I die cut using the Impact alphabet die set from My Favorite Things.
![]() Not a whole lot of Copics used for this.
Not a whole lot of Copics used for this.
 Today I’m sharing a simple one, featuring
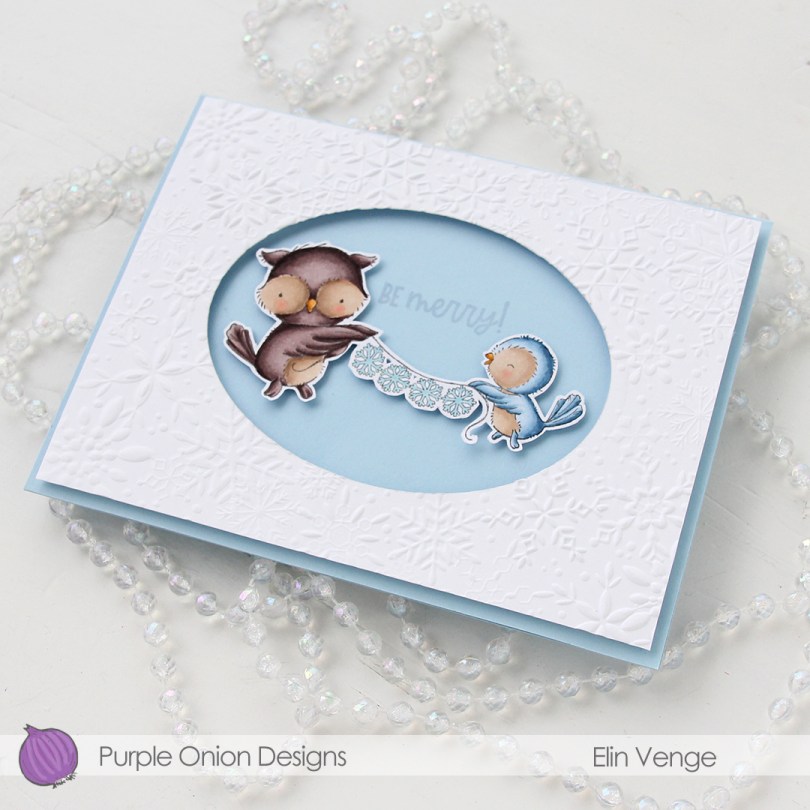
  I stamped the image with Extreme Black ink from My Favorite Things onto X-Press It blending card, colored the image with Copics and fussy cut, leaving a thin, white border. I prefer cutting right up against the stamped lines when I fussy cut, but with the snowflake garland, that just wasn’t an option.
 I used an oval die from Spellbinders to cut a window into a white cardstock panel. I then used the Snowflake Oval Frame embossing folder from Simon Says Stamp to create a little bit of texture to my plain white cardstock. This embossing folder has an oval in the center that doesn’t emboss (where you can stamp a sentiment), but I wanted a window for my card and cut out an oval before using the embossing folder.
 I created a card base from Spring Rain cardstock from Papertrey Ink and stamped part of a sentiment from the
  I put lots of foam tape on the back of the white cardstock with the dry embossed snowflakes and adhered that to my card, and then added foam tape behind my colored image and placed it in the center of the card.
 Simple color palette for this card.
 I colored the cat, tree and ground with my Copics, before deciding that I really wanted a dark, intense night sky. I stamped and fussy cut masks for both images, then did some free hand cutting of a snowbank at the back, before I went in with my Copic airbrush system and some dark blue colors to quickly create the sky.
 I used the largest of the dies from the Slimline Double Stitched Rectangle STAX set from My Favorite Things to cut down the panel to fit on the front of my card, and stamped a sentiment from the
  I sprinkled on chunky white embossing enamel from Stampendous, making sure no granules covered the sentiment or Hazel’s eye before melting the granules from the back of the panel. I adhered my snowy scene to a card base I created from Stamper’s Select White cardstock from Papertrey Ink, and my card was complete. I didn’t want to add anything else to it.
 For such a simple scene I sure used quite a few colors. The ones that come after the jump in this graphic are the ones I used to airbrush the sky.
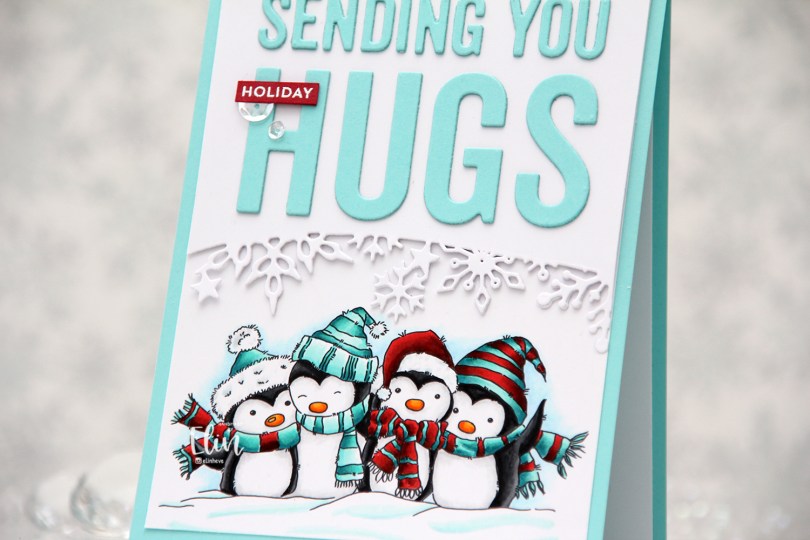
 I colored up my penguins with Copics, using a combo of red and teal for their hats and scarves. I’m not a fan of complementary colors, and I do my best to avoid using green with red, but teals, blues and greys all work well.
 I didn’t really have a card idea in mind when I printed my image, but I printed it towards the bottom of a 4 1/4 x 5 1/2″ piece of X-Press It blending card. Once I sat down with my colored panel to actually create the card, an idea formed straight away. It doesn’t always happen like that, but I’m grateful every time it does. I created a card base from Summer Splash cardstock from My Favorite Things, cut down my panel to 4 x 5 1/4″ and adhered it to the card base.
 Using a snowflake border die from Papirdesign, I die cut a snowflake border above their heads. I used the same X-Press It blending card for this as I wanted the whites to match. I die cut an additional two pieces, and glued them together for a stacked look. The die is actually meant for slimline cards, but it worked really well for this.
 I used the Sending You Hugs die from My Favorite Things to die cut my sentiment twice from Summer Splash cardstock. I used the negative piece of the die cut for placement, and layered my letters together for a little bit of dimension. On a piece of Amarena Cherry cardstock from My Favorite Things, I stamped and white heat embossed the word holiday from the Itty Bitty Holiday stamp set, also from MFT. I cut it down to a thin strip, added another layer of Amarena Cherry cardstock behind it for a bit of dimension and stability, and glued my little strip to the H in hugs, before finishing off the card with a couple of sequins from the Sparkling Clear mix from Pretty Pink Posh.
 I could have gone crazy with tons of colors for the accessories on these cute penguins, but I limited my color palette by keeping the coloring simple.
 Meet
Meet  I stamped my images using Extreme Black ink from My Favorite Things, and colored in the scene using my Copics.
 After trimming down the panel, I stamped a sentiment from the
  I adhered my colored panel onto a square card base I created from Blue Yonder cardstock from My Favorite Things. When I first started making cards, they were all square; 6×6″ is the standard size for handmade cards in Norway, and I admit it’s a fun size to go back to. This isn’t actually fully square, it measures 5 7/8 x 5 1/2″, but it’s the size that best fit my scene, so I went with it.
 There’s something cozy and serene about this entire scene, and I really like how it turned out.
 Very muted color palette for this one. I see now that I forgot to add the green, but I believe they were BG99, G46, 43, YG61 and G20.
 I cut down my panel of X-Press It blending card significantly when my coloring was done, and mounted it on foam tape onto the cardbase, which I’d covered with a scrap piece of patterned paper from the Hjem til jul collection from Papirdesign.
 I added a small cluster towards the top right corner of the card, using a mini doily from Doodlebug, as well as some die cut scraps of patterned paper from Maja Design and Sunny Studio. I stamped a sentiment from Norsk Stempelblad AS using Dark Chocolate ink from Papertrey Ink onto Classic Kraft cardstock, also from Papertrey Ink. The dies I used in my cluster are a combination of My Favorite Things (Fishtail Flag Frames and Itty Bitty Strips) and X-Cut (Happy Days Ticket Stubs). I also used the Hero Arts Snowflake Confetti fancy die to die cut snowflakes that I scattered across the card, and I put a white pearl from Kort & Godt in the center of each snowflake to finish the card.
 This color combination of blue and bright pink sure was fun, and these are brighter blues than the ones I normally use. I also used a ton of colors for the snow in this little scene. I just can’t help myself.
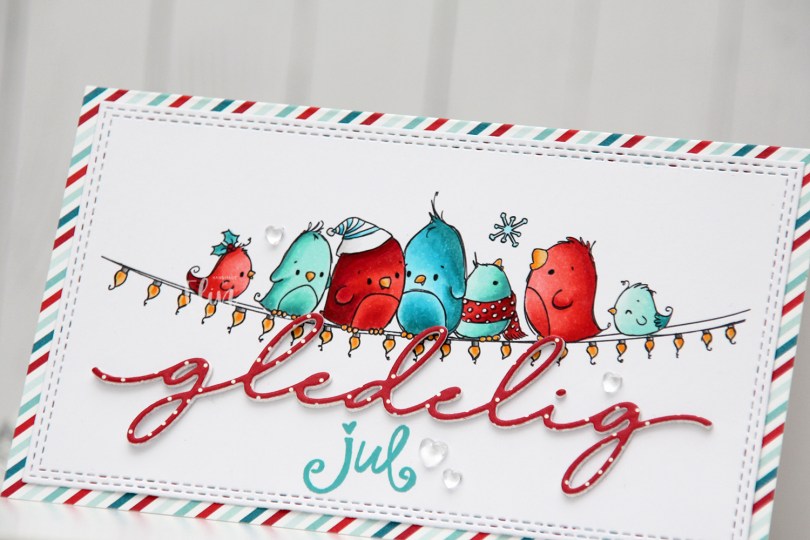
 I printed the image on a piece of X-Press It blending card and colored my birds with Copics in colors that match the Cool Collab paper pad from My Favorite Things, because I really wanted to use it. Red and teal is a color combo I really like, and this paper pad has lots of it. Once my coloring was complete I did some partial die cutting using the largest die in the Slimline Double Stitched Rectangle STAX die set, also from My Favorite Things. It gave me a nice double stitched edge around my colored image.
 I adhered my panel to a card base I covered with one of the papers in the pad, which gave me a nice frame. I also die cut the word gledelig from another piece of paper in the pad, with three white die cuts behind for dimension. I stamped the word jul (stamp set from Norsk Stempelblad AS) below it using a combination of Peacock Feathers Distress Oxide ink and Caribbean Sea ink from My Favorite Things to get the perfect color. To finish off the card I added a few heart droplets from the Crystal Collection Glass mix from Little Things from Lucy’s Cards.
 Simple color palette for this one.
 This image is so quirky and playful, and the look of that cat just puts a smile on my face! This card actually came together pretty quickly and easily. I’d colored all my images for this release over a couple of days, and I spent a couple of hours fussy cutting all the images I wanted to have fussy cut, so when it was time for assembly, this one was a cinch.
 Onto a top fold white card base I added a panel of white cardstock that I die cut using the Snowflake Confetti Fancy die from Hero Arts. I love this die, I’ve had it for years, and it’s great for die cutting lots of tiny snowflakes to put on cards, which is what I usually use for. I do, however, keep the bigger die cut pieces in the packaging with the die, and for this card I just pulled one out and adhered it to the card base. Super simple when the die cutting job is done in advance. I like the subtle texture the tone on tone die cut gives. It adds a little bit of interest, but doesn’t steal the show from the focal point of the card.
 Seriously, look at that cat. He’s so funny and quirky and awesome!! As I’m writing this blog post, I’m realizing that I’ve kind of colored him to look like Garfield. Totally unintentional, but I’ll just run with it! Now that I think about it, it’s not a him, it’s a her, her name’s Felicia.
 I die cut the words god jul (Merry Christmas in Norwegian) twice from Jalapeño Popper cardstock from My Favorite Things using a die from Papirdesign. I glued the two layers together and adhered them on top of my colored image, and my card was complete.
 Very limited amount of colors for this one.
 I started by creating a watercolor background in Photoshop using a png from Lili of the Valley, before I added the Dinosaur Friends on top. No fuss and no masking, I love how easy it is to work with digital files. I printed my critters and background onto X-Press It blending card before I did Copic coloring. I wanted to match my coloring to the colors in the background.
 I used the largest die in the A2 Stitched Rectangles STAX 1 set from My Favorite Things to create a nice finished edge around my coloring, before I did partial die cutting using the Sending Big Hugs die, also from My Favorite Things. I made sure to only die cut the word HUGS from my colored panel, and die cut 3 more from white cardstock. I layered my white die cuts together, adhering the colored piece on top of each letter. I adhered my scene to a side fold cardbase I created from Amethyst Allure cardstock from Papertrey Ink, and puzzled each of the letters into their place.
 The letters are a bit chameleon like. You can’t see them very well from head on, but if you look at them from an angle, they pop into view a lot better. I added a layer of Glossy Accents to the letters so they would shine and stand out a bit more.
 Stacked die cut inlay is a great technique when you want to add a big sentiment without distracting too much from the focal point of the card. This HUGS word is pretty big, but because of the inlay, what you really notice are the colored critters.
 I added some Sparkling Clear sequins from Pretty Pink Posh to finish off the card. These are my favorite sequins; they go with everything, and my stash is running low, so I need to buy a new bag soon. They also last forever, I’ve had mine for years, used them a ton and am only now running low.
 Simple color palette for this one. Those BGs blend effortlessly!
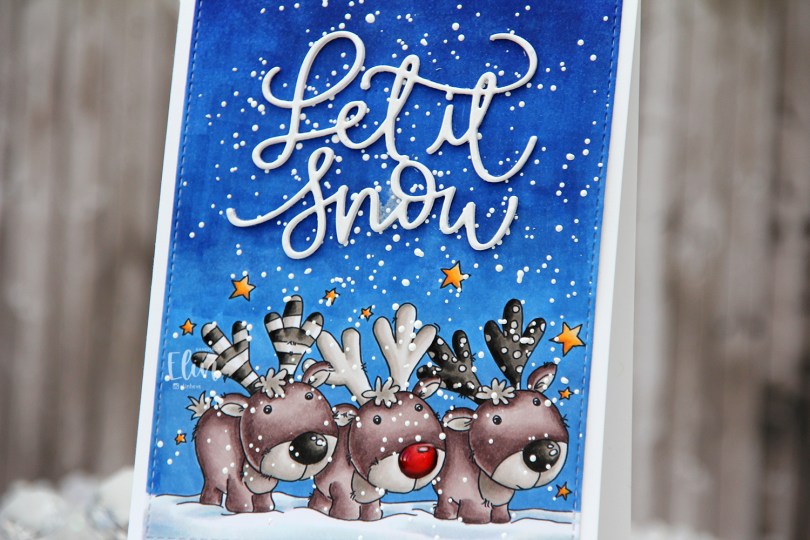
 I often wind up running out of time to create cards from my colored images in a timely manner, but better late than never? I colored most of this image in very neutral tones, I wanted the red nose to really stand out, and it does. It helps that I added Glossy Accents to it, but it’s a very red nose!
 Once I’d colored my image, I used the largest die in the A2 Stitched Rectangles STAX 2 set from My Favorite Things to give it that nice finished edge that I’m so fond of.
 I sprinkled on lots of Chunky White embossing enamel from Stampendous and heated the panel from the back, before adhering it to the front of a top fold white card base I created from Stamper’s Select White cardstock from Papertrey Ink.
 From the same white cardstock I die cut the sentiment three times using a die from Mama Elephant and stacked them for a dimensional look, before gluing them to my sky.
 I added some shimmer to the die cut words using a Wink of Stella brush marker from Kuretake. It doesn’t really show up in photos, but it gives a nice effect in real life.
 Last but not least – lots of Copics. 6 markers for that tiny red nose might have been overkill…