
Hi, crafty friends. I have a simple holiday card to share today, featuring Kayla with gingerbread from Mo’s Digital Pencil. This is such an adorable image!
 I printed the image onto X-Press It blending card and colored it with Copics. I went with a grayish green/muted pink combo, which is one I often use for holiday cards. I’m not a fan of bright red and green together, but this works for me. Once colored, I used a die from the Wonky Stitched Rectangle STAX set from My Favorite Things for a fun faux stitch look on the edges. I adhered my panel to a top fold card base I created from Autumn Rose cardstock from Papertrey Ink, which is a nice match with my pink coloring.

I stamped the word Gledelig from the Jul stamp set from Norsk Stempelblad AS using VersaMark ink, and then heat embossed it using Super fine detail embossing powder from Ranger. I used a die from the Itty Bitty Strips die set from My Favorite Things to turn it into a banner, and I cut it short with a craft knife. I used the Gledelig jul die set from Kort & Godt to create a banner that spells JUL. I used Stormy Sea cardstock from Papertrey Ink and added three layers for strength and dimension. I adhered my Gledelig strip on top with a couple of additional layers of cardstock behind it for dimension and finished off the card with sequins and confetti from the Starry Sky mix from Little Things from Lucy’s Cards.
 I used a fairly simple color combo, but it’s still a lot of Copics, I never can seem to rein it in.

 I colored my image with Copics and used a fancy border die from Papirdesign (Snøkrystall ramme 2) to create trees and snowflakes along the edge. I wanted to do something different, and actually created a card base from vellum. I have heavyweight translucent vellum from My Favorite Things, and it’s a very thick, sturdy vellum that can handle being a card base.
 I sprinkled on chunky white embossing enamel from Stampendous both on my colored piece and on the vellum base, before adhering the two together. I decided to create a white panel with the same die cut border for the inside of the card, as the vellum is very slick and not well suited for writing a personal message.
 I stamped and white heat embossed a sentiment from the B05 stamp set from Norsk Stempelblad onto Autumn Rose cardstock from Papertrey Ink. I used the Wax Seals die set from Waffle Flower to turn it into a faux seal and mounted it onto my card using foam tape.
 The vellum and die cut border create unexpected elements, the embossing enamel creates texture and you get a little bit of dimension with the sentiment seal. They all contribute and make this simple card a special one.
 Not a whole lot of Copics for this, and a fairly muted color palette.
 I knew one of the elves at the bottom would get his head cut off (the one wearing blue), so I created a copy with just his head, rotated it and put it in the top right corner to include another kid peeking in.
 I colored in the scene with Copics, choosing very bright colors. I then took my white Gelly Roll 05 to create patterns on most of the kids’ clothes. I used the largest die in the Watercolor Rectangle STAX die set from My Favorite Things to create a fun edge to my panel, before using the Connected alphabet die set, also from MFT, to spell out the name of the recipient. At first, I thought of cutting them straight, but realized that a wonky look would work well with the card and also be less time consuming.
 I wanted to include her age too, but didn’t have any number dies that matched the letters. There was just enough room on her apron for me to sketch in a couple of stick figures holding signs. I used my 0.03 Copic multiliner, and I think it’s running out of ink, which only enhanced the sketchy look I was going for. I die cut six more of each of the letters from True Black cardstock from Papertrey Ink, stacked them and added the colored pieces on top for a stacked inlay look. I mounted the panel on foam tape and adhered it to a card base I created from True Black cardstock from Papertrey Ink. I decided not to add any embellishments, I figured this card is colorful and really doesn’t need it.
 For the inside, I stamped a fun sentiment (You’re not thaaaat old – you were just born too soon) from the Til mannen stamp set from Norsk Stempelblad AS using Summer Splash ink from My Favorite Things.
 I stamped a sentiment from the Go’klem stamp set from Norsk Stempelblad AS onto a Summer Splash envelope from My Favorite Things using Summer Splash ink. I thought the envelope and ink matched the dress nicely.
 Here you can see those popped up letters a bit better.
 I used a lot of Copics for this one. Skin tones (and hair) make up that entire top row. I wanted different skin tones for the kids, and even though they don’t look that different in my photos, the difference is more pronounced in real life.
 I had a plan for this one even before I started coloring. Things changed as I was creating, but I still love the end result. I colored the little girl and fussy cut her, leaving a thin white trim around the hat and no trim at all around her mittens. I used The Stitched Snowflake Frame die from Lawn Fawn to create my large snowflake frame. I die cut four from white cardstock that I stacked for dimension and one from Soft Stone cardstock from Papertrey Ink that I adhered behind the white ones, you can see the gray peeking out from the points on the snowflake. The die also cuts a circle inside the frame. It has the same faux stitching as the snowflake, but I wanted a plain circle for this and used a circle die to cut a circle that was slightly larger than the frame opening. Inside the circle, I sprinkled on chunky white embossing enamel from Stampendous and melted the granules from the back for a snowy look. I put foam tape on the back of the girl and added her to the opening in the frame.
 Using the Stitched Snowflake Backdrop die from Lawn Fawn, I created some texture to a plain white panel. The die actually cuts a panel that covers an A2 card, but I wanted a bit of a border on mine and pulled out the A2 Stitched Rectangle STAX 2 die set from My Favorite Things to get it a little bit smaller. I adhered it to a panel of Cornflower cardstock from My Favorite Things, which I then adhered to a top fold card base I created from Stamper’s Select White cardstock from Papertrey Ink.
 I adhered the snowflake frame at the top center of the card and created a stacked die cut merry using the Merry Script die from Mama Elephant. There are four white layers topped with one in Soft Stone. I stamped and white heat embossed a sentiment from the Holiday messages stamp set from Mama Elephant onto a scrap of the blue card I used previously. I cut it down to a strip and added four small cardstock strips behind it for dimension, before I nestled it in with the die cut and finished off with a couple of pearls from the Glossy Porcelain mix from Little Things from Lucy’s Cards.
 There’s quite a bit of dimension on this card. I love dimension!!
 I tried to limit the amount of marker colors for this one. Did I succeed? Up to you 🙂
 It’s confirmation season, and my nephew’s confirmation was September 10th. I made several cards for him, and this is one of them. I thought this image was the perfect one to use, nothing says fifteen year old boy like a guy with his phone in his hand, school books hidden away and a bowl of snacks on the armrest. The controller tucked away is a nice touch too. We don’t wear shoes indoors in Norway, but the rest is pretty spot on.
 I created a background for my colored image using a variety of stamps, inks and even a stencil. I started with the Abstract Triangle Background stamp from My Favorite Things that I stamped in Orange Peel ink from Simon Says Stamp. I didn’t want the stamp to cover the entire background and made sure to stamp it in the lower left corner and have it fade as it went up and to the right. I then took a confirmation stamp from the A05 stamp set from Norsk Stempelblad AS and repeatedly stamped it on top of the stamping I’d already done using VersaMark ink, before sprinkling on super fine detail embossing powder from Ranger and melting the powder with my heat gun. I then used the Watercolor Wash Free Form stencil from My Favorite Things and ink blended using Spiced Marmalade and Mustard Seed distress inks.
 I fussy cut my image leaving a white trim and mounted it on foam tape on top of the stamping and ink blending I’d done. I die cut the Hullmønster die from Papirdesign twice; once from Cornflower cardstock and once from Sour Apple cardstock, both from My Favorite Things. I tore them both up, tucking a couple of pieces behind the image for a little bit of added interest.
 I used the Konfirmant 2 die from Papirdesign to die cut five times from cardstock for a stacked look, placing a layer die cut from True Black cardstock from Papertrey Ink on top of the stack. I adhered it to the card using liquid glue, placing the beginning of the word on top of Noah’s pant leg to make it all fit.
 I added some sentiment stickers from Kort & Godt to fill the space at the bottom of the card a little. They’re originally a bit bigger than this and white with black letters, but I used a Copic marker to color them blue to make them stand out against the white background a little and also cut them down slightly. The banners with the stars are also Kort & Godt stickers.
 In the top right corner, I created a little cluster with die cut pieces and those stickers, before finishing off the card with a few Papirdesign enamel dots. Onto a Limelight envelope from My Favorite Things, I adhered white die cut letters (dies from Papirdesign) to spell his name and stamped Konfirmant from the Konf. 02 stamp set from Norsk Stempelblad AS using Limelight ink from My Favorite Things.
 On the inside, I stamped a sentiment from the Konf. 02 stamp set from Norsk Stempelblad AS using Orange Peel ink from Simon Says Stamp. I also adhered number stickers from Papirdesign to get the date on there. The right hand side has plenty of space for a personal message.
 Fun, bright color palette for this one.
 I knew I wanted lots of green on this card, and as soon I was done coloring skin, hair and the ground, I grabbed a few green combos and colored in all the elves. I hit a bit of a snag when I got to Mrs. Claus’ dress, because I felt like there were no good color options. Grey would have been boring, brown would have been sad, red wouldn’t work with the amount of green I had and I felt a little lost, to be honest. Color buddy Liz to the rescue. She suggested the RV90s, and they worked beautifully. I’ve combined RV90s with green plenty of times in the past, but usually for florals, and I have to admit it’s been a while, so it was fun to use an old classic again.
 Once the coloring was complete, I used the largest die in the A2 Double Stitched Rectangle STAX die set from My Favorite Things to create a nice detailed edge around my panel and adhered it to a top fold card base I created from Autumn Rose cardstock from Papertrey Ink. I used most of a mini doily from Doodlebug in the top right corner of the card for a little bit of soft texture, and added a small scrap of the same doily in the lower left corner for a little bit of balance. I used a tag die from the Everyday Gift Box die set from My Favorite Things to create my tag, and stamped and white heat embossed a sentiment from the Mini messages stamp set from Mama Elephant in the center of it. I tied some Green Apple Divine twine into a bow and mounted the tag using a couple of foam squares before finishing off the card with a few gems from Crafty Meraki. These are the Green Illusion Sparkle and they change color when you tilt them in the light. They appear green and somehow shift to a pink/purple tone, they’re really cool, and the colors worked perfectly for this card.
 Lots of green for this one. I used four different green combos to color in the elves so they wouldn’t all look the same. I also used RV97, a color I’ve created myself, for the dress on Mrs. Claus.
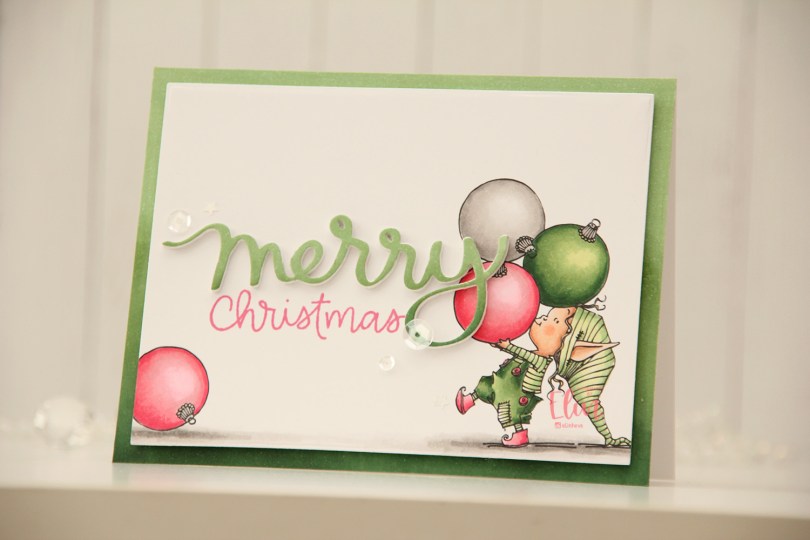
 I was planning on coloring this in green with a soft pink. I knew which greens I wanted use, but referred to my Copic color chart for the pink. My color chart is old and Copics fade with time, so the soft pink on my color chart wasn’t as soft in real life once I started coloring. I should color in a new chart, but I LOVE the hot pink with the green, so it all worked out.
 This stamp is what you see on the right. The tip of her hat goes a little further to the right, but I wanted a more dynamic design with her coming in from the edge, so I chopped it off. I copied one of the baubles in her hands and put it on the left of the panel before printing, I thought it added a little bit of extra interest.
 Isn’t she cute carrying those baubles? I love that they’re so big she has to use her forehead to balance them, because her arms just aren’t long enough to carry them on their own.
 I knew I wanted to use this Scripty merry die from Mama Elephant. I tried a pink one and a green one and the green just worked better. I didn’t have any green cardstock that matched my coloring, so I used the colors I’d used on the image to create a piece of green cardstock I could die cut from, which I adhered on top of four white ones that I also die cut. I used the same technique for the base and created an ombré effect going from dark at the base to lighter at the top.
 Using the Scripty Xmas stamp set from Mama Elephant, I stamped the word Christmas. The sentiment actually says merry Christmas, but I wanted to use the die cut merry, so I masked off the stamp version and stamped using Picked Raspberry Distress Ink, then stamped again using Worn Lipstick Distress Ink. I didn’t have a pink in that matched my coloring, but these two created the perfect blend.
 I mounted my panel onto the card front using foam tape, adhered the stacked merry die cut to nestle in perfectly with the stamped part of the sentiment and finished off with sequins and confetti from the Starry Night mix from Little Things from Lucy’s Cards.
 I love the dimension from the popped up panel and the stacked merry, as well as the ombre effect on the base and the die cut. The addition of the pink bauble on the ground gives the card a little bit of balance, not everything is happening on the right hand side of the card.
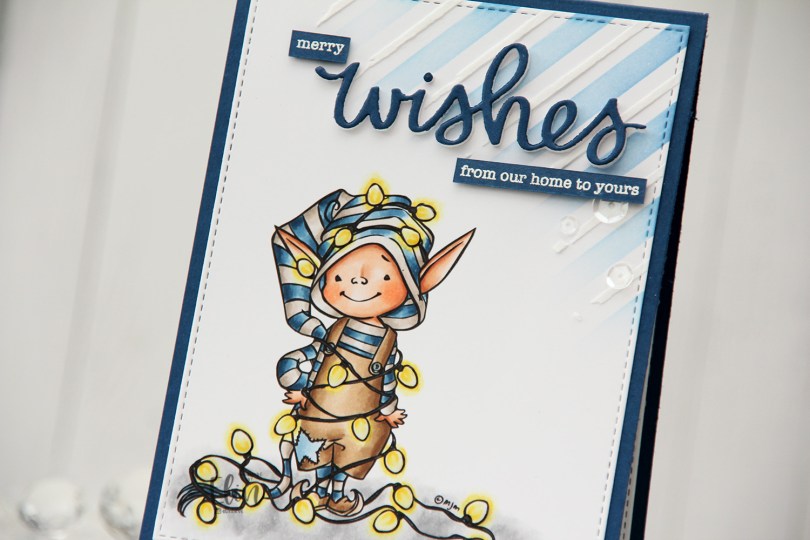

 I had to go for my traditional Christmas colors for this one with blue, brown and grey, it’s such a good combo. I made all the lights the same color. I know some people prefer the differently colored lights, but as a Scandinavian minimalist, my color palette for Christmas is very toned down, including my Christmas lights, which are all white.
 Once I’d colored my image, I used the largest die in the Stitched Rectangles STAX 2 set from My Favorite Things to create a faux stitch border around my panel. I then took the Plaid builder stencil set from My Favorite Things and ink blended using Blue Yonder ink from My Favorite Things in the top right corner with the stencil with the wide stripes. On top of the stencil with the smaller stripes, I used Light & Fluffy Modeling Paste from The Crafter’s Workshop for a little bit of added dimension and interest to the background.
 I adhered my panel to an A2 top fold card base I created from Enchanted Evening cardstock from Papertrey Ink. Using the scripty wishes die from Mama Elephant, I die cut three layers of white and one blue on top for a stacked look and adhered it on top of my stenciled background. I also stamped and white heat embossed a couple of sentiments from the Holiday messages stamp set from Mama Elephant to add to the wishes to make my sentiment complete. I cut them down to strips and added a few layers of cardstock behind each of them for dimension, before finishing off the card with a few sequins from the Starry Night mix from Little Things from Lucy’s Cards, as well as Glossy Accents for the lightbulbs.
 I love the glow and shine from the lightbulbs.
 Fairly simple color palette for this one.
 I colored Mae with Copics, opting for one of my go to summer color palettes. There’s something about pink, yellow and orange that just screams summer to me. Once colored, I fussy cut her, leaving a white border around the image. The white border makes her stand out against a colorful background, and with that hair, there’s no way I was cutting right up against the black lines in the image.
 I created an A2 top fold card base from Stamper’s Select White cardstock from Papertrey Ink, and did some ink blending directly on the front. I first used the Watercolor Circle stencil from My Favorite Things and ink blended using Squeezed Lemonade and Mustard Seed Distress inks. I removed the circle stencil, added the Geometric mosaic stencil, also from MFT, and used Spiced Marmalade Distress ink for an orange pattern on top, extending out from the circle a bit. I didn’t think the orange was dark enough, so I went over it with Orange Peel ink from Simon Says Stamp and even added a little bit of Abandoned Coral Distress ink on top to amp up the contrast.
 I mounted Mae on foam tape, before adding a couple of Kort & Godt sentiment stickers, which I also put foam tape on the back of.
 I love dimension on my cards, and by popping up the image and the sentiments, they stand out a little against a fairly busy background.
 To finish the card, I added a few pearls, hearts and gems from the Chrysanthemum mix from Little Things from Lucy’s Cards. I love her mixes, and use them on most of my cards, they add the perfect finishing touch.
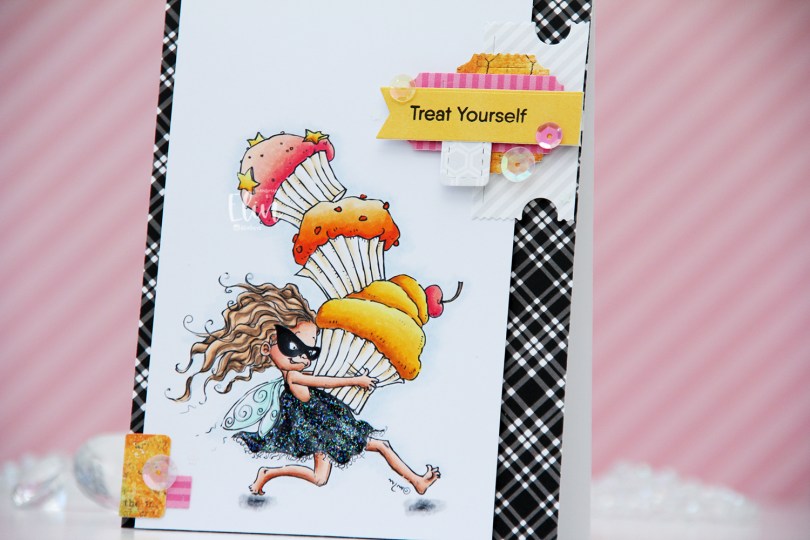
 This is Cupcake Thief. I’ve used the image once before. This time, I flipped it so she’s facing right, it’s one of the many advantages of using digital stamps. I colored her with Copics and cut my panel down to a width of 3 1/2″. I put it aside, covered a white card base with the black and white plaid patterned paper from My Favorite Things, then mounted the colored panel on foam tape, leaving a little bit of the patterned paper showing on one side, and more showing on the other.
 On my desk, I keep storage pockets of die cut patterned paper scraps that I use on my cards. I keep them organized by color family, and pulled out the pink, orange and yellow ones for this, as well as a grey/white/neutral one. The great thing about this system is that everything’s already die cut (using the Happy Days Ticket Stubs die from XCut [which cuts 9 different tickets with one die] and the Fishtail Flag Frames die set from My Favorite Things), so I just play with sizes, colors and composition of the different pieces until I’m happy with the result. For this particular card I used a combo of patterned papers from Sunny Studio, P13 and Bo Bunny. Onto one of the die cut banners I stamped a sentiment from the Little Birthday Notes stamp set from My Favorite Things using Obsidian ink from Altenew. I finished off the card with a few sequins from the Sweet Shop mix from Little Things from Lucy’s Cards and some Stardust Stickles to the dress.
 Quite a few Copics for this one. I also used B90, which is a color I’ve made myself, for a subtle hint of a sky.