
Hi, crafty friends. It’s the time of year when all the ghosts come out to play, and as such, I’m sharing a fun Halloween card today, featuring the adorable Cast a Spell image from Purple Onion Designs, illustrated by Pei.
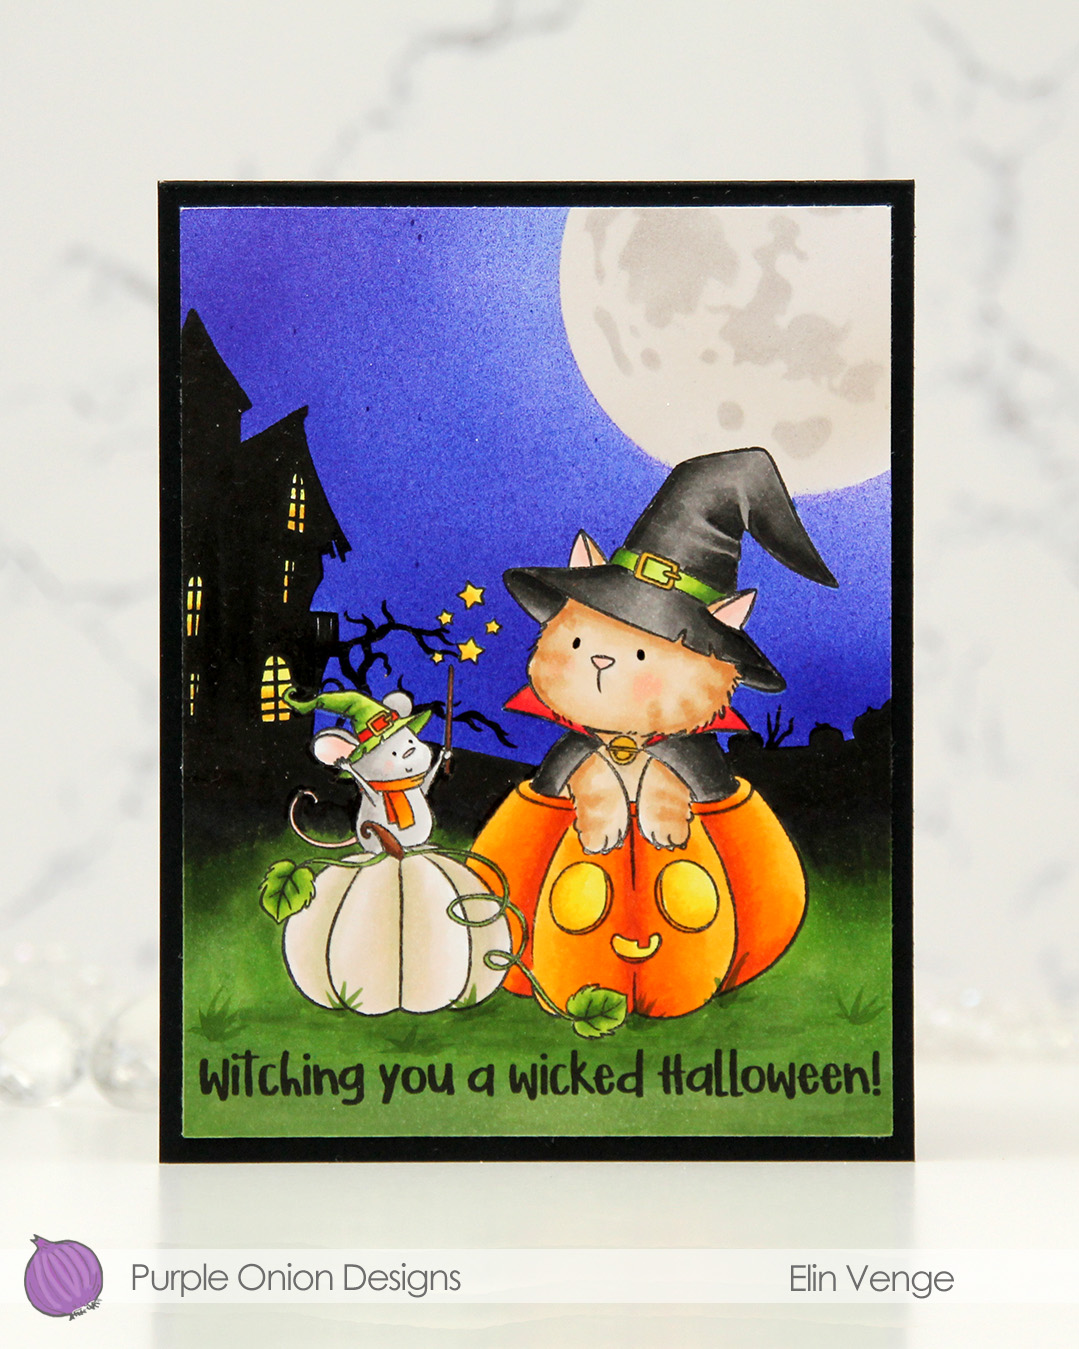 I stamped the image near the bottom center of a panel of X-Press It blending card using Extreme Black ink from MFT, which is a Copic safe hybrid ink. I colored the image and created a spooky silhouette background which fades from black in the distance to green as you get closer to the front of the image.
 I masked off the scene and put a moon mask from an old Simon Says Stamp Stamptember collaboration with Tim Holtz into the top right corner, before I went in with Copics and an airbrush to create the sky. I used three colors of blue, trying to make it a bit lighter near the moon and darker further away. I took off the moon mask, masked the sky and airbrushed into the circle opening using E40 for a very pale moon. I then added the detail mask for the moon and airbrushed the openings with T1, which is a very light grey that I also used for the mouse. Once all the coloring was complete, I removed all the masks, added a bit of black glaze pen to their eyes and stamped a sentiment at the bottom using Obsidian ink from Altenew, before trimming the panel down a little and adhering it to a card base I created from Black cardstock from Concord & 9th to finish.
 I used quite a few markers for this. The ones after the gap are the ones I used for the airbrushing of the moon and sky.

 I colored the trick or treat mouse with Copics, and adhered my panel of X-Press It blending card to a top fold white card base I created from Stamper’s Select White cardstock from Papertrey Ink. I used the Boo! stamp from the Itty Bitty Boos stamp set from My Favorite Things to stamp here and there around the scene, with Limelight ink from My Favorite Things, using second generation stamping for a couple of them for a softer look.
 I added a couple of pieces of orange dotted patterned paper from Waffle Flower above and below the image. I put foam tape on the back for dimension.
 I printed the ghosts on Heavyweight Translucent vellum from My Favorite Things and colored softly with Copics on the back of each of them. Colors don’t really blend on vellum, so you don’t need to be precise. You also need darker colors than you want to end up with, because the colors don’t show through all that well. I fussy cut the ghosts leaving a border around the edge and adhered two of the ghosts directly onto the orange patterned paper, using a little bit of liquid glue, before strategically placing enamel dots from Papirdesign on top, so the glue wouldn’t show through.
 I used the Happy die from the Hand-Lettered Happy Birthday dies from My Favorite Things to create my sentiment. I stacked four white die cuts, adhered the last ghost to the y and added a fifth die cut on top. The top layer sparkles in the right light. I used a sheer shimmer craft spray from Imagine, but it doesn’t really show up in photos. It’s subtle in real life too. To finish off my sentiment I white heat embossed another sentiment from the Itty Bitty Boos stamp set from My Favorite Things, this time onto Gravel Gray cardstock from My Favorite Things. I cut it down to a strip, added a few layers behind it for strength and dimension and adhered it to the die cut word, and my card was finished.
 I used quite a few Copics for this card.
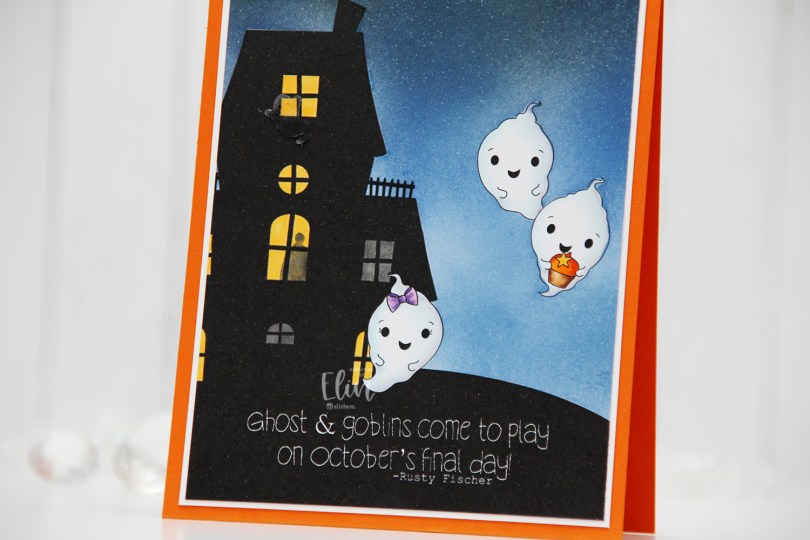
 I thought the ghost stamps in the
  I colored the ghosts with Copics, and used a yellow and a grey marker to color the windows. Most of the rooms have the lights on, but by coloring two windows grey, it gives the illusion that the lights aren’t on in those particular rooms. I also used the grey to add a silhouette of a person in one of the lit rooms, upping the creep factor a tiny bit.
 I masked off the ghosts and the house before I ink blended the nighttime sky. I used Eiffel Tower ink from My Favorite Things as well as Distress Inks in the colors Chipped Sapphire, Faded Jeans and Stormy Sky. Evidently, I’d used the paper I laid down to do my ink blending on to catch overspray from another project I added shimmer to, so the sky has a subtle shimmer to it when you tilt the card in the light. Completely unintentional, but not the worst thing in the world. My ink pads are now a little shimmery too, but it’s not too bad.
 I decided to also add an acetate ghost outside the top window of the haunted house. The ghost is from the Candy Corn mix from Little Things from Lucy’s Cards.
 I added my panel to a piece of white cardstock, and then adhered everything to a card base I created from Orange Zest cardstock from Papertrey Ink.
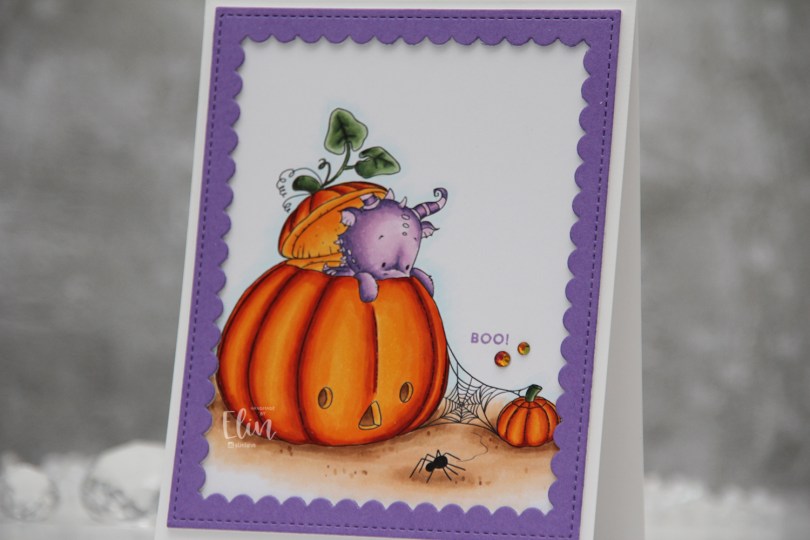
 Halloween isn’t really a big thing in Norway, but this image was so cute I just couldn’t resist. I colored up the ground, pumpkins and leaves before asking my “twin” Liz for a color suggestion for the actual dragon, thinking in my mind “please don’t say purple”. What did she choose? It was inevitable, I knew she’d say purple, she even said which purples to use. I actually think he’s cute in purple, and I don’t think I’ve colored one of Lee’s dragons purple before, so I guess it was about time.
 Once I finished coloring, I embraced the purple, stamping the Boo! sentiment from the Itty Bitty Boos stamp set from My Favorite Things using Deep Iris ink from Altenew. I then die cut the largest frame in the Scallop Frames die set from Pretty Pink Posh from Amethyst Allure cardstock from Papertrey Ink, adding two additional white die cuts behind it for dimension.
 The outside dimensions of the die cut frame are 4 x 5″, so I cut 1/4″ off the height of my card base, making it 4 1/4 x 5 1/4″ instead of the normal A2 size to get an even white border on the outside of it.
 The sentiment is tiny, and to draw the eye to it I decided to add a couple of gems. These are from the Meraki Sparkle Red Illusion jar. They’re color changing glass rhinestones, and this color was perfect for this card.
 If you look at the various photos in this post, you’ll see that these rhinestones appear to have different colors depending on how the light hits them, it’s a really cool effect. In this photo, you can also see the dimension added by using stacked die cuts.
 Fairly simple color palette for this card. It was a pretty quick image to color too!
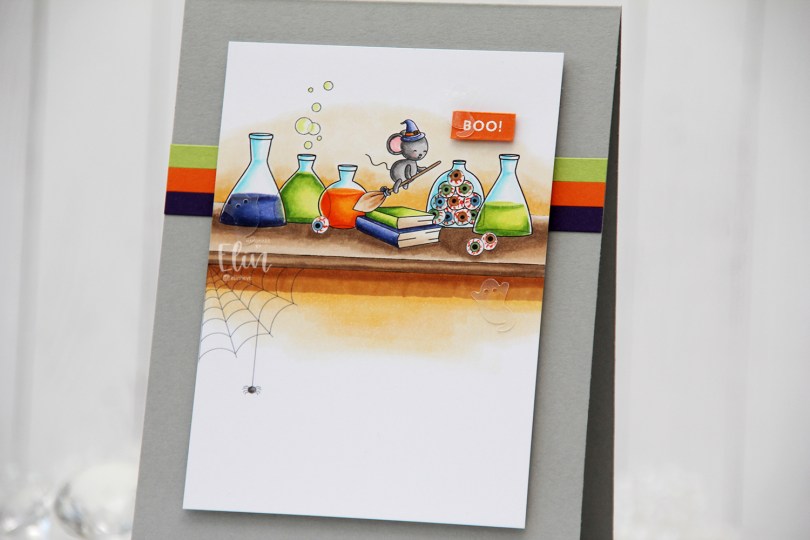
 This set comes with sooo many images, and I’ve actually used 11 different ones for this card. I added the lines for the shelf with a black pen, but everything else in the scene comes in the one stamp set.
 I’m known on the design team for occasionally printing my images very small. This time I might have set a new record, the mouse and the eyeballs in this scene were so small, they were tricky to color, but I really wanted them this size to fit the scene and the card design.
 Once I finished the coloring, I trimmed the panel down to 3 1/4 x 4 1/2″, and put it aside while I worked on the rest of the card.
 I created a card base from Cement Gray cardstock from My Favorite Things, added three 1/4″ strips of cardstock in colors that matched the scene (Royal Velvet from Papertrey Ink, Orange Zest from Papertrey Ink, Sour Apple from My Favorite Things), before I mounted the scene on top using plenty of foam tape.
 I stamped and white heat embossed the sentiment from the Itty Bitty Boos stamp set from My Favorite Things, added a few more layers of cardstock behind it for stability and dimension and finished off the card with a trio of acetate ghosts from the Candy Corn mix from Little Things from Lucy’s Cards.
 Lots of Copics for this little scene.
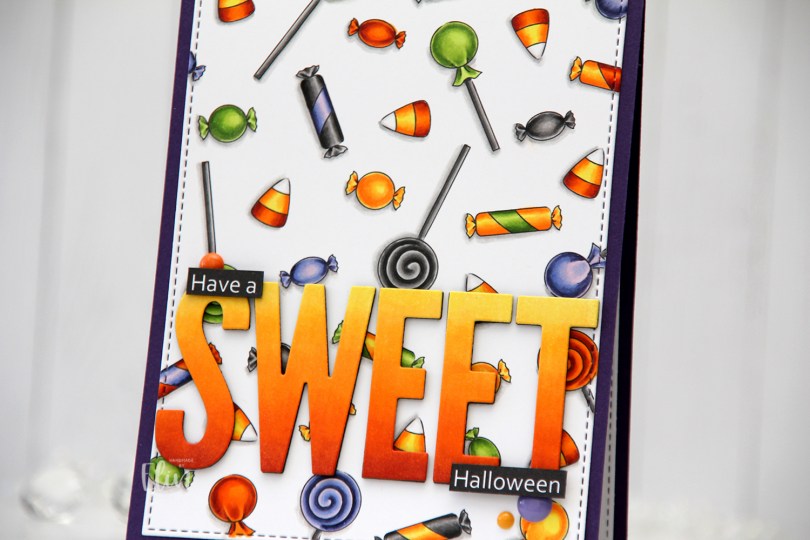
 In the stamp set, there are three fairies, a few ghosts, an adorable bat (yes, it’s adorable) and various accessories. Among them are different candies. I created a panel of these candies, and colored them in with my Copics using very Halloween-y colors. That was last year.
 I wasn’t sure what to do with my colored background, but I didn’t want to cover too much of it, and opted for a very simple design. Using the largest die from the A2 Stitched Rectangles STAX 2 set from My Favorite Things, I turned my colored piece into a panel with a nice faux stitched edge. I love these faux stitch dies from MFT and use them for nearly every card I make. It adds such a wonderful detail. It’s all in the details, to paraphrase a famous German architect.
 I adhered my die cut panel onto a card base I created from Royal Velvet cardstock from Papertrey Ink. It’s a deep purple that goes well with the coloring.
 I created the remainder of my sentiment in Photoshop and printed it, cut it down to two strips and added them on top of the letters with an extra strip of black cardstock behind for a little added dimension and stability. I added three enamel dots from Papirdesign (yellow and orange) and Altenew (purple) to finish my card.
 Not a lot of colors for this one, and yet they’re very Halloween-y.
 I wanted a really dark, intense moon to illuminate and cast shadows in my scene. Once I’d placed all the different images where I wanted them in Photoshop, I drew a large circle to create the edges of my moon. I set the opacity very low, so I could use it as a guide when I did the actual coloring to get a perfect circle and not have any black lines around the edges.
 My original plan when I colored this scene (which was actually last year) was to create a shaker card where the tombstone was the actual shaker recessed into the card, while everything else was popped up. Plans change, though, and when I sat down to actually make the card I decided to go for a very simple approach. I glued my colored panel onto a card base made from Sour Apple cardstock from My Favorite Things, and that was it. No embellishments, no nothing. Some people might call this a one layer card, but to me, a one layer card is one where everything is done on the card base. This is adhered to the card base, so I wouldn’t technically call it a one layer card. What do you think? One layer or not? What’s your definition of a one layer card?
 Not a whole lot of Copics, given the fact that the entire front panel is colored in.
 This cute vampire is from the My Little Pet Ghost stamp set. There’s also a witch in the same set that I used for a similar treat bag, which you can read all about in
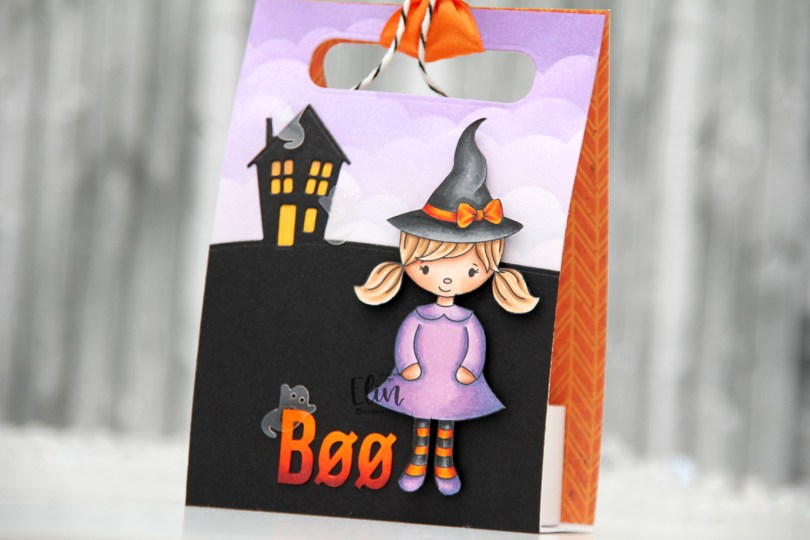
 This cute witch is part of the
  I did ink blending on this one, using the Slimline Cloud Edges stencil from My Favorite Things and inks from Altenew in the colors Deep Iris, Lavender Fields and Soft Lilac. I used the House on the Horizon die from Simon Says Stamp and die cut that from True Black cardstock from Papertrey Ink and adhered it directly onto my ink blended piece. Using a yellow Copic marker, I quickly colored in the windows and door of the house. I colored some white letter stickers from Papirdesign to match the orange on the girl, and adhered the letters next to her feet, before finishing off with a few ghosts from the Candy Corn mix from Little Things from Lucy’s Cards. I put a scrap piece of patterned paper on the inside back for a little extra visual interest, die cut holes through both layers and added a piece of ribbon and some twine to finish.
 Jeg har laget et lite hylster til en bitteliten sjokolade (eventyrsjokolade). Denne er superenkel å lage, og krever egentlig ikke at du måler heller. Jeg sørget for at mønsterarket mitt var langt nok til at sjokoladen fikk plass inni og jeg samtidig kunne lime den sammen i den ene enden og lage et hull i den andre enden til å træ bånd gjennom.
 Jeg syns svart og grått passer bra til Halloween, så jeg fant frem et mønsterark fra Papirdesign som jeg syns var fint. Det er egentlig et fotballark som tilhører en konfirmasjonsserie, men jeg syns det var ypperlig til Halloween også. Jeg brettet arket rundt sjokoladen og limte igjen i den ene enden. Gjennom hullene i den andre enden trædde jeg et oransje bånd. Deretter dyttet jeg inn sjokoladen, så båndet går rundt sjokoladen. Jeg knøt fast båndenene, og når man drar i båndet kommer sjokoladen ut.
 Det er en ganske effektiv måte å få ut sjokoladen på, samtidig som båndet pynter opp en ellers veldig enkel innpakning. Jeg pyntet ellers veldig enkelt med tekststripe, spøkelse og oransje dotter, alle fra Papirdesign. Dette prosjektet kan lett masseproduseres, så da er det kjekt at det er litt enkelt.