Hi, crafty friends. I started March by hopping on a flight to Trondheim for a crafty weekend away, and on Sunday, I even taught a class. I was a little apprehensive about the whole thing, as my mojo went missing around New Year’s. As it turns out, it had run away to Trondheim, and I was lucky enough to bring it back home with me. I taught a very simple Easter card, complete with Copic coloring. Some people did use Zig clean color brush markers, as that was the coloring medium taught in an earlier class, and the participants all received a few Zigs in their class kits for the weekend.
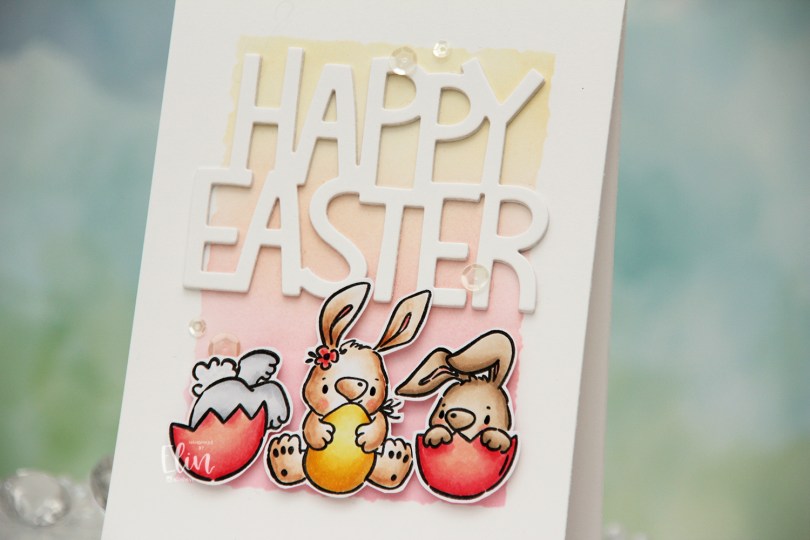
 The Easter Bunnies stamp set from Simon Hurley was the perfect one to teach with. It’s a stamp set with lots of images to choose from. They’re all small, easy to color and very beginner friendly, as there aren’t any big areas to fill in. Once colored, we fussy cut the bunnies. There’s a coordinating die set for this stamp set, but these are pretty easy to fussy cut.
 I did some simple ink blending on the background. I used the Watercolor Rectangle stencil from My Favorite Things and ink blended from the bottom to the top using Worn Lipstick distress ink, Pink Pearl ink from Altenew and Scattered Straw distress ink. These colors went well with the Copics I used for the bunnies, and it creates a little bit of interest to the background. I used the Giant Happy Easter die from Lawn Fawn and die cut that four times from white cardstock, before gluing them all together for a stacked look. I adhered the sentiment in the top center of the card, mounted the bunnies on foam tape and added a few sequins from the White Orchid Sequin mix from Little Things from Lucy’s Cards. I also used a black Glaze pen for the eyes, which the attendees really enjoyed, as it creates a little bit of dimension and shine very quickly and easily.
![]() Very soft color palette for this one.
Very soft color palette for this one.
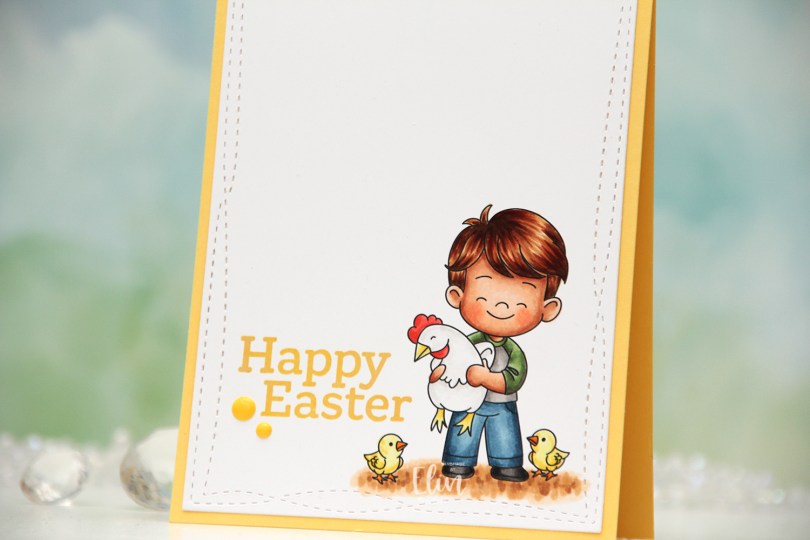
 I colored the image with my Copics and used the largest die in the Wonky Stitched Rectangle STAX die set from My Favorite Things to create a little bit of interest to the edge. I adhered my panel onto a top fold card base I created from Harvest Gold cardstock from Papertrey Ink.
 The sentiment is from the Sweet Easter stamp set from Sweet November Stamps. It’s actually a single line stamp, but I wanted a staggered look and cut the two words apart. You could also mask if you don’t want to cut your stamps, but I promise they don’t cry, and it’s easy to put the two halves back together as originally intended. I used Fossilized Amber Distress Oxide ink, stamping Easter first, then nestling in Happy above it, before finishing the card off with a couple of enamel dots from the Pocketful of Sunshine pack from Altenew.
 I used quite a few Copics for this, even though the card is very simple.
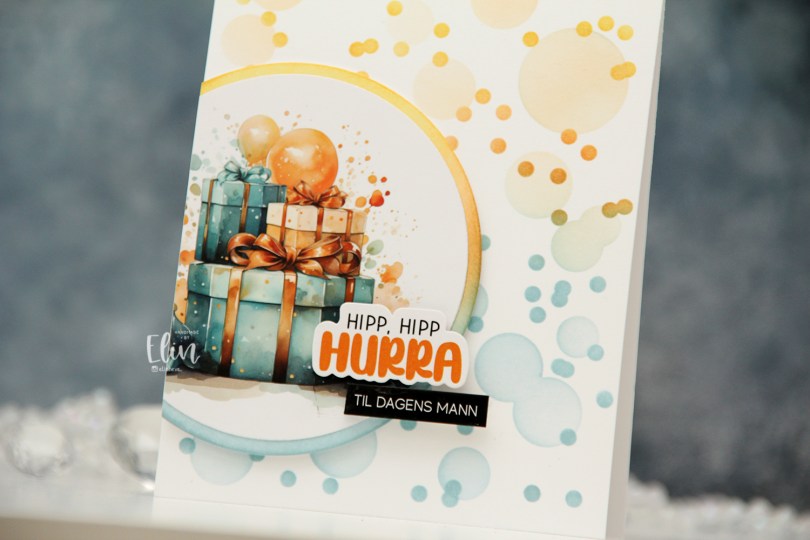

 I mounted my circles on foam tape, cut off the excess, then added a couple of pre cut stickers to finish off the card. I love these stickers!
 I colored the image with my Copics, then used the second largest die in the A2 Stitched Rectangles STAX 2 set from My Favorite Things to turn it into a nice panel with a faux stitch edge. I put a few additional layers of cardstock behind my colored piece for dimension and adhered it to a card base that I had covered in the patterned paper in this release. I used the blossoms, I thought the pattern went well with the blooms in the image and colored my dragon to be a good color match.
 Using the Waterbrush Hello Die from Altenew, I die cut three layers from white cardstock and one from the patterned paper, adhered them together for a stacked look and placed the die cut so it nestles in with the image, before finishing off with a few pearls. These Panduro pearls are very pale pink and they’re at least ten years old, but they worked really well for this card. I also used a black Glaze pen from Sakura to add shine to the eyes, and on the dragon, I added a white dot to each eye once the black was dry.
 Simple color palette this time, one that really makes me think of (and long for) spring. Even though spring technically starts today in the Northern Hemisphere, it doesn’t feel like it yet. I’m getting impatient, I’m 100 % over the cold weather.
 I created a mini slimline card this time. I figured it would go well with the tall, skinny image. This particular mini slimline measures 3 1/8 x 6 1/8″. I colored the image with Copics and used a die from the Stitched Mini Slimline STAX die set from My Favorite Things before I went over it with the Bokeh Elements Stencil Duo set from Waffle Flower and Rose Quartz ink from Altenew to create a soft background behind the chicks. I didn’t even bother masking them off, the pink ink was so light. I then trimmed down a piece of Lemon Tart cardstock from Papertrey Ink and used the Diagonal Stripe stencil from Simon Says Stamp with Scattered Straw Distress Ink to create some interest to the base as well. I stamped a sentiment from an Easter stamp set from Papirdesign (PD18390 Påske) using Obsidian ink from Altenew, and the card was complete.
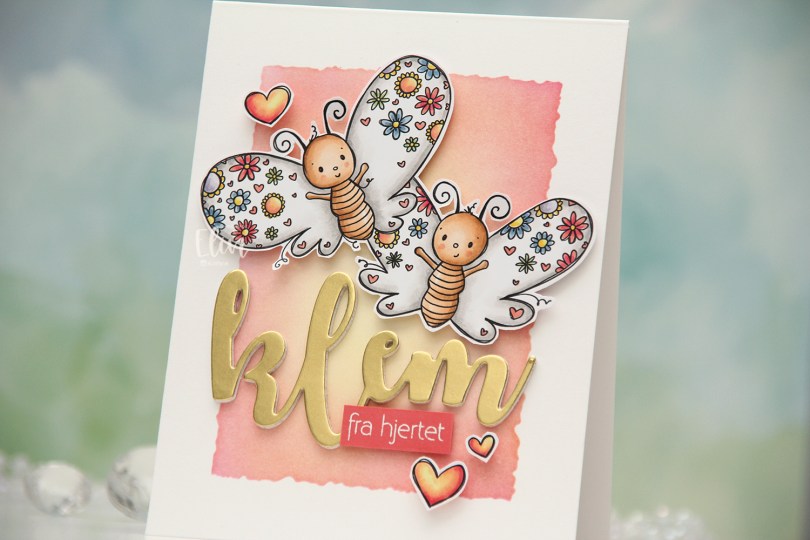
 I colored the butterflies (and the three hearts that are part of the image) with Copics and fussy cut them, leaving a thin white trim around the edge. Onto a top fold card base I created from Stamper’s Select White cardstock from Papertrey Ink, I ink blended the center of the card, using the Watercolor Rectangle stencil from My Favorite Things and various inks (Distress Ink Picked Raspberry, Distress Ink Worn Lipstick, Altenew Pink Pearl, Distress Ink Scattered Straw). I went with pink on the edge and yellow in the center to mimic the colors in the hearts.
 I die cut the word klem (hug) four times from white cardstock and once from Gold Shine cardstock from My Favorite Things, and stacked them for a layered look. I added foam tape to the back of my butterflies, adhered them top center on the card and put the stacked klem below them. I also added a sub sentiment from Norsk Stempelblad AS that I white heat embossed on a piece of Berry Sorbet cardstock from Papertrey Ink. I put a few layers of cardstock behind it for dimension and added it to the card, partly on top of the die cut, before embellishing with the colored hearts to finish.
 I colored the cow with Copics, before fussing cutting it, leaving a white trim around the edge. Onto a top fold fold card base, I ink blended blue inks from Altenew (Winter Lake, Icy Water and Polar Bear) through the Geometric Landscape stencil, also from Altenew, before stamping a Happy Birthday background stamp from My Favorite Things on top, using the darker two of the inks I used for the blending. I also used the stencil in the top right corner and used what was left on my ink blender brush for a soft look.
 I added Light & Fluffy modeling paste from The Crafters Workshop through the Tiny Clouds stencil from My Favorite Things. I wanted dimension to my clouds and put down a very thick layer of the paste. While that dried I worked on the rest of the card. I die cut four polaroid framed using the Precious Polaroids die set from My Favorite Things and stacked them for dimension. Onto Grapefruit cardstock from Concord & 9th, I stamped and white heat embossed three sentiments from the Bitty Birthday Wishes stamp set from My Favorite Things and cut them all down to strips, adding a few extra layers of cardstock behind each for dimension. I adhered the polaroid frame to my card base at an angle, glued the cow on top, added my sentiment strips and finished off with sequins and gems from the
  Super simple and very neutral color palette for this one.
 I colored up
  I stamped a sentiment from InkyWings using Pink Pearl ink from Altenew. The stamp actually has the word hugs in it too, but I opted for a die cut hugs, using the Sweet Sentiments die set from Altenew. I die cut four from Grapefruit cardstock and stacked them together for a dimensional look.
 I finished off with a couple of heart droplets from Little Things from Lucy’s Cards.
 Fairly simple color palette for this one.
 I used the Big Balloons stencil from My Favorite Things and did a rainbow of balloons going across the card. Each balloon is a gradient color, from dark at the bottom right, to a lot lighter at the top left. I used sooooo many ink colors to achieve this look.
 I die cut the word bursdag from Gold Shine cardstock from My Favorite Things. This is a very dainty die cut, so I chose to put double sided adhesive (I used a sheet from Altenew) on the back of the cardstock before die cutting, which made everything easy once it came to assembly. I die cut the shadow layer from True Black cardstock from Papertrey Ink and used black foam tape to pop it up in the center of my card. I used some sticker strips to fill out my sentiment, and added those using foam tape as well, before finishing off with a little gold bling.
 I colored the cute mouse and the tree with Copics, before fussing cutting them. I left a white trim around the edge to make it a little easier on myself, that mouse is small and I didn’t want to accidentally cut off his tail. Onto Stamper’s Select White cardstock from Papertrey Ink, I ink blended trees using the Wintry Forest stencil set from Pinkfresh Studio along with Polar Bear, Icy Water and Winter Lake inks from Altenew. I used the largest die in the Stitch. Trad. Tag STAX die set from My Favorite Things to turn it into a tag and sprinkled on chunky white embossing enamel from Stampendous, which I melted from the back for a snowy look.
 I mounted Pippin and the Christmas Tree to the tag using foam tape. I stamped a sentiment from the
  I used a reinforcer die from the Fold-up Tags die set from MFT to add strength to the hole at the top of the tag, added a couple of Snowdrift Sprinkles from Little Things from Lucy’s Cards, as well as some blue satin ribbon, a piece of Blueberry Divine Twine, a thin string and a snowflake charm to the top of the tag for a finished look.
 Simple color palette for this one. I didn’t even go overboard with the snow on the tree.