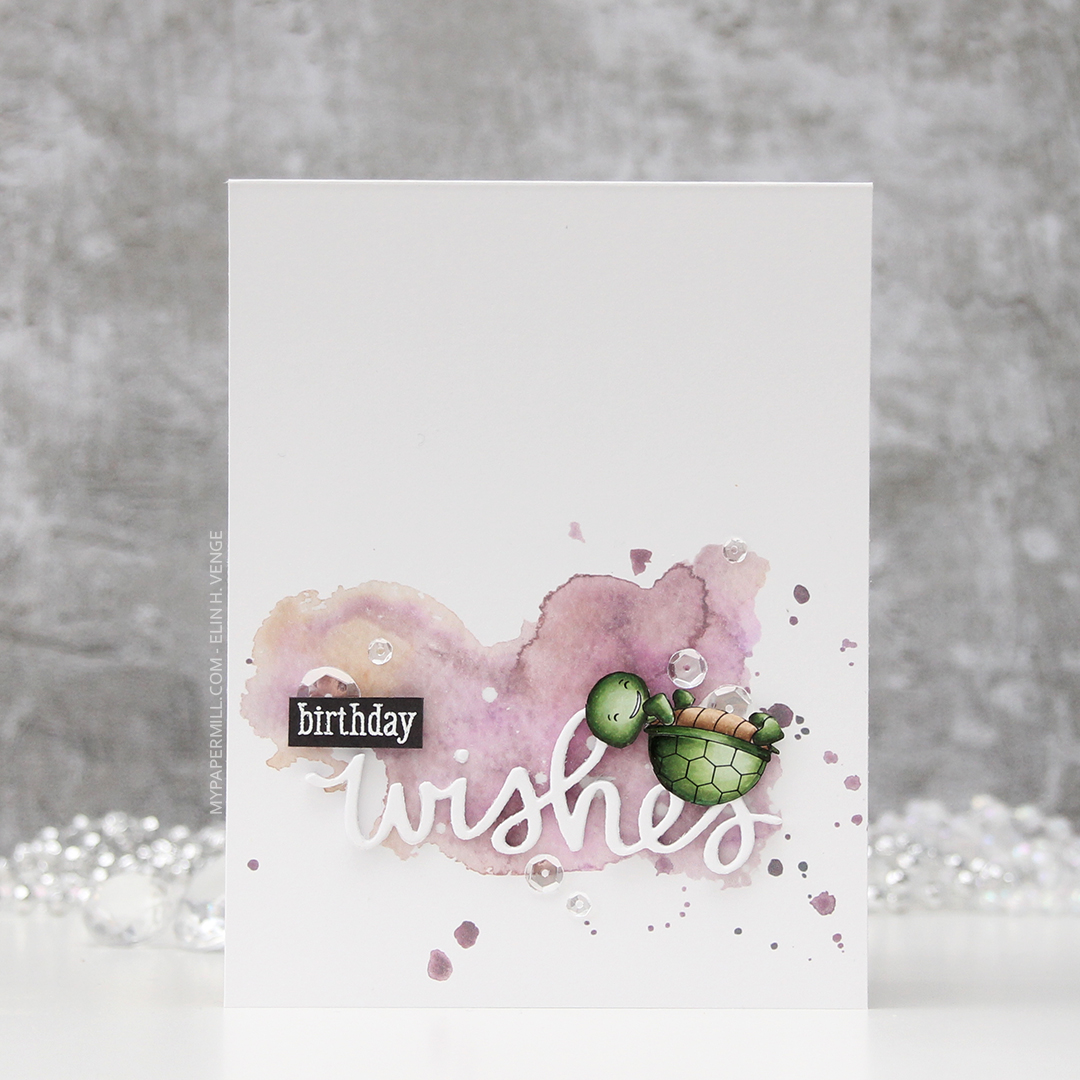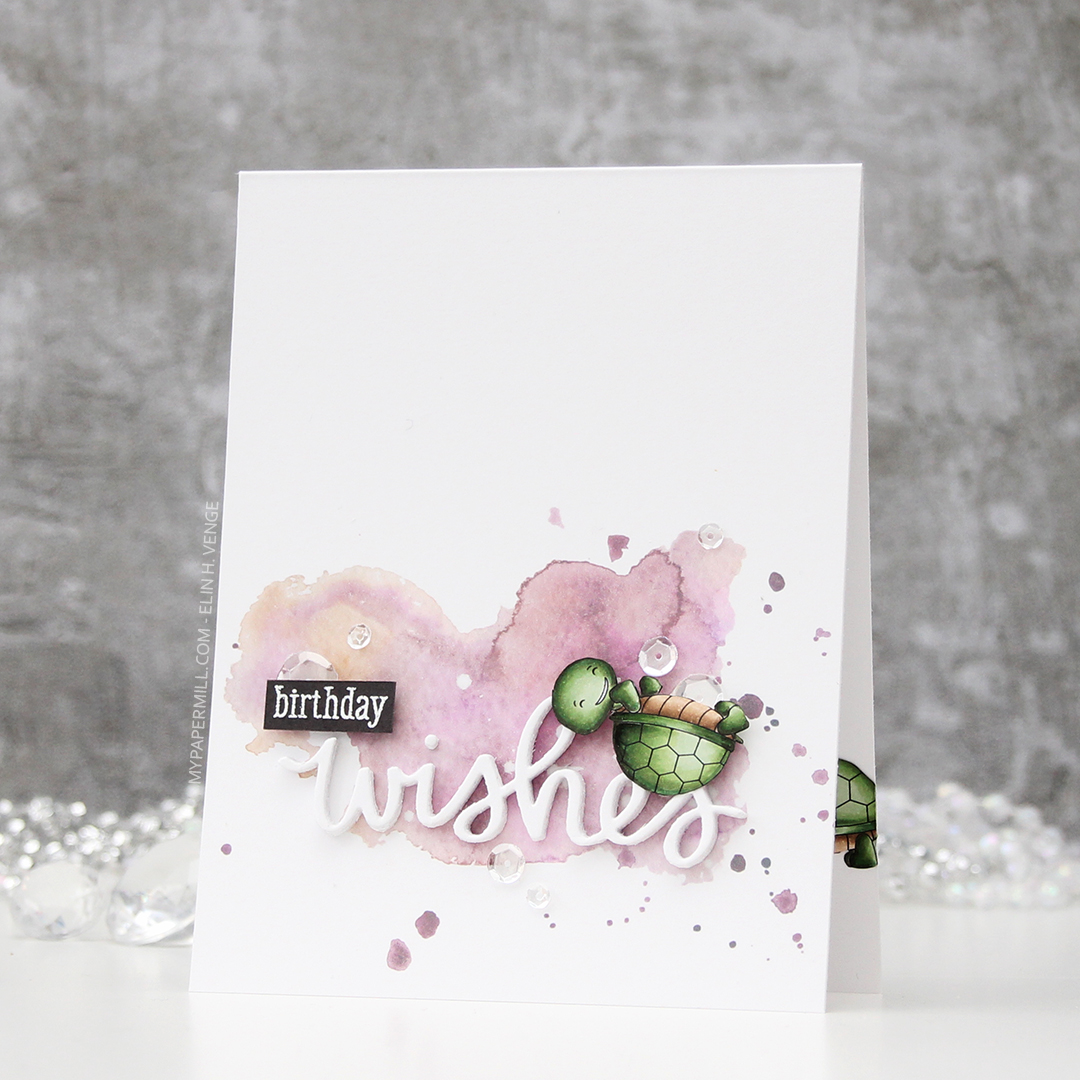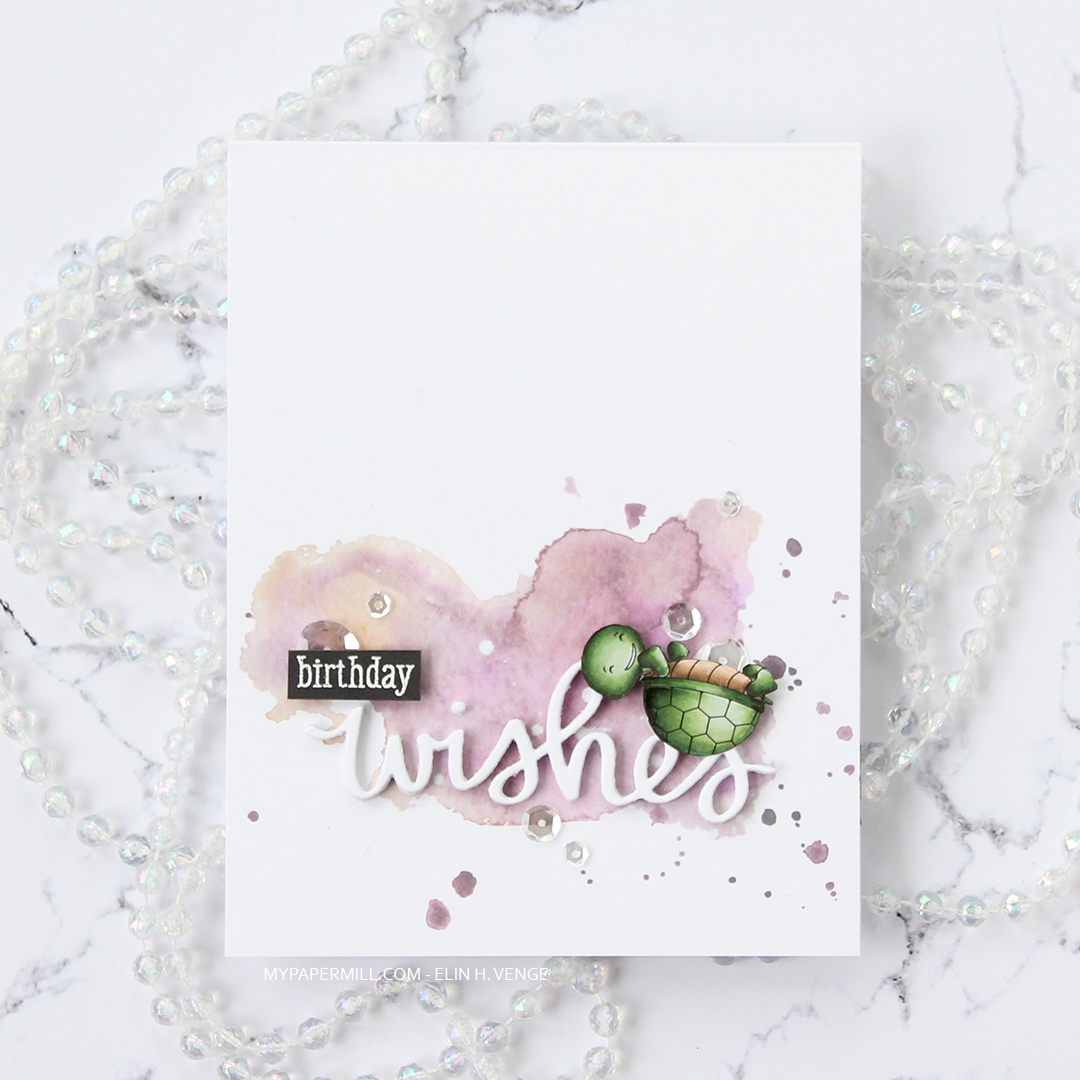
Hi, crafty friends. I have a super simple card to share today (I feel like I always say that), featuring this adorable turtle (based on the shape of the shell, I’d say it’s a tortoise and not a turtle, but that’s just because I like being as accurate as I can) from the Turtley Awesome stamp set from Streamside Studios.
 I colored in the image using Copics, before fussy cutting it, right up against the black lines of the image. I put the image aside while I worked on the rest of my card.
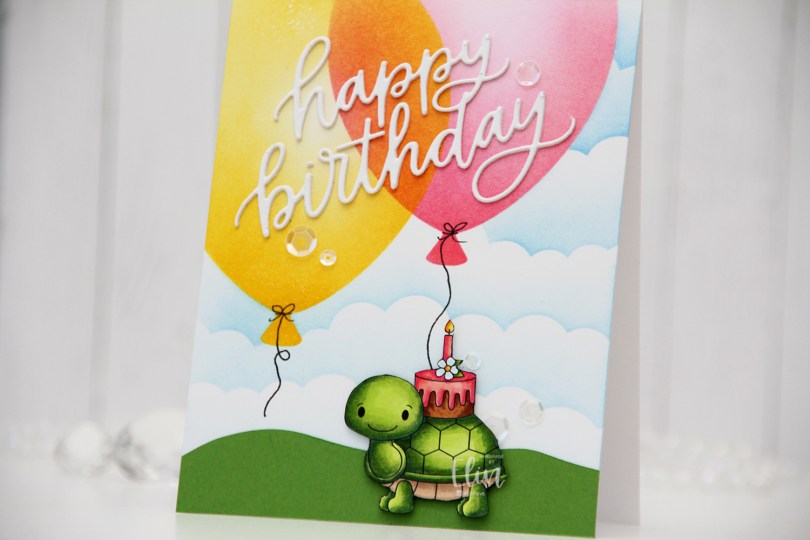
 I actually worked directly on the card base for this one. Using the Big Balloon stencil from My Favorite Things, I ink blended two balloons using Distress inks – one using Picked Raspberry, Worn Lipstick and Abandoned Coral; the other using Mustard Seed and Squeezed Lemonade. And in the words of Laura Bassen – the magic’s in the overlap.
 Once the balloons were done, I used the mask in the Big Balloon stencil set to mask off the balloons while I used the Slimline Cloud Edges stencil, also from MFT, to create the illusion of clouds in the distance. I used Eastern Sky ink near the top of the card, Iceberg ink towards the bottom, both are gorgeous colors from Altenew.
 I free hand cut a grassy hill from Parsley cardstock from Concord & 9th and adhered it to the bottom of my card. I die cut the Happy Birthday die from My Favorite Things twice using white cardstock from Papertrey Ink (same cardstock as my card base) and adhered the two layers together for a tiny bit of dimension and adhered my layered die cut on top of the balloons.
 To finish off the card, I drew in balloon strings using a 0.35 Copic Multiliner, popped the tortoise (I can’t bring myself to write the word “turtle” when this is clearly a tortoise) up using some 1/16″ foam squares and added sequins from the White Orchid sequin mix from Little Things From Lucy’s Cards for a bit of sparkle and shine.
![]() Simple color palette for this small image.
Simple color palette for this small image.
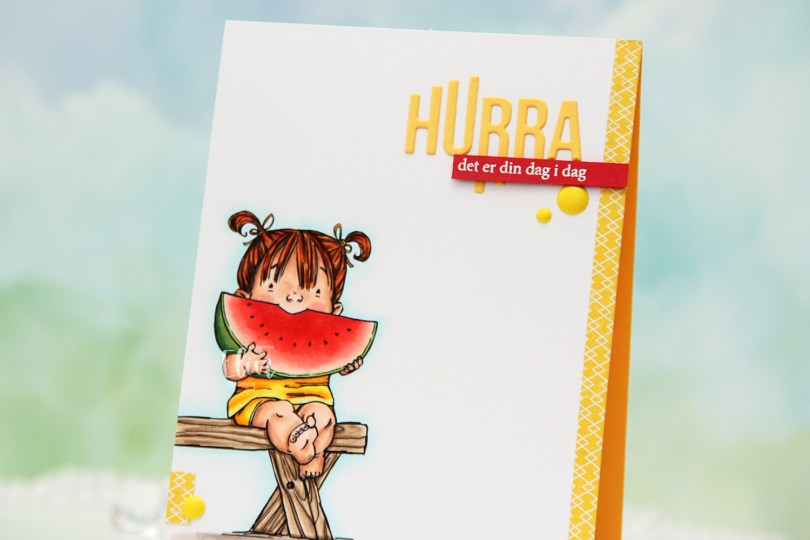
 I printed the image towards the bottom left of my panel of X-Press It blending card and colored it with Copics. I’ve colored this girl once before, but I decided to go for a different color scheme this time, I think the only thing that’s stayed the same since the last card is the coloring on the watermelon. The printer doesn’t print all the way to the edge, so I cut off a little strip on the left side and decided to add a strip of yellow patterned paper from Papirdesign on the right to balance out the design and fill the front of this A2 card.
 And as usual, I finish with the Copics I used. Quite a few for this super simple image, I reckon.
 I colored the chick with Copics and fussy cut it, leaving a white border around the edge. I put it aside while I worked on the rest of the card.
 On a 3 1/2 x 4 3/4″ panel of Stamper’s Select White cardstock from Papertrey Ink, I adhered 1/4″ strips of pastel colored cardstock at an angle. The colors are (top to bottom) Ballet Slipper (Concord & 9th), Lemon Tart (Papertrey Ink), Mint Julep (Papertrey Ink), Aqua Sky (Concord & 9th), Blue Breeze (My Favorite Things), Lilac Grace (Papertrey Ink). I then die cut a circle from the center of this panel.
 I die cut a sligthly smaller circle out of vellum and adhered it to my card base using foam tape for a little bit of lift. I mounted the stripped up panel on top using even more foam tape (a thicker one for this layer) and put pieces of foam tape behind the little chick and added it in the center of the window opening.
 I stamped a sentiment from My Favorite Things using Harvest Gold ink from Papertrey Ink on a leftover strip of Lemon Tart cardstock, then used foam tape to adhere it to the front of the card before finishing off with a few raindrops from Little Things from Lucy’s Cards.
 This card has lots of dimension and a soft look because of all the pastel colors of cardstock, but that little chick is still the star of the show!
 Very simple color palette for this tiny little image.
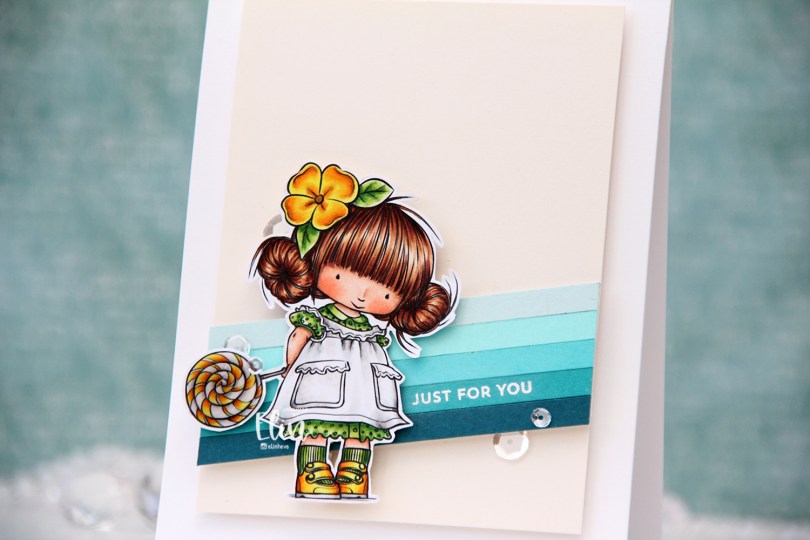
 I went for a green and yellow combo this time, and made her hair dark (I colored her blonde last time). I was going to color her dress in teals, but when I was done with everything else and only had the dress left to color I changed my mind and opted for white. White’s not really white, I used a few grays and the tiniest amount of light blue, but it reads white in the finished coloring. I fussy cut my image leaving a white trim around the edge and put her aside while I worked on the rest of my card.
 I took a page out of
  I adhered my cream panel onto a top fold, white card base using foam tape, before stamping and heat embossing a sentiment from the Itty Bitty Birthday stamp set from My Favorite Things. I thought this particular sentiment would work for many occasions, not just birthdays, and the size was perfect to add to one of my cardstock strips.
 Using even more foam tape I adhered Mona near the bottom left of the card. I love that her dress sticks out right below the sentiment, I really couldn’t have placed the sentiment any better, it’s nestled in perfectly. I put Glossy Accents on the lollipop and a few Sparkling Clear sequins from Pretty Pink Posh here and there to finish the card.
 Here you can see all the dimension. The cream panel is mounted on foam tape, the cardstock stripes are mounted on foam tape, and Mona is mounted on foam tape.
 Quick and easy color palette for this one. I don’t think I went too much overboard with the amount of markers in this one. I won’t mention that I used six colors for her hair 😉
 I actually made this card for my dad, whose birthday was last week. He loves his cakes and desserts, and has a stationary bike that he works on on almost daily (while watching police car chases on YouTube; no joke), and I thought this image would be perfect for him, with the little bear on his bike and the cupcake trailing behind. I colored the image with my Copics and used the Stitched Mini Slimline STAX die set from My Favorite Things to turn it into a panel that would fit nicely on a mini slimline card. I then die cut the letters to spell HURRA three times from Jalapeño Popper cardstock from My Favorite Things and stacked them for a dimensional look, before deciding that the green was too dark. I didn’t want to start over, so I using the same dies (the Connected die set from My Favorite Things), I cut an additional layer from Parsley cardstock from Concord & 9th and glued that on top of the dark green. I like the lighter green better.
 I adhered my panel to a card base I created from Blueberry cardstock from My Favorite Things. I added Glossy Accents to the hearts in the image, stamped a sentiment from the A06 stamp set from Norsk Stempelblad AS using Jalapeño Popper ink from My Favorite Things and added a few more strips of cardstock behind it for dimension. I finished off the card with a couple of enamel dots from Papirdesign.
 I probably used way more colors than I really needed for this card. Three colors for that cherry is kind of ridiculous, it’s not that big, but that’s kind of what I do – I really love my Copics.
 For this slightly larger than normal slimline card, I stamped the
  I cut down my background so that it would fit on my cardbase, which I created from Sprout cardstock from Concord & 9th. I stamped a sentiment from the
  It shows better in this photo that the dogs are slightly raised off the background. It adds a fun detail to an otherwise very simple card. This is the point where I’d normally share the Copics I used, but I seem to have misplaced my post-it note where I’d written it down. Things were kind of hectic before the holidays when I made this.
 I colored the image with my Copics, die cut her using the largest of the A2 Double Stitched Rectangle STAX dies from My Favorite Things and sprinkled on a generous amount of chunky white embossing enamel from Stampendous, which I then melted.
 I adhered my panel onto a top fold cardbase I created from Cranberry cardstock from Concord & 9th, before adding a piece of a mini paper doily from Doodlebug and a sentiment from My Favorite Things that I white heat embossed onto a separate piece of the Cranberry cardstock, with three additional layers behind for a little dimension. I added a few Snowdrift sprinkles from Little Things from Lucy’s Cards, and my card was complete. Super simple.
 As usual, I finish with the Copics I used for my image.
 I put the penguins on a sheet of ice, made the ice no line and scattered baubles and stars around the ice to create a fun scene.
 I colored in my scene using Copics, die cut my panel using a double stitched rectangle die from My Favorite Things and decided to add a few little details for shine and texture. I added Rock Candy distress glitter to the stars, a dot of black glaze pen in each eye for a little bit of dimension and shine, and I also glued on some additional stars to the tree. The stars are from the Icicle sequin mix from Hero Arts.
 I printed one of the sentiments in the scene creator set onto a piece of Aqua Sky cardstock from Concord & 9th, and die cut that using a die from My Favorite Things. I used the same die to die cut from some Grapefruit cardstock, another beautiful Concord & 9th color, and one that matches perfectly with the baubles I colored.
 Near the sentiment, I added sequins from the White Orchid sequin mix from Little Things from Lucy’s Cards, and that finishes my card.
 I used lots of Copics for the ocean, the sheet of ice and the sky, not that many for everything else.
 I colored the image using a very soft color palette with my Copics. I didn’t write the colors down, so unfortunately, I have no fancy graphic to show you at the end of this post. I wish I did, though, because I really like the colors I used for this.
 I used the largest of the A2 Stitched Rectangles STAX 2 dies to turn my colored piece into a nice panel with the faux stitch edge I love so much. I decided to adhere it directly to my top fold card base, that I made from Berry Sorbet cardstock from Papertrey Ink. The color matches the darkest parts of her dress very well.
 Onto a separate piece of Berry Sorbet, I stamped and white heat embossed part of a sentiment in the
  I die cut part the word wish using a die from Mama Elephant. The die actually die cuts the word wishes, but I cut off the tail end of the word so I was left with just wish. I die cut four more from Grapefruit cardstock from Concord & 9th, and added them behind the top die cut for dimension. This makes the word lighter (and it makes it match the lighter parts of the dress) from the sides. I did the same with the sentiment strips above, making the strip and the stacked die cut flush.
 I finished off the card by adding a few sparkling clear sequins from Pretty Pink Posh. I used my scissors to cut the largest sequin in half to tuck it behind the sentiment strip.