Hi, there! It’s Wednesday again, and you know what that means. Time for another Mo Manning creation around here. This time, I’ve kind of gone back to my roots, but not really. It’s a layered card, which used to be the norm for me, but the image is fussy cut, which most certainly has never been my signature.

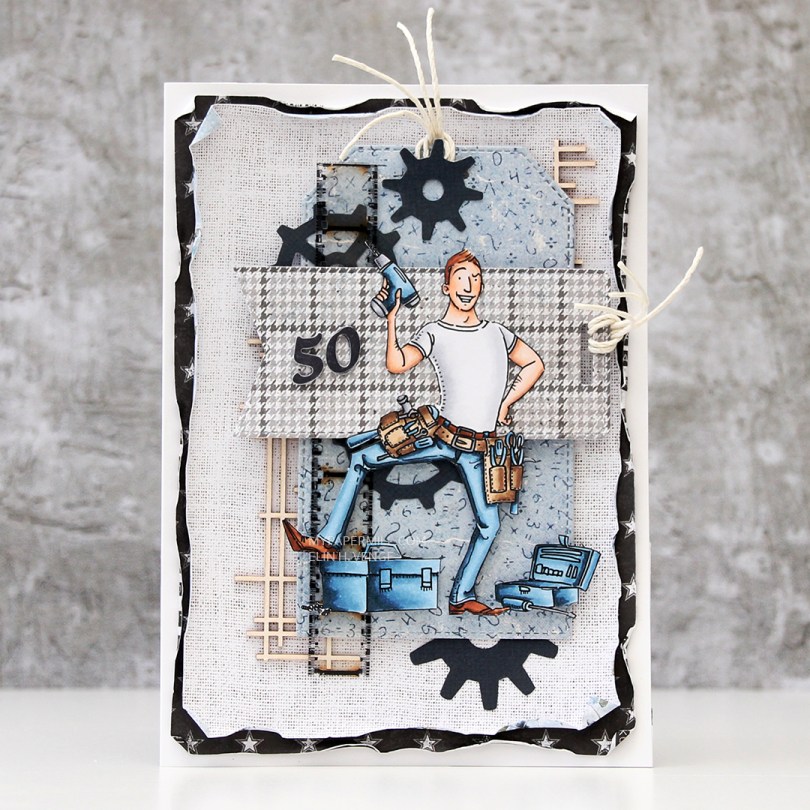
I received an order for a 50th birthday card for an electrician. The card needed to be “messy”, which is kind of difficult for me. My usual style is pared back and very simple, I just don’t have enough elements on my cards to be able to make a mess of any kind. Thus going back to my roots of using lots of patterned paper. I colored up Mr. Fixit in my favorite colors and fussy cut him.
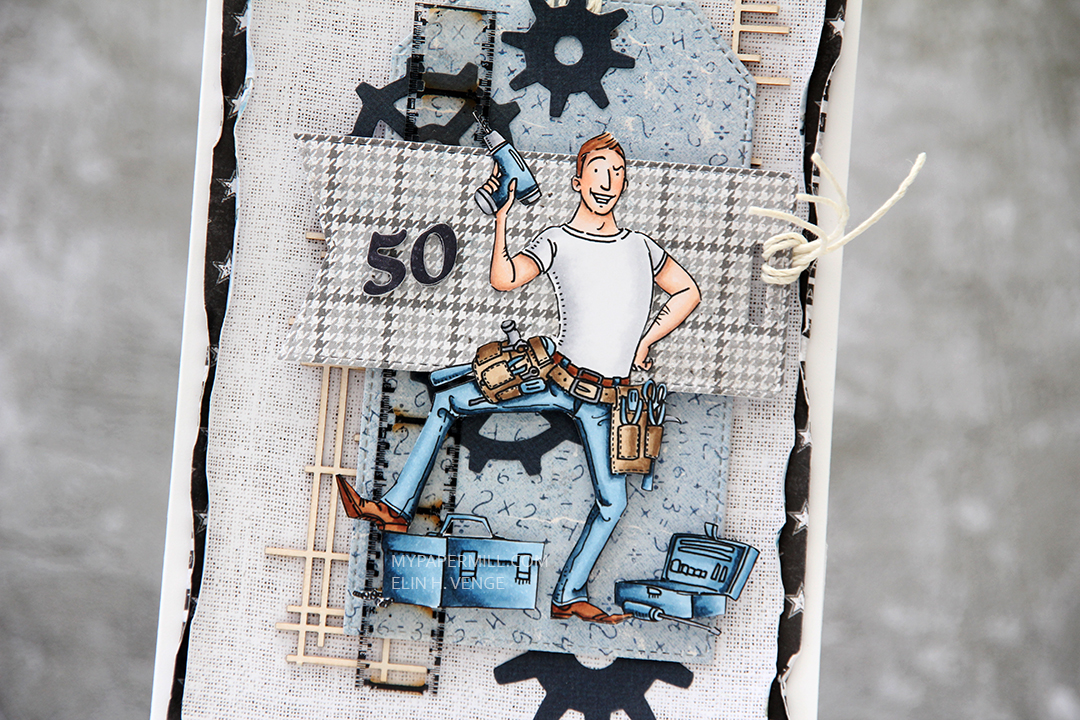
I had to go looking for inspiration online. The last “old style” card I made was in June of last year, which means I’m rusty. I found a card I liked and used it as a guide to create this one, which is actually an A7 card (5×7″). I dug through my patterned papers, both 12×12″ sheets and scraps, and found a few from Papirdesign, Maja Design and a small scrap from My Mind’s Eye that I used to die cut the gears and numbers. I arranged all the elements on my card, some using foam tape and others adhered straight down, and wound up with this. I used old dies from Sizzix for the gears, forcing me to pull my BigShot out of retirement for a few minutes. Those dies are too thick for my Gemini Jr., which is the machine I use for nearly all my die cutting. The last time I used my BigShot was over two years ago, so there’s a reason it’s retired in the closet. I added a piece of Snip Art chipboard and a film strip piece from Tim Holtz for a little bit of added interest and something that wasn’t just made of paper.

On the inside, I adhered left over pieces of the gears, just to use it all, and stamped a sentiment from Norsk Stempelblad AS using Dark Indigo ink from Papertrey Ink. There’s plenty of room on the right for a personal message, this is a side fold card (another anomaly from me, I prefer top fold).

On the back of the card, I repeated a lot of the elements that I used on the front. The tag dies I used are from My Favorite Things, and I used my recently acquired personal stamp from Create a Smile on one of the die cut tags, stamped in Dark Indigo ink.

Not a lot of Copics used for this one, I mostly stuck to blues.

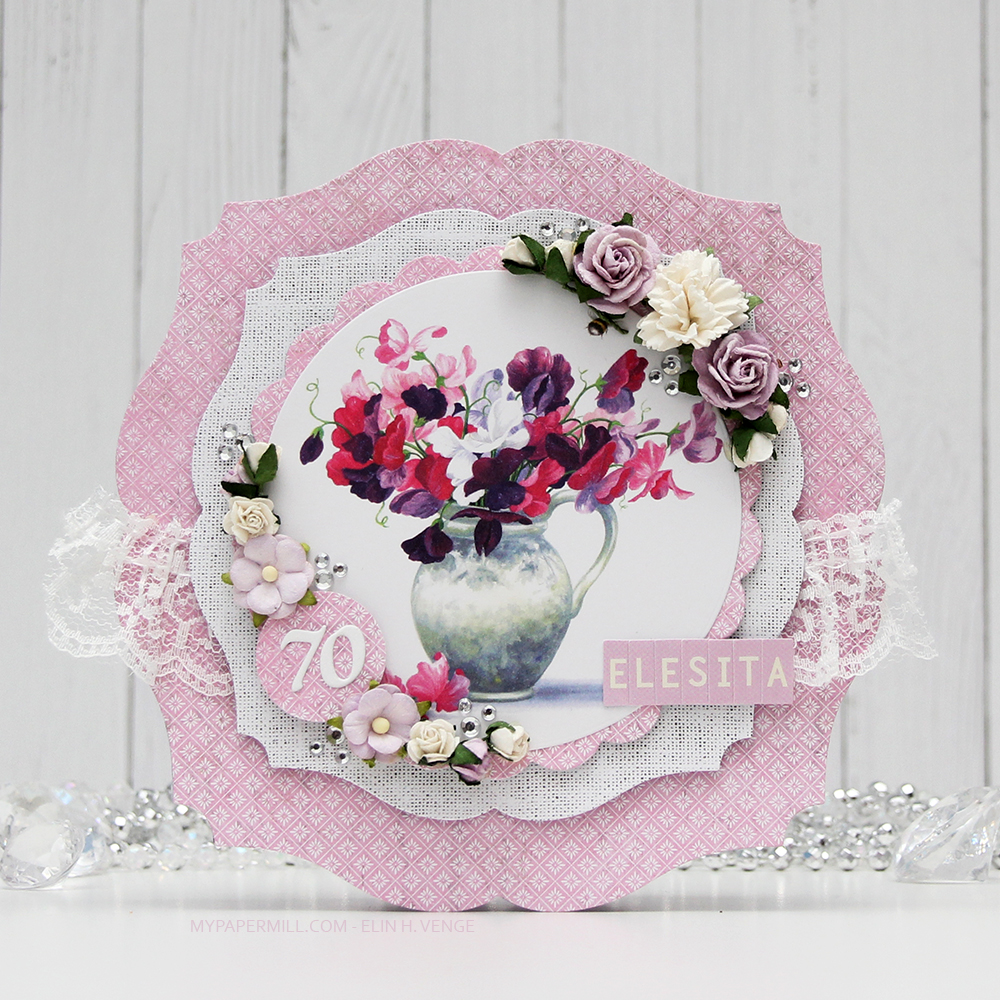 Cards like this come together very easily, it’s basically a bunch of diecutting and you’re done. I use two full 12×12 sheets of patterned paper for cards like this, and the beauty is that there are no scraps left when I’m done. For this one I used two sheets from Papirdesign, one is Roseduft, and the other is stemorsblomst, blå.
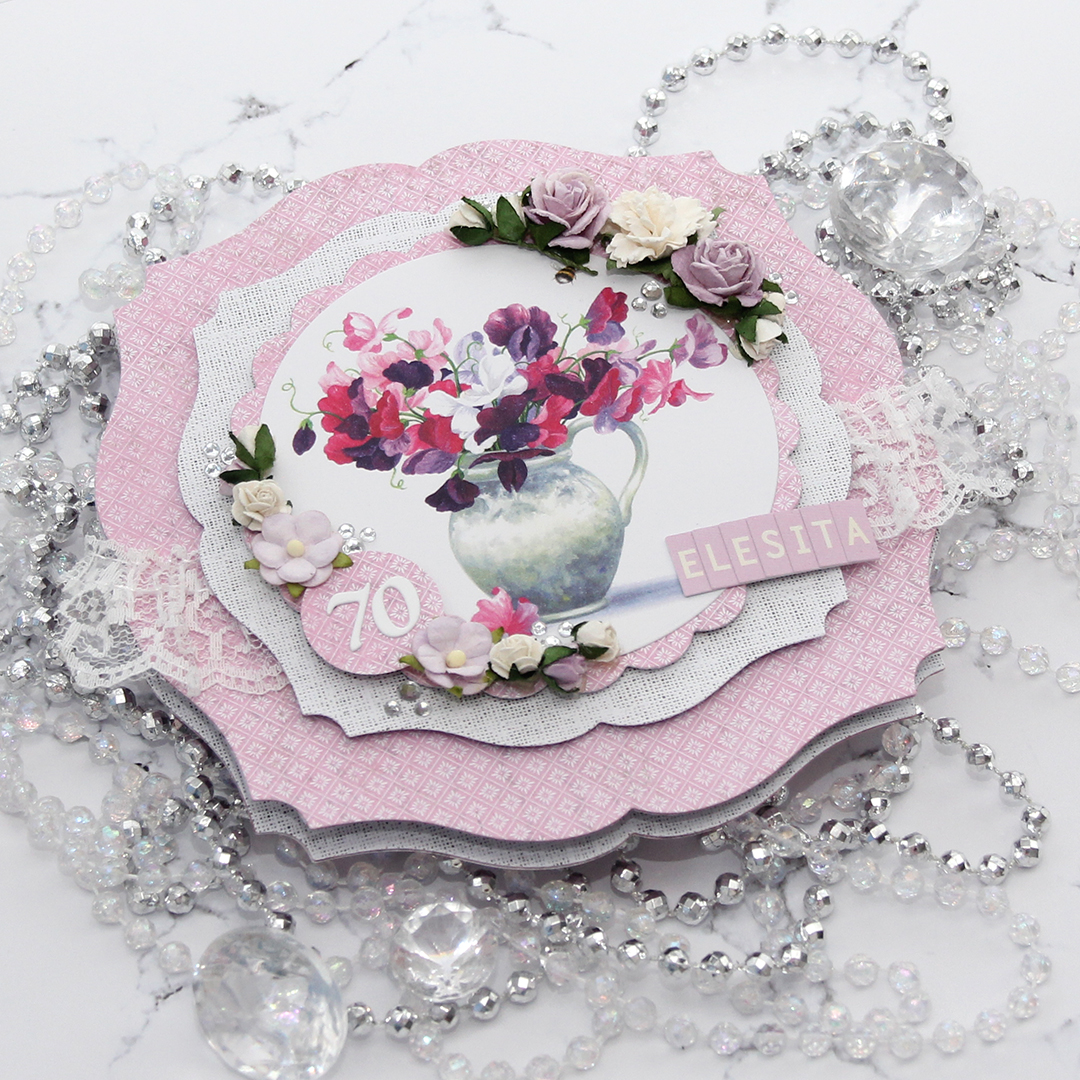 I added flowers from Wild Orchid Crafts, Kort & Godt and Papirdesign along the edge of two opposite quadrants on my circle, used letter stickers from Papirdesign to spell her name and some diecut numbers for her age. I finished off the front of the card using diamonds from Kort & Godt.
 I kept the insides pretty simple, with plenty of room for a personal message for the birthday lady. I added some more diamonds to embellish a tiny bit.
 On the back of the card I used more flowers, more diamonds and stamped a Norsk Stempelblad AS sentiment using Autumn Rose ink from Papertrey Ink. “Happiness is the art of creating a bouquet of the flowers within reach.”
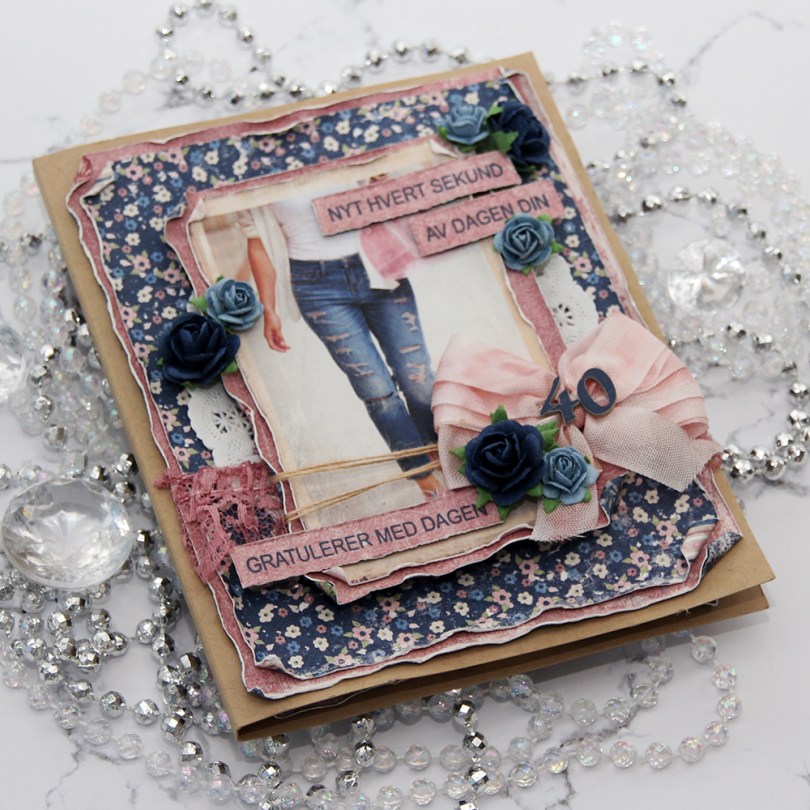
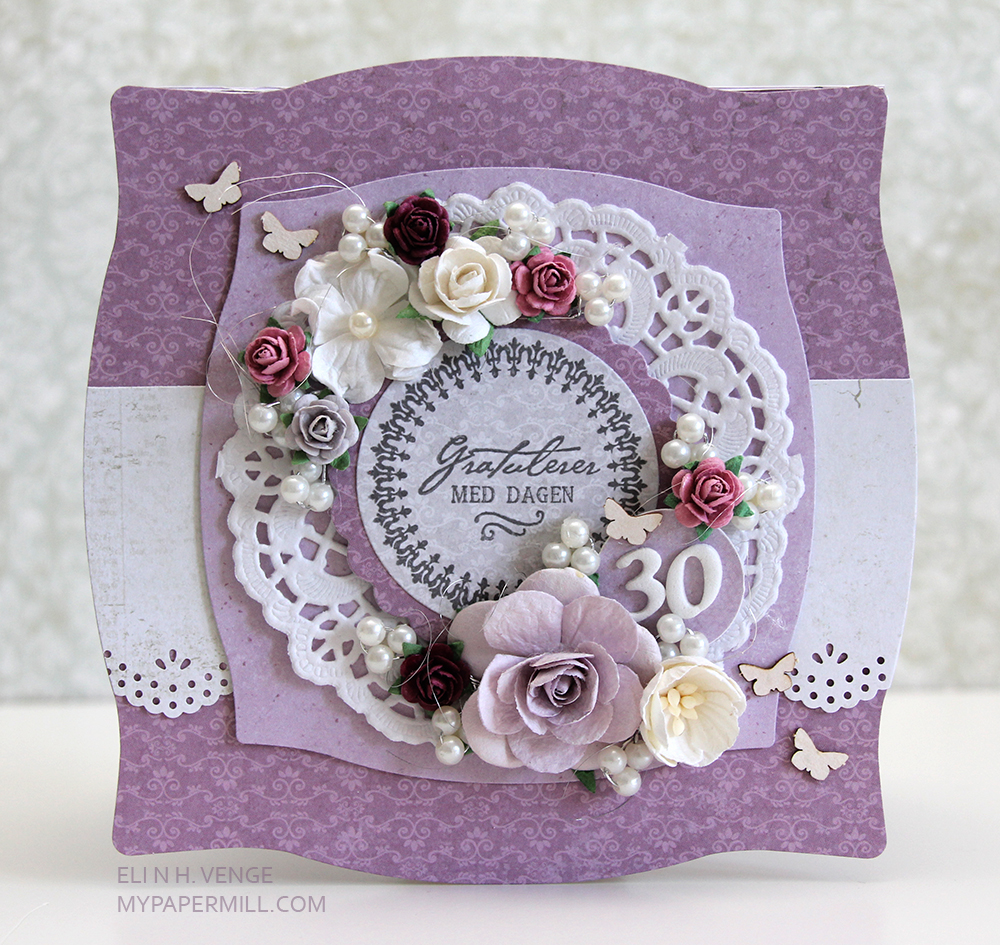
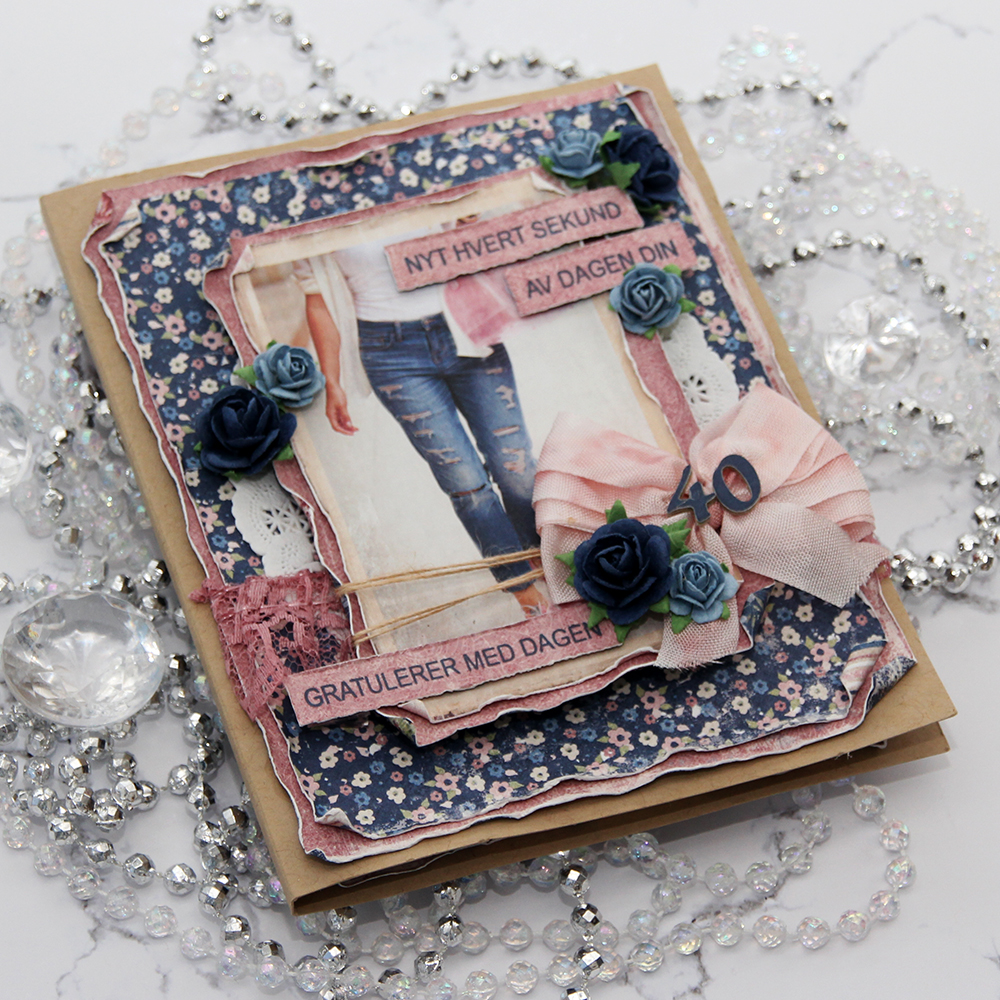 I was told that the birthday girl likes blue, pink and flowers. I knew just which papers to dig out from my stash. The paper I’ve used here is all from the Denim & Girls collection from Maja Design. I love their collections, the patterns are nice and small and the colors to die for. I mean, look at those blues!!! Amazing!!! I’ve predominantly featured two sheets on this card;
  I started by cutting down the patterned paper to the sizes I wanted, before using a paint brush with clean water to wet all the edges. This makes the paper more pliable, and I can curl the edges with my fingers, giving the paper some dimension and interest. The cool thing is that when it dries, it stays like that, it’s very sturdy. With Maja Design patterned paper it’s extra sturdy, because the paper is so thick you can actually use it for card bases. It’s really nice.
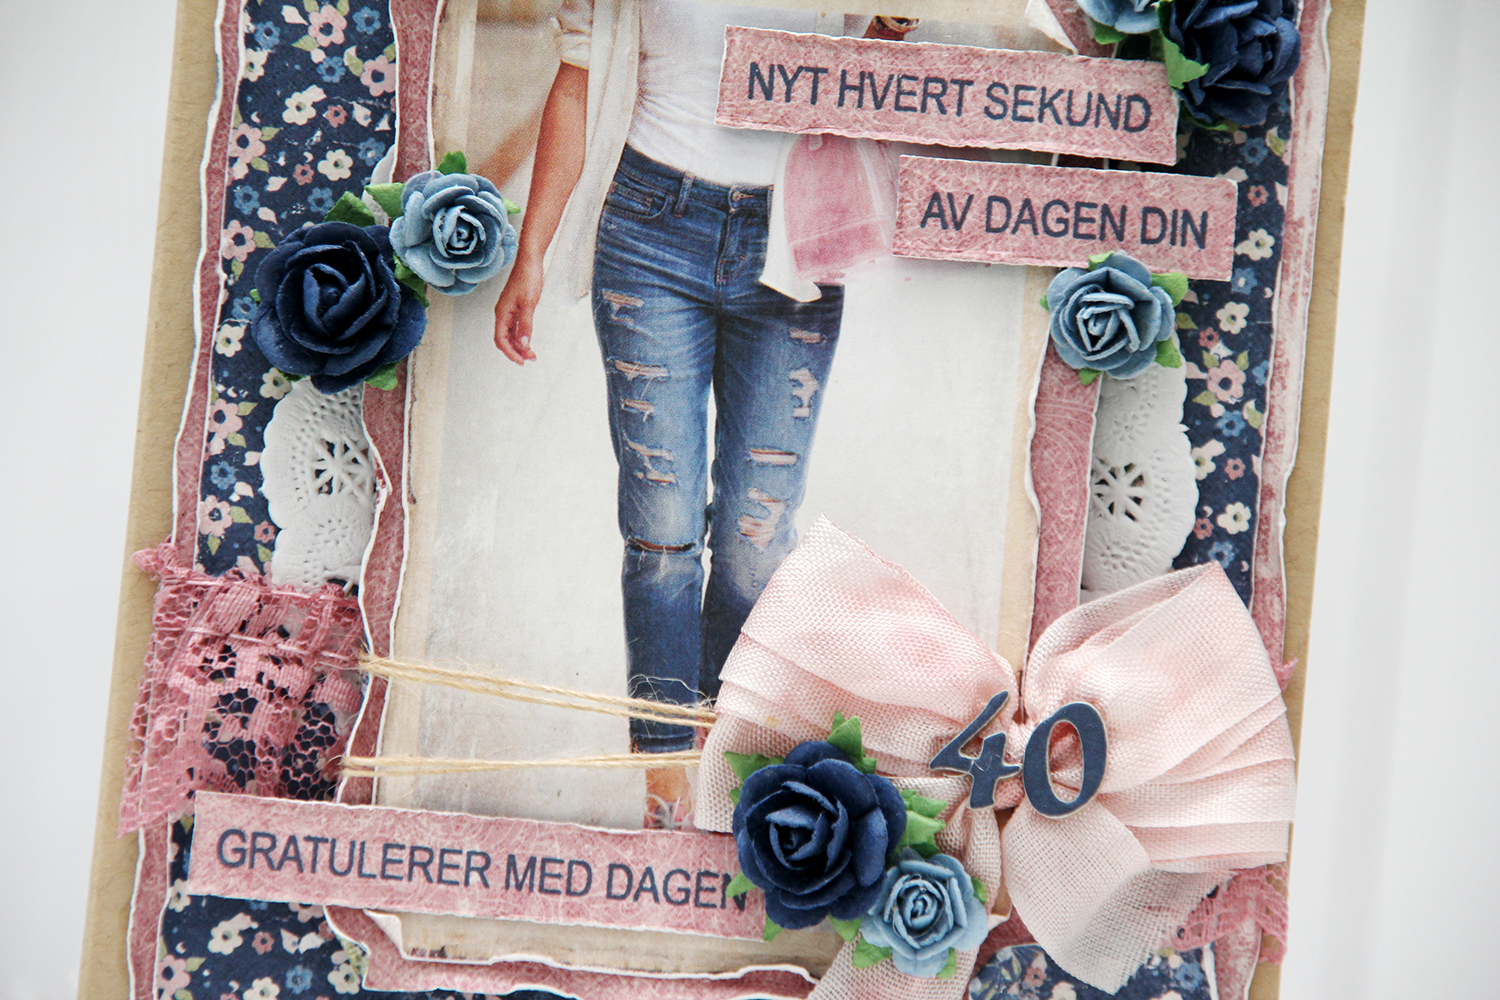 I added a paper doily, some pink lace, some May Arts natural twine, a bow, a couple of diecut numbers and a few paper roses from Papirdesign, in addition to a couple of sentiment strips. I stamped the
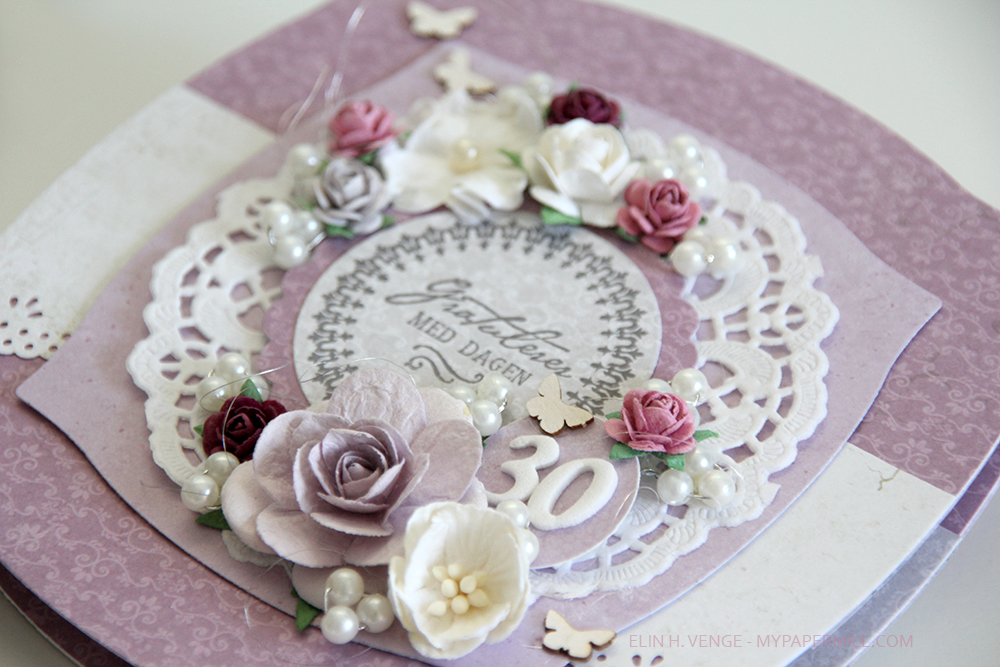
 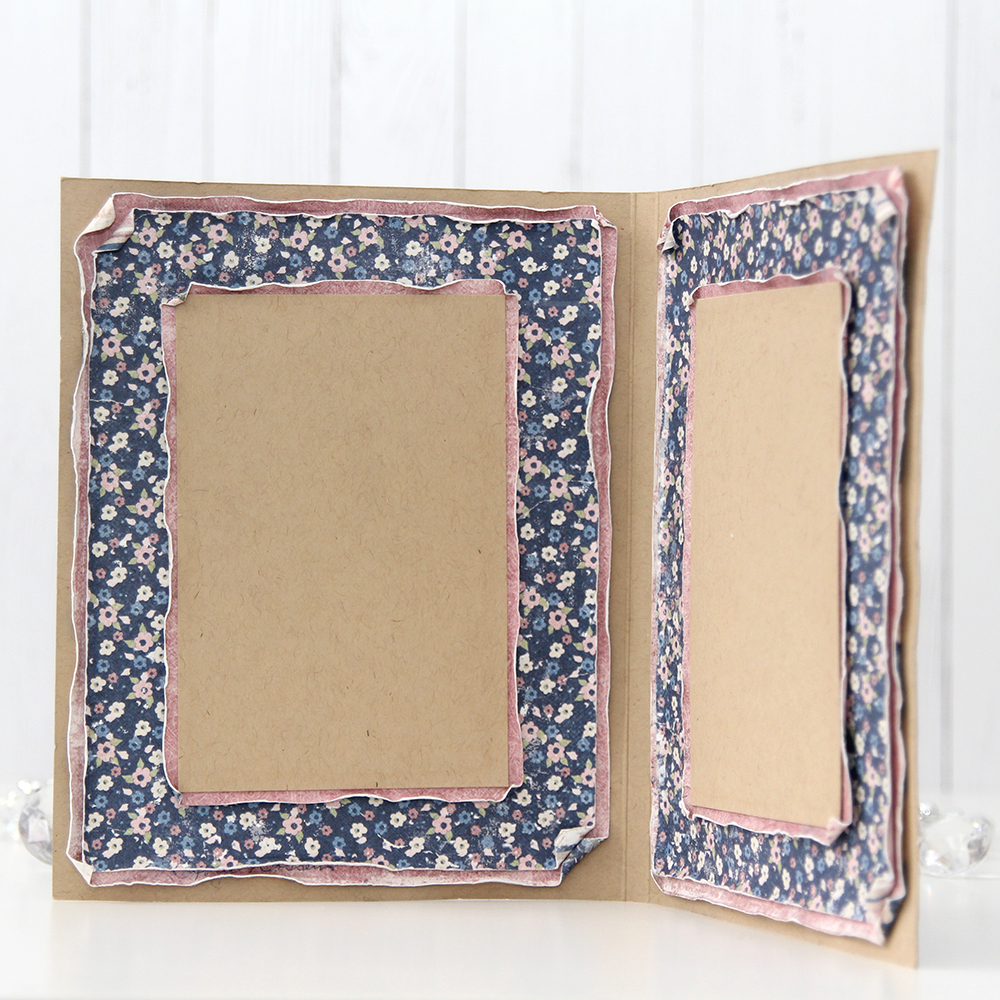 When creating this type of card I go all out and decorate all four sides of my card. I used the same layout on the insides, but skipped all the embellishments. The kraft panels are actually removable. I added double sided tape to the back in generous amounts, but left the release paper on, and glued the panels on using just a glue dot. Glue dots are a nice temporary solution, and it enables you to pull the panels out fairly easily, write your personal message, remove the release paper from the double sided tape and glue the panels back where they belong. It’s a great way to not have to write inside a bulky card.
 I had to decorate the back, too. I just had to. Same basic layout on the back. Not as heavily embellished as the front, also not as bare as the insides. I stamped a birthday sentiment from Norsk Stempelblad AS using the same color ink as the sentiment strips on the front, and added a few blue roses to finish the card.
 With cards this thick, they don’t fit in regular envelopes, so I usually make simple envelope boxes to match. This one is 1″ high, and it actually could have been a little higher, it was a little bulgy when the card went in. I diecut the blue patterned paper with a Simon Says Stamp label die and added pink diecut letters from Scrapmagasinet to spell the name of the birthday girl. I did two layers so the name wouldn’t get completely lost with that busy background.
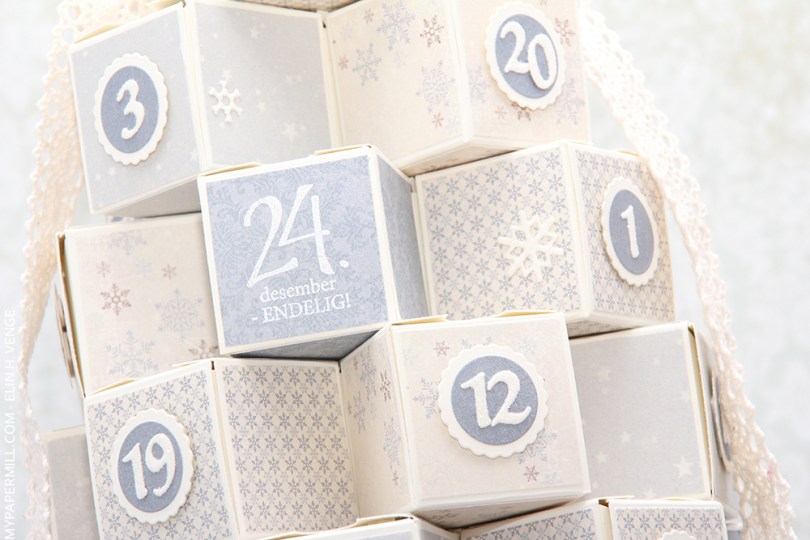
 Jeg brukte rester fra Greetings from the North Pole-serien til Pion Design til treet mitt. Jeg tror det må være favoritten min av alle juleseriene Pion Design har laget – fargene er helt perfekte til jul og det samme er mønsterne.
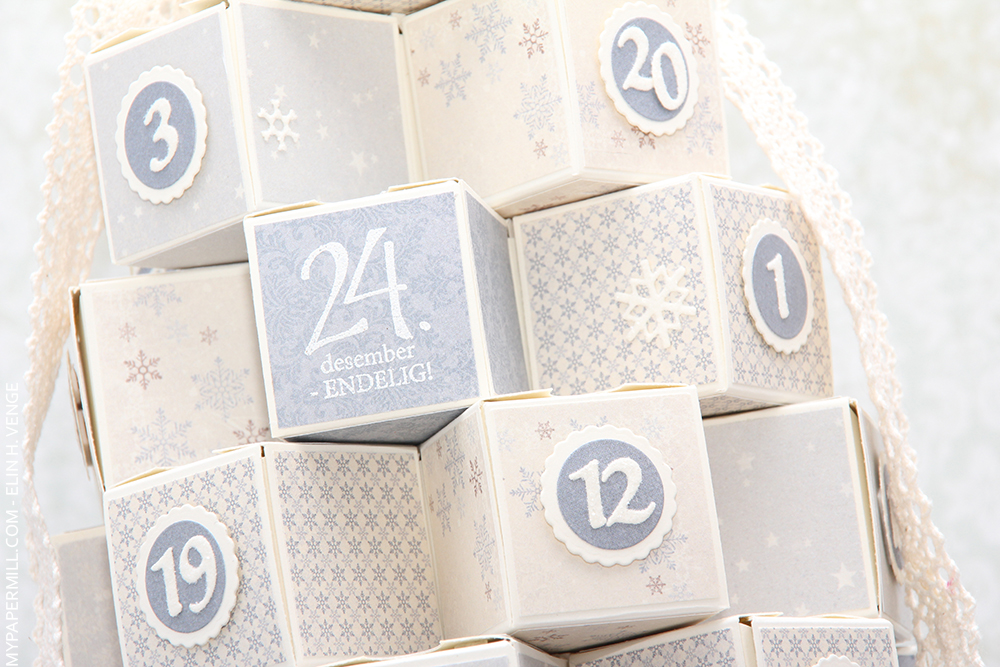 Jeg har stanset ut tallene mine med dies fra KaBoks. Alle tallene er dekket med distressglitter. Det vises dessverre ikke så godt på bildene, men gir en herlig frostet effekt i virkeligheten. Samtlige tall er limt på sirkler av mønsterark, som igjen er limt på scallopsirkler i kartong og proppet opp fra fronten av hver lille eske.
 Alle lukene åpnes i fronten, og jeg har satt på små snøfnugg laget med en die fra Marianne Design her og der. Snøfnuggene er også dekket med distressglitter.
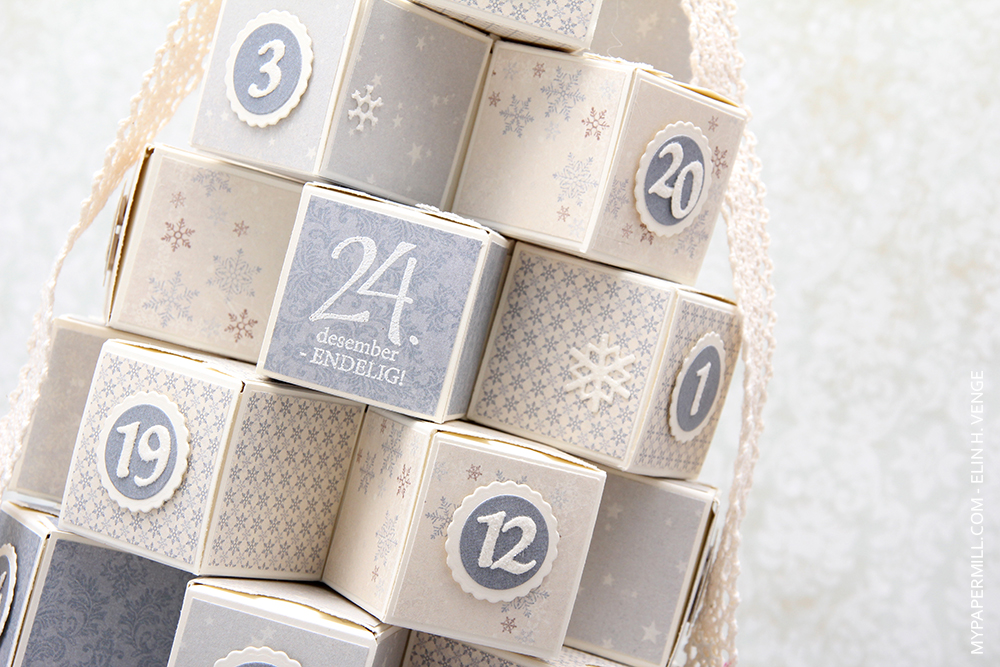 24. desember-luken har jeg laget litt annerledes. De nye stempelplatene til Norsk Stempelblad AS som Åshild lagde i fjor var ferdig akkurat i tide til at jeg kunne bruke et av dem på den siste luken min. Jeg stemplet med VersaMark og embosset med hvitt embossingpulver rett på mønsterarket på fronten av luken.
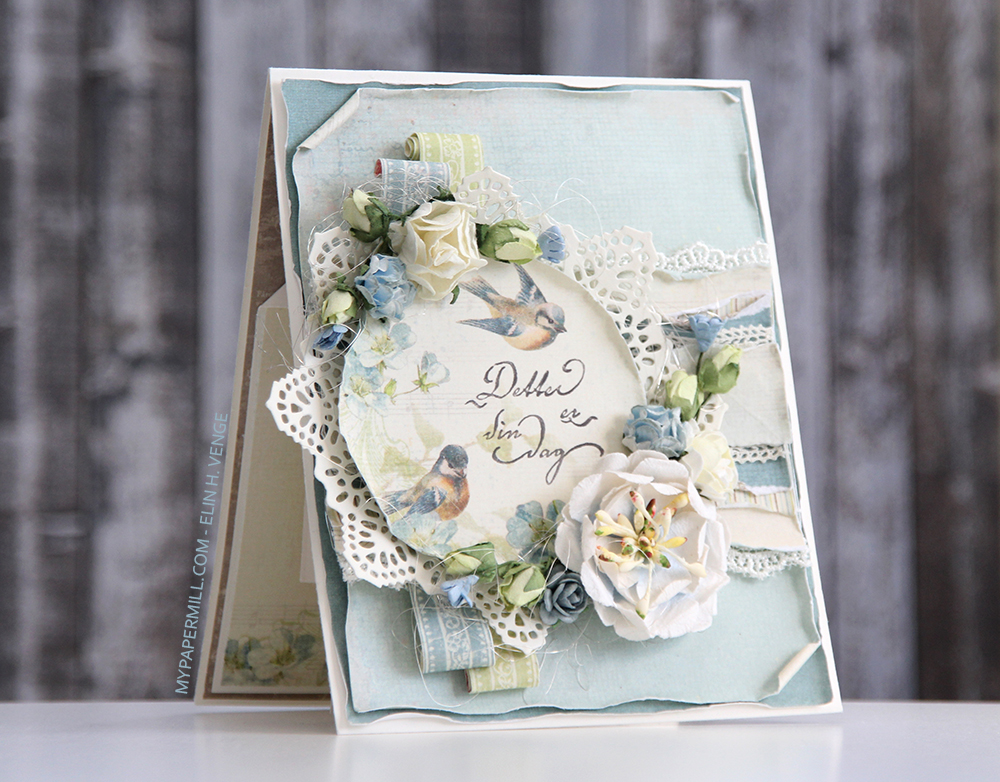
 Jeg har brukt blomster fra Petaloo, Wild Orchid Crafts, Kort & Godt Hobby og Papirdesign på fronten, i tillegg til englehår fra Mester Grønn. Teksten kommer fra Papirdesign, og er stemplet rett på mønsterarket.
 På innsiden har jeg laget det litt renere og enklere. Her har jeg brukt stempler fra Norsk Stempelblad AS og dies fra KaBoks (tallene) og Papertrey Ink.
 Baksiden har jeg laget relativt enkel, men med elementer som bordene fra forsiden. Stempelet her kommer også fra Norsk Stempelblad AS. Ordet DU har jeg stemplet på en mørk bit mønsterark, klippet ut og limt på tagen.