
Hi, crafty friends. The new release from Lili of the Valley is just around the corner, and today I’ve played with another stamp set from the release. Last week I used the set with the wreath and the critters for this card, this week, I’m shaking things up with a snow globe.
 As soon as I saw this stamp set, I knew these snow globes would make the perfect shaker cards. The stamp set comes with the snow globe and six different scenes you can stamp inside. I, of course, opted for the penguin, but there’s also a snowman, a car with a tree on the roof, a house, a tree with presents and a village, as well as a few sentiments.
 I stamped and colored the empty snow globe on a quarter sheet of X-Press It blending card. I stamped the penguin on a separate piece of blending card and colored that for the inside of my snow globe. I glued a few Kort & Godt pearls around the penguin and put him aside while I worked on the rest of the card.
 I cut the center out of the snow globe and adhered a piece of acetate to the back of the white cardstock, before adding foam tape on the back of the shaker area, making sure not to leave any gaps. With glitter inside the shaker window, you don’t want it to escape.
 I put a mix of clear Distress glitter from Ranger and some micro beads inside the shaker area, before adding my colored penguin to the exposed adhesive of the foam tape to close the shaker.
 I initially put too much inside (I always seem to put too much inside) and had to pour some out to get the perfect amount. I then adhered my popped up snow globe to a card base I created from Enchanted Evening cardstock from Papertrey Ink. I used the merry script die from Mama Elephant to cut the word merry three times from Blue Breeze cardstock from My Favorite Things, stacking the die cuts for a dimensional look. Near the bottom of the letters I softly ink blended a bit of Blueberry Sky ink from Papertrey Ink to add a little bit of a gradient. I stamped the word Christmas from the Snow Cute stamp set onto a separate piece of Blue Breeze cardstock using Blueberry Sky ink once again. I put a couple of additional layers of cardstock behind it for dimension and adhered it below the die cut word and finished the card with a few snowdrift sprinkles from Little Things from Lucy’s Cards.
 This is a fairly simple looking card, but it’s got tons of dimension and a shaker card is always fun, right?
![]() Not a whole lot of Copics for this one. I did also use B90, which is a color I made myself using an empty marker, some B91 refill and blender refill.
Not a whole lot of Copics for this one. I did also use B90, which is a color I made myself using an empty marker, some B91 refill and blender refill.

 I printed the image with a 10% opacity onto X-Press It blending card before coloring. Whenever I want to color things that are supposed to look close to white (ice, snow, polar bears +++), I prefer doing a no line version. To me, there’s something very distracting about black lines on an image that’s supposed to look white, so I prefer the softer no line version. I colored the image with Copics, starting with the sky, then ocean, ice floe, polar bear and finally the penguin and his little scarf. I prefer doing the black towards the end, it’s just good practice to avoid getting it into nearby areas where you don’t want it.
 Once I finished the coloring, I die cut the panel using the second largest die in the A2 Stitched Rectangles STAX 1 set from My Favorite Things, before mounting it on foam tape onto a white card base I created from white cardstock from Papertrey Ink. I die cut the word klem (hug) twice from white cardstock using a die from Kort & Godt. It’s actually a Christmas die that says juleklem (Christmas hug), but by using only the latter part of the word, I have a completely different use for the die, which I love. That’s the whole card, I decided not to add any embellishments, I wanted to keep the focus on the image.
 Loooots of Copics for this deceptively simple scene.
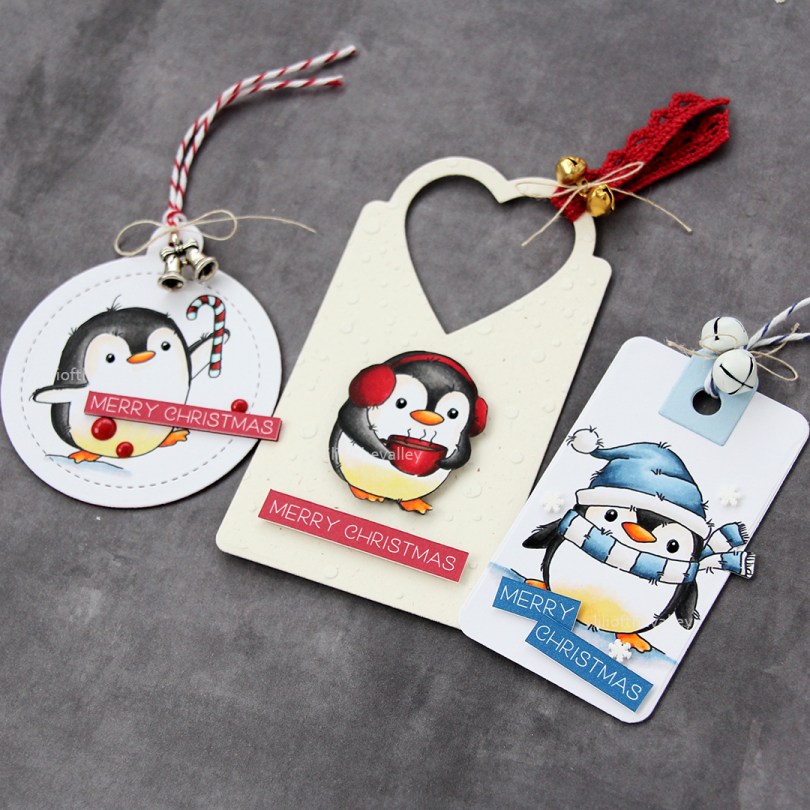
 These penguins are about 4 cm tall, which makes them the perfect size to create gift tags from. By stamping them on a sheet of X-Press It blending card (or your cardstock of choice) with a little bit of space between them, you can die cut some and fussy cut the remaining ones. I decided to fussy cut the one in the center, while using dies for the other two.
 I colored all the penguins with Copics and used a black glaze pen to create a little bit of shine and dimension to their eyes. Once the black was dry, which didn’t take long, I used a white Gelly Roll 05 on top of the black to put the white back into their eyes.
 I’m starting with this fussy cut penguin. In a drawer, I had a scrap of a snowy background that I created last fall using Rustic Cream cardstock from Papertrey Ink, the Falling Snow stencil from Simon Says Stamp, modeling paste from The Crafter’s Workshop and Rock Candy distress glitter from Ranger. I decided to put it to use and die cut it using the 210 die from Kort & Godt, I really like the heart shaped hole it creates at the top. I mounted the penguin using foam tape and added a sentiment strip below. The sentiment is from the
  On the back, I added die cut letters to spell the words to and from. The words are from the Tag Builder Blueprints 6 die set from My Favorite Things, die cut from Amarena Cherry cardstock, also from MFT.
 Simple color palette for this one.
 Next up is the circular tag. I used the Tag Builder Blueprints 6 die set for this one as well, as well as another sentiment from the Christmas Greetings stamp set from LOTV. I added Divine Twine in the color Cherry to the top, a bell charm and a few red enamel dots from Papirdesign to finish it off.
 For the blue one, I used the Fold-Up Tags die set from My Favorite Things to create my tag. I made sure not to cut off his scarf by fussy cutting that and putting it behind the die as I ran it through my die cutting machine. I used a piece of Blue Breeze cardstock from My Favorite Things to create the reinforcing element near the top, added some Divine Twine in the color Blueberry, a couple of white bells from UiT Hobby and some thread that’s actually meant to use with a loom (it’s super strong). Once again, I used the Christmas Greetings stamp set for the sentiment, and scattered a few snowdrift sprinkles from Little Things from Lucy’s Cards to finish.
 On the back, I used that same die from the Tag Builder Blueprints 6 die set from My Favorite Things that I used for the other two tags, this time die cut from Enchanted Evening cardstock from Papertrey Ink.
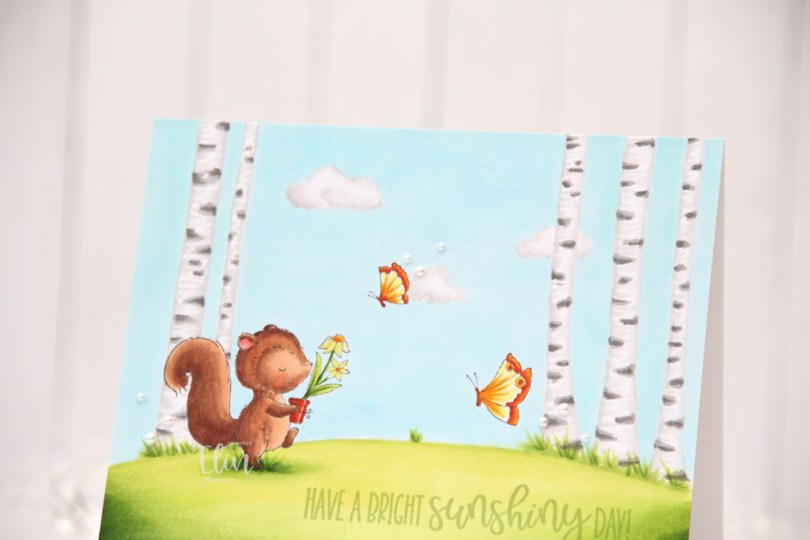
 I stamped
  I colored the entire panel with Copics, deciding to add a few clouds in the sky as well as some visible blades of grass near the trees.
 I adhered my colored panel onto a top fold landscape A2 card base I created from Stamper’s Select White cardstock from Papertrey Ink. I stamped a sentiment from the
  To finish off the card I added a few pearls from Kort & Godt in three different sizes (2 mm, 2.5 mm, 3 mm). Adding the pearls was actually my niece’s idea. I tend to go for sequins myself, but I love pearls too and hadn’t used these in a while, so it was good to break them out.
 The lack of dimension makes this a very thin, lightweight card compared to my normal cards, which means this won’t have any problems going through the mail.
 Not a lot of colors given that the entire card front is colored.
 I colored the image with Copics, die cut the word HURRA from my panel using a die from Kort & Godt and the largest die in the A2 Stitched Rectangles STAX 2 set from My Favorite Things for the faux stitching to frame the image. I printed a second image to put behind, so the ball of yarn is continuous throughout the word.
 I adhered my panel to an A2 card base I created from Berry Sorbet cardstock from Papertrey Ink. Onto a strip of the same color cardstock, I stamped and white heat embossed a sentiment from Huldra Designstudio, added a couple of additional layers of cardstock behind it for dimension and embellished with a couple of sequins from Pretty Pink Posh to finish the card.
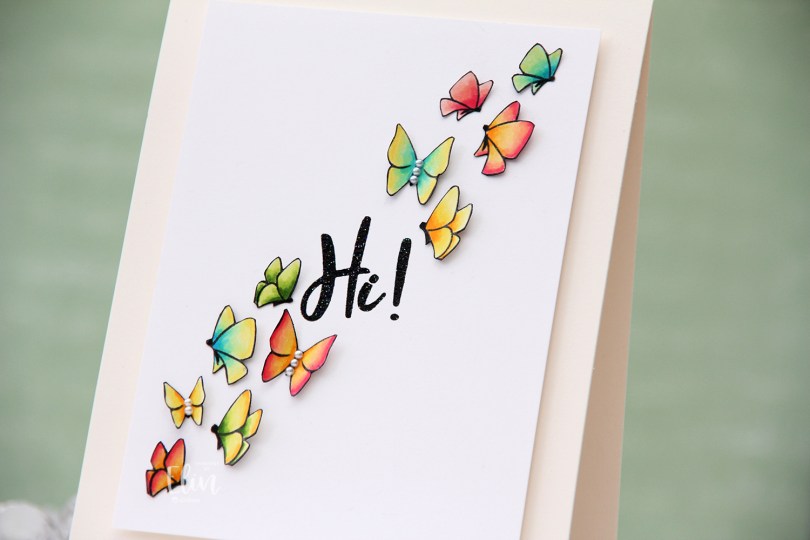
 I used the
  I fussy cut each of the butterflies right up against the stamped lines, going over the cut edge with a black pen so no white core would show from the sides. I then took a thin Copic multiliner to make the bodies of the butterflies more solid black (I suspect I might need a new black ink pad because my current one is starting to get dry).
 I added the butterflies to a 3 1/2 x 4 3/4″ panel of Stamper’s Select White cardstock from Papertrey Ink, lifting the wings and adding tiny pieces of 1 mm foam squares to the back of them for dimension. I didn’t want these to be flat. On some of the butterlies, I added 2 mm white pearls from Kort & Godt to the bodies.
 The sentiment is from the
  The sparkle of the embossing powder is visible in this photo, as is the wonderful lift the wings of the butterflies get by using tiny pieces of foam tape. I colored one more butterfly, but there was no more room on the front of the card, so I adhered it to the back of the card above my “Handmade by Elin” stamp.
 Not a lot of colors for this one, though I did use the yellow ones for all the two toned butterflies.
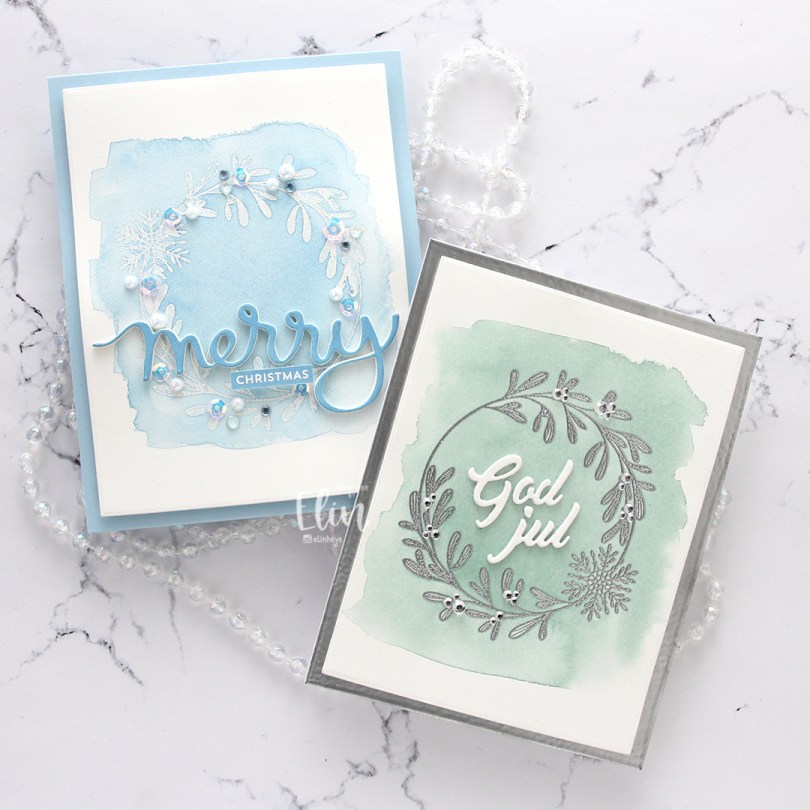
 I actually created two cards this time. No Copic coloring on these, which is rare for me. I bought the Wreaths and Mulled Wine stamp set from Ciao Bella last year, but didn’t have time to use it. Get Cracking to the rescue. I took one of the wreaths in the stamp set, stamped it in VersaMark ink onto watercolor paper (I used Fabriano Artistico Extra White 140 lb hot pressed paper for this) and created two similar, yet different cards.
 For this blue one I used Iridescent Sparkle embossing powder from JudiKins for my heat embossing. I used Prussian Blue paint from my Mijello Mission Gold watercolor set and watered it down quite a bit to get the light blue I was after. I used a 3/4″ flat brush across the surface, and the heat embossing resisted the watercolor I put on top. I love the edges of watercolor, so I just walked away and let this air dry, I didn’t want to mess with it.
 Using a more concentrated paint of the the same color, I did a flat wash on a scrap piece of watercolor paper that was big enough for me to die cut. I used the Merry Script die from Mama Elephant and die cut three layers of white and one layer from my painted blue piece and stacked them for dimension. I also white heat embossed part of a sentiment from the Itty Bitty Holiday stamp set from My Favorite Things and nestled that in below the merry using some clear foam tape.
 I could fiddle with placement of embellishments all day long. Color, size, I wanted everything to be just right, and wound up using a combination of the Igloo mix from Little Things from Lucy’s Cards (pearls and iridescent sparkle sequins), the Crystal Collection – Glass mix, also from Little Things from Lucy’s Cards (clear jewels), and a few blue diamonds from Kort & Godt to fill in the rest.
 I used a die from Waffle Flower to create a rectangle from the watercolored piece and mounted in on foam tape on a card base I created from Spring Rain cardstock from Papertrey Ink. It’s no secret that I love blue for Christmas cards, and I thought this soft background with the wreath and the embellishments was a nice combo.
 For my second card I used the same wreath stamp that I stamped in VersaMark ink. This time I embossed it in silver, painted the background with Van Dyke Green (also watered down quite a bit) and flipped the panel upside down to have the snowflake in the bottom right “corner” of the wreath instead of the top left.
 I used the same Waffle Flower die to create my rectangle from the watercolor piece and was a little unsure of what to do for a card base. I didn’t have any green cardstocks that matched my watercoloring, and I didn’t feel like pulling my paints back out to create a green wash that I could use (although that would have been pretty). I rummaged through my silver cardstocks, but none of them matched the silver heat embossing very well, so I wound up creating my own using the same silver embossing powder that I used for the wreath. I squished my VersaMark pad onto the edges of a 4 1/4 x 5 1/2″ piece of white cardstock, sprinkled on the embossing powder and repeated the process until the embossing was even and covered everything. I adhered my embossed panel onto a white top fold card base and mounted my watercolor cardstock on top using foam tape.
 Using the Hjerte 3 die set from Papirdesign, I die cut the words God jul three times and stacked them for a dimensional look. I made sure to cut the top layer from the watercolor paper I’d already used so that the whites would match. I adhered my die cut words to the center of the wreath using liquid glue.
 To finish off the card I added Kort & Godt diamonds in three different sizes in clusters around the wreath. They act as little berries and add a little bit of sparkle and shine.
 I made quite a few green Christmas cards last year. It’s a color that’s growing on me, and this Van Dyke Green from Mijello is the most perfect green ever.
 I had so much fun creating these cards. They’re very different from what I usually create, that might be part of the reason why. The simplicity of this design makes it easy to mass produce, too, if that’s your jam. Break out your embossing powders, different colors of paint and go to town.

 I wanted a little bit of subtle interest to my background, and used the Garden Lattice dies from Honey Bee and die cut both the base and the top die (these are sold separately) twice from Stamper’s Select White cardstock from Papertrey Ink. By doubling up on each of the die cuts, I get lots of dimension.
 I also die cut the word hugs from the Sending Big Hugs die from My Favorite Things. I die cut two layers from white cardstock and three layers from purple (Winter Wisteria from Papertrey Ink). The purple didn’t match my coloring, so I added BV02 to the top layer, that did the trick. I stamped my sub sentiment from the Bitty Thanks & Gratitude stamp set from My Favorite Things using Grapesicle ink, also from My Favorite Things, and adhered the strip directly to the diecut HUGS word.
 I finished off the card by adding a few veneer butterflies, I thought they paired well with the butterfly on the bunny’s nose. The butterflies are from Wycinanka, and I added two Kort & Godt pearls to the center of each of the butterflies to form the body, and that finishes the card.
 Simple, yet happy color palette for this card.
 I stamped my critters onto a piece of X-Press It blending card, which is the paper I prefer for all my Copic coloring. I colored the image, then restamped it using VersaFine Onyx Black to get super crisp black lines in the image. This needs to be done after coloring, Copics and VersaFine don’t play well together.
 I used a die from Kort & Godt to create the torn page edge at the top of my panel, before trimming the rest of it down to fit on the front of a mini slimline card. I stamped a sentiment from the Scripty Xmas stamp set from Mama Elephant using Jalapeño Popper ink from My Favorite Things, added another three layers of cardstock behind my panel and adhered it to a card base I created from Jalapeño Popper cardstock from My Favorite Things.
 To finish the card I scattered a few snowdrift sprinkles from Little Things From Lucy’s Cards around the image and sentiment.
 I love this little stack of critters, and the tall, narrow design is the perfect kind of image for a mini slimline card.
 You’d think my color palette wouldn’t have this many colors in it, but I tend to go overboard on the snow. I do the same with the green, I love this green combo.
 For my first card, I chose to feature this adorable image from Lee Holland. Last year, he asked his followers and fans what more we wanted of his dragons (he is known for his dragons, he has lots of different ones), and I suggested one hugging a penguin. He came through big time, and created this image, which I, of course, had to get. I colored it in noline, because I love the look, before sprinkling Chunky White embossing enamel on top and melting the granules from the back of the paper to create that wonderful snowy look.
 I taped a square die inside a rectangle die from Waffle Flower and die cut the two dies four times from Stamper’s Select White cardstock from Papertrey Ink to create a chunky polaroid frame for my little fellas to fit into. By taping the two dies together, they won’t shift and the square opening will be in the same spot for all my diecut pieces. I stacked my diecuts and put the image behind my chunky frame, before adhering it all to a cardbase I created from Stormy Sea cardstock from Papertrey Ink. Using a die from Kort & Godt, I die cut the word klem three times from the same color cardstock. The die actually cuts the word juleklem (Christmas hug in Norwegian), but it’s so big the first part didn’t fit my card, so I just chose the latter half of the word. I stacked three together for dimension, adhered it at an angle to my card, and put a white heat embossed sub sentiment from Norsk Stempelblad AS below. This too, has additional layers of cardstock behind it for dimension. To finish off the card, I die cut a few white snowflakes using dies from Hero Arts and Marianne Design, and I stacked two of each snowflake on top of each other to make them stand out a bit.
 Fairly simple color palette for this image.