Hi, crafty friends! I’m so happy to be back in the craft room on a somewhat regular basis. The months of mid October through mid January were insane, and I had no crafty time whatsoever, but that’s changed now. I have a fun card to share today, featuring this Hugs image from Purple Onion Designs, illustrated by Julian Charlton. I love his Elliot & Marcel images, they’re quirky and cute and just perfect.
 I chose to color Elliot in a very soft grey, and once fully colored, fussy cut the image leaving a thin white border. I put the image aside and started working on the rest of the card.
 I felt a landscape design would work best for what I had in mind, and used the Geometric Landscape stencil from Altenew to create some interest in the background with blue inks, also from Altenew. I used the entire Lapis Lazuli color palette from Altenew for my blending, (Azurite, Ultramarine, Eastern Sky, Iceberg) which fades to white at the top.
 Using the Sending You Hugs die from My Favorite Things, I die cut the letters to spell out HUG four times from white cardstock from Papertrey Ink, which happens to be the same cardstock I used for my cardbase. I love their white cardstock, it’s the best by far. I stacked the letters for dimension and stamped and white heat embossed a punny sentiment that comes with Elliot & Marcel. There are actually a few more sentiments in the set, and I added another one to the inside of the card. I didn’t have the right color cardstock, though, so I cheated and covered white cardstock with the Azurite color, which is the darkest of the four blues I used for the blending of the background. To create the sentiment strip, I went direct to paper, and used my heat tool to speed up the drying process of the ink so I could stamp and heat emboss on top. I added three additional strips of cardstock behind it to make it flush with the die cut letters, adhered it to the card and finished off with a few sequins from the White Orchid Sequin mix from Little Things from Lucy’s Cards.
 I chimply love punny sentiments and couldn’t resist.
 Very simple color palette for this one. This was fast to color.
 I did fairly simple Copic coloring for this, die cut my panel and added it to a white card base I’d covered with a quarter sheet of Winter Wisteria cardstock from Papertrey Ink.
 This image with its sentiment deserved to steal the show on its own, so I embellished very sparingly with a few sequins from the White Orchid sequin mix from Little Things from Lucy’s Cards.
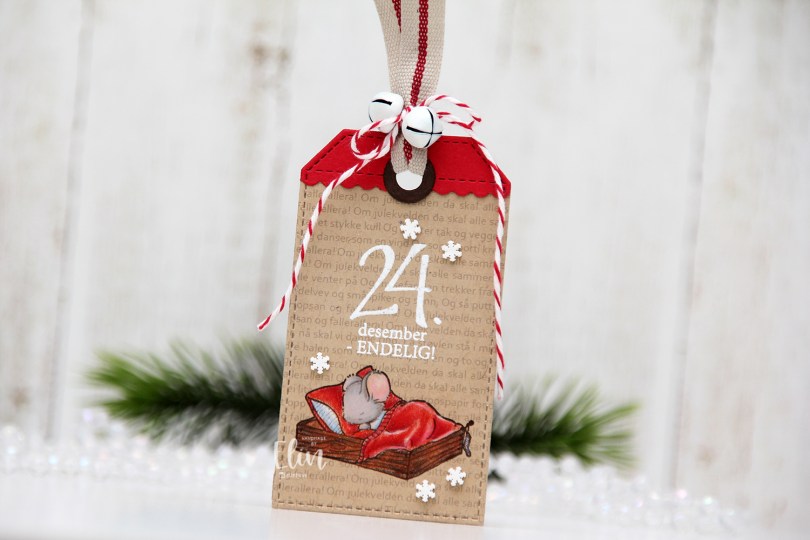
 I stamped the cute mouse using Memento Rich Cocoa ink onto Classic Kraft cardstock from Papertrey Ink, before covering the image with a mask and running the cardstock through my printer to add the lyrics to a Norwegian Christmas song all about mice. I thought it was a fitting background. I colored the image with Prismacolor pencils (not Copics, I know, it’s rare), heat embossed a sentiment from the B04 stamp set from Norsk Stempelblad AS above the cutie and used a die from the Stitched Traditional Tag STAX die set from My Favorite Things to turn it into a tag. I then die cut a label from the Everyday Gift Box die set (also MFT) from Wild Cherry cardstock from My Favorite Things, and used the tag die again to turn it into the top piece of my tag. I also used a reinforcer die from the Fold-Up Tags die set (also from MFT) and die cut that from Dark Chocolate cardstock from Papertrey Ink. I added a ribbon, a couple of bells and some Cherry twine from Whisker Graphics to the top of the tag, before adhering a few snowdrift sprinkles from Little Things from Lucy’s Cards to finish.
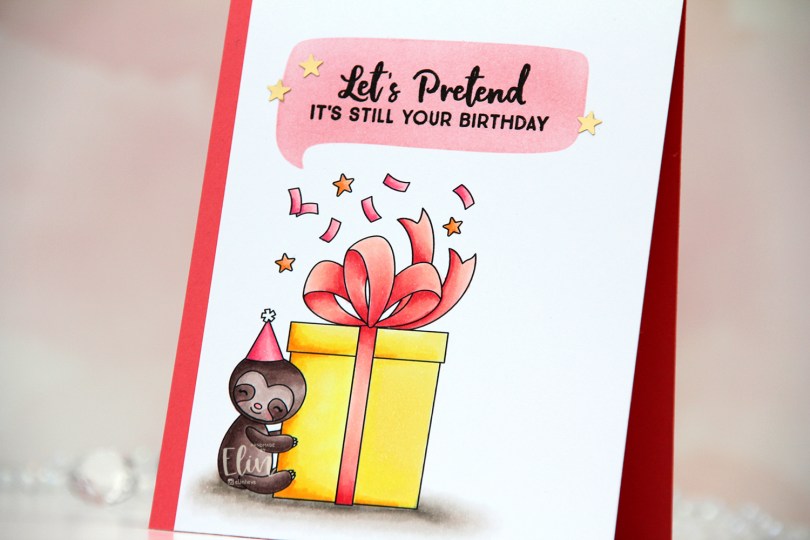
 There’s something about the
  I printed my image on a quarter of an A4 sheet of X-Press It blending card. A4 is narrower and taller than lettersize, so my quarter panel doesn’t quite cover an A2 card front. By letting a strip of the card base showing as a result, it adds a design element to the card.
 Once my coloring was complete, I ink blended Berry Sorbet and Melon Berry inks into one of the openings in the Say Anything stencil from My Favorite Things, before stamping a sentiment from the Anything-but-Basic Birthday Wishes stamp set (also from MFT) using VersaFine Onyx Black ink.
 I adhered the panel directly to the card base (Melon Berry cardstock from Papertrey Ink) and added a few confetti stars from the Rosy Glow mix from Little Things from Lucy’s Cards.
 The stars are matte gold, but they still shine in the light. And because they’re flat, and everything else on this card is also flat, this card is very mail friendly, which is a rarity for me.
 Quick, simple color palette.
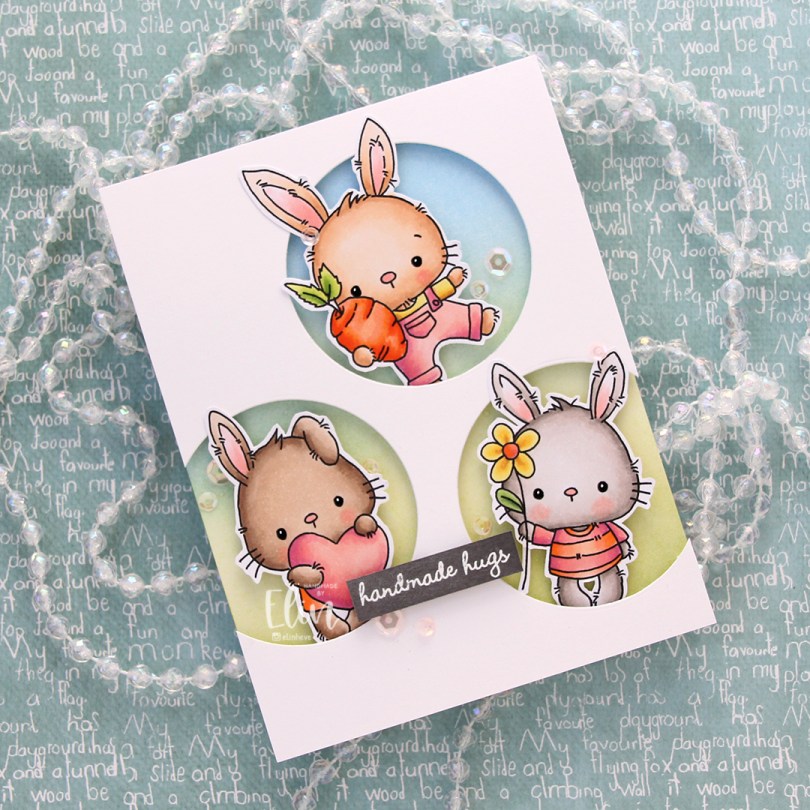
 These guys are from the
  Onto the card base, I ink blended Fresh Leaf and Eastern Sky inks from Altenew to create a soft background that went from green to blue. I then added splatters of my sheer shimmer spray from Imagine. It’s not really visible in the photos, but in real life it adds a bit of sparkle.
 I die cut three circle openings in a quarter piece of white cardstock and mounted it with foam tape to the card base.
 I added foam tape to the back of my critters, popping each of them into the circle openings. I stamped and white heat embossed a sentiment from InkyWings onto a piece of Mushroom cardstock from Concord & 9th, mounted it on foam tape and added it to the card.
 To finish off the card I added sequins from the Rosy Glow mix from Little Things from Lucy’s Cards.
 Such a simple color palette for this one. Aside from the colors of the fur, which differ for each bunny, I used the same colors throughout.
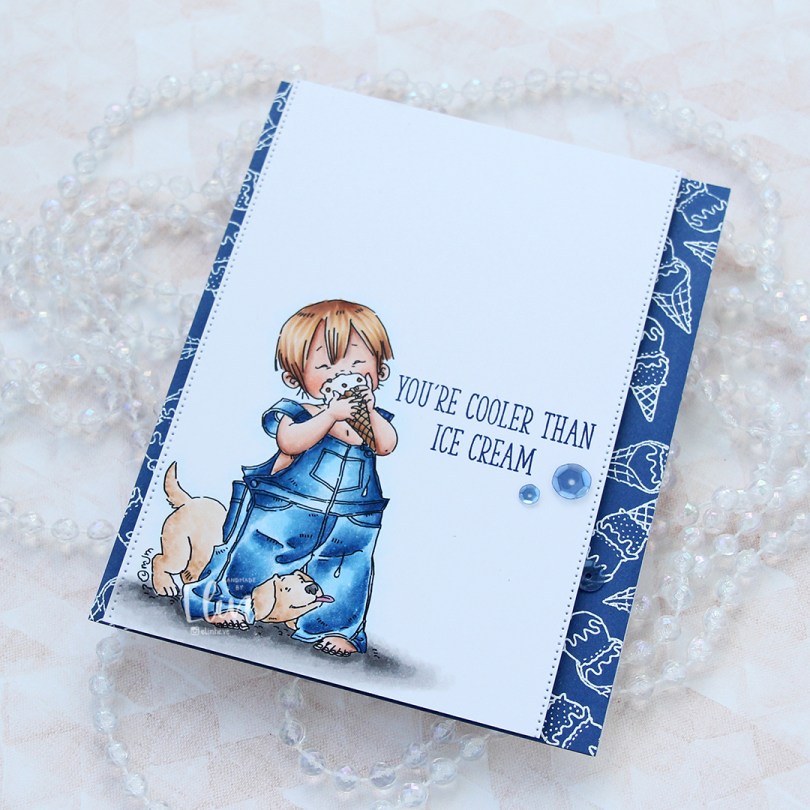
 I’ve colored this image before, but never using blue for his overalls. That feels crazy, but it’s also true. I obviously used blue this time, and gave him blond hair too. I stamped a sentiment from the Double Scoop of Cute stamp set from My Favorite Things, using Blue Beyond ink, also from My Favorite Things.
 On the sides of the panel, I used a die from the Stitched Borders die set from Lawn Fawn to create a tiny bit of interest.
 On a quarter piece of Blueberry cardstock from My Favorite Things, I repeatedly stamped the ice cream cones in the Double Scoop of Cute stamp set and white heat embossed them all. I adhered the blue panel to a card base and mounted my colored panel on top using foam tape.
 To finish off the card I added three sequins from the Denim mix of sequins from Little Things from Lucy’s Cards. I tend to put my embellishments near the sentiment, it’s a good way to draw the eye to the sentiment.
 It doesn’t get much cuter than a boy with a puppy. And I wish the temps were good enough for ice cream outdoors. We still have snow on the ground, it’s cold and there’s more snow in the forecast. I want summer, when’s it coming?
 Lots of Copics despite a very limited color palette. It happens.
 This
This  I stamped a sentiment from the Definisjoner stamp set from Norsk Stempelblad AS with Melon Berry ink from Papertrey Ink, chopped off a bit of the panel and adhered it to a card base I created from Melon Berry cardstock, also from Papertrey Ink.
 I added a couple of sequins from Little Things from Lucy’s Cards. The larger sequin is from the Sweet Shop mix, the smaller one from the Iced Sherbet mix.
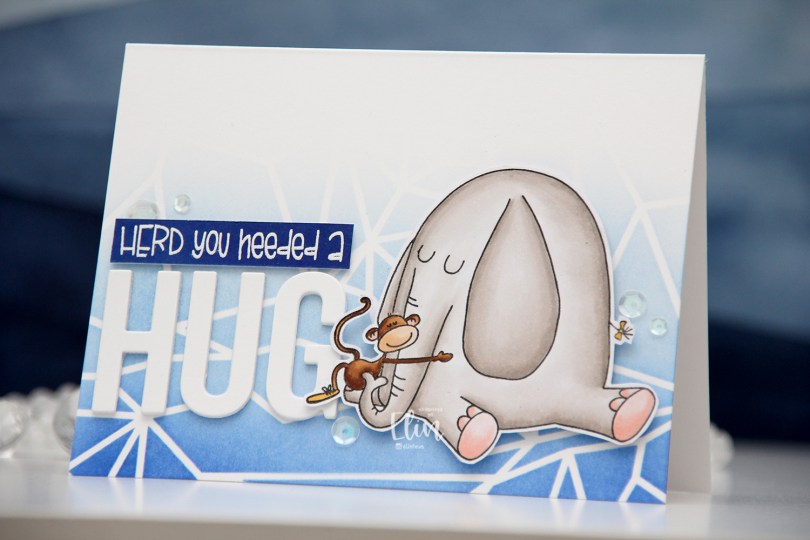

 I love these animal number images from Rachelle, and these ducks are sooo cute. Perfect for a birthday card, I think. I colored the image with my Copics, before temporarily adhering the Watercolor Wash Free Form stencil from My Favorite Things and ink blending with Harvest Gold ink from Papertrey Ink. I then stamped a sentiment from the A06 stamp set from Norsk Stempelblad AS using Shadow Creek ink from Altenew.
 I used the largest of the Wonky Stitched Rectangle STAX dies from My Favorite Things to create a quirky faux stitch interest around the edge and adhered my panel to a top fold card base I created from Meadow cardstock from Hero Arts.
 To finish off the card I added a few raindrops from Little Things from Lucy’s Cards, I thought they fit well with the water theme in the image.
 I colored the donut with my Copics and fussy cut it, leaving a thin white border around the edge. I printed a panel of several donuts in light gray for a bit of added interest in the background, popped up my panel onto a card base I created from Rustic Cream cardstock from Papertrey Ink, while I worked on the rest of the card.
 Using the Parker alphabet die set from Memory Box, I die cut the letters to spell sweet from Grapesicle cardstock from My Favorite Things. I stacked six of each for a dimensional look.
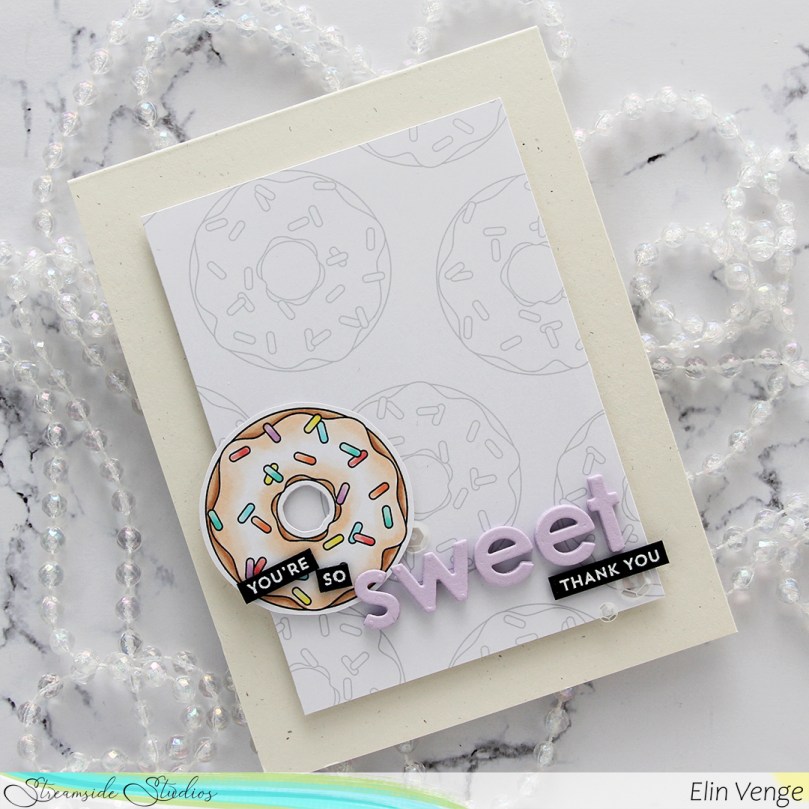 I stamped and white heat embossed partial sentiments from the Itty Bitty Basics and Itty Bitty Gifting stamp sets from My Favorite Things to complete my sentiment, adhered it all to the card and finished with a few sequins from the White Orchid Sequin mix from Little Things From Lucy’s Cards.
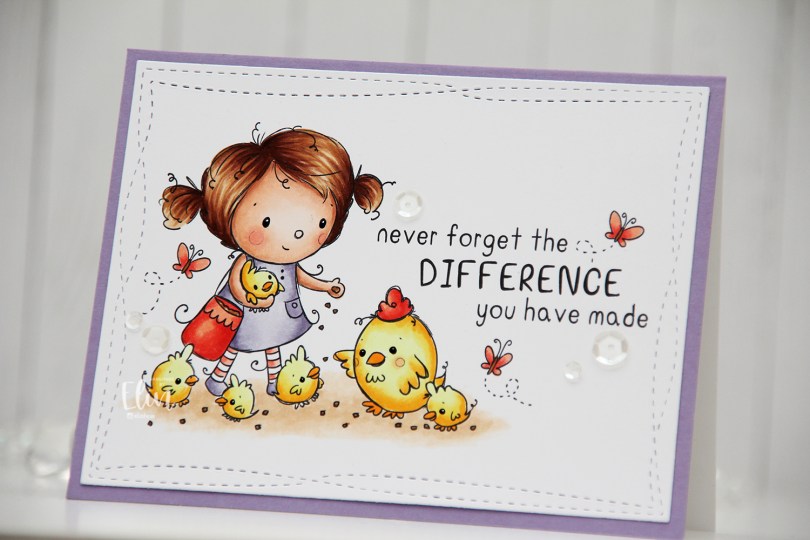
 I love the playful nature of the Lili of the Valley stamps, and their adorable critters drew me in when I was a new cardmaker years and years ago. I still have all my old rubber stamps from Lili of the Valley, and they stamp so well. This one is digital, however, and the two main advantages that I see in digital stamps are that you can adjust the size to suit your needs and that there’s no waiting for ink to dry. Also, you get a perfect print every time. I love digital stamps!
 I haven’t made a mini slimline card in a while, and decided that this image would be perfect for it. I created a card base that was slightly smaller than an average mini slimline. This one measures 5 1/4 x 3″, it fit the scene better than a 6″ wide base.
 I colored the scene with Copics, cut it down to a size that left a nice border around the edge and adhered it directly to the card base, before adding some crystals from a mix from Little Things from Lucy’s Cards to the banner.
 The crystals add a tiny bit of dimension to an otherwise fairly flat card, and those penguins are the cutest, aren’t they?
 Simple color palette for this one.