Hi, everyone. I’ve got a birthday card to share with you today, but it’s not in my usual clean and simple style, it’s a more layered card. I used to make this kind of card all the time when I first started making cards, and it’s what I feel I have to go back to whenever I get an order for a card. It’s a good way for me to justify the price I set.
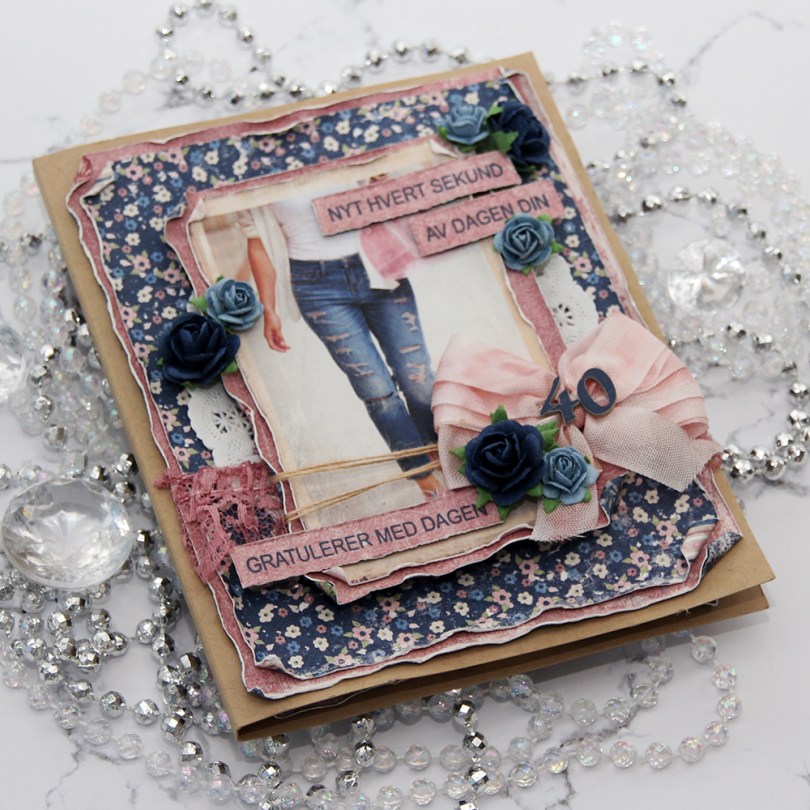
 I was told that the birthday girl likes blue, pink and flowers. I knew just which papers to dig out from my stash. The paper I’ve used here is all from the Denim & Girls collection from Maja Design. I love their collections, the patterns are nice and small and the colors to die for. I mean, look at those blues!!! Amazing!!! I’ve predominantly featured two sheets on this card; Summer outfit (which is the blue with the flowers) and Romantic blouse (the pink one). The image comes from the Snapshots sheet.
 I started by cutting down the patterned paper to the sizes I wanted, before using a paint brush with clean water to wet all the edges. This makes the paper more pliable, and I can curl the edges with my fingers, giving the paper some dimension and interest. The cool thing is that when it dries, it stays like that, it’s very sturdy. With Maja Design patterned paper it’s extra sturdy, because the paper is so thick you can actually use it for card bases. It’s really nice.
 I added a paper doily, some pink lace, some May Arts natural twine, a bow, a couple of diecut numbers and a few paper roses from Papirdesign, in addition to a couple of sentiment strips. I stamped the Mathia design sentiments straight onto the pink patterned paper using Enchanted Evening ink from Papertrey Ink, distressed the edges of the strips slightly with a finger nail and mounted them on foam tape. The top sentiment translates to “Enjoy every second of your day” and the bottom one says “Happy birthday”.
 When creating this type of card I go all out and decorate all four sides of my card. I used the same layout on the insides, but skipped all the embellishments. The kraft panels are actually removable. I added double sided tape to the back in generous amounts, but left the release paper on, and glued the panels on using just a glue dot. Glue dots are a nice temporary solution, and it enables you to pull the panels out fairly easily, write your personal message, remove the release paper from the double sided tape and glue the panels back where they belong. It’s a great way to not have to write inside a bulky card.
 I had to decorate the back, too. I just had to. Same basic layout on the back. Not as heavily embellished as the front, also not as bare as the insides. I stamped a birthday sentiment from Norsk Stempelblad AS using the same color ink as the sentiment strips on the front, and added a few blue roses to finish the card.
 With cards this thick, they don’t fit in regular envelopes, so I usually make simple envelope boxes to match. This one is 1″ high, and it actually could have been a little higher, it was a little bulgy when the card went in. I diecut the blue patterned paper with a Simon Says Stamp label die and added pink diecut letters from Scrapmagasinet to spell the name of the birthday girl. I did two layers so the name wouldn’t get completely lost with that busy background.

 I printed
  I’m no stranger to adding clusters on my cards, so I pulled out half a paper doily from Doodlebug Design, more scraps of Maja Design patterned paper (the Vintage Summer Basics and Vintage Autumn Basics collections) and diecut a couple of banners using the Fishtail Flag Frames die set from My Favorite Things. I also stamped and white heat embossed a Norsk Stempelblad AS sentiment, before punching it out using my 1″ circle punch from EK Success. I added a pebble on top for an extra bit of dimension.
 I also added some sequins (from the Ice Water mix) and a couple of heart shaped drops (from the Crystal Collection – Glass mix) from Little Things from Lucy’s Cards, and my card was done.
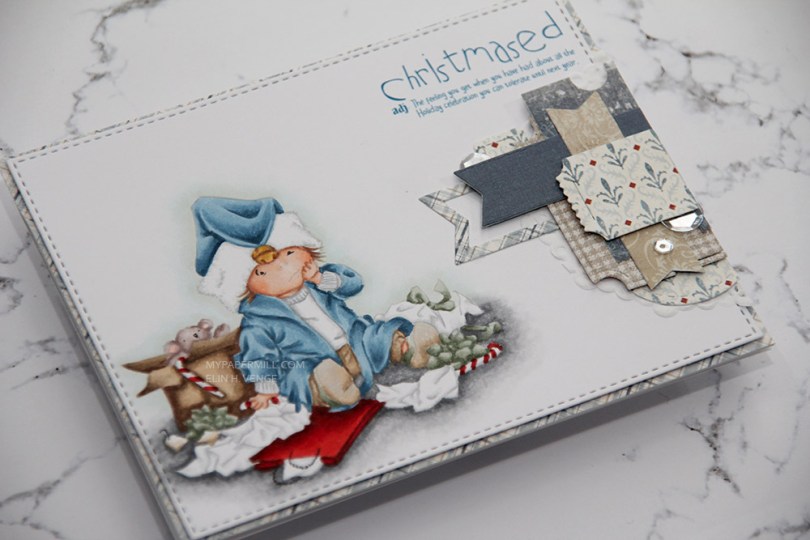
 I had to use my favorite color combination for Christmas on this one. Blue, grey and brown. I made my greys very light, so they look more white than grey, and I have to admit I kind of love the look! I printed the image with 15 % opacity and did no line coloring. I love no line coloring!
 This card is very “me”. The cardbase is made from Papertrey Ink Enchanted Evening cardstock, I used a die from My Favorite Things to add the faux stitching detail on the main panel, and I added a little cluster of diecut patterned paper scraps. I stamped and heat embossed a Norsk Stempelblad AS sentiment on one of the patterned paper pieces and added three snowdrift sprinkles from Little Things from Lucy’s Card as my finishing touch.
 Clean and simple with cluster, these cards come together so easily once the image is colored.
 I used quite a few colors for this simple image. Lots of different earth tones for different parts of the image, and two grey families.
 I colored up
  I used a Docrafts die to create those tickets from scraps of patterned paper from Maja Design, popping them up on foam squares from Gina K designs to give them a little bit of dimension. I white heat embossed a sentiment from Ladybug & Friends on one of the tickets and tucked a diecut pine branch behind it. I finished by adding a few red enamel dots from Papirdesign, tying in the red details from the colored image.
 As usual, I finish with the Copic colors I used to color my image.
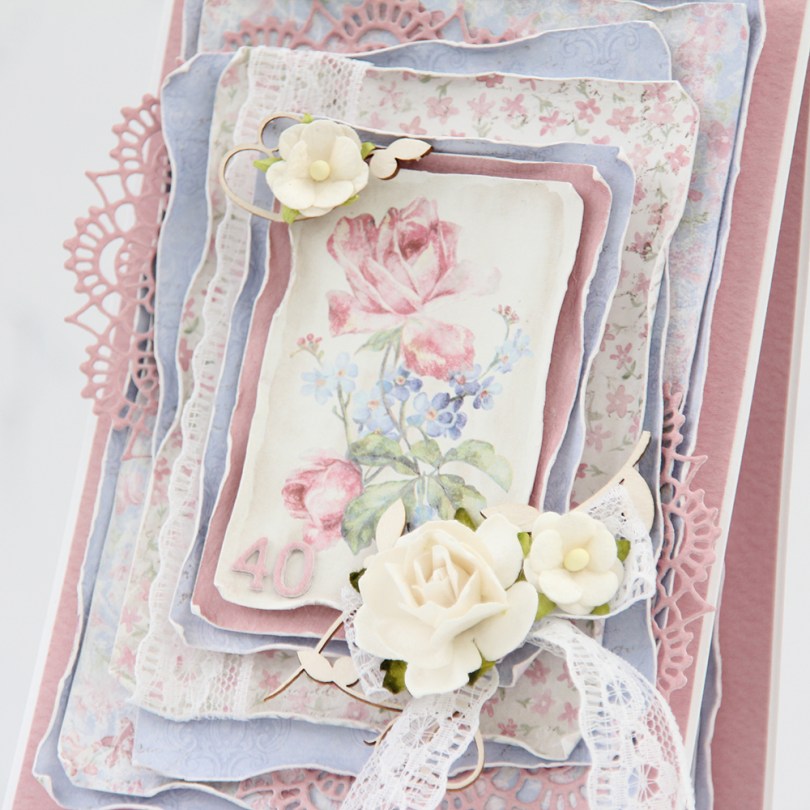
 There are two types of cards I love making more than any other: Christmas cards and birthday cards. I love making clean and simple cards, but also very layered ones with lots of patterned paper. Today’s card is one of those, made exclusively with papers from the Sofiero collection from Maja Design.
 One of the things I love the most about Maja Design paper is the quality of the paper they use. It’s almost as thick as cardstock, something I haven’t really found in other patterned papers. Their patterns are gorgous, too, making card making a breeze. The thick quality also means I can use a wet paint brush (with clean water) and run along the edges, before using my fingers to curl them slightly back. This is so much easier to do when the paper is wet, and so much easier to do with these good quality papers. Thinner paper won’t hold up as well to all that water. I love the look you achieve by doing this.
 I’m not an embellishment queen. I use a little bit on cards like this, but I rarely do a lot. This time, I used some pieces of chipboard from SnipArt and a few flowers to frame the image in the center of my card. I also used some lace to combat the rigid look you sometimes get when using just straight lines like square or rectangular panels.
 I also added a couple of diecut doilies to further break up the linear look, and added stacked diecut numbers to the bottom left of the focal point of the card. As you can tell from this photo, this is a card with lots of dimension, it’s not very mail friendly.
 I did a little bit of layering on the insides, as well. They are both the same, and those pink center panels provide plenty of room to write a personal message to the birthday girl.
 On the back of the card I stamped a sentiment from Norsk Stempelblad AS using Papertrey Ink Autumn Rose ink. The text is about butterflies, so I thought it fitting to add a few chipboard ones for a little bit of extra interest.
 Even though my card isn’t very mail friendly, I needed something to put it in, so I made a box envelope to go with it and added the recipient’s name on the front of it. The card was hand delivered, so this works perfectly.
 I dag slår jeg et slag for alle småstemplene. Ofte i et stempelsett finnes det i tillegg til de litt større stemplene noen mindre som fyller ut plassen på stempelplaten. Disse blir ofte glemt, da vi gjerne kjøper stempelplatene for de store stemplene. I dag har jeg brukt flesteparten av småstemplene i et stempelsett fra Pretty Pink Posh og stemplet dem over hele fronten av kortet mitt.
 Å stemple såpass mange stempler tar litt tid. Ikke bare skal de stemples, men for at det hele skal se litt vilkårlig ut til slutt stemples de ikke i noe mønster, og hvert stempel må derfor plasseres på nytt for hver stempling. Jeg brukte vel omtrent en time på å stemple alle disse småstemplene, før jeg fargela dem med Prismacolor-blyanter.
 Jeg prøver så godt jeg kan å bruke rester av mønsterark på kortene mine, så her fant jeg noen Maja Design-rester i farger som matchet fargeleggingen min. Det rødstripete er fra Home for the Holidays-kolleksjonen, mens det øverste er fra Vintage Frost Basics-serien, som kom ut helt tilbake i 2013. Jeg er jo ikke akkurat kjent for å være den som bruker mest ark på kortene mine, så det minker ikke så fort av restelageret, men litt og litt er bedre enn ingenting.
 Jeg brukte et
  Jeg avslutter med fargene jeg har brukt. Veldig uvant å bruke Prismacolor-blyantene mine istedenfor Copics (tregere går det selvfølgelig også), men jeg prøver å bli flinkere til å bruke det jeg har, og det er jo litt synd om de bare blir liggende i en skuff uten å bli brukt, ikke sant?
 I printed my image on a piece of X-Press It cut down to 4 1/4 x 5 1/2″. I colored my image with my Copics and used the largest of the stitched rectangle dies from My Favorite Things to cut it slightly smaller.
 I’m also doing my best this year to use scraps of patterned paper. I have a basket of scraps that I’ve cut down to card front sizes, and I realized pink is the color I have the most of, which was the reason for my color choice today. I found a pink scrap in the basket that I wanted to use, colored my image in matching colors and took a bit of a dive into my smaller scraps to find pieces to use for my cluster. The circle with the sentiment is actually cut from the center of the patterned paper I used on the front of this card, which is a scrap from the Vintage Summer Basics collection from Maja Design. The diecut banners are from the Sofiero collection, the colors were perfect for this card.
 I used part of a Doodlebug mini paper doily in the top right corner as a base for my small cluster. I had a tiny bit left over and glued in the opposite corner. I embellished very simply with a couple of hearts from the Rosy Glow mix from Little Things from Lucy’s Cards and sequins from the White Orchid Sequin mix, also from Little Things from Lucy’s Cards. I added an epoxy pebble to the sentiment circle for a little bit of extra dimension and interest.
 I colored my image before diecutting it with the largest of the dies in a stitched rectangle set from My Favorite Things.
 I love the little sentiment that comes with the image. I printed it, along with my image, from Photoshop, making sure that the color would be close my blue Copics. The color of the sentiment is actually B99, which I didn’t end up using to color my little guy.
 Lots of little details in this image, requiring the use of lots of colors!
 It’s Mo day (aka Wednesday). One of the last things I did in 2019 was to clear away all the jars of flowers from the desk in my craft room (I had about 50 of them). I figured I don’t really use flowers all that much on my cards anymore, so I didn’t need them to be easily accessible and take up space on my desk. I put them in a cabinet right below the ceiling, I was able to cram all of them into one single cabinet. The last card I made in 2019 had flowers on it. We’re barely two weeks into the new year, and I’ve made another one with flowers. For both cards I had to climb on a ladder and pull out a bunch of jars to get to the flowers I wanted. Maybe removing those jars wasn’t such a good idea after all?
 Good idea or not, this was the card I made. I colored up Mo’s
  I partially die cut my image with some of the bubble hanging out, and glued it to my card using lots of foam tape. I haven’t used my frame dies from GoKreate in a while, so I thought I’d break them out for this one. I usually make my card from the third largest die in the set (the XXL Square Frilly Frames #10 set), but I want to see how far into 2020 I can get with using just scraps, and the third largest die in the set requires a full sheet of paper to die cut two pieces (front and back of the card). The next size down was the perfect size for this scrap of Maja Design patterned paper, and it was also a good size for the green patterned paper from Papirdesign that I used behind my image and on the insides of the card.
 Speaking of insides – I diecut an eyelet circle with a Cottage Cutz die, stamped a Norsk Stempelblad AS sentiment using Memento Sweet Plum ink and again used lots of foam tape. I even diecut a scrap strip of another purple piece of Maja Design patterned paper to go across.
 The second inside has plenty of space for a personal message, and I diecut another eyelet circle from patterned paper and added a couple of diecut numbers from Scrapmagasinet to my circle. I thought this card would be the perfect birthday card for my niece, she turns 10 in June!!
 I used the same design on the back, but used a green strip instead of a purple one. Another NSB sentiment, once again stamped in Memento Sweet Plum ink, and once again glued on with lots of foam tape.
 There’s quite a bit of dimension in this card, and with that great image as the focal point, I think this will be perfect for my niece!
 Lots and lots of Copics used for this one, but there are 15 colors in the heart bubble alone.
 I’ve got
  I quickly found out that the closest Copic color to that specific Pantone color is B99. How perfect is that, the B90s are my favorite blues in all the land. I colored my image and glued it to my card base with lots of foam tape. All I did embellishment wise was add a couple of those little diecut banners (they’re so wide you can hardly see the V shape) and enamel dots from Papirdesign. The white heat embossed sentiment is from Norsk Stempelblad AS.
 I love anything and everything blue – expect to be bombarded with lots of blue this year!
