Hi, crafty friends. I’m back with one of those cards I make once in a blue moon, which happens to be a type of card I used to make all the time back in the day (I realize I’m making myself sound really old by saying that). It’s a 6×6″ card, but still not square.
 The card was made on order for a superintendent turning 60. I was told he likes wine, good food, sunny, warm weather and enjoying life and was given free reign to do as I pleased. Mr. Fixit from Mo Manning seemed like the perfect choice for an image to color.
 I rarely use patterned papers on my cards anymore, and certainly not pieces this big, but I love the XXL Square Frames Frilly #10 die set from GoKreate, the dies in the set are perfect for creating shaped cards. I use two 12×12″ sheets of patterned paper to make one of these cards, and this time I used the Drivers License patterned paper from the Denim & Friends collection as well as the Tough but sweet sheet from the Denim & Girls collection, both from Maja Design. I can cut two of the larger shapes and two of the smaller shapes from one sheet, so the insides of the card are reverse.
 I colored the image in colors that went with the patterned paper, adding a bit of red to catch the eye and writing the words on his t shirt with a black Copic friendly pen. I thought the pun would tick the “loves wine” box.
 I used foam tape to add the smaller shape to the larger one, and also to add the die cut circle to the smaller shape. I stamped postmarks from various cities in the world using Memento Rich Cocoa ink to add a little bit of interest to the circle and the panel behind it. I figure if the guy loves warm, sunny weather, he probably also loves to travel, there’s not a whole lot of warm days in Oslo over the course of a year.
 I added some metal embellishments from Tim Holtz in a bit of a cluster near the bottom left “corner”, as well as his age, die cut and put on a 1″ circle with an epoxy sticker on top for a bit of added dimension.
 I hid a die cut tag behind my image. I used to do this all the time, and it’s a fun way to add a sentiment without having to find space for it on the front of the card. The sentiment is from the Til mannen stamp set from Norsk Stempelblad AS. The dies I used for the tag and reinforcer are old ones from Magnolia. I tied a bow from twill onto the tag, and some cutlery charms to the twill bow using natural twine from May Arts. I thought the cutlery was perfect for a food lover, I have so many treasures in my stash that I forget about until I go looking for something to use.
 The inside of the card are pretty simple. The same patterned paper as the front, only with the reverse size. I used more of the postmark stamps from Marianne Design, as well as a sentiment from the Gratulerer stamp set from Norsk Stempelblad AS. There’s plenty of space for a personal message on the second circle, which only has the postmark stamps on the edges.
 The back of the card is also simple. Another sentiment from Norsk Stempelblad AS, this time it’s the B03 stamp set. I love their stamp sets and use them more than any other of my Norwegian sentiment stamps. They’re hard to get your hands on because the company is no longer in business, but they’re the best sentiments out there.
 Simple color palette.
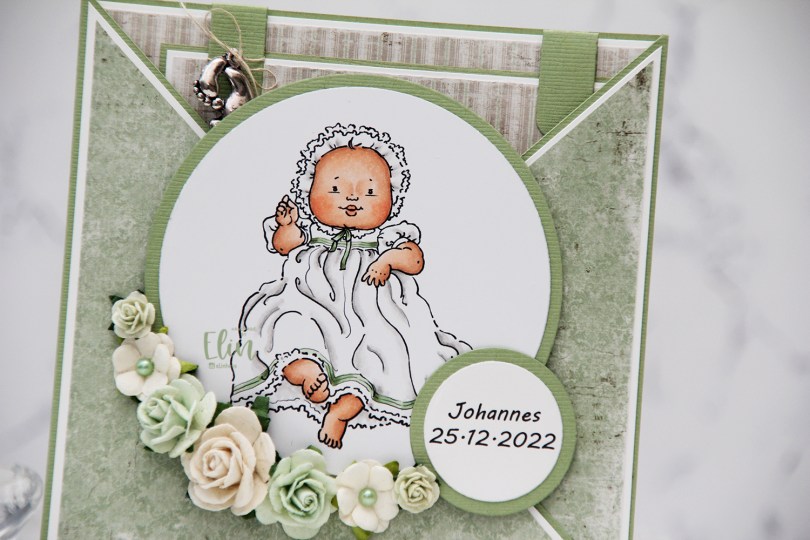
 This Christening image is one that I’ve used several times in the past. It’s super easy to color, which came in handy this time for two reasons: 1 – I didn’t have a lot of time on my hands, and 2 – I haven’t colored in what felt like eons. This was the perfect image to start with after a long break from my markers.
 I colored the image with Copics and used patterned paper from Maja Design to create this criss cross card. I added some flowers, a few pearls and also a charm to the large square tag I put inside, which has plenty of room for a personal message.
 On the back I put an additional sentiment, and the card was complete. Easy peasy.
 Simple color palette, not a whole lot of Copics.
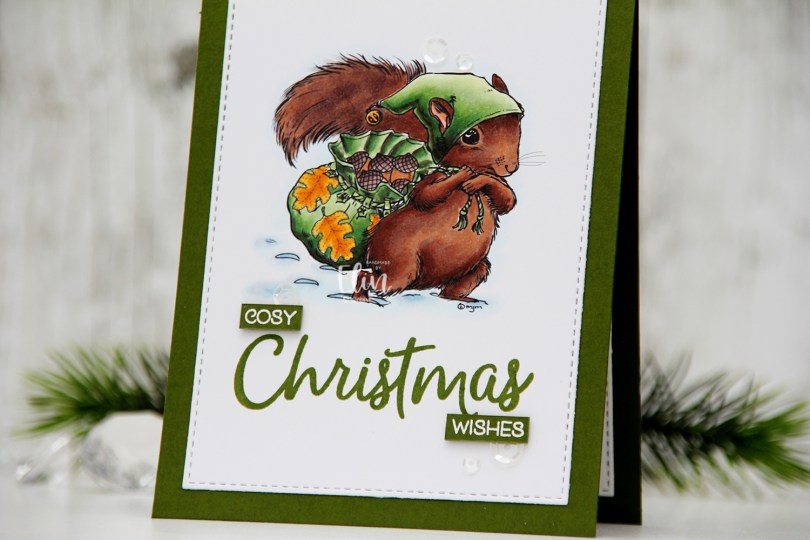
 This image is
  I have a tall pine tree outside my craft room window. In it, there’s a huge nest that magpies built a few years back. One morning last week, I heard the magpies making more sound than usual. When I looked outside, there was a squirrel that had taken over the nest. It was adding one twig after another to the nest, I guess it had evicted the magpies. After quite some time, one of the magpies tried to get back in, but was chased away by the squirrel. I must admit I was delighted, I’d much rather have a squirrel outside my window than magpies. The squirrel is much cuter, and it’s a lot quieter too.
 Back to the card. Once I finished the coloring, I stamped the word Christmas from the Christmas Greeting stamp set that Lili of the Valley released earlier this year using Jalapeño Popper ink from My Favorite Things.
 I then die cut the panel using the second larges die in the A2 Stitched Rectangles STAX 1 die set from My Favorite Things and adhered it directly to a card base I created from Jalapeño Popper cardstock, also from My Favorite Things. On a scrap piece of cardstock the same color, I stamped and white heat embossed the words cosy and wishes to complete my sentiment. I put a couple of additional layers of green cardstock behind each word for a little bit of added dimension.
 I added a few sequins from the White Orchid Sequin Mix from Little Things from Lucy’s Cards to finish off this very simple card. A little bit of shine is never a bad idea on a simple card.
 You’d think an image this simple would have less Copics used, but I tend to go overboard on snow. This time I also went overboard on the fur, even though it might not look like it.

 I love Mo’s elves, and this is
  Once the image was colored, I used the largest die in the A2 Stitched Rectangles STAX 1 set from My Favorite Things to create a faux stitch border. I then white heat embossed a sentiment from the Mini Messages stamp set from Mama Elephant in the center of the darkest bauble, before adhering the panel onto a top fold card base I created from Enchanted Evening cardstock from Papertrey Ink. I added a few diamonds from the Urban Chic mix from Little Things from Lucy’s Cards to finish off the card.
 Simple color palette for this one. It was super fast to color too, which isn’t usually the case with no line coloring.
 This is one of the penguin chicks from the
  I colored the penguin very simply with my Copics, sprinkled on chunky white embossing enamel to my panel and added it to a top fold note card I created from Blue Breeze cardstock from My Favorite Things. I then die cut the Let it snow sentiment using a die from Mama Elephant. I die cut three layers of the same blue color cardstock and adhered them for a stacked look in the top center of the card before finishing off with a few snowdrift sprinkles from Little Things from Lucy’s Cards.
 I colored up
  Once the coloring was complete, I used the largest die in the A2 Double Stitched Rectangles STAX die set from My Favorite Things to turn my panel into a rectangle with a nice faux stitch around the edges. I then added a thick layer of Glossy Accents to the heart and let that dry.
 Using the Geometric Landscape stencil from Altenew, I ink blended a bit of yellow in the top right corner using Distress Inks in the colors Mustard Seed and Squeezed Lemonade, letting the lighter shade of the two fade to white. I then adhered my panel onto a top fold card base I created from Stormy Sea cardstock from Papertrey Ink.
 I die cut the word wishes four times from the same color cardstock using a die from Mama Elephant. I stacked the die cuts for a dimensional look and adhered them on top of my ink blended section.
 Using two stamp sets from My Favorite Things (Bitty Birthday Wishes and Itty Bitty Gifting), I heat embossed sub sentiments onto strips of Canyon Clay cardstock from Papertrey Ink. I die cut those using the Itty Bitty Strips dies, also from My Favorite Things, before finishing off the card with a few yellow enamel dots from the Pocketful of Sunshine pack of enamel dots from Altenew.
 This was a fun color palette to work with, and I think the finished card echoes that. I’d say it’s my usual style of card, just not my usual color palette. I need to branch out more often, I had a blast using these colors.
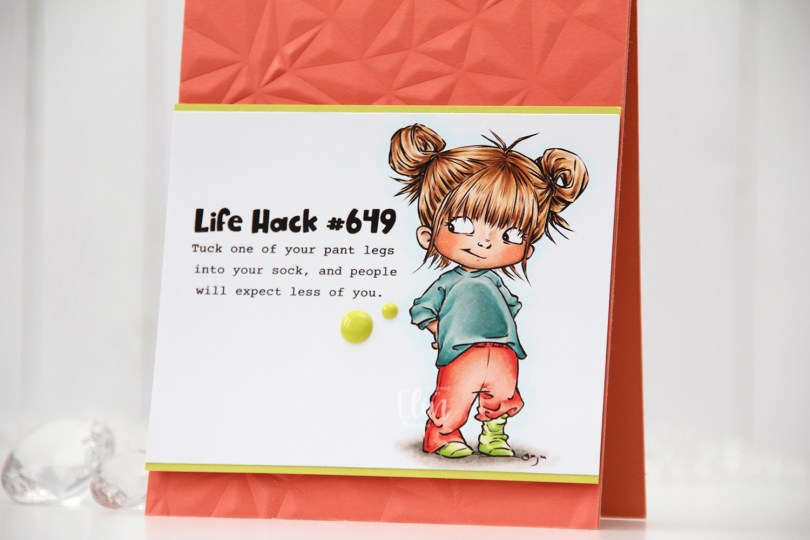
 Meet
Meet  I colored the image with Copics, trimmed my panel down and added a thin strip of Limeade Ice cardstock from Papertrey Ink above and below for a little bit of extra color and definition.


 I used more Copics than I thought I would for this. I even used BG71, which is a color I’ve created myself.
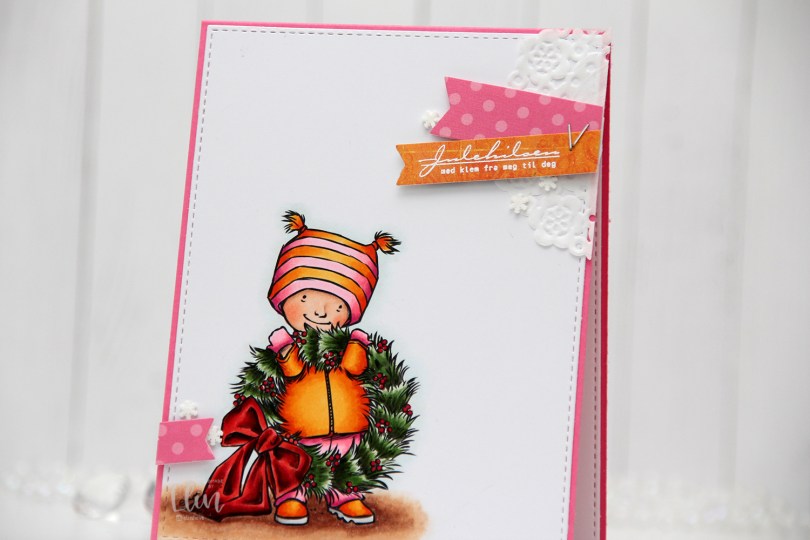
 This is
  After coloring the image with Copics, I used the largest of the dies from the A2 Stitched Rectangles STAX 1 set from My Favorite Things to turn it into a panel. I adhered it to a top fold card base I created from Hibiscus Burst cardstock from Papertrey Ink, before gluing on a scrap piece of doily from Doodlebug Design in the upper right corner. I stamped and white heat embossed a sentiment from the Julehilsen stamp set from Norsk Stempelblad AS onto a die cut piece of patterned paper from Bo Bunny. I added another die cut piece of patterned paper (this dotted pink is from Sunny Studio) and stapled the two pieces together before mounting them to the card using foam tape. I put another scrap of the pink in the opposite corner of the card and finished off with a few snowdrift sprinkles from Little Things from Lucy’s Cards.
 Colors for this crazy combo. Evidently I forgot to include the greens, but they are BG99, G99, YG67, YG63 and YG61.
 I printed the image on a piece of X-Press It blending card, extending the candy cane so it would run along the entire left side of my card front. The line style of the image is somewhat sketchy, which means you can’t really mess up creating an additional couple of lines. I colored the image with Copics and sprinkled on lots of chunky white embossing enamel, before melting the granules from the back of the cardstock.
 I wanted a big sentiment for this card, and chose the Let It Snow die from Lawn Fawn to create it. I cut once from Hawaiian Shores cardstock from Papertrey Ink, and three times from white cardstock, also from PTI, to create a chipboard like element that adds dimension to my card. I finished off with a few snowflake sprinkles from Little Things from Lucy’s Cards.
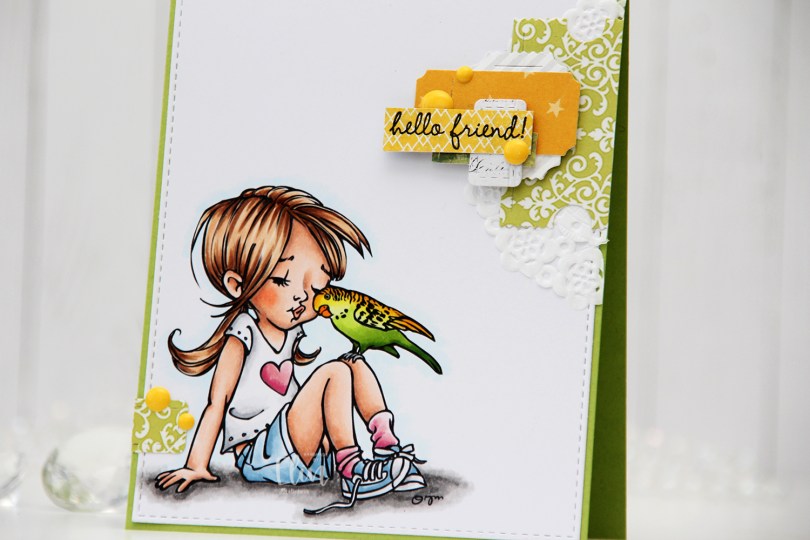
 I colored the image with Copics and die cut the panel using the largest die in the A2 Stitched Rectangles STAX 1 die set from My Favorite Things, before adhering it to a card base I created from Sour Apple cardstock, also from My Favorite Things.
 On my cluster cards, I usually choose two to three colors from the image to create scraps from. This time I chose green and yellow with a little bit of gray. Neutrals are always a good thing to add. I keep die cut scraps in stamp storage pockets on my desk, sorted by color. Whenever I want to create a cluster, I choose the storage pockets with the colors I want, dump the contents on my desk and start PLAYING.
 For this card I wound up using scraps from 3ndypapir, Karen Foster, Sunny Studio, P13, Magnolia and Papirdesign. By limiting the size and colors of my clusters, the design stays harmonious and you can’t tell that I’ve used patterned paper from 6 different companies. I adhere some directly to the layer below, some using foam squares. As a base, I used half a doily from Doodlebug Design that I had in a drawer. I love these tiny paper doilies, they’re perfect for this.
 Using VersaFine Onyx Black ink, I stamped a sentiment from the
  These cluster cards are so fun to make. They make my piles of scraps shrink EVER so slightly, but anything’s better than nothing, and I love the dimension they add to the card.
 I used quite a few colors for this one.