Hi, crafty friends. I’m usually pretty good at making Christmas cards all year. What I’m not usually so good at is creating Christmas tags to go on presents. It’s often one of those things I do last minute, even after the gifts are wrapped. I’m trying to be better, though, and today I have three tags to share featuring the Snow Cute stamp set from Lili of the Valley, I just can’t get enough of this set.
 These penguins are about 4 cm tall, which makes them the perfect size to create gift tags from. By stamping them on a sheet of X-Press It blending card (or your cardstock of choice) with a little bit of space between them, you can die cut some and fussy cut the remaining ones. I decided to fussy cut the one in the center, while using dies for the other two.
 I colored all the penguins with Copics and used a black glaze pen to create a little bit of shine and dimension to their eyes. Once the black was dry, which didn’t take long, I used a white Gelly Roll 05 on top of the black to put the white back into their eyes.
 I’m starting with this fussy cut penguin. In a drawer, I had a scrap of a snowy background that I created last fall using Rustic Cream cardstock from Papertrey Ink, the Falling Snow stencil from Simon Says Stamp, modeling paste from The Crafter’s Workshop and Rock Candy distress glitter from Ranger. I decided to put it to use and die cut it using the 210 die from Kort & Godt, I really like the heart shaped hole it creates at the top. I mounted the penguin using foam tape and added a sentiment strip below. The sentiment is from the Christmas Greetings stamp set from Lili of the Valley, it’s got heaps of great sentiments for the holidays. I used a bit of red lace ribbon, a couple of bells and a piece of thread to the top of the tag to embellish it a little.
 On the back, I added die cut letters to spell the words to and from. The words are from the Tag Builder Blueprints 6 die set from My Favorite Things, die cut from Amarena Cherry cardstock, also from MFT.
 Simple color palette for this one.
 Next up is the circular tag. I used the Tag Builder Blueprints 6 die set for this one as well, as well as another sentiment from the Christmas Greetings stamp set from LOTV. I added Divine Twine in the color Cherry to the top, a bell charm and a few red enamel dots from Papirdesign to finish it off.

On the back, I used the to/from circle die that I used for the first tag, but for this one, I used the negative of the die cut, popping in the centers of the o’s to complete the look. I figured it would be easier to see the writing on white cardstock instead of the red in the dim light on Christmas Eve when we open our presents, so this is meant to be practical too.
 A few additional colors for this one, I wanted to ground my penguin and also needed some color on that candy cane.
 For the blue one, I used the Fold-Up Tags die set from My Favorite Things to create my tag. I made sure not to cut off his scarf by fussy cutting that and putting it behind the die as I ran it through my die cutting machine. I used a piece of Blue Breeze cardstock from My Favorite Things to create the reinforcing element near the top, added some Divine Twine in the color Blueberry, a couple of white bells from UiT Hobby and some thread that’s actually meant to use with a loom (it’s super strong). Once again, I used the Christmas Greetings stamp set for the sentiment, and scattered a few snowdrift sprinkles from Little Things from Lucy’s Cards to finish.
 On the back, I used that same die from the Tag Builder Blueprints 6 die set from My Favorite Things that I used for the other two tags, this time die cut from Enchanted Evening cardstock from Papertrey Ink.
 Once again, simple color palette. These were such fun to make. I want to make more, and have a bunch on hand when it’s time to wrap Christmas presents, so I’m not rushing last minute to get the tags done.

 I printed the image with a 10% opacity onto X-Press It blending card before coloring. Whenever I want to color things that are supposed to look close to white (ice, snow, polar bears +++), I prefer doing a no line version. To me, there’s something very distracting about black lines on an image that’s supposed to look white, so I prefer the softer no line version. I colored the image with Copics, starting with the sky, then ocean, ice floe, polar bear and finally the penguin and his little scarf. I prefer doing the black towards the end, it’s just good practice to avoid getting it into nearby areas where you don’t want it.
 Once I finished the coloring, I die cut the panel using the second largest die in the A2 Stitched Rectangles STAX 1 set from My Favorite Things, before mounting it on foam tape onto a white card base I created from white cardstock from Papertrey Ink. I die cut the word klem (hug) twice from white cardstock using a die from Kort & Godt. It’s actually a Christmas die that says juleklem (Christmas hug), but by using only the latter part of the word, I have a completely different use for the die, which I love. That’s the whole card, I decided not to add any embellishments, I wanted to keep the focus on the image.
 Loooots of Copics for this deceptively simple scene.
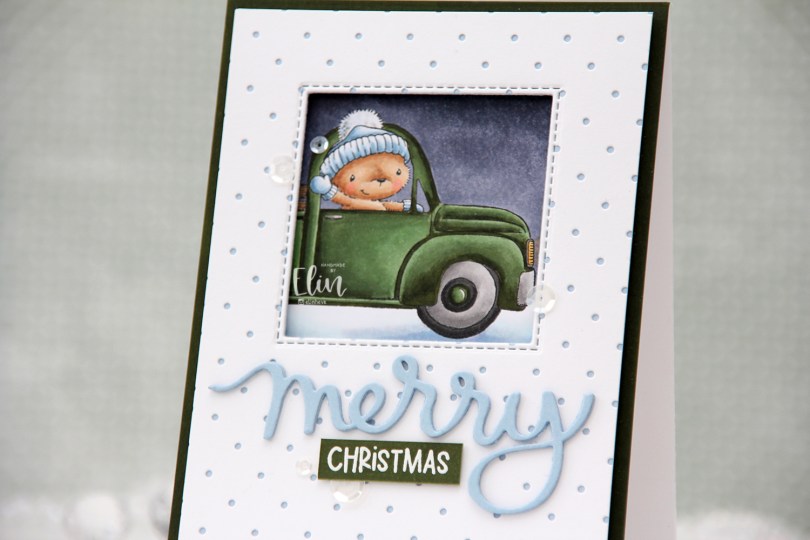

 Using the Itsy Bitsy Polka Dot Backdrop die from Lawn Fawn, I die cut a panel of white cardstock from Papertrey Ink to add a little bit of texture to the front of my card. I adhered it to a quarter panel of Blue Breeze cardstock from My Favorite Things, before using the Selfie Square die, also from My Favorite Things, to die cut a window in the top center.
 I put foam tape on the back of my polka dot panel and adhered it to my colored piece, making sure to line up the image so it would show trough the window the way I wanted it to. I then grabbed a quarter panel of Jalapeño Popper cardstock from My Favorite Things and used my G99 Copic marker and scribbled it close to the edge of the green cardstock to make the color match my car a little bit better. Green cardstock is tricky, and I don’t often find the right kind of green that I want for my projects. This was an easy hack, but if anyone out there has a suggestion for a green cardstock that is close in color to G99 (or G94), please let me know.
 I adhered my improved green cardstock to an A2 top fold white note card and mounted the polka dot piece with the colored window using foam tape – lots of it. I then used the same Blue Breeze cardstock that I used previously to cut the word merry three times using the Merry Script die from Mama Elephant. I love their script dies! On the top layer I spritzed sheer shimmer craft spray from Imagine for a bit of sparkle to the letters. Unfortunately, details like that are tricky to photograph, but it’s definitely noticeable in real life, trust me 🙂
 Onto a leftover scrap of X-Press It blending card, I scribbled an even layer of G99 to create a dark green cardstock that would match my colored image. Onto it, I white heat embossed the word
  I love my Copics and used quite a few for this rather simple image.
 I colored up
  Once the coloring was complete, I used the largest die in the A2 Double Stitched Rectangles STAX die set from My Favorite Things to turn my panel into a rectangle with a nice faux stitch around the edges. I then added a thick layer of Glossy Accents to the heart and let that dry.
 Using the Geometric Landscape stencil from Altenew, I ink blended a bit of yellow in the top right corner using Distress Inks in the colors Mustard Seed and Squeezed Lemonade, letting the lighter shade of the two fade to white. I then adhered my panel onto a top fold card base I created from Stormy Sea cardstock from Papertrey Ink.
 I die cut the word wishes four times from the same color cardstock using a die from Mama Elephant. I stacked the die cuts for a dimensional look and adhered them on top of my ink blended section.
 Using two stamp sets from My Favorite Things (Bitty Birthday Wishes and Itty Bitty Gifting), I heat embossed sub sentiments onto strips of Canyon Clay cardstock from Papertrey Ink. I die cut those using the Itty Bitty Strips dies, also from My Favorite Things, before finishing off the card with a few yellow enamel dots from the Pocketful of Sunshine pack of enamel dots from Altenew.
 This was a fun color palette to work with, and I think the finished card echoes that. I’d say it’s my usual style of card, just not my usual color palette. I need to branch out more often, I had a blast using these colors.
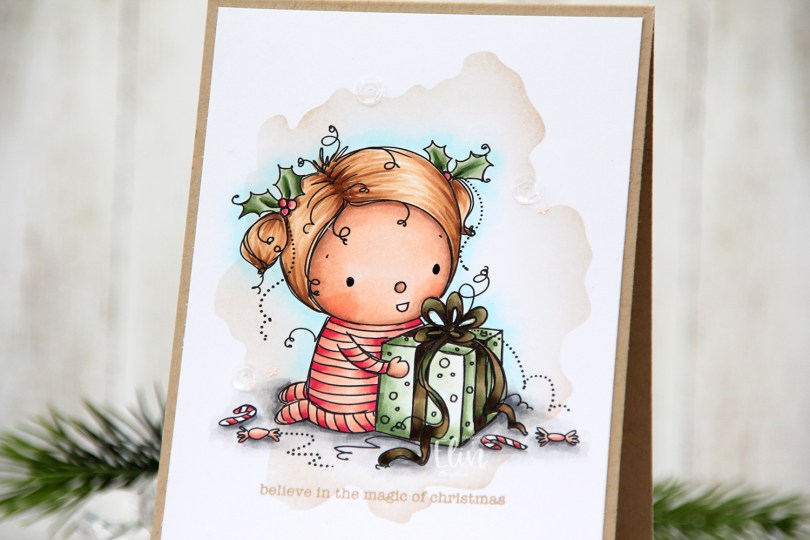
 The sentiment comes with the image. You can omit it if you want to, but I really like both the placement and the mix of the handwritten style with the playful print style. I decided to also add a few additional leaves above their heads. Aside from the green leaf to the left of the bird and the one leaf that’s landed on the hat, all the leaves above their heads are ones I added. I did that by copying the leaves already in the image and placing them where I wanted them; it’s one of the many advantages of working with digital stamps.
 I colored everything with my Copics and went for a much warmer color palette than I usually choose. Their clothes are cool tones, but everything else is in warm tones.
 I used one of the dies in the Stitched Borders set from Lawn Fawn to create the faux stitching on the sides of my colored piece, before I adhered it to a top fold card base I created from Jalapeño Popper cardstock from My Favorite Things. I did add a few additional layers of cardstock behind the panel for dimension, though.
 I wanted to keep the focus on this cute image, and scattered a few iridescent gems from the Glass Crystal collection from Little Things from Lucy’s Cards to finish it off.
 The gems catch the light and add to the warm feel of the card.
 I used quite a bit of Copics for this card, even though my coloring is pretty simple.
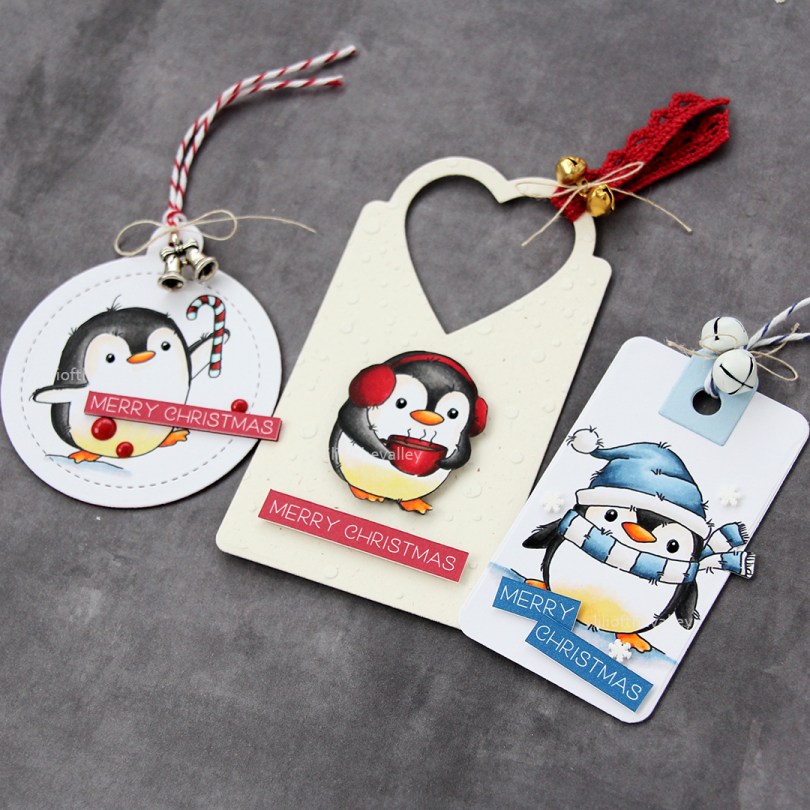


 There’s a stamp in the stamp set with a penguin holding a present. I thought it was perfect for a simple birthday card. I colored the penguin with Copics and added a layer of black glaze pen to the eyes for shine. Once the black was dry (this stuff dries fast), I went back in with a 05 Gelly Roll to add the white dots back in. I fussy cut the penguin and started working on the rest of the card.
 Using the Snow Drifts Cover-Up die from My Favorite Things, I decided to create some waves on the front of my card. I die cut four layers from white cardstock and used various shades of aqua tones for the top layer. From bottom to top they are: Tropical Teal from My Favorite Things (bottom two waves), Caribbean Sea from MFT, Hawaiian Shores from Papertrey Ink, Summer Splash from MFT, Sno Cone from MFT and Stamper’s Select White from PTI (top two waves).
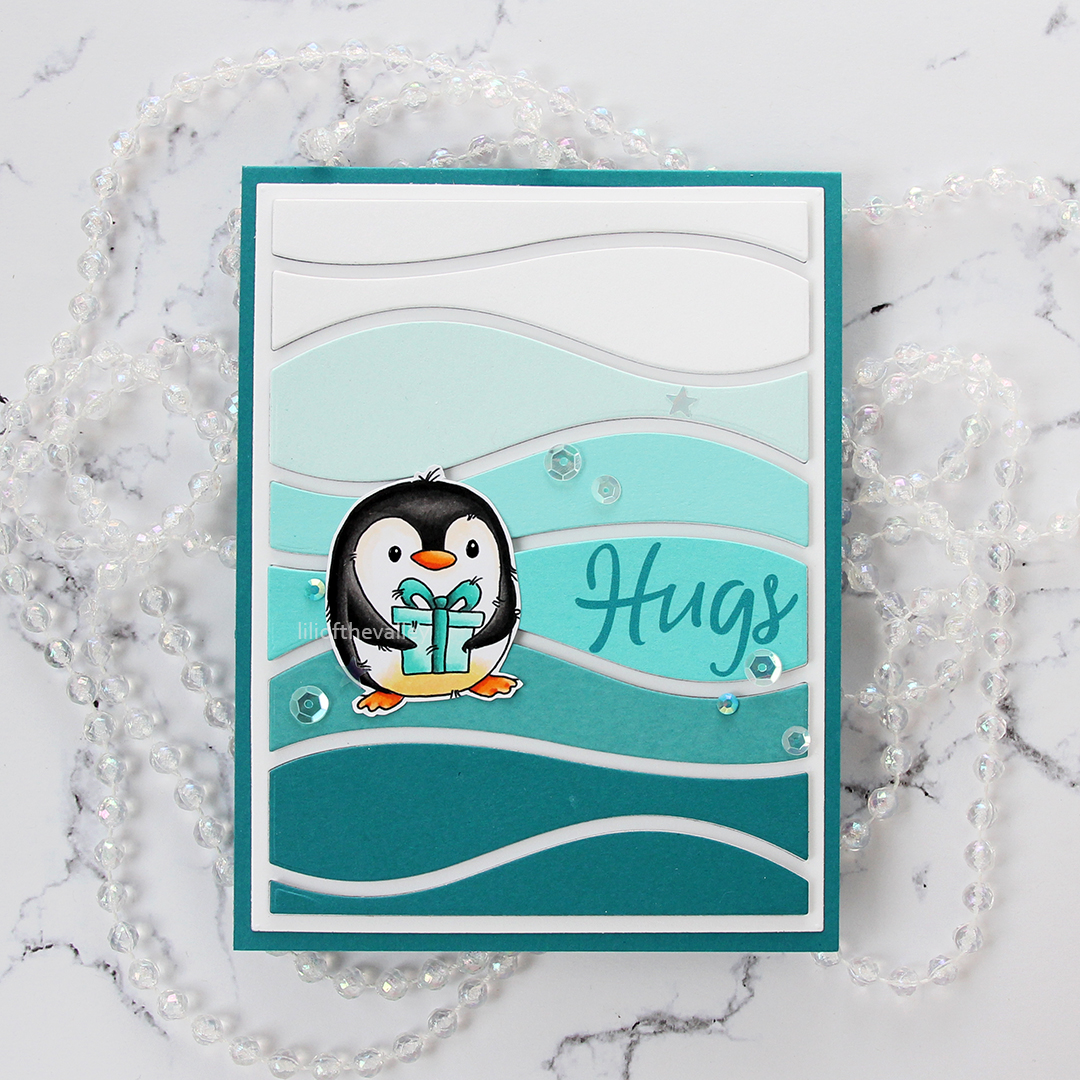 On the Hawaiian Shores wave, I used one of the big words in the
 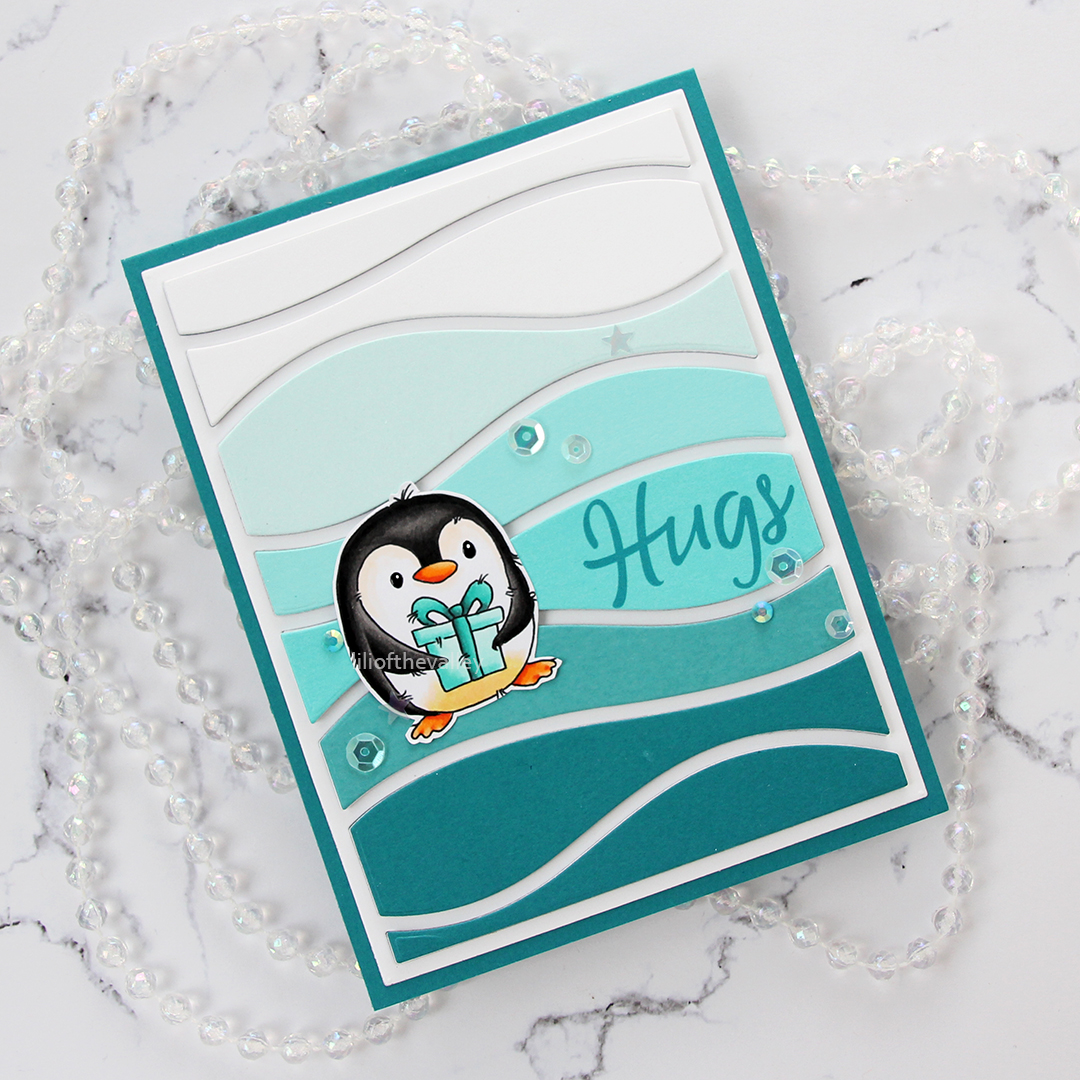 I used the Sea Glass mix of embellishments from Little Things from Lucy’s Cards for a finishing touch. This mix was the perfect color for my card, and it’s sometimes fun to add something besides JUST sequins. There are a couple of gems and even confetti stars on this card, too, all from the same mix.
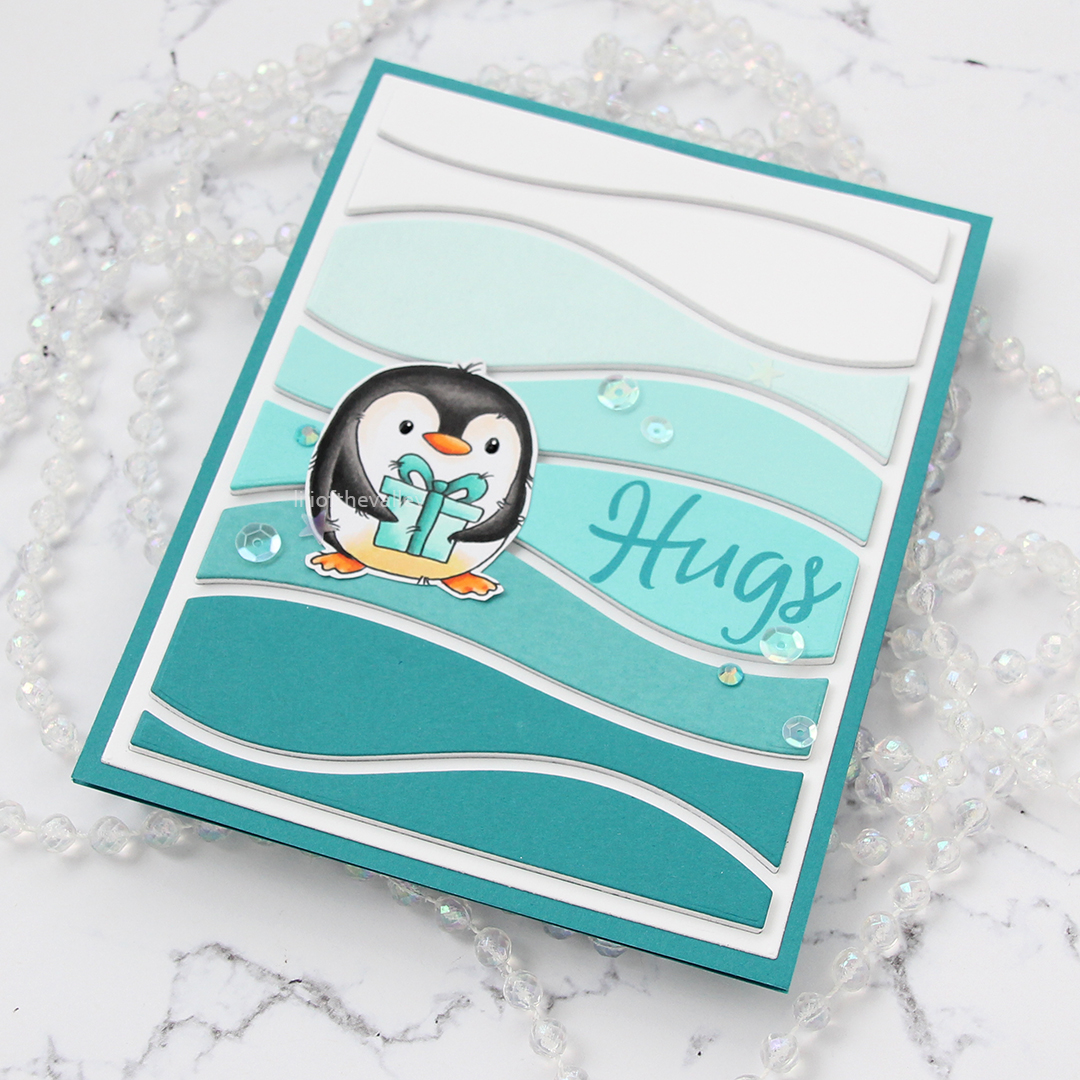 I love the dimension of those waves, it’s very impactful, and the reason I wish I’d added dimension behind my penguin, as well, I feel he’s a little flat compared to the rest. Oh well, next time.
 Simple color palette for this one.
 For this card, I’m once again focusing on the
  I created a top fold card base from Enchanted Evening cardstock from Papertrey Ink. This is one of my all time favorite cardstock colors, and I hoard it, always afraid I’m going to run out even though I have several packs of it. I die cut the lighter blue panel from Blue Breeze cardstock from My Favorite Things using the Stitched Snowflake Backdrop die from Lawn Fawn. The die cuts a full size panel for an A2 card, I trimmed mine down slightly to have the darker blue border showing around the edges.
 I added a few extra white pieces of cardstock behind my colored panel to make it stand out a little more against the background. I like the dimension it adds.
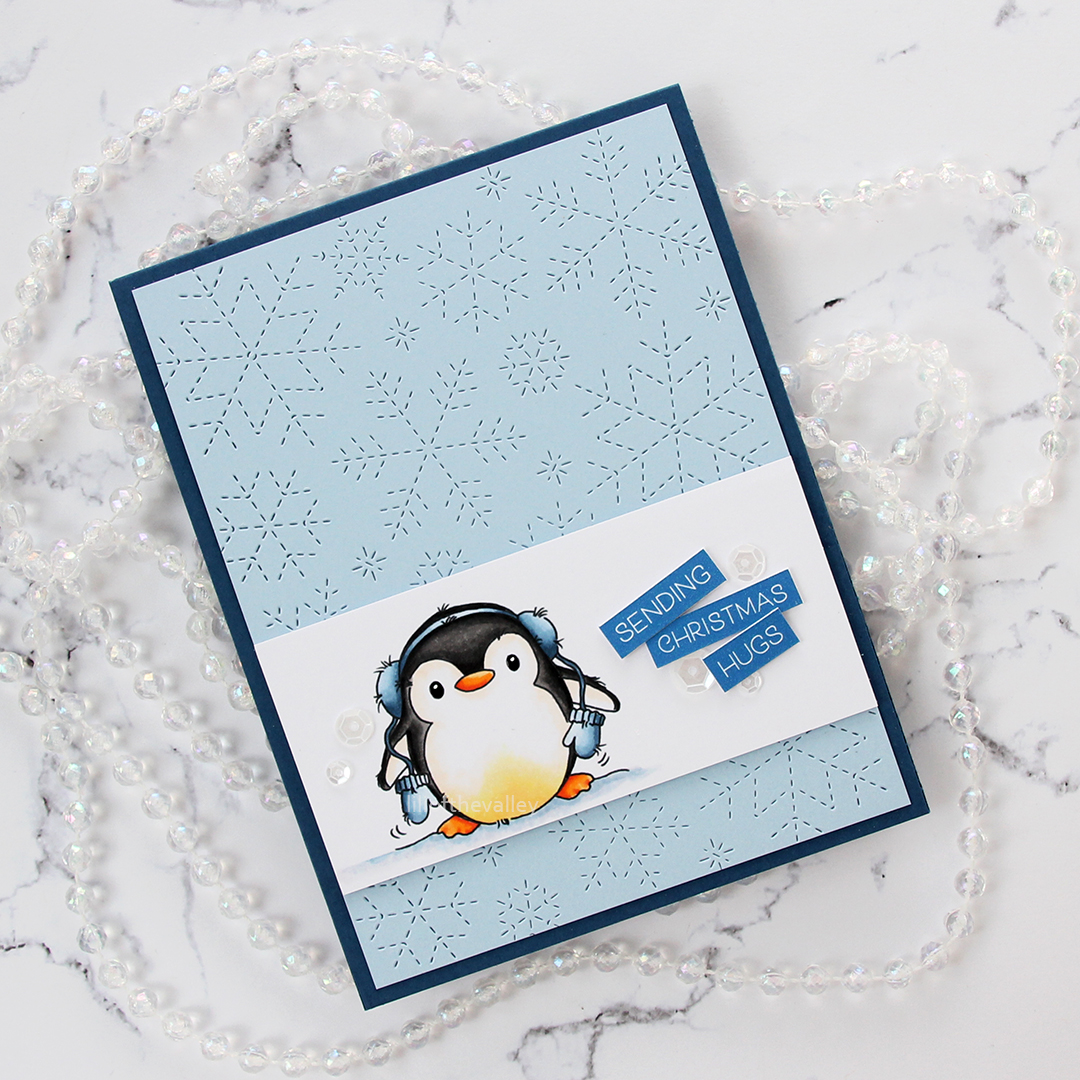 I used a few words from the
  To finish the card I added a few sequins from the White Orchid sequin mix from Little Things from Lucy’s Cards. I also added a bit of black glaze pen to the penguin’s eyes, and then a white dot of Gelly Roll 05 on top once the black had dried. This makes the eyes stand out a little against the rest, and the shine looks great in real life. It’s hard to photograph, though, so you’ll just have to trust me.
 Simple color palette for this one, these penguins don’t require a lot.
 This is
  I stamped a sentiment from the Scripty Bday stamp set from Mama Elephant using Fossilized Amber Distress Oxide ink, then trimmed my panel down slightly and mounted it using foam tape onto a top fold card base I created from Green Parakeet cardstock from Papertrey Ink.
 I finished the card by adhering some sequins and a gem from the Seashore mix from Little Things from Lucy’s Cards.
 I colored the image with the colors she suggested, adding different colors only to bear. I trimmed my panel down slightly and stamped a sentiment from the Mini Messages stamp set from Mama Elephant using Sour Apple ink from My Favorite Things.
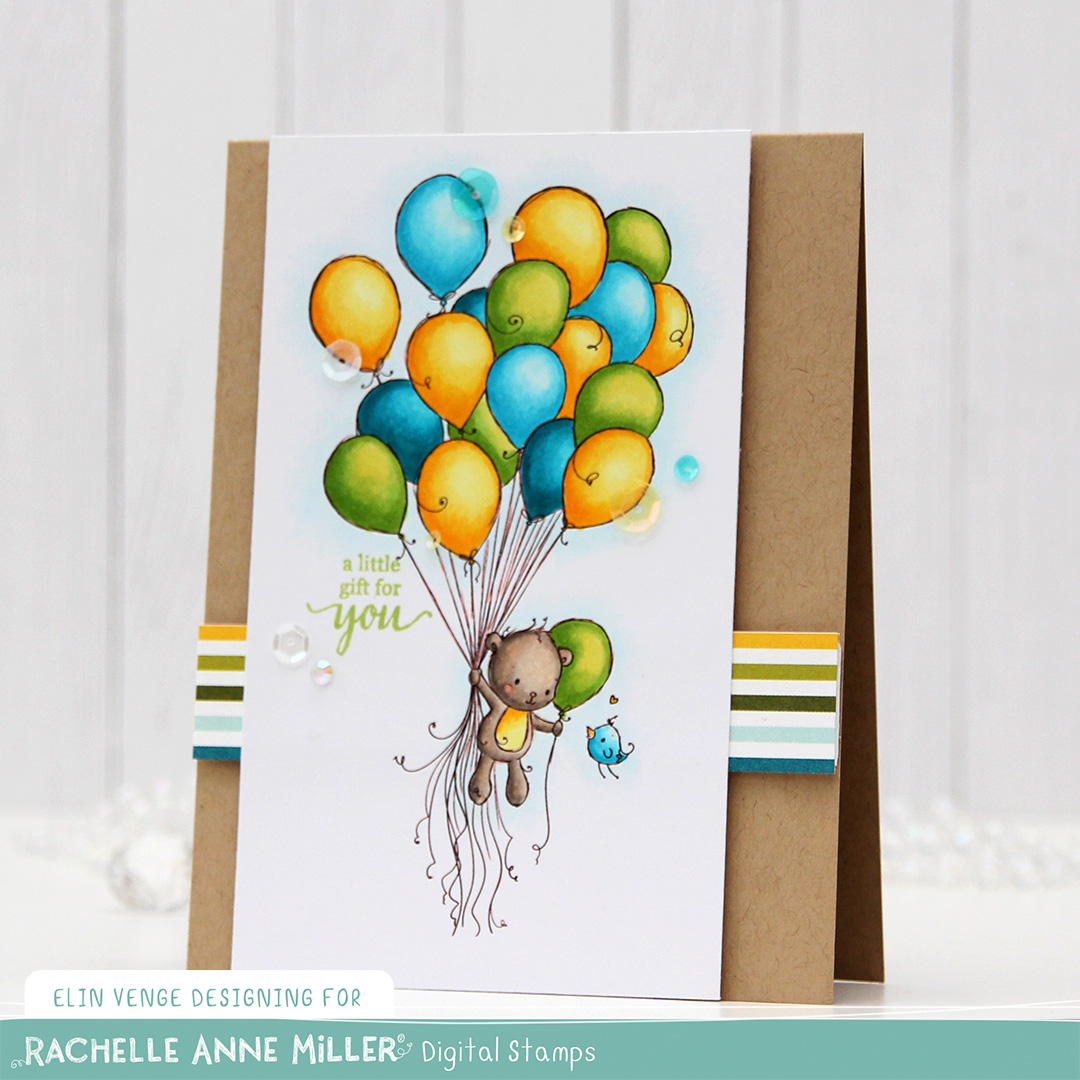 I created my card base from Classic Kraft cardstock from Papertrey Ink. I trimmed a piece of patterned paper from the Party Time 6×6″ paper pad from My Favorite Things down to a strip, and it had just the right colors for my card. I put four layers of white cardstock scraps behind it for dimension, and adhered it to my card. I did the same thing with my colored piece, adhering it to the card left of center, before using the Seashore mix of embellishments from Little Things from Lucy’s Cards to finish off the card.
 This color palette makes me happy!