
Hi, crafty friends! Today I’m sharing with you a fun, wintery card with the quirkiest moose and giraffe you ever did see. They’re both skating, and I thought they were brilliant to pair together on this card.
 Meet Murray and Muriel, aren’t they fun? I stamped them using Extreme Black ink from My Favorite Things, masked them both and then stamped the Snow Much Fun background stamp behind them, using the same ink.
 I’ve probably mentioned this in a previous post, but I love the quality of rubber stamps and their ability to include very thin, detailed linework. The lines in these images are all very thin, and they stamp so beautifully in a way only rubber can. I love it.
 I colored my scene with Copics, then stamped a sentiment from the Snow Much Fun sentiment set onto the ice using Jalapeño Popper ink from My Favorite Things, before adhering my panel onto a card base made from Jalapeño Popper cardstock, also from My Favorite Things.
 I wanted some sparkle to my ice, and added Stickles. I didn’t like the look of the Stickles, so I scraped most of it off and switched to liquid glue with a sprinkling of Distress Glitter Rock Candy instead. I made sure not to spread it perfectly, but to create streaks to emphasize the streaky look of the ice I created with my markers.
 I added a dot of a black glaze pen to their eyes to make them pop, and I love that this card is versatile enough to work as a general card in the winter months or even a birthday card. It’s a bit of an odd size, about 5 7/8 x 4 1/2″, but I made the size of the card fit my scene, not the other way around. I’ll create a custom envelope for this, and it’ll be good to go in the mail.
 Lots of Copics used for this one!

 I colored the image with my Copics and used a die from the A2 Stitched Rectangles STAX 2 set from My Favorite Things to turn my colored piece into a panel with the nice faux stitching I love so much.
 Onto a piece of Pure Poppy cardstock from Papertrey Ink, I stamped the Number Jumble background stamp from MFT with Pure Poppy ink from Papertrey Ink for a tone on tone look. It just adds a little interest to the background without being too distracting. I mounted my colored piece on top using foam tape.
 I stamped a sentiment from the Mini Messages stamp set from Mama Elephant using Summer Splash ink from MFT and diecut that using a circle die with faux stitching, also from MFT. I adhered it to a 1″ circle I created from Summer Splash cardstock from My Favorite Things and adhered the circle to the card using a thin foam tape to finish my card.
 I created an envelope to match from some really old patterned paper from My Mind’s Eye that I had in my stash.
 These snowmen from the
  I have lots of layers on these, and used a whole bunch of Christmas scraps from old collections by Pion Design, as well as some sentiment stamps and other stamps from Inkido and Norsk Stempelblad AS.
 More scraps on the back. I love this way of creating, and I hope to do more of it this year!
 Every year I seem to create just enough Christmas cards by making them all year, but I tend to neglect gift tags and scramble last minute to get them done as I wrap presents. This time I was a little more ahead, and this gift tag was one of the early ones I made, featuring
  Through the hole at the top, I looped a bit of tinsel and tied a bow around it using Purple Plum divine twine from Whisker Graphics. I also die cut a letter tag using the Personalized Tags die set from My Favorite Things from some Winter Wisteria cardstock from Papertrey Ink. My niece loves purple, so I thought it fit nicely. I also added a charm with a pair of mittens, I just couldn’t help myself. This tag doesn’t even have to be a holiday tag, it’d be perfect for someone born in the winter months (not my niece, though, her birthday’s in June).
 On the back of the tag I used a piece of patterned paper from the Forever Green paper pack from Moda Scrap. I die cut it using that same stitched tag die from MFT that I used on the front and stamped a to/from stamp from the B06 stamp set from Norsk Stempelblad AS using Milk Chocolate ink from MFT. I love their inks, they stamp so well!
 You wouldn’t think I’d use this many colors for such a small image, but I did. I even airbrushed the sky in the background using B93, 91 and 90 (a color I’ve made myself), and used BG93 and BG90 with a tip to tip technique on the trees in the background for just a hint of color. I wanted the main focus to be on the cat in the foreground, so I chose very soft colors for the background.

 I stamped the snowflake in the stamp set repeatedly across my background using Iceberg ink from Altenew. I did second generation stamping on some of the snowflakes, especially where they overlap the lines where I intend to write. From Cornflower cardstock from My Favorite Things, I die cut the letters to spell januar using the In Stitches Lowercase Alphabet die set, also from My Favorite Things. I adhered the letters using liquid glue, centering them above the dates for the month.
 I used lots of colors for this little owl. Isn’t he just the cutest, sitting there on his branch wrapped in a scarf?
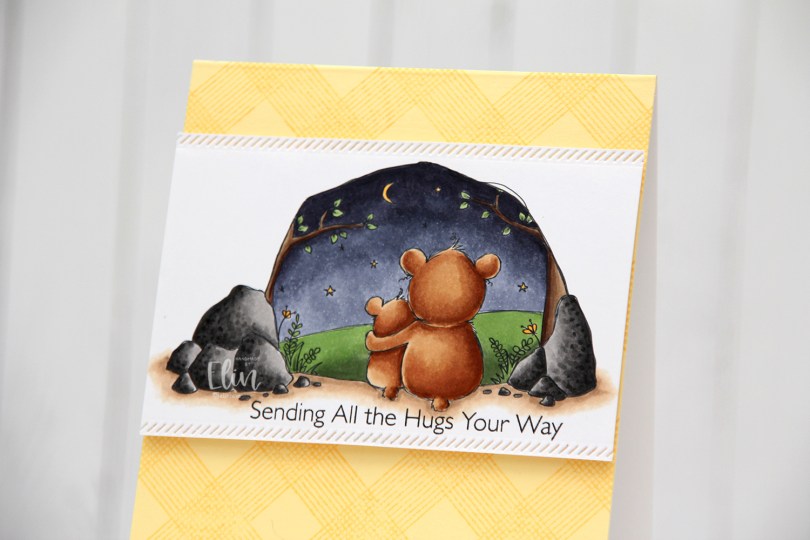
 I wanted the focus to be on the image and kept the rest of the card pretty simple. I stamped a sentiment from the Hugs Make Everything Better stamp set from My Favorite Things directly below my image using Smokey Shadow ink from Papertrey Ink. I wanted something a little bit softer than black, but I did stamp it twice, so maybe I should have used black after all. Close to the sentiment and close to the top of the scene I used one of the Stitched Borders dies from Lawn Fawn to create a decorative edge. I love faux stitching details on my cards, and this diagonal one is a fun change from the ones I normally use.
 Onto a panel of Lemon Tart cardstock from Papertrey Ink, I stamped the All Lined Up Diagonally Background stamp from My Favorite Things using Harvest Gold ink from Papertrey Ink, which is a tiny bit darker than the Lemon Tart. It adds subtle tone on tone interest to the background without distracting from the focal point of the image. I adhered the panel directly to a white top fold card base I created from Stamper’s Select White cardstock from Papertrey Ink and added my image towards the top of the card using foam tape for dimension.
 Simple color palette today. I also used BV27 for the sky, which is a color I’ve made myself.
 I colored the gingerbread cookies with my Copics and used a circle die to turn it into a circle. I die cut another circle from patterned paper from Papirdesign and used a die from the Glassic Snow Globe die set from My Favorite Things to cut a window from the same piece. I stamped and white heat embossed a sentiment from Norsk Stempelblad AS below the window and added a shaker pouch from My Favorite Things that I filled with the Icicle Sequin mix from Hero Arts.
 I die cut another circle from the same patterned paper that I used on the front and white heat embossed a to/from stamp from Norsk Stempelblad AS in the center. After adhering all the pieces together, I cut a hole at the top, reinforcing it with an eyelet before pulling string through. This shaker gift tag can definitely be used as an ornament too, and I’m hoping that’s what will happen.
 Simple image and simple colors for this one.
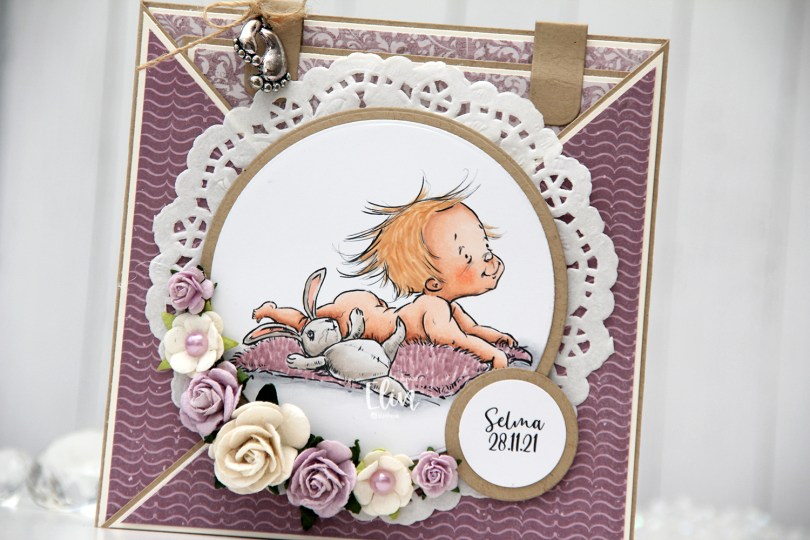
 This card was created for a little girl whose christening was this past Sunday. I think the
  I die cut the image using a circle die from Lifestyle Crafts and matted it with kraft cardstock. I also printed the name and date on a piece of white cardstock that I also matted with kraft. I put a doily from Helz Cuppelditch behind my image and added flowers using a hot glue gun. I took out the yellow centers of two of the flowers and replaced them with Lavender pearls from Kaisercraft.
 On the inside tag I added a circle diecut made from white cardstock for a space to write a personal message. I used the Labels Trio die set from Spellbinders to create two “handles” from kraft cardstock. I tied a bow and attached a charm to one of them for a little added interest.
 On the back of the card I stamped a sentiment from North Star Design using Amethyst ink from Altenew.
 The card isn’t very big, it only measures 5×5″, but it’s quite dimensional and doesn’t fit in a regular envelope, so I decided it was best to create a box envelope.
 I rummaged through my 12×12″ cardstock and found a color that matched pretty well, and used my Envelope Punch Board from We R Memory Keepers to create the box. I added another Helz Cuppelditch doily for cohesion, as well as more of the patterned paper that I die cut using the Impact alphabet die set from My Favorite Things.
 The process for creating this one was identical to the first ones I shared in
  There’s lots of texture and visual interest on this tag because of all the layers of paper, the foam tape to add dimension and the stenciled background. The accessories on the snowman are in a brighter green color than everything else on the tag, which still makes him stand out against the other elements.
 For the back of the tag I used a couple of stamps from Inkido, as well as more of the white heat embossed sentiments from Norsk Stempelblad that I created lots of in one of my compartmental crafty sessions. These tags were heaps of fun to put together like this.
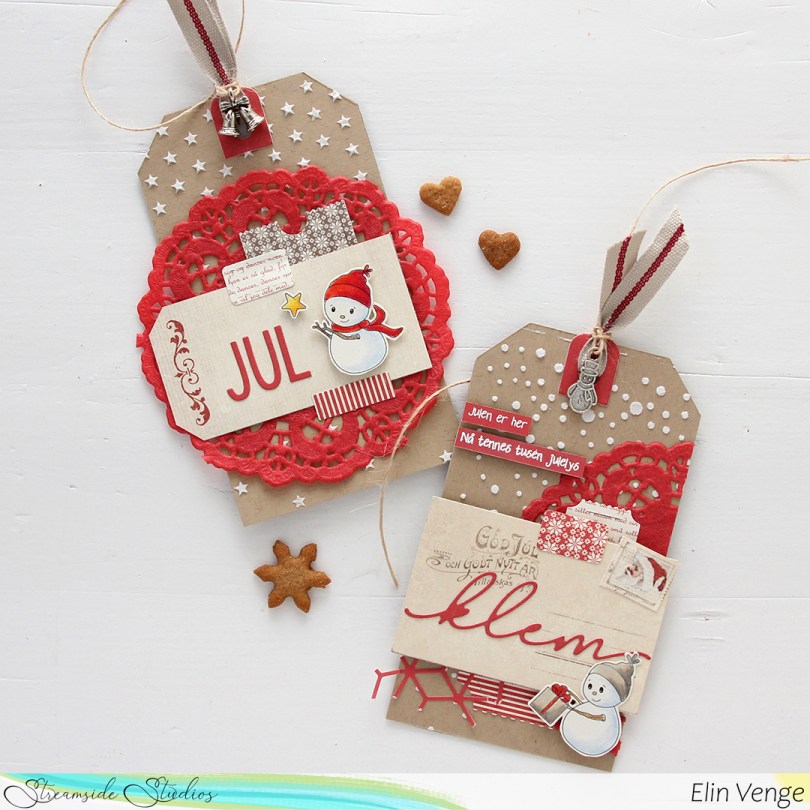
 For these tags, I chose red instead of green. I planned ahead and colored some of the snowmen with green accessories, and some with red. For one of these tags I used the Falling Stars stencil from Simon Says Stamp, and I thought it was fitting to add the snowman with the star for that particular tag.
 A lot of elements are the same on these two tags as the first two; patterned paper from Pion Design die cut using the Happy Days Ticket Stubs die from XCut. I also used the same die from Altenew that I used with the green cardstock on this one, and it’s a nice added element that doesn’t have the perpendicular angles than many of the other layers do, so it breaks up the monotony a little and adds interest. For the tag with the stars, I used the word JUL from the Gledelig jul die from Kort & Godt, and for the tag with the Christmas present, I used the word klem from the Juleklem die, also from Kort & Godt. I added red paper doilies from Papirdesign to the base of these tags, it’s a nice foundation to put everything else on top of.
 The backs of these are pretty similar to the backs of the green tags I made. I used the same 24.12 stamp from Inkido and the same stamps from the Distressed Patterns stamp set from My Favorite Things, but changed the ink color to Pure Poppy ink from Papertrey Ink.