Mr. Fixit {Purple Onion Designs}

Hi, there! I’ve got a simple card with some dimension and fussy cutting to share today, featuring a couple of stamps from the latest release from Stacey Yacula and Purple Onion Designs.

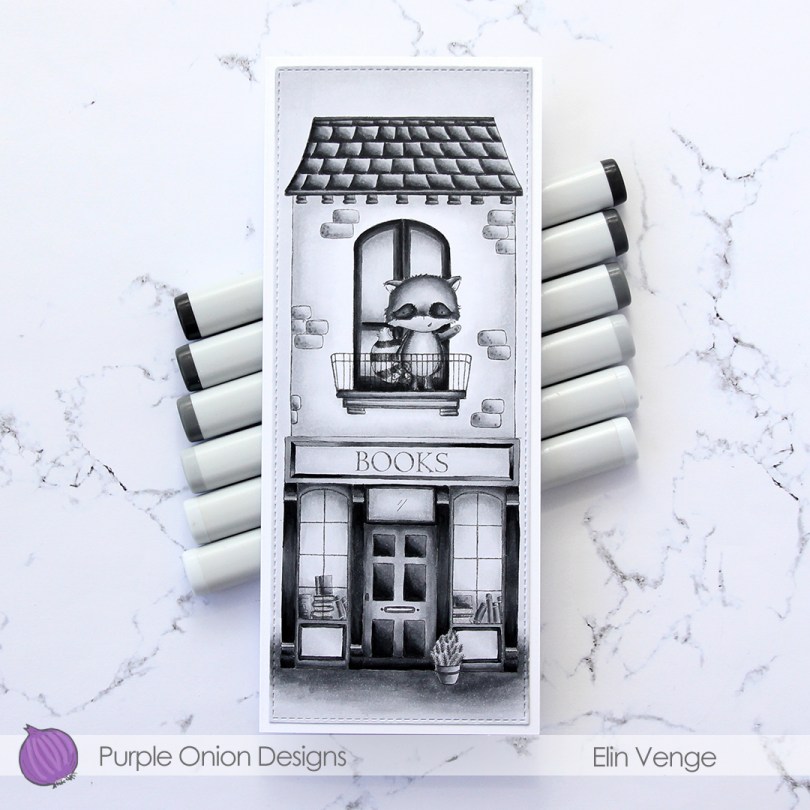
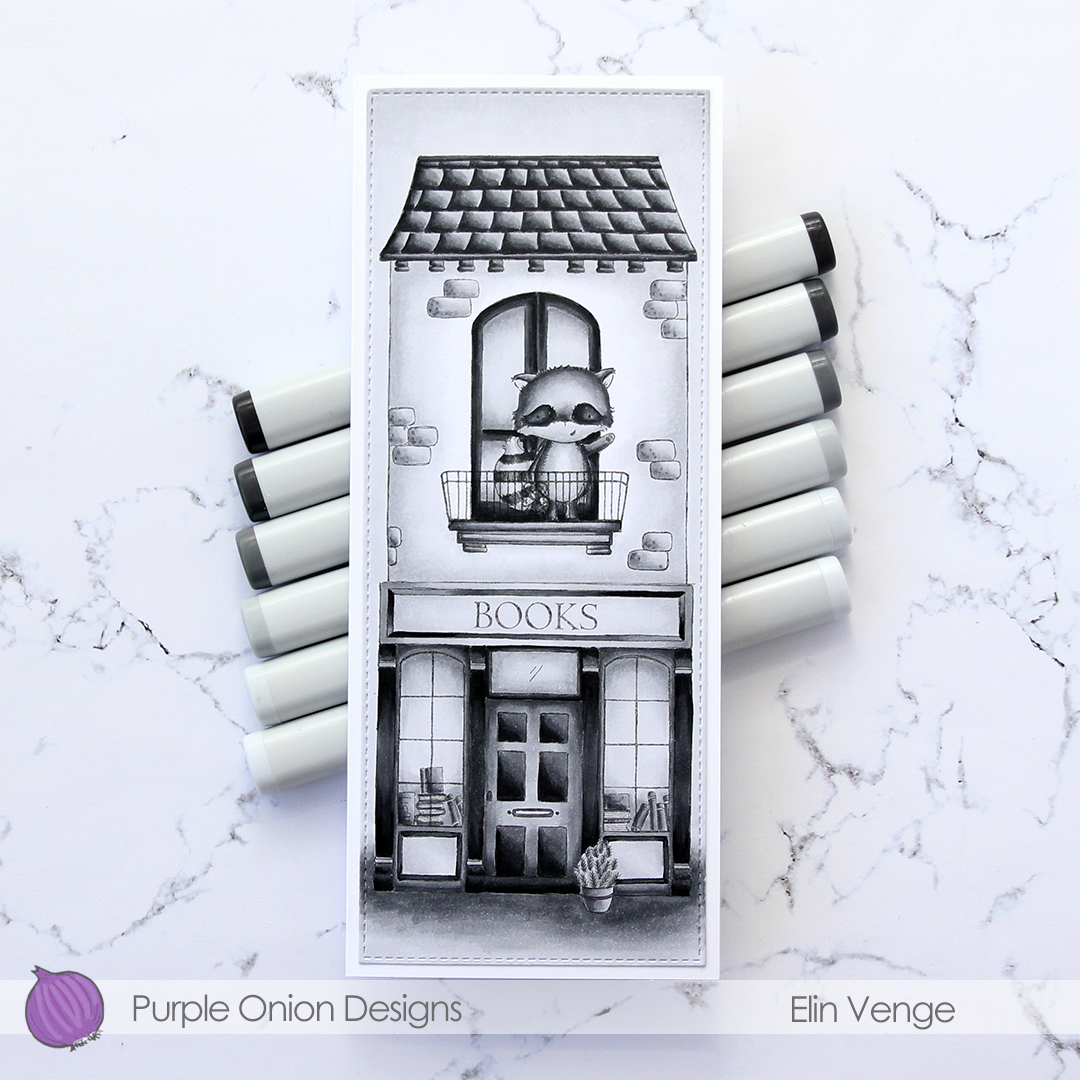
I started by stamping Milton the bear and the ivy cottage in Extreme Black ink from My Favorite Things, coloring in both images with my Copics. I fussy cut both right up to the stamped lines, and used a die from the A2 Stitched Rectangles STAX 1 set from MFT to do some partial die cutting of the cottage. I wanted the foreground to have that nice stitched edge, but not cut off the tree – partial die cutting is great for that. 

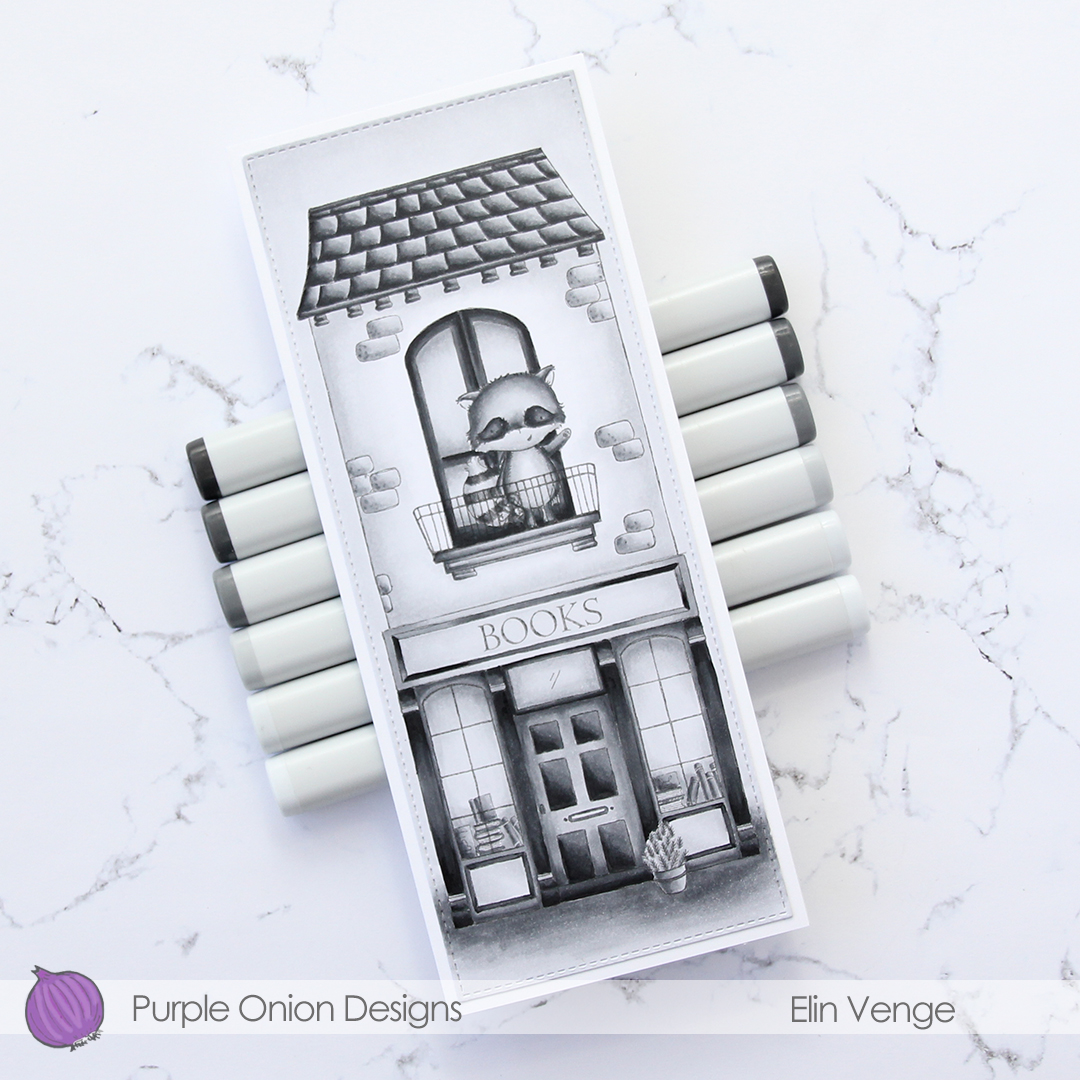
On a piece of white cardstock, I used the cloud stencil from My Favorite Things to ink blend some puffy clouds with Iceberg ink from Altenew. I die cut this panel with that same die that I used for the ivy cottage, adhered it directly onto a white top fold card base, and mounted the ivy cottage onto that using 1 mm foam squares. I added Milton on top with more 1 mm foam squares, stamped a sentiment from the Around the Town sentiment set using Soft Granite ink from Hero Arts, and added the sentiment towards the top of the card using foam tape. I adhered a few sequins from the white orchid sequin mix from Little Things from Lucy’s Cards to finish my card. I need to create a slightly bigger envelope than usual for this card. The tree hanging out from the edge means it won’t fit in a standard envelope for A2 cards.

Not a whole lot of Copics for this one. Lots of green, though.

You deserve flowers {Rachelle Anne Miller Creative Studios}

Hi, there! I have a super simple card to share today, featuring the Little Fairy image from Rachelle Anne Miller.

Rachelle Anne Miller Little Fairy front skrått

I colored my image with Copics and die cut it using a die from My Favorite Things and adhered it to a top fold card base I made from Bright Buttercup cardstock from Papertrey Ink.

Rachelle Anne Miller Little Fairy flatlay venstre

Using VersaMark ink, I stamped a sentiment from Norsk Stempelblad AS onto a scrap piece of Raspberry Fizz cardstock from Papertrey Ink. I turned it into a strip using one of the dies in the Fishtail Flag Frames die set from My Favorite Things, mounted it on foam tape and adhered it to the card.

Rachelle Anne Miller Little Fairy flatlay høyre

I finished off the card with some white sequins from Little Things from Lucy’s Cards.

Rachelle Anne Miller Little Fairy Copics

As usual, a graphic of the Copics I used.

Hang in there {Purple Onion Designs}

Hi, there! I have a very clean and simple card to share today, featuring some more stamps from the latest release from Stacey Yacula and Purple Onion Designs.

Purple Onion Designs - Elin Venge - Jane Clothes Line Country Side front

I thought the Hang in there sentiment from the Around the Town sentiment set (also new with this release) would be the perfect accompaniment to the clothes line. I could have kept my card even simpler by not adding anything else to it, but I wanted to create a little scene. I stamped Jane the fox waving hello at the very front and added in one of the stamps from the country flowers set to fill out my scene a little. They match the little sprigs at the bottom of the clothes line perfectly. I stamped the countryside horizon towards the top of my panel and colored everything with my Copics.

Purple Onion Designs - Elin Venge - Jane Clothes Line Country Side front angled

Once my entire scene was colored, I used the largest of the A2 Stitched Rectangles dies from My Favorite Things to turn it into a panel with a nice faux stitch egde and adhered it to a top fold white card base. I stamped the sentiment using Blueberry Sky ink from Papertrey Ink, die cutting it into a nice banner using one of the dies in the Fishtail Flag Frames die set from My Favorite Things. I adhered it to my card using foam tape and added some blue enamel dots from Papirdesign to finish.

Purple Onion Designs Jane Country side clothes line Copics

I’ve colored a lot of scenery for the cards I’ve made with this release, and wanted to get a different green look for the grass and trees for this card compared to the others, which have all been fairly bright. This is a more subdued green, I kind of like it.

Best news ever! {Purple Onion Designs}

Hi, there! I’m sharing a shaker card today, featuring Alex the owl from Purple Onion Designs. He’s got good news to share!

Purple Onion Designs - Elin Venge - Alex shaker front

I colored the image with Copics and set it aside while I worked on the rest of the card. On a piece of white card stock, I used the Linen & Canvas impression plate from Papertrey Ink to add texture to all that white space, before using the Selfie Square die and the largest of the A2 Stitched Rectangles dies from My Favorite Things to add the faux stitching around the edge and also to frame the window.

Purple Onion Designs - Elin Venge - Alex shaker front angled

I added acetate in the window and put micro beads inside, before mounting it all on foam tape and adhering it to a top fold card base I made from New Leaf cardstock from Papertrey Ink.

Purple Onion Designs - Elin Venge - Alex shaker flatlay

I stamped and white heat embossed a sentiment from the Around the Town sentiment set onto a scrap of New Leaf cardstock, which I die cut using the smallest of the Fishtail Flag Frames dies from My Favorite Things. I finished off the card with a few green enamel dots from Papirdesign.

Purple Onion Designs Alex best news ever Copics

The image is small and very simply colored, so I didn’t use a lot of Copics for this.

Hope your day is peachy keen! {Purple Onion Designs}

Hi, everyone! I have a peachy keen card to share today, using a few of the stamps from the most recent release from Purple Onion Designs. You can still purchase the entire collection in a bundle at a 30 % discount, an offer that expires at midnight tonight EST.

Purple Onion Designs - Elin Venge - Produce Stand Fruit Crates Jane Alice trifold front

My card is actually a tri-fold card. My original plan was a regular card with a window on the front and the remainder of the scene on the inside, but I really wanted to use William the owl for this card while still keeping it an A2 size, and there just wasn’t room for him, so I opted for a tri-fold design. I started by stamping and masking Alice the squirrel and the crate of apples from the fruit crates set, and then stamping the produce stand. I colored everything with my Copics, used the largest of the A2 Stitched Rectangles dies from My Favorite Things to turn it into a nice panel and adhered it to the front of a sidefold A2 card card base. Using a craft knife, I cut the opening in the fruit stand through both layers of paper, making sure to be very careful around those garlics so I didn’t chop them off.

Purple Onion designs - Elin Venge - Jane Fruit Crates tri-fold insid

On a separate piece of X-Press It blending card, I stamped the remaining two fruit crates, masking the one with the lemons and adding Jane the fox behind it, stamping her so she’d be perfectly placed in the window on the front of the card when it’s closed. You can see the back of the window on the left in this photo. I used the same die from MFT to die cut this panel too, and added a sentiment from the Around the Town sentiment set above the cute fox. I adhered the panel on the back of another sidefold card and glued the two cards together to make my tri-fold.

Purple Onion Designs - Elin Venge - William tri-fold inside

William gets to steal the show on the middle inside of the card. The front is to his left (you can see the window there) and the panel with the fox and the two fruit crates on the back of the part you can see to his right. He might look a little mis-placed since he’s not tucked in a corner, but it’s with good reason. The panel on the right (which is the back of the one with the fox) has plenty of room for a personal message.

Purple Onion Designs - Elin Venge - William tri-fold inside detail

Here’s a bit of a close up. I prefer not to color with my Copics on regular card stock, so I stamped him on X-Press It, colored him with Copics, fussy cut him and glued him to the card base, using a think black pen to draw his feet back in and some gray colored pencils on the card base to ground him.

Purple Onion Designs - Elin Venge - Produce Stand Fruit Crates Alice William tri-fold half open

If you close the front of the card without folding the panel with the fox back where it belongs, it looks like William is the one standing behind the produce stand. This was my reason for placing him where I did, I wanted to have the option of keeping the card half open, so he’d appear in the window instead of Jane.

Purple Onion Designs Produce stand Fruit crates Jane Alice William Copics

I used a ton of Copics for this card.

You are sweet {Mo’s Dream Team}

Hi! Today I have a sweet card (pun intended) to share featuring one of the kids from the 3 on a bench stamp set from Mo Manning. There are two options in the store: you can by the merged stamp with 3 kids sitting on a bench or opt for the separated version, which has the bench and each of the kids as 4 separate image files. I used the latter for my card today, and chose to use just the girl eating the watermelon and the bench.

Mo Manning 3 on a bench watermelon front rett

I colored the girl with my Copics and fussy cut her. I put her to the side while I worked on the rest of my card.

Mo Manning 3 on a bench watermelon front skrått

I wanted to repeat the blue from the image in my card, and found a scrap of Fancy Pants patterned paper that was already cut down to fit the front of an A2 card. It’s a beautiful blue, and it has a little bit more interest to it than card stock, without distracting too much from the image.

Mo Manning 3 on a bench watermelon flatlay rett

I used the cloud die in the slim card basics die set from Mama Elephant to create my clouds. The die was long enough that I only had to die cut it once, and cut my finished cloud border into two pieces that are both 4 1/4″ wide. I mounted them to the bottom of my card with 1 mm foam squares for both layers, creating a little bit of depth and dimension in my card, and also an anchor point for the remaining elements. I even stamped part of a background stamp from Tim Holtz on the left half using Spring Rain ink from Papertrey Ink, which is a very light blue ink. Again, it adds a little interest to the background without being too distracting.

Mo Manning 3 on a bench watermelon flatlay skrått

I put 1 mm foam squares on the back of the little girl and adhered her near the left edge of my card. I think she’s so cute with that big slice of watermelon!

Mo Manning 3 on a bench watermelon flatlay detalj

I used the Parker alphabet die set from Memory Box to die cut the letters to spell “sweet” six times from Red Hot heavyweight card stock from My Favorite Things. I glued them together for a stacked look and adhered the word to my cloud. I stamped and white heat embossed the words “you are” from the Courageous You stamp set from Altenew on a scrap piece of that blue patterned paper, cut the words apart and adhered them to the card using clear foam tape from KoolTak. Those little word strips are so small, I thought clear would be best. I added a couple of light blue enamel dots from Papirdesign to finish.

Mo Manning 3 on a bench watermelon Copics

Not a whole lot of colors used for this one. I also used B90, which is a color I’ve made myself.

Welcome to the world {Rachelle Anne Miller Creative Studios}

Hi, there! Today I’m sharing a super simple card (I feel like I always say that), featuring an image (Dinosaur Friends) from Rachelle Anne Miller from the release that’s coming later this week.

Rachelle Anne Miller Dinosaur Friends Velkommen til verden front

I colored the image with my Copics, using the largest of the A2 Stitched rectangles dies from My Favorite Things to turn it into a panel with a nice faux stitch edge. I adhered it to a card base made from Lush Lagoon card stock from My Favorite Things and wanted to keep everything simple and the focus on the image. I did that by adding just a sentiment strip (white heat embossed sentiment from Norsk Stempelblad AS) and a sparkling clear sequins from Pretty Pink Posh.

Rachelle Anne Miller Dinosaur Friends Velkommen til verden Copics

Simple coloring, simple color palette.

One for the books {Purple Onion Designs}

Hi, everyone! I have another card to share featuring the new spring release from Purple Onion Designs. This card is very different. First of all, it’s a slimline card, which I don’t make too many of (on account of them being difficult to photograph). Secondly, I only used 6 Copic markers for the entire card. I’ve dabbled with grayscale images in the past, but always with a pop of color somewhere. This one is all about those grays. Oh, and those fabulous new images, of course.

Purple Onion Designs - Elin Venge - George Book Store Room with a view slimline straight

I stamped and masked George the raccoon on a piece of X-Press It blending card that I’d already die cut using the slimline starter die set from My Favorite Things. I stamped Room with a view so George is standing firmly on the balcony, then stamped the book store (minus the roof of the book store) below it and then the balcony railing directly over top of the raccoon once I’d removed the mask.

Purple Onion Designs - Elin Venge - George Book Store Room with a view slimline angled

I colored the entire panel with my 6 chosen Copics, adhered the panel onto a card base I made from Stamper’s Select White card stock from Papertrey Ink.

Purple Onion Designs - Elin Venge - George Book Store Room with a view slimline inside

Deciding to keep the grayscale going on the inside of the card, I stamped one of the sentiments in the “Around the Town” sentiment set using VersaMark ink on a piece of Steel Gray card stock from My Favorite Things, and heat embossed it in white, before adhering the sentiment to the inside of the card. Super simple.

Purple Onion Designs George Book store Room with a view Copics

The Ns and Ts are my favorite Copic grays. For this card, I went with the Ns.

Sending hugs {Streamside Studios}

Hi, there! I have a super colorful shaker card to share today, featuring a cute raccoon from Streamside Studios. Now, the raccoon isn’t particularly colorful, but I did some colorful ink blending of the background, making the raccoon stand out against the background.

Streamside Studios Woodland Friends Raccoon shaker front skrått

I colored the raccoon from the Woodland Friends stamp set using my Copics. Just grays and a little R21 for the cheeks and the inside of the ears. Super simple coloring. I fussy cut the raccoon, leaving a thin white border, before I started on my background.

Streamside Studios Woodland Friends Raccoon shaker front rett

I pulled out a piece of Bristol Smooth card stock and my Distress Oxide inks for my background. I only have 8 oxides, and I used 6 of them for this, they make a nice rainbow. From the top left corner going clockwise they are Cracked Pistachio, Twisted Citron, Fossilized Amber, Picked Raspberry, Salty Ocean and Peacock Feathers. Where the colors overlap, new colors are created.

Streamside Studios Woodland Friends Raccoon shaker flatlay

I splattered some drops of a shimmer sparkle spray onto the ink blended panel, blotting it off with a dry paper towel to create the oxidized look in the background. I then took the largest of my A2 Stitched Rectangles dies from My Favorite Things, along with the Say Hello die, also from My Favorite Things, to die cut the background. I made sure to keep the internal negative pieces from the Say Hello die to puzzle piece them onto the card base.

Streamside Studios Woodland Friends Raccoon shaker flatlay skrått

I die cut the Say Hello die an additional 8 times from white card stock, stacking all but 2 of them to form the shaker area. I removed the internal part of the stacked die cuts, creating a nice frame for my sequins to shake around in. I glued one of the remaining two die cuts onto the card base to fill in the word between the colorful negative die cuts. After filling the shaker area with white orchid sequins from Little Things from Lucy’s Cards, I put acetate on top to close the shaker area and the last white die cut on top, inlaid and flush with the colorful background mounted on foam tape for dimension.

Streamside Studios Woodland Friends Raccoon shaker flatlay venstre

I stamped a sentiment from the Simon Says Stamp/Concord & 9th stamp set Monster Hugs using VersaMark ink onto Steel Gray card stock from My Favorite Things, before white heat embossing it, cutting it down to a strip and adding it to the acetate window using foam tape. The last thing was to add 1 mm foam squares behind the raccoon, and my card was complete.

Surprise {Mo’s Digital Pencil}

Hi, there! I can’t believe it’s May and the last month of spring already. It doesn’t really feel like spring, though, it’s still really cold with snow in the forecast for today. What do I do when it’s cold? I escape by coloring summery images, like this I like you image from Mo’s Digital Pencil.

Mo Manning I like you front

For someone who claims that her favorite color is blue, I haven’t really used a lot of blue lately. It might have something to do with the fact that I associate blue with Christmas, but it might also be that I’ve found myself a new favorite. A double favorite, even. I’ve used the combination of teal and peach on so many of my cards lately, I might have to put away those markers for a bit and try some other colors. 😉

Mo Manning I like you front skrått

I changed up my teal combo a little bit for this girl and even introduced a green in my combo, making her shirt super light in the highlight areas. I even tried a new combo for her hair, which matched surprisingly well with those yellow flowers she’s holding. Once I was done coloring, I used the largest of the A2 Stitched Rectangles STAX dies from My Favorite Things to turn my colored piece into a panel with nice faux stitch edges.

Mo Manning I like you cluster

On my desk I keep a tub of die cut paper scraps that I use for my embellishment clusters. I dug through it and found various pieces that I thought would fit this card well. They’re from a mix of companies: Maja Design, Studio Light, P13 and Sunny Studio. I love creating these clusters, they’re so fun to put together, and a great way to make use of scraps (not that my pile of scraps shrinks too much with each card). At the bottom is part of a mini paper doily from Doodlebug, and I added some enamel dots from the Warm and Cozy set from Altenew to finish.

Mo Manning I like you flatlay

I white heat embossed the sentiment from the Hilsninger stamp set from Norsk Stempelblad AS and die cut that using the smallest of the fishtail flag frames dies from My Favorite Things. After chopping off the overhang, I had a little piece of that doily left and the end of the sentiment banner, which I adhered in the bottom left corner of the card. I like not wasting my scraps, and this is a great way to use them.

Mo Manning I like you flatlay venstre

Most of the pieces in my embellishment cluster are mounted on 1 mm foam squares for dimension. Foam without a ton of dimension is key for this, otherwise the card gets super thick from all the layers.

Mo Manning I like you Copics

Quite a few Copics for such a simple image.