
Hi, crafty friends! I’m sharing a confirmation card today, featuring Noah from Mo Manning.
 It’s confirmation season, and my nephew’s confirmation was September 10th. I made several cards for him, and this is one of them. I thought this image was the perfect one to use, nothing says fifteen year old boy like a guy with his phone in his hand, school books hidden away and a bowl of snacks on the armrest. The controller tucked away is a nice touch too. We don’t wear shoes indoors in Norway, but the rest is pretty spot on.
 I created a background for my colored image using a variety of stamps, inks and even a stencil. I started with the Abstract Triangle Background stamp from My Favorite Things that I stamped in Orange Peel ink from Simon Says Stamp. I didn’t want the stamp to cover the entire background and made sure to stamp it in the lower left corner and have it fade as it went up and to the right. I then took a confirmation stamp from the A05 stamp set from Norsk Stempelblad AS and repeatedly stamped it on top of the stamping I’d already done using VersaMark ink, before sprinkling on super fine detail embossing powder from Ranger and melting the powder with my heat gun. I then used the Watercolor Wash Free Form stencil from My Favorite Things and ink blended using Spiced Marmalade and Mustard Seed distress inks.
 I fussy cut my image leaving a white trim and mounted it on foam tape on top of the stamping and ink blending I’d done. I die cut the Hullmønster die from Papirdesign twice; once from Cornflower cardstock and once from Sour Apple cardstock, both from My Favorite Things. I tore them both up, tucking a couple of pieces behind the image for a little bit of added interest.
 I used the Konfirmant 2 die from Papirdesign to die cut five times from cardstock for a stacked look, placing a layer die cut from True Black cardstock from Papertrey Ink on top of the stack. I adhered it to the card using liquid glue, placing the beginning of the word on top of Noah’s pant leg to make it all fit.
 I added some sentiment stickers from Kort & Godt to fill the space at the bottom of the card a little. They’re originally a bit bigger than this and white with black letters, but I used a Copic marker to color them blue to make them stand out against the white background a little and also cut them down slightly. The banners with the stars are also Kort & Godt stickers.
 In the top right corner, I created a little cluster with die cut pieces and those stickers, before finishing off the card with a few Papirdesign enamel dots. Onto a Limelight envelope from My Favorite Things, I adhered white die cut letters (dies from Papirdesign) to spell his name and stamped Konfirmant from the Konf. 02 stamp set from Norsk Stempelblad AS using Limelight ink from My Favorite Things.
 On the inside, I stamped a sentiment from the Konf. 02 stamp set from Norsk Stempelblad AS using Orange Peel ink from Simon Says Stamp. I also adhered number stickers from Papirdesign to get the date on there. The right hand side has plenty of space for a personal message.
 Fun, bright color palette for this one.

 I colored the trick or treat mouse with Copics, and adhered my panel of X-Press It blending card to a top fold white card base I created from Stamper’s Select White cardstock from Papertrey Ink. I used the Boo! stamp from the Itty Bitty Boos stamp set from My Favorite Things to stamp here and there around the scene, with Limelight ink from My Favorite Things, using second generation stamping for a couple of them for a softer look.
 I added a couple of pieces of orange dotted patterned paper from Waffle Flower above and below the image. I put foam tape on the back for dimension.
 I printed the ghosts on Heavyweight Translucent vellum from My Favorite Things and colored softly with Copics on the back of each of them. Colors don’t really blend on vellum, so you don’t need to be precise. You also need darker colors than you want to end up with, because the colors don’t show through all that well. I fussy cut the ghosts leaving a border around the edge and adhered two of the ghosts directly onto the orange patterned paper, using a little bit of liquid glue, before strategically placing enamel dots from Papirdesign on top, so the glue wouldn’t show through.
 I used the Happy die from the Hand-Lettered Happy Birthday dies from My Favorite Things to create my sentiment. I stacked four white die cuts, adhered the last ghost to the y and added a fifth die cut on top. The top layer sparkles in the right light. I used a sheer shimmer craft spray from Imagine, but it doesn’t really show up in photos. It’s subtle in real life too. To finish off my sentiment I white heat embossed another sentiment from the Itty Bitty Boos stamp set from My Favorite Things, this time onto Gravel Gray cardstock from My Favorite Things. I cut it down to a strip, added a few layers behind it for strength and dimension and adhered it to the die cut word, and my card was finished.
 I used quite a few Copics for this card.
 This time I’m focusing on
  I colored the image with Copics, then used the largest die in the Blueprints 27 die set from My Favorite Things to turn it into a rectangle with faux stitching and a scalloped edge, just for something different from my usual faux stitch rectangles. I die cut another piece from white cardstock to put on the inside of the card.
 Before adhering my panel, I sprinkled on Chunky White embossing enamel from Stampendous, and melted the granules from the back of the panel. I also used a black glaze pen from Sakura to create a tiny bit of dimension and shine to the penguin’s eyes. I adhered the panel directly to a top fold card base I created from After Midnight cardstock from My Favorite Things, which is a nice dark blue color.
 From the same color cardstock, I die cut God jul four times using a die from Papirdesign. I stacked the layers and adhered it to the left of the image, before finishing off the card with a few hearts from the Festivities mix from Little Things from Lucy’s Cards.
 This is a fairly flat card for me. Other than the sentiment and the white hearts, there’s nothing that adds a lot of dimension. I considered mounting the panel on foam tape, but in the end decided against it. The sentiment and the hearts still pop and add interest, as does the snow, which has a bit of texture to it.
 I used mostly blue Copics for this card. Not really a surprise, huh?
 I decided to cut off about half of the bench. Since I’m only using one of the kids, I didn’t need the whole thing. If you want, there’s also a
  I adhered my panel directly to a card base I created from Green Parakeet cardstock from Papertrey Ink. I stamped a sentiment from Norsk Stempelblad AS onto a strip of the same color cardstock using Green Apple ink from Simon Says Stamp and put the sentiment aside while I worked on the rest of my card.
 I die cut the word hipp 8 times from Tropical Teal cardstock from Papertrey Ink using a die from Kort og Godt, and created two stacks of four each for a dimensional look. I adhered my stacked die cuts to the card and put the green cardstock strip on top of the bottom hipp.
 To finish off the card I added a few enamel dots from Papirdesign. I decided to go for orange ones to pick up the color from the little boy’s ice cream.
 It’s a fairly simple card, but the clouds add a little something to the white space, and the die cuts and dots add dimension.
 For such a small image, I used a lot of colors.

 I used the largest die in the A2 Double Stitched Rectangle STAX die set from My Favorite Things to give the edges of the panel a little bit of detail. Onto a white top fold card base, I adhered a quarter panel of Blueberry cardstock from My Favorite Things. I put foam tape on the back of my colored, die cut panel, tied some Blueberry divine twine from Whisker Graphics around the panel and adhered it to the center of the blue card front, before finishing off with a few enamel dots from Papirdesign.
 I added a bunny to the top of the teacup stack and colored the image with Copics, before fussy cutting, leaving a thin white border around the edge. I used a black glaze pen from Sakura to add shine and a tiny bit of dimension to the bunny’s eyes, then a white dot of Gelly Roll 05 on top of the black, once the black was dry. The glaze pen dries fairly quickly once applied, so I didn’t have to wait long.
 I adhered a panel of Blueberry cardstock from My Favorite Things to my white card base. Using a die in the A2 Double Stitched Rectangle STAX die set, also from My Favorite Things, I die cut a piece of patterned paper from Sunny Studio to adhere on top of the blue. This patterned paper is from the Subtle Grey Tones pack, and it really is subtle.
 I realized I hadn’t made any of my signature clusters in a while, and decided to pull out my die cut scraps of patterned paper and have a play. These patterned papers are from Sunny Studio (more from the subtle grey pack), Kaisercraft (light blue with dots), Papirdesign (dark blue with smaller dots) and Maja Design (pink floral), all die cut using a combination of the Happy Days Ticket Stubs die from XCut and the Fishtail Flag Frames dies from My Favorite Things. I used a mini paper doily from Doodlebug to mat my little clusters, and embellished with sequins from Pretty Pink Posh and Simon Says Stamp.
 The sentiment is from the Coffee and Chocolate stamp set from hÄnglar & Wings, white heat embossed on a strip of the same color cardstock I used for the card front. I then die cut it using one of the dies in the Itty Bitty Banners die set from My Favorite Things.
 The interactive element that I mentioned at the beginning of the post is actually the image. As you can see in this photo, it sits pretty high off the base. The reason for that is that it’s on an action wobble, so it’ll shake and move once you help it along a tiny bit.
 Fairly simple color palette for this one.
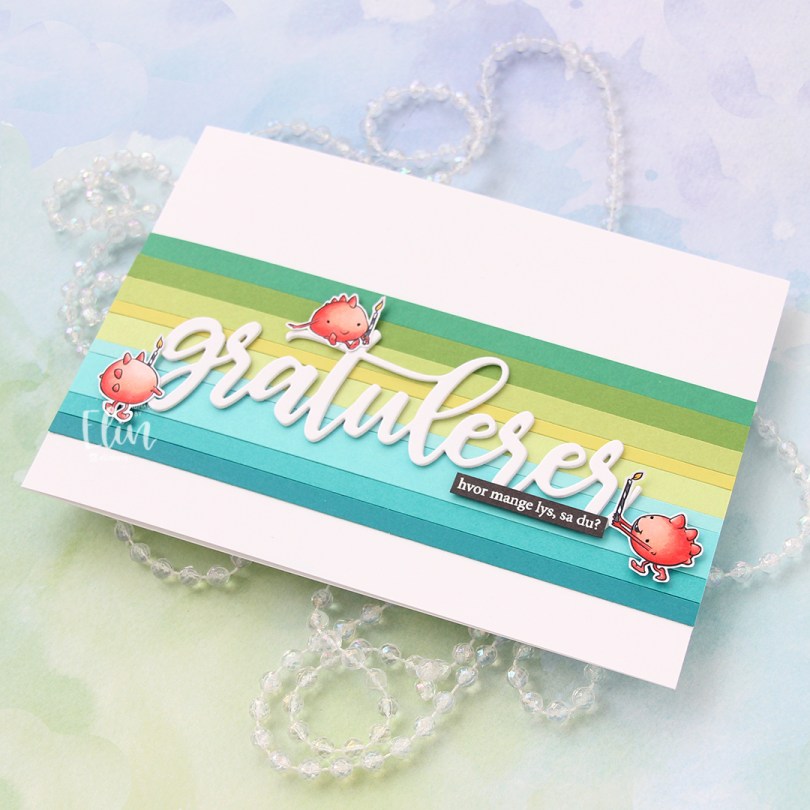
 I colored my monsters with Copics and fussy cut them leaving a thin white border. I covered my A7 card base with a band of solid colored cardstock strips. From top to bottom they are Concord & 9th Clover, Concord & 9th Parsley, Papertrey Ink Green Parakeet, Papertrey Ink Limeade Ice, Concord & 9th Sprout, My Favorite Things Summer Splash, Papertrey Ink Hawaiian Shores, Concord & 9th Oceanside and My Favorite Things Tropical Teal.
 I die cut the word gratulerer three times from white cardstock using the Flasketag, gratulerer die set from Papirdesign. The cardstock I used is Stamper’s Select White cardstock from Papertrey Ink, which is the same cardstock I used for my card base. I want my whites to match, and this is the perfect white cardstock, I love it.
 I added my stacked white die cut to the center of the striped background, mounted the monsters on foam tape and white heat embossed a sentiment from the A06 stamp set from Norsk Stempelblad AS onto Smokey Shadow cardstock from Papertrey Ink and adhered it to the stacked die cut word to finish the card. I decided against adding embellishments, I wanted the monsters to really steal the show.
 Very limited Copic selection for this one.
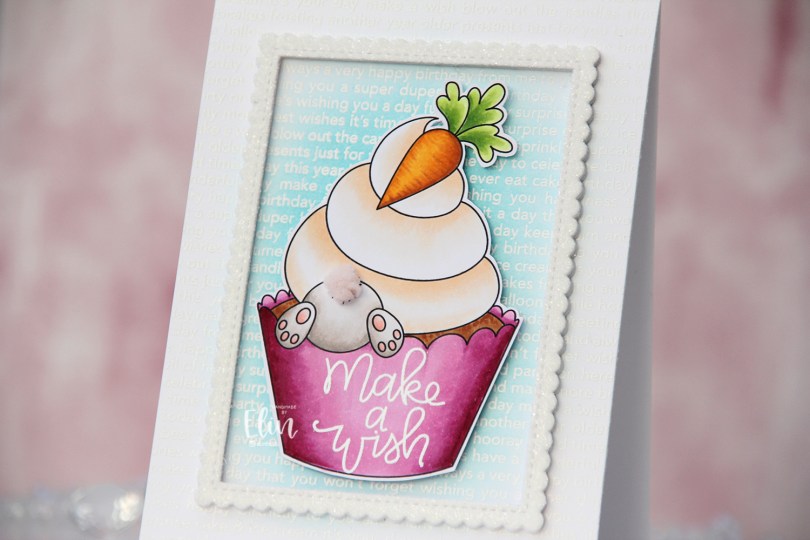
 When I first saw the
  I just knew this bunny had to be digging for treasure somewhere and decided to pair it with the carrot cupcake. I colored my image with Copics, stamped and white heat embossed a sentiment from the Scripty Bday stamp set from Mama Elephant, before adding a fluffy tail from part of a ribbon from Papirdesign. I felt the soft pink worked with the rest of the image. I fussy cut around my colored piece leaving a thin white border and put it aside while I worked on the rest of the card.
 Onto the card base, I stamped and white heat embossed the Happy Birthday background stamp from My Favorite Things, before ink blending in the center with a blender brush and Summer Splash ink, also from My Favorite Things.
 Using a die from the Stitched Rectangle Scallop Edge Frames die set from My Favorite Things, I die cut 5 frames from white cardstock and stacked them for dimension. I covered a sheet of white cardstock with a double sided adhesive sheet from Altenew, before using the same frame die to die cut one more from that. I added it on top of my stacked frames, removed the release paper from the top and covered it with rock candy distress glitter from Ranger for a bit of sparkle.
 I centered the frame on my card base and added my colored image in the center using foam tape. This card is fairly simple, and that tail totally steals the show.
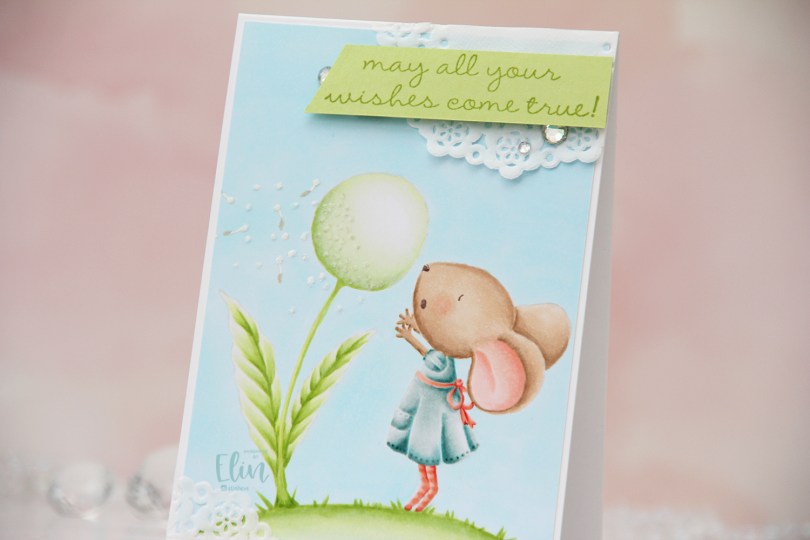
 This is
  I love no line coloring, and no line is perfect for an image like this, which has just enough detail to make it interesting, but it’s still large enough to get soft gradient in colors and not too fiddly.
 Once I finished my coloring, I added my panel to a 4 bar card base I created from Stamper’s Select White cardstock from Papertrey Ink. I created some texture to the dandelion fluff by using my Quickie glue pen and sprinkling on Rock Candy Distress glitter.
 I adhered scraps of a Doodlebug mini paper doily to opposite corners of the card to add to the soft, delicate look I was aiming for. Using Sour Apple ink from My Favorite Things, I stamped a sentiment from the
  Very soft color palette.
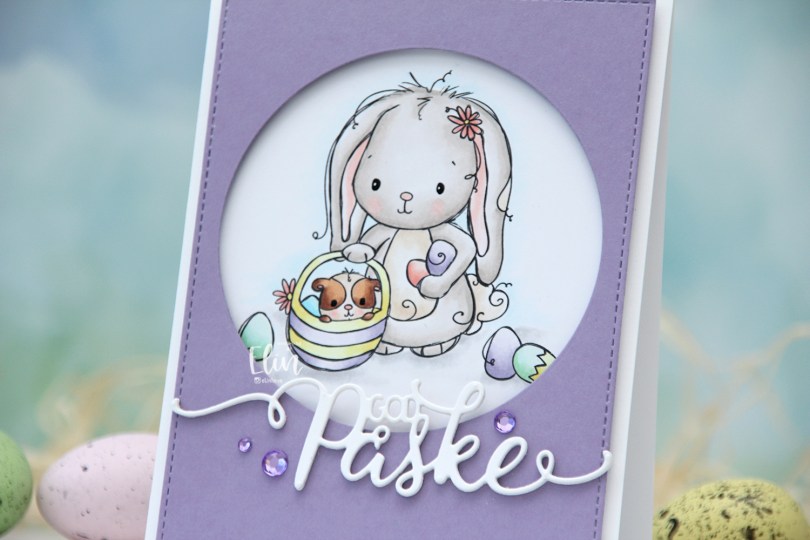
 I used the
  I wanted a pastel look for my card, and this is probably the lightest wash of color I’ve ever done with my Copics. Except for E25 on the guinea pig, I’ve only used markers ending in numbers that are 3 or lower. That’s super light for someone who doesn’t shy away from using markers ending with 9. Once the coloring was complete, I used a black glaze pen to create shine in their eyes, and I went over it with a dot of white Gelly Roll 05 on the bunny.
 From a piece of Winter Wisteria cardstock from Papertrey Ink, I die cut a circle opening and also used a faux stitch rectangle die from My Favorite Things to create a little bit of extra interest around the edge of the panel, before mounting it on foam tape.
 I used a die from Papirdesign to make my God påske (Happy Easter in Norwegian) sentiment, and made it dimensional by stacking four white die cuts on top of each other, before finishing off the card with a few crystals from Papirdesign that match the Winter Wisteria cardstock nicely.
 Here it is, the softest color palette ever.