
Hi, crafty friends. I’m back today with another winter/holiday themed card, featuring Christmas Sled from Rachelle Anne Miller. I’m hoping I don’t jinx anything with the sentiment I used. It snowed earlier in the week and I really don’t want more, so I’m crossing my fingers it won’t snow again until late fall.
 My last holiday card was blue, so I needed a new color. Green to the rescue, with a little bit of “gold” and a touch of pink. Somehow, I think it works.
 I printed the image twice: once onto X-Press It blending card, which is what I use for all my Copic coloring, and once onto Stamper’s Select White cardstock from Papertrey Ink. I wanted to fussy cut my colored image right up against the lines, but Rachelle’s images come with these great squiggly lines that I didn’t want to lose, they add such a unique look. By printing twice, I could mount my colored piece onto the other one and maintain the wonderful linework.
 For the background, I ran my printed white cardstock through my die cutting machine using the Magic Snow Cover die from Mama Elephant, which adds a nice faux stitch snow flurry look. I used an embossing mat to make the details stand out even more, then adhered my white panel to a white cardbase and mounted the colored image using 1 mm foam squares – I wanted a little bit of lift, but not too much dimension.
 I then used the sentiment from the Let It Snow die set from Mama Elephant to die cut 5 times from Meadow cardstock from Hero Arts. Before die cutting, I colored one of the pieces with my G46 Copic marker to better match my coloring, stacked the five layers together with the colored one on top and added the stacked die cut sentiment to the card.
 I finished off the card with a few sequins. These are a mix of Sparkling Clear sequins from Pretty Pink Posh and select sequins from the Sea Glass mix from Simon Says Stamp.
 I used my favorite green combo AND my favorite “holiday pink” combo for this card. I hope they inspire you.

 I added a bunny to the top of the teacup stack and colored the image with Copics, before fussy cutting, leaving a thin white border around the edge. I used a black glaze pen from Sakura to add shine and a tiny bit of dimension to the bunny’s eyes, then a white dot of Gelly Roll 05 on top of the black, once the black was dry. The glaze pen dries fairly quickly once applied, so I didn’t have to wait long.
 I adhered a panel of Blueberry cardstock from My Favorite Things to my white card base. Using a die in the A2 Double Stitched Rectangle STAX die set, also from My Favorite Things, I die cut a piece of patterned paper from Sunny Studio to adhere on top of the blue. This patterned paper is from the Subtle Grey Tones pack, and it really is subtle.
 I realized I hadn’t made any of my signature clusters in a while, and decided to pull out my die cut scraps of patterned paper and have a play. These patterned papers are from Sunny Studio (more from the subtle grey pack), Kaisercraft (light blue with dots), Papirdesign (dark blue with smaller dots) and Maja Design (pink floral), all die cut using a combination of the Happy Days Ticket Stubs die from XCut and the Fishtail Flag Frames dies from My Favorite Things. I used a mini paper doily from Doodlebug to mat my little clusters, and embellished with sequins from Pretty Pink Posh and Simon Says Stamp.
 The sentiment is from the Coffee and Chocolate stamp set from hÄnglar & Wings, white heat embossed on a strip of the same color cardstock I used for the card front. I then die cut it using one of the dies in the Itty Bitty Banners die set from My Favorite Things.
 The interactive element that I mentioned at the beginning of the post is actually the image. As you can see in this photo, it sits pretty high off the base. The reason for that is that it’s on an action wobble, so it’ll shake and move once you help it along a tiny bit.
 Fairly simple color palette for this one.
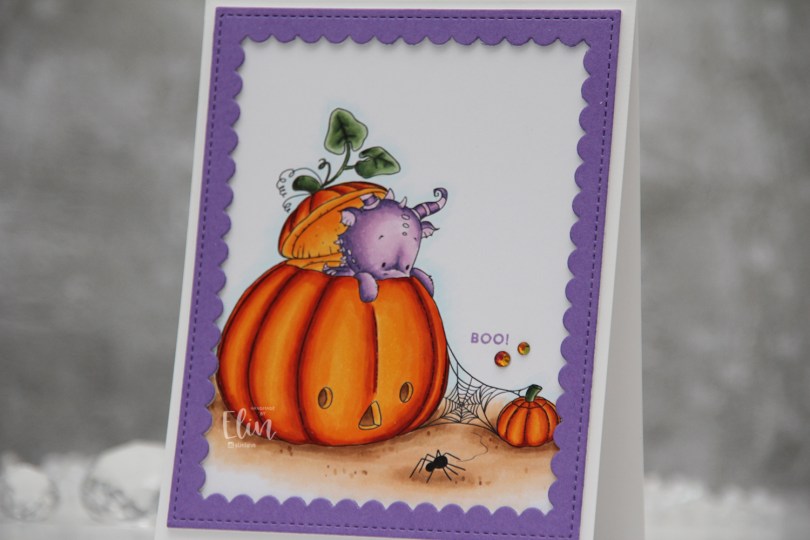
 Halloween isn’t really a big thing in Norway, but this image was so cute I just couldn’t resist. I colored up the ground, pumpkins and leaves before asking my “twin” Liz for a color suggestion for the actual dragon, thinking in my mind “please don’t say purple”. What did she choose? It was inevitable, I knew she’d say purple, she even said which purples to use. I actually think he’s cute in purple, and I don’t think I’ve colored one of Lee’s dragons purple before, so I guess it was about time.
 Once I finished coloring, I embraced the purple, stamping the Boo! sentiment from the Itty Bitty Boos stamp set from My Favorite Things using Deep Iris ink from Altenew. I then die cut the largest frame in the Scallop Frames die set from Pretty Pink Posh from Amethyst Allure cardstock from Papertrey Ink, adding two additional white die cuts behind it for dimension.
 The outside dimensions of the die cut frame are 4 x 5″, so I cut 1/4″ off the height of my card base, making it 4 1/4 x 5 1/4″ instead of the normal A2 size to get an even white border on the outside of it.
 The sentiment is tiny, and to draw the eye to it I decided to add a couple of gems. These are from the Meraki Sparkle Red Illusion jar. They’re color changing glass rhinestones, and this color was perfect for this card.
 If you look at the various photos in this post, you’ll see that these rhinestones appear to have different colors depending on how the light hits them, it’s a really cool effect. In this photo, you can also see the dimension added by using stacked die cuts.
 Fairly simple color palette for this card. It was a pretty quick image to color too!
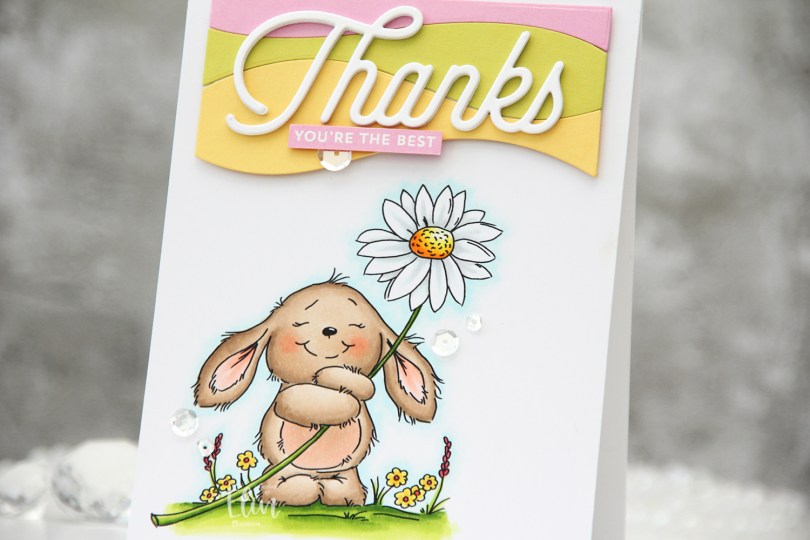
 I used the
  Once my coloring was done, I adhered it to a top fold A2 card base I created from white cardstock. Using the Snow Drifts Cover-Up die from My Favorite Things, I die cut three wavy pieces from solid colors Of cardstock to go towards the top of my card. I used Limeade Ice, Lovely Lady and Harvest Gold, all from Papertrey Ink. I butted them right up against each other, added them to a backer so I could handle one piece instead of three and mounted them on foam tape. I then die cut the Thanks from the Twice the Thanks die set from My Favorite Things four times from white cardstock from PTI. I love the cardstock from Papertrey Ink, it’s my favorite!! Onto a strip of Lovely Lady cardstock, I white heat embossed a sub sentiment from the Itty Bitty Basics stamp set from My Favorite Things and mounted it below my stacked Thanks die cut. To finish I added a few Sparkling Clear Sequins from Pretty Pink Posh.
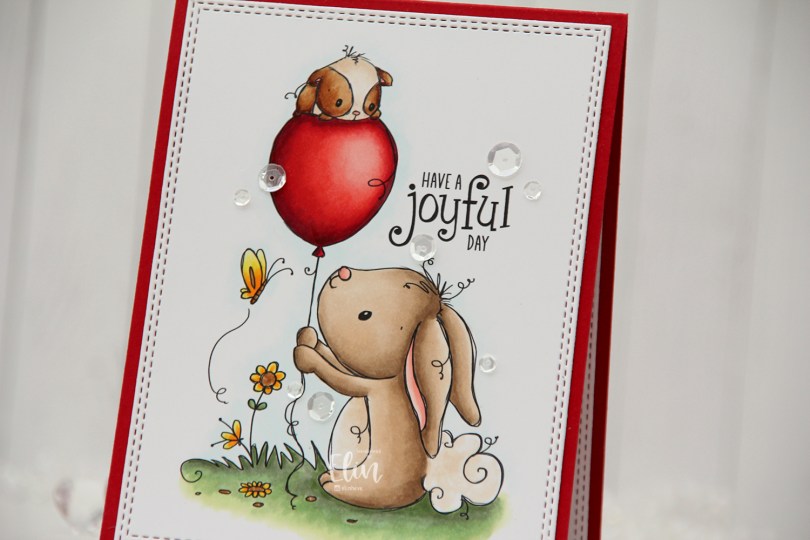
 I printed the image with the accompanying sentiment and made it bigger than what I normally color. I wanted the focus to really be on this stamp.
 I colored the image with Copics, then used a die from the A2 Double Stitched Rectangles STAX set from My Favorite Things to create the faux stitch look around the edge that I really enjoy having on my cards.
 I adhered the panel to a card base I created from Pure Poppy cardstock from Papertrey Ink.
 The red cardstock matches the red balloon and really makes it pop.
 To finish the card I added Sparkling Clear sequins from Pretty Pink Posh here and there. These are my favorite sequins, and they’re near impossible to find in stock anywhere. I need to get some more soon, though, I’ve almost run out.
 Last, but not least; the colors I used for this. The ones on the bottom row were all used for the balloon. I went a little overboard on the balloon.
 I colored the image with Copics, die cut the word HURRA from my panel using a die from Kort & Godt and the largest die in the A2 Stitched Rectangles STAX 2 set from My Favorite Things for the faux stitching to frame the image. I printed a second image to put behind, so the ball of yarn is continuous throughout the word.
 I adhered my panel to an A2 card base I created from Berry Sorbet cardstock from Papertrey Ink. Onto a strip of the same color cardstock, I stamped and white heat embossed a sentiment from Huldra Designstudio, added a couple of additional layers of cardstock behind it for dimension and embellished with a couple of sequins from Pretty Pink Posh to finish the card.
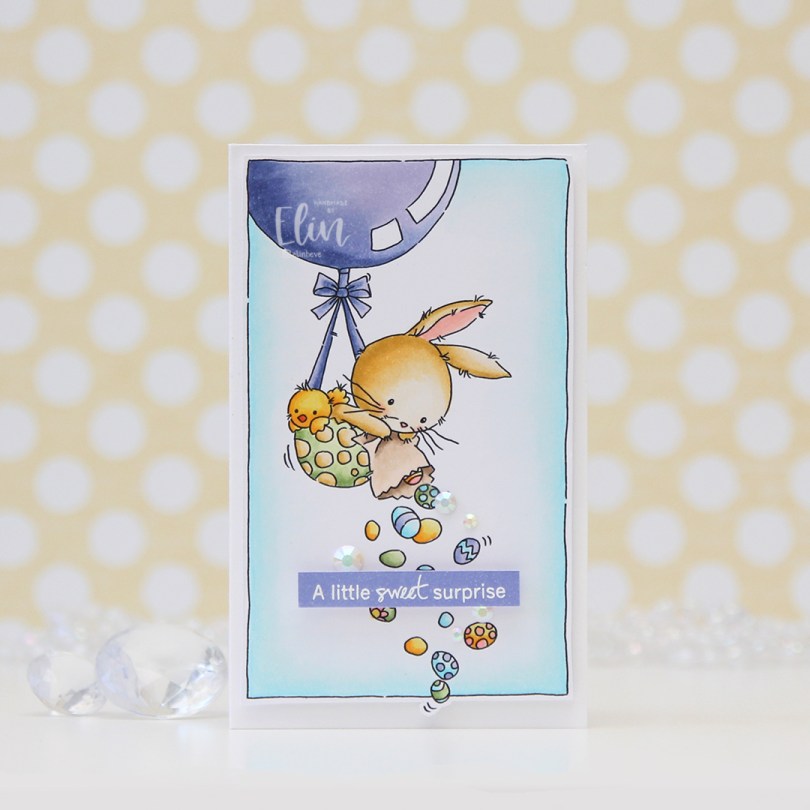
 I colored the image with Copics and fussy cut it, leaving a white border. The frame that’s part of the image makes fussy cutting super easy, the only thing sticking out is one small egg at the bottom. I mounted my panel on a card base I created from Stamper’s Select White cardstock from Papertrey Ink. This card is on the smaller side, it measures 3 x 4 7/8″.
 I colored a separate piece of X-Press It blending card with one of the purples I used for the image. I made sure it was dry before I stamped and white heat embossed a sentiment from the IWCL2017005 English stamp set from InkyWings. I popped it up the colored piece for even more dimension, using Double Thick Crystal Clear foam tape from The Rabbit Hole Designs.
 I added a few Pearl White Crystals from Pretty Pink Posh between all the eggs for a little bit of embellishment.
 A simple card, but the dimension adds some interest. The clear foam tape makes the sentiment look like it’s floating above the card.
 I colored him in very simply with just a few Copics, hinted at a sky behind him and grass below him using some very soft colors, trimmed my panel down and put it aside while I worked on the rest of my card.
 Using Spring Moss cardstock from Papertrey Ink and the By the Numbers impression plate, also from PTI, I created a soft, yet textured background that I adhered to my top fold A2 card base created from Stamper’s Select White cardstock from Papertrey Ink. I love their white cardstock, it’s the whitest I’ve found, and it’s thick and wonderful to work with.
 I glued a strip of silver glitter cardstock above and below my little puppy, before mounting it on foam tape on the top half of the card.
 I die cut Gratulerer using the Gratulerer 6 die from Papirdesign three times: two from white cardstock, once from the silver glitter cardstock I’d already used. I stacked these for a little bit of dimension. I stamped a sentiment from the A06 stamp set from Norsk Stempelblad AS onto a piece of Pale Peony cardstock from Papertrey Ink using VersaMark ink, then heat embossing using clear embossing powder from Ranger. I added two more layers of pink cardstock behind it so it’d be flush with the die cut word above it.
 To finish the card I added a few Sparkling Clear sequins from Pretty Pink Posh. These might be my favorite sequins, and I’m almost out of them, so I’m desperately searching for new ones. They seem to always be sold out.
 Very soft and simple color palette used for this card.
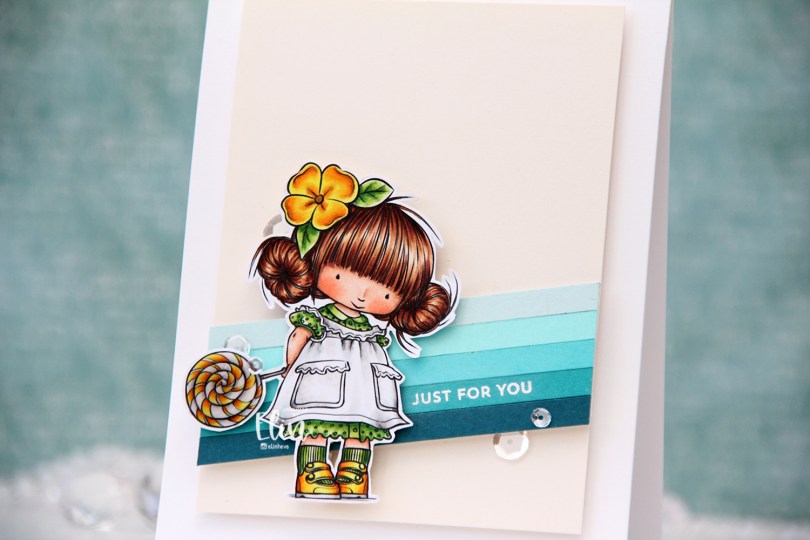
 I went for a green and yellow combo this time, and made her hair dark (I colored her blonde last time). I was going to color her dress in teals, but when I was done with everything else and only had the dress left to color I changed my mind and opted for white. White’s not really white, I used a few grays and the tiniest amount of light blue, but it reads white in the finished coloring. I fussy cut my image leaving a white trim around the edge and put her aside while I worked on the rest of my card.
 I took a page out of
  I adhered my cream panel onto a top fold, white card base using foam tape, before stamping and heat embossing a sentiment from the Itty Bitty Birthday stamp set from My Favorite Things. I thought this particular sentiment would work for many occasions, not just birthdays, and the size was perfect to add to one of my cardstock strips.
 Using even more foam tape I adhered Mona near the bottom left of the card. I love that her dress sticks out right below the sentiment, I really couldn’t have placed the sentiment any better, it’s nestled in perfectly. I put Glossy Accents on the lollipop and a few Sparkling Clear sequins from Pretty Pink Posh here and there to finish the card.
 Here you can see all the dimension. The cream panel is mounted on foam tape, the cardstock stripes are mounted on foam tape, and Mona is mounted on foam tape.
 Quick and easy color palette for this one. I don’t think I went too much overboard with the amount of markers in this one. I won’t mention that I used six colors for her hair 😉
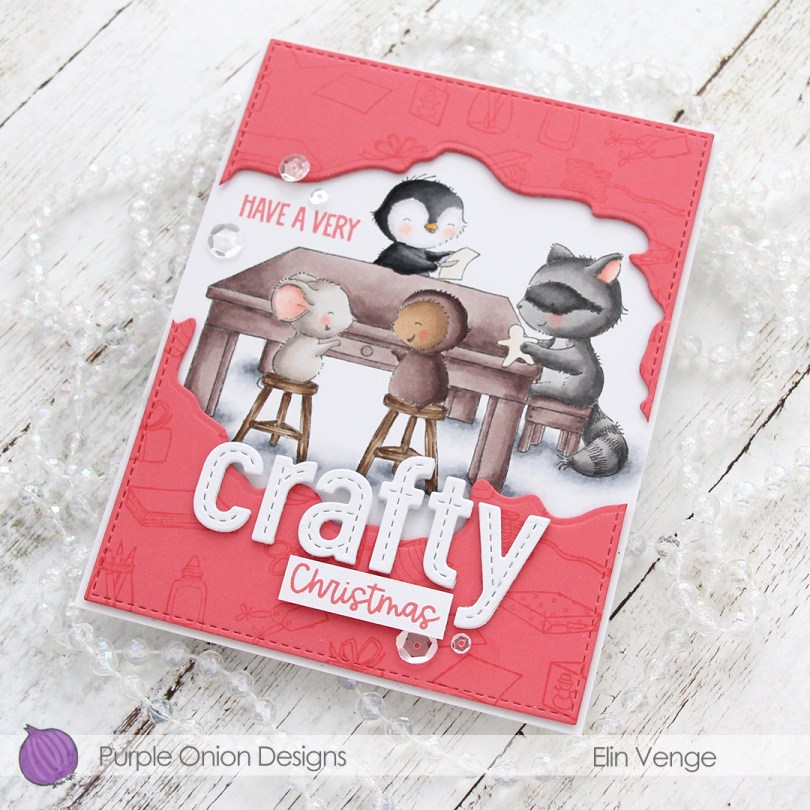
 I stamped and masked
  I colored in the scene using my Copics, and I actually used all the gray families for this, something that rarely happens. I tend to stick to one or maaaaybe two, but using all four made sense for this card.
 On a piece of Berry Sorbet cardstock from Papertrey Ink, I stamped the
  The sentiment is a mix of a stamp from the
  To finish the card I added a few Sparkling Clear sequins from Pretty Pink Posh around the sentiment.
 Lots of Copics for this one, but not a lot of color. Like I mentioned, I used all the gray families for this card.