Your friendship is the cherry on top {Streamside Studios}

Hi! I’m sharing a fun card today, featuring the Cherry-ific mouse from Streamside Studios. I colored up this image last year, but sometimes, images simply take their sweet time making it onto cards.

Streamside Studios Cherry-ific mouse front rett

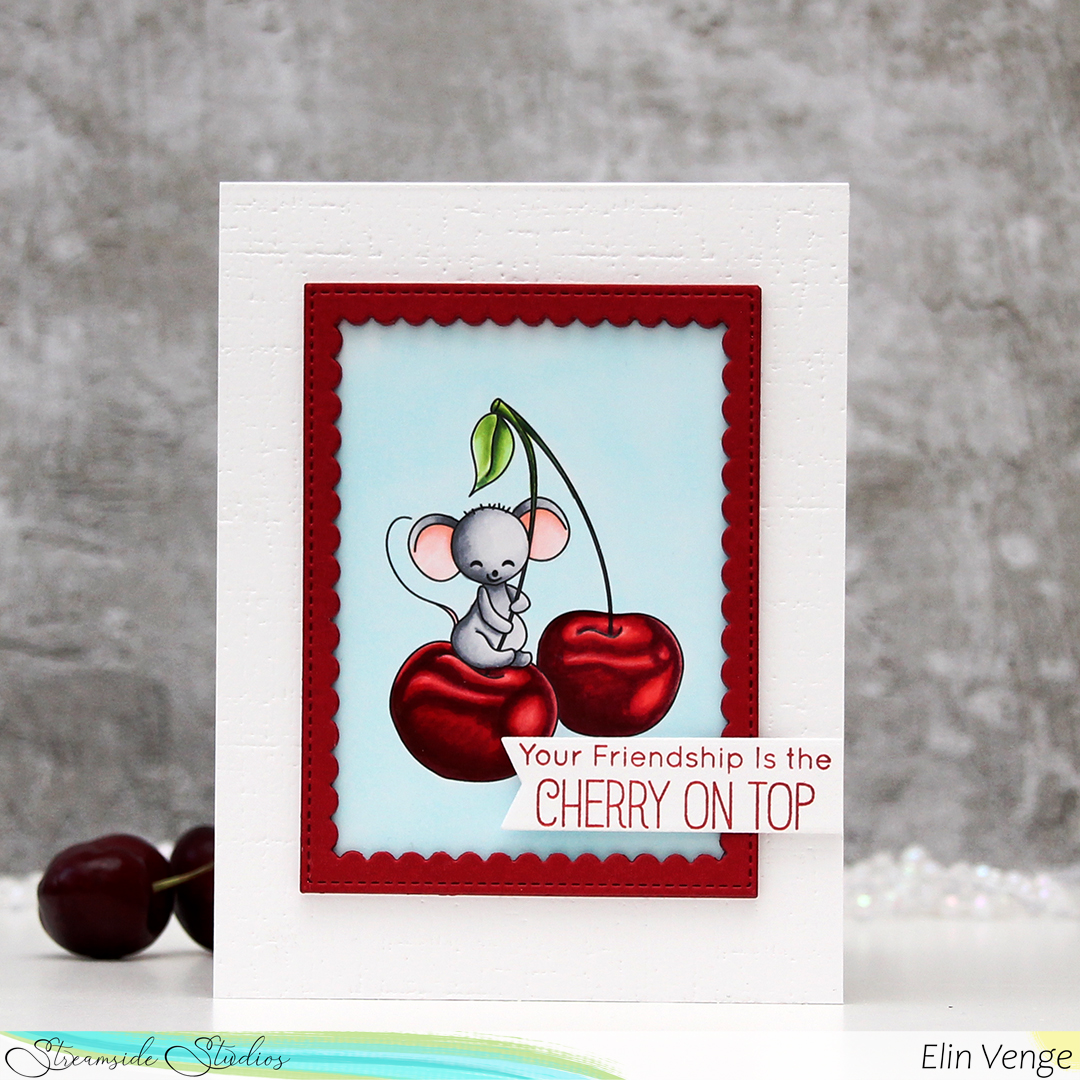
I rarely use my red Copics (and most of the Rs aren’t really red, they lean either pink or orange, making red super tricky with Copics), but with these cherries I really didn’t have much of an alternative. Maybe I should have even made them darker, if you look at the cherries I used for props, they’re darker than the ones I colored.

Streamside Studios Cherry-ific mouse front skrått

I used an impression plate from Papertrey Ink to create some texture on a piece of Stampers Select White cardstock from Papertrey Ink. I adhered it directly onto my cardbase, which is made from the same white cardstock.

Streamside Studios Cherry-ific mouse flatlay skrått

Using a die from the Scallop Frames die set from Pretty Pink Posh, I die cut four frames from Amarena Cherry cardstock from Papertrey Ink and stacked them for a dimensional look. I adhered the stacked frame to my colored piece and then centered that on my card front.

Streamside Studios Cherry-ific mouse flatlay høyre

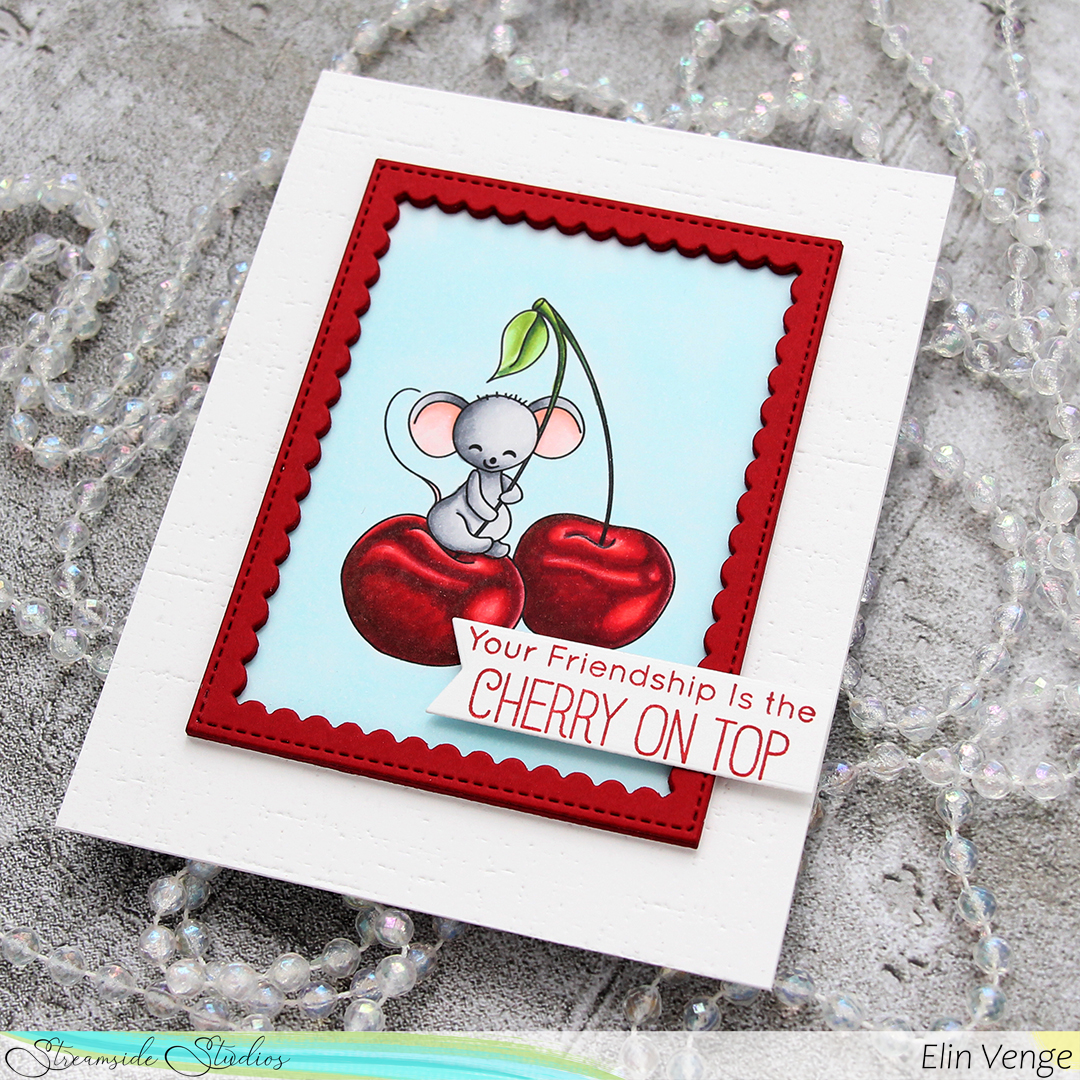
I stamped a sentiment from the Mice Day to Celebrate stamp set from My Favorite Things using Amarena Cherry ink, and die cut that using the largest of the dies in the Fishtail Flag Frames die set, also from My Favorite Things. It’s adhered directly to the red frame, and popped up using foam tape on both sides for even dimension.

Streamside Studios Cherry-ific mouse Copics

Simple color palette.

Let the good times roll {Rachelle Anne Miller Creative Studios}

Hi! I’m sharing a new card with another image from the July release from Rachelle Anne Miller. This is Animal Train. I love those cute little critters hitching a ride behind the locomotive.

Rachelle Anne Miller Animal Train front rett

I feel like I’ve been doing pretty good lately about using lots of different colors, and not stick to the same ones each time. This, however, has made me neglect my favorite blues. I haven’t used them since early May(!) and desperately needed to change that.

Rachelle Anne Miller Animal Train front skrått

I paired my blue with a pinky peach and a soft, pale yellow, and once I added the blue (which was the last thing I colored), I realized that the colors kind of look like the UniSA colors. Not intentional at all; maybe I miss Australia even more than I thought I did.

Rachelle Anne Miller Animal Train flatlay rett

I was going to use Fire Coral cardstock from My Favorite Things for my base and also have some peeking out behind the image, but I put a panel of Coral Crush cardstock on top, which fit most of my coloring better. I decided to use Fire Coral for the banner.

Rachelle Anne Miller Animal Train flatlay skrått

The banner itself is die cut using the Elegant Folded Banner die from My Favorite Things. Onto that I white heat embossed a sentiment from the Pawty Time stamp set, also from MFT. It’s fairly easy to curve clear stamps to fit whatever shape you’re stamping on, and this was a breeze. I used the largest die in the Double Stitched Rectangle STAX die set from My Favorite Things, which was a brand new die set in their July release. I love the STAX dies from MFT, so I was very excited about this set. I finished off the card by adding three sparkling clear sequins from Pretty Pink Posh.

Rachelle Anne Miller Animal Train Copics

Pinks, yellows and blues. And a few neutrals thrown in for good measure. I also used B90, which is a color I’ve made myself. And believe it or not, but I used four different color families for the peach – R, RV, E and YR. Who says you have to stick to one color?

It’s a mice day {Streamside Studios}

… to celebrate! I have some cute mice from Streamside Studios to share today. One of these is eating a cheese, which inspired the yellow and the circles. Sometimes it doesn’t take much.

Streamside Studios A Mice Day flatlay rett

I colored the mice with Copics and adhered them behind a panel of Lemon Drop card stock from My Favorite Things, which I die cut using a die from the Slimline Starter die set and also the Slimline Stitched Circle Trio set. I thought the plain yellow cardstock looked a little plain, and stamped some streamers from the Mice Day to Celebrate stamp set from My Favorite Things using Distress Oxide ink in the color Fossilized Amber.

Streamside Studios A Mice Day flatlay skrått

I created my sentiment by heat embossing parts of sentiments from two different stamp sets from My Favorite Things (Always Bring a Smile and Pawty Time) on Gravel Gray cardstock, and added three extra strips of cardstock behind them for dimension. I die cut the word mice using the In Stitches Lowercase alphabet set from My Favorite Things. I initially planned on doing it in yellow, so I die cut four layers of Pineapple cardstock and stacked together. The yellow word kind of got lost, so I die cut an additional layer in gray and added that on top, which makes it stand out more. I finished off the card with some pearl white crystals from Pretty Pink Posh.

Streamside Studios A Mice Day Copics

Lots of gray and hardly anything else for the coloring on this card.

You make me smile {hÄnglar & Wings}

Hi there! I’m back with the second card I made as a guest designer for hÄnglar & Wings (you’ll find my first card here). This time it’s even simpler than the last.

hÄnglar & Wings - Bästa Vänner you make me smile front

The stamp is from the Bästa Vänner stamp set (same as the first card), and I fussy cut this one leaving a thin white border on the outside edge once I’d colored the image with my Copics.

hÄnglar & Wings - Bästa Vänner you make me smile front skrått

Using the Detail Ringlet Plate die from Simon Says Stamp AND one of the dies in the A2 Stitched Rectangles STAX 1 set from My Favorite Things onto a piece of Aqua card stock from Maja Design, I was able to create a little bit of texture and interest in the background. I added my die cut panel onto a white top fold card base using lots of foam tape.

hÄnglar & Wings - Bästa Vänner you make me smile flatlay

On a die cut ticket (die from XCut), I stamped a sentiment from the Bästa Vänner stamp set using Audrey Blue ink from Simon Says Stamp. I added the ticket to the bottom center of my card using foam tape, letting the girl sit on top of the tag with foam tape behind her in the parts that were hanging off the sides of the ticket.

hÄnglar & Wings - Bästa Vänner you make me smile flatlay høyre

I added a couple of sparkling clear sequins from Pretty Pink Posh to the bottom left of the ticket for a finishing touch.

hÄnglar & Wings - Bästa Vänner you make me smile Copics

Simple color palette of pink, teal and yellow for this girl. Teal’s my favorite color of the three, which is why I chose to do the sentiment and background in teal.

Treat yourself! {Purple Onion Designs}

Hi, there! I’m back with another card where it’s pretty much all about the coloring. As a Stacey Yacula fan, getting the chance to play with her images is a dream, and today I dreamt up a very summery birthday card… with a sundae. Can’t beat a sundae!

Purple Onion Designs - Elin Venge - Juliet Tree Line Horizon Sunshiny Sentiment set front straight

I stamped Juliet, masked the umbrella and stamped the Tree Line Horizon before removing the mask and coloring in my scene using Copics. I usually color the whole panel, but this time I left the sky white.

Purple Onion Designs - Elin Venge - Juliet Tree Line Horizon Sunshiny Sentiment set front angled

To add color to the sky I once again placed a mask on the umbrella, masked off the trees and the horizon line and put a piece of printer paper at the bottom to protect the rest of the scene before using a blender brush from Taylored Expressions and inks from Altenew. I wanted a darker blue towards the grass, going lighter further up. I used Eastern Sky at the bottom and Iceberg towards the top.

Purple Onion Designs - Elin Venge - Juliet Tree Line Horizon Sunshiny Sentiment set flatlay

I wanted a little bit of extra interest in the sky, and decided to add some ink splatters. I added a spritz of sheer shimmer spray to an acrylic block along with Eastern Sky ink for a sparkly blue. I liked it, but thought it needed a little more contrast, and went one shade darker with Ultramarine mixed with a little bit of water and added that too.

Purple Onion Designs - Elin Venge - Juliet Tree Line Horizon Sunshiny Sentiment set flatlay angled

I stamped and white heat embossed a sentiment from the Sunshiny Sentiment set onto a piece of Gravel Gray card stock from My Favorite Things and die cut it using the largest of the three dies in the Fishtail Flag Frames die set, also from MFT. I added a couple of more strips of card stock behind the banner for a little bit of lift, and tucked a couple of sparkling clear sequins from Pretty Pink Posh under for a little bit of embellishment.

Purple Onion Designs - Elin Venge - Juliet Tree Line Horizon Sunshiny Sentiment set angled

I really really really love Stacey’s images, and they’re so much fun to create dreamy scenes from.

Purple Onion Designs Juliet Tree Line Horizon

I want to say I didn’t go overboard with my Copics on this one, but there were a lot of greens used for this card. I just can’t help myself.

Happy birthday to you!

A certain someone nudged me to play along with this week’s sketch at My Favorite Things. Little challenges like that really drive me, and using a stamp set from the July release, which came out earlier this week, I made a colorful birthday card with a party penguin!

My Favorite Things Penguin Party sketch 549 front rett

I wanted the focus to be on the party penguin carrying the balloon, and colored him before turning him into a stacked die cut (3 layers behind the colored one). I stamped and die cut the bunting from another stamp in the stamp set, but only added one layer behind each of these, they’re in the background, after all. On a piece of white cardstock, I stamped the Scattered Triangles background stamp using Picked Raspberry and Squeezed Lemonade distress inks. I thought the triangles went well with the bunting, and wanted an ombré effect from the hot pink up to the yellow. I’ve come up with a great trick for achieving this: ink blending on the stamp. By using blender brushes and ink blending onto the actual stamp, I get a really nice gradient in my stamping. It’s a little tough on my blender brushes, and a couple of the bristles have fallen off, but I don’t mind, I don’t normally ink blend that much anyway, a missing bristle or five is a nice trade off for the effect I get – I’ll take it.

My Favorite Things Penguin Party sketch 549 front skrått

I die cut the background using the largest die in the A2 Stitched Rectangles STAX 2 set and adhered it directly to a top fold card base made out of Ripe Raspberry cardstock. I die cut a stitched circle from the same color cardstock for the penguin to stand on, and mounted it using foam tape in the center of the card. I added a white heat embossed sentiment strip below, with lots of extra strips of cardstock behind it, so it would be flush with the penguin. I finished off the card by adding Glossy Accents to the balloon and a few Sparkling Clear sequins from Pretty Pink Posh, and glued what was left of the bunting on the inside of the card for added detail.

My Favorite Things Penguin Party skisse 549 Copics

Not a whole heap of Copics for such a small image.

Let’s get floral {Streamside Studios}

Hi! Sometimes, I like to change up the use of a stamp or two in a stamp set. Small stamps in stamp sets, for example, are great for making backgrounds (though time consuming). This time, I’ve turned a floral image from the Fairy Happy Couple stamp set from Streamside Studios into a card that isn’t wedding related at all. It could be, though, I chose a sentiment that can be used for a birthday card, a wedding card and many other occasions.

Streamside Studios Fairy Happy Couple front

This wedding bouquet is so gorgeous, and I printed it onto X-Press It blending card before fussy cutting it, leaving a white border around the edge. For some reason, I’ve been riding a pink, peachy, yellow wave whenever I’ve colored flowers lately, and this one is no exception.

Streamside Studios Fairy Happy Couple flatlay skrått

I cut down a piece of Lemon Tart card stock from Papertrey Ink to 3 1/4 x 5 1/2″ and ran it through my die cutting machine with an impression plate to create some texture to my yellow background. I mounted it with foam tape onto a side fold A2 card I created using Stamper’s Select White card stock from Papertrey Ink. It’s my favorite white card stock, it’s thick, bright white and doesn’t crack.

Streamside Studios Fairy Happy Couple flatlay

Onto the yellow, I added my colored flowers using 1 mm foam squares. On the part that hangs off the yellow edge, I used foam tape in addition to the 1 mm foam squares to prevent sagging and make everything level. Using a die set from Papirdesign, I created a stacked sentiment. For the shadow, I used some 40 lb vellum, and on top of that I have four white die cuts stacked on top of each other for dimension. The trick here is that I also put two layers of white die cuts behind the vellum, giving it a little lift. In fact, the part of the word that overhangs to the right of the flowers has an additional three white die cuts behind it to compensate for the height of the 1 mm foam squares behind the flowers. Dimension is life?

Streamside Studios Fairy Happy Couple flatlay høyre

I stamped and white heat embossed part of a sentiment from Norsk Stempelblad AS onto Melon Berry card stock from Papertrey Ink and added a few more strips of the same card stock behind it for dimension. I embellished the card very simply using sparkling clear sequins from Pretty Pink staggered around the flowers. Some are tucked behind, others hanging off the edge, I really like the effect it brings.

Streamside Studios Fairy Happy Couple zoom 1500

Lots of layers, and lots of dimension.

Streamside Studios Fairy Happy Couple Copics

Quite a few colors despite a fairly simple palette. I didn’t want the center flower to be the same color as the other ones, so I went in with dark colors and plenty of layers before I was happy.

Bear hugs {Lili of the Valley}

Hi! I have a simple card to share today, featuring Jenny floral border, which is an image from Lili of the Valley. I printed the image with a low opacity setting to get the no line look and colored in my image with Copics, drawing the facial features back in with a black pen.

Lili of the Valley Jenny floral border front rett

I don’t often color fur like this. It’s very relaxing to do and a very forgiving technique, but it’s a time consuming one, layering up all those fine lines isn’t done in five minutes, or fifteen, for that matter, so I don’t usually take the time to do it, but this cute little bear was begging for it.

Lili of the Valley Jenny floral border front skrått

Using the watercolor stripes stencil from Altenew, I dry embossed a piece of Soft Stone card stock from Papertrey Ink. I’ve had a love affair with the Papertrey Ink card stock for close to a decade now; it’s my favorite, and this particular grey color is so soft and perfect! I mounted it onto a top fold white card base (made out of Stamper’s Select White card stock, another one from PTI) using lots of foam tape, leaving a 1/4″ border around the edge. Using even more foam tape, I mounted my fussy cut colored piece in the center of the grey card stock for even more dimension.

Lili of the Valley Jenny floral border flatlay høyre

I stamped and white heat embossed a sentiment from Norsk Stempelblad AS onto a scrap piece of Berry Sorbet card stock from Papertrey Ink and turned it into a small banner with one of the dies in the Itty Bitty Strips die set from My Favorite Things. This particular pink card stock is another favorite of mine, and I only have tiny scraps left, I need to stock up! I mounted the banner onto my colored piece using 1 mm foam squares.

Lili of the Valley Jenny floral border flatlay rett

I added sparkling clear sequins from Pretty Pink Posh to finish off my card. Three groupings forming a visual embellishment triangle. I usually only place my embellishments near the sentiment to draw the eye to the sentiment, but for this one I staggered them elsewhere too. I love that these sequins come in a bag with four different sizes. I have other sequins I love too (the mixes from Little Things from Lucy’s Cards are awesome), but I still believe these are my favorites. If I could only buy one type of sequins for the rest of forever, these are the ones I’d choose.

Lili of the Valley Jenny floral border flatlay angled

I’m sending sparkling, dimensional, flowery bear hugs your way!

You are simply wonderful {Mo’s Digital Pencil}

Hi! Today, I have a simple card to share. Nothing out of the ordinary, really, my cards are usually pretty simple.

Mo Manning August front rett

August from Mo Manning is such a cute image, and I colored it up with my Copics in the beginning of the month, and I’ve turned my colored piece into a very simple card.

Mo Manning August front skrått

I die cut my colored piece with the largest of the A2 Stitched Rectangles STAX dies from My Favorite Things and adhered it to a top fold card base I made from Lavender Fields card stock, also from MFT. I also die cut a white piece to put on the inside of the card for a space to write a personal message.

Mo Manning August flatlay

I die cut a patterned paper piece from My Favorite Things using the same die, and cut it down to a 1 1/4″ strip with my paper trimmer. I mounted it on foam tape above my image. I love that the faux stitch edge is continuous across the colored panel and this patterned paper strip.

Mo Manning August flatlay angled

I stamped and white heat embossed a Norsk Stempelblad AS sentiment onto a separate piece of Lavender Fields card stock, and die cut it into a banner using the smallest die in the Fishtail Flag Frames die set from My Favorite Things and mounted it on 1 mm foam squares to the patterned paper.

Mo Manning August flatlay høyre

I finished off with a few sparkling clear sequins from Pretty Pink Posh near my sentiment.

Mo Manning August Copics

I used lots of colors for her skin, but other than that, I didn’t use a whole lot of Copics for this one.

Waving hello {Rachelle Anne Miller Creative Studios}

Hi, there! Today I have a sneak peek to share of one of the new images coming from Rachelle Anne Miller later this week. It’s a hot air balloon, and I actually saw one outside my craft room window a couple of weeks ago. They’re not too common around here.

Rachelle Anne Miller hot air balloon front rett

I printed the image on X-Press It blending card, colored it with my Copics and die cut it into a panel using the largest of the dies from the A2 Stitched Rectangles STAX 2 set from My Favorite Things. I adhered it to a card base I made from Wild Wisteria card stock from My Favorite Things and went digging through my stash looking for the perfect sentiment.

Rachelle Anne Miller hot air balloon front skrått

The girl in the basket is definitely waving hello to the little bird on the outside, so I decided to use this sentiment from Purple Onion Designs. I white heat embossed it onto a separate piece of Wild Wisteria card stock, cut it down to a strip with a nice end using the medium size of the fishtail flag frames dies from My Favorite Things and adhered it to my card using 1 mm foam squares. I finished off the card with a few sparkling clear sequins from Pretty Pink Posh.

Rachelle Anne Miller hot air balloon Copics

Not a lot of Copics for this one, this image was quick and easy to color. The first thing I colored was actually the bird using those blues, but once the rest of the image was colored too, he really stood out, so I put some pinkish purple on top of the blue.