
Hi, crafty friends! There’s a new release coming next week from Rachelle Anne Miller which has me super excited. It has a theme I love and a type of critter I simply can’t resist – a little tease for you there. Today’s card, however, is created using an oldie, but goodie stamp. This is the Animal Parade, and I know I keep saying so many of Rachelle’s images are among my favorites, but they really are, and this is another one. I’ve used this image once before on this card. This time I cut the image apart and used the critters individually to create postage stamps on my card.
 I colored the images with Copics, then used the Postage Collage die from Waffle Flower to create stamps.
 I added Solar Paste in the Golden Hour color onto Lemon Tart cardstock from Papertrey Ink using the Merry Go Round stencil from Memory Box. I wanted a little bit of interest in the background, but nothing too distracting, and this worked really well. I added the panel to a top fold white card base I created from Stamper’s Select White cardstock from Papertrey Ink.
 I added scraps of cardstock behind my die cuts to give them a little lift off my card and adhered them pretty much in the center of the card.
 I stamped a sentiment from the Anything-but Basic Birthday Wishes stamp set from My Favorite Things onto Spring Rain cardstock from Papertrey Ink using Obsidian ink from Altenew. I cut the sentiment down to a strip and added a few layers of cardstock behind it before adhering it to the card.
 I finished off with a few sequins from the White Orchid Sequin mix from Little Things from Lucy’s Cards.
![]() Fairly muted color palette for this one.
Fairly muted color palette for this one.


 I stamped this cute gang onto X-Press It blending card and colored them with Copics, then used the largest die in the A2 Rectangle STAX Set 2 from My Favorite Things to create my standard faux stitch edge. I stamped a sentiment from the
  I covered the critters with a mask, then used the Bokeh Elements Stencil Duo set from Waffle Flower to create some interest to the rest of the panel. I used Pistachio and Misty Sage fresh dye inks from Altenew for the green and started with Peachy Glow, also fresh ink from Altenew, for the smaller yellow dots. I suspect my stencil wasn’t clean from the last project, because the yellow seemed a bit too muddy for the look I was going for, so I went over with Scattered Straw Distress Ink, which helped. I then rotated the stencil 180 degrees and went in with Simon Hurley Solar Paste in the Golden Hour color. This paste goes on so easily and has a lot of shine. Once the paste was dry, I adhered my panel to a top fold card base I created from Sour Apple cardstock from My Favorite Things, and the card was complete.
 The solar paste adds so much shine that I decided not to add any embellishments to this card, making it very mail friendly.
 I didn’t use a ton of colors for this one.
 I colored the image with my Copics, before using the Notebook Edge die from My Favorite Things to create a fun border at the bottom. I used a black glaze pen to add shine and dimension to their eyes, then went in with a Gelly Roll 05 once the black was dry. I fussy cut around the image, and the stems of the sunflowers actually dictated the width of this card, which only measures about 3 1/4 x 4 3/4″. If you include the flowers hanging off the edge, it’s a little wider than 4 1/4″, so I might need to put it in a larger envelope.
 I used the Raised Sentiments 3D embossing folder from Altenew on a piece of Harbor cardstock from Concord & 9th to create a little interest in the background, cut it down and adhered it to a top fold white card base. I mounted my colored piece on top using foam tape, I’m a big fan of dimension on cards.
 I die cut one of the dies from the Blooming Delight die set from Altenew from True Black cardstock from Papertrey Ink. I cut five, put two together, and stacked the remaining three, so I had two somewhat dimensional die cuts. I die cut the shadow layer from Heavyweight Translucent Vellum from My Favorite Things, adhered the stack with 3 behind it and the stack with the 2 on top. This creates a nice shadow around the shadow die without the use of foam tape.
 I white heat embossed a sentiment from the Pristine Peonies stamp set from Altenew, cut it down to a strip, added a few more strips behind it for dimension and adhered it below my die cut to complete the sentiment (the stamp actually says
  Fairly soft color palette for this one.
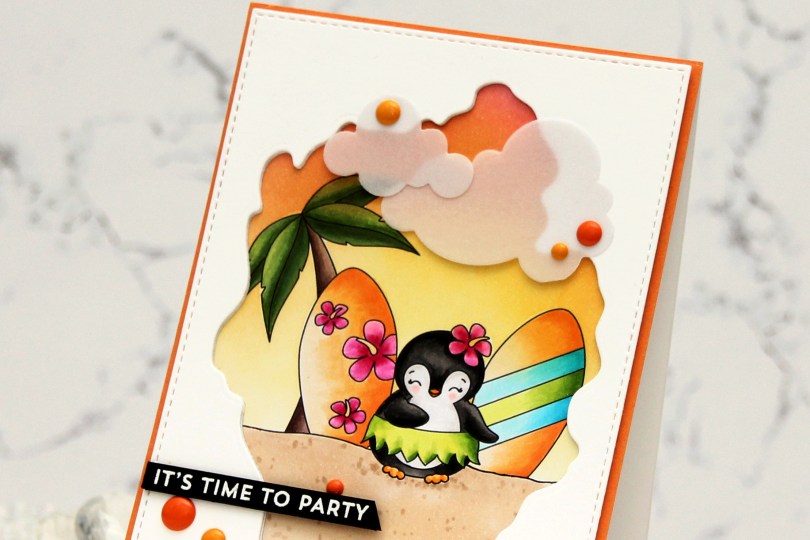
 I created my little scene with the palm tree, a couple of surfboards and a penguin. I can never resist a penguin, and this one has a hula skirt – I was sold! I colored my scene with Copics, and the plan I had initially went out the window. I was going to color the base of the surfboards in a light yellow, almost white, but then I came up with this soft orange combo and totally changed everything else to fit. Instead of a soft blue sky, I ink blended a sunset using Honeysuckle, Clementine and Buttercup inks from Concord and 9th. I then used the largest die in the A2 Stitched Rectangle STAX 1 set from My Favorite Things, along with the Watercolor Wash Free Form die, also from MFT, to create a rectangular panel with a fun window. I die cut a couple more to stack behind the front panel to create a little bit of dimension, before adhering it all to my colored image.
 I adhered a quarter sheet of Clementine cardstock from Concord & 9th directly to a top fold card base and glued my scene in the center. This created a bit of an orange border around the image. I then die cut Cloud 1 & 2 from Papertrey Ink out of Heavyweight Translucent vellum from My Favorite Things. I love die cut vellum clouds. This vellum is super thick, so the glue I put behind it doesn’t even show through, but I still placed enamel dots strategically on top. Old habit, I guess. These enamel dots are actually from a Halloween pack from Papirdesign. Onto a piece of True Black cardstock from Papertrey Ink, I stamped and white heat embossed a sentiment from the Bitty Birthday Wishes stamp set from My Favorite Things. I cut it down to a strip, added a couple of extra layers of cardstock behind it and adhered it to my card.
 I used quite a few Copics for this one.
 I used the panda peeking out from behind a fence or a wall or whatever you’d like it to be, as well as the bamboo. I used the bamboo multiple times to create a “wall” of bamboo behind my panda. I created mirrored versions so they wouldn’t all look the same, and I made sure to make them different heights. I erased the bottom of the bamboo so they’d end at the horizontal lines going out from the paws of the panda. Once I printed my image, I used a 0.35 Copic multiliner to extend the horizontal lines, making it look like a wall. I colored in my image, making sure to use a couple of green combos for the bamboo leaves for a little bit of variety.
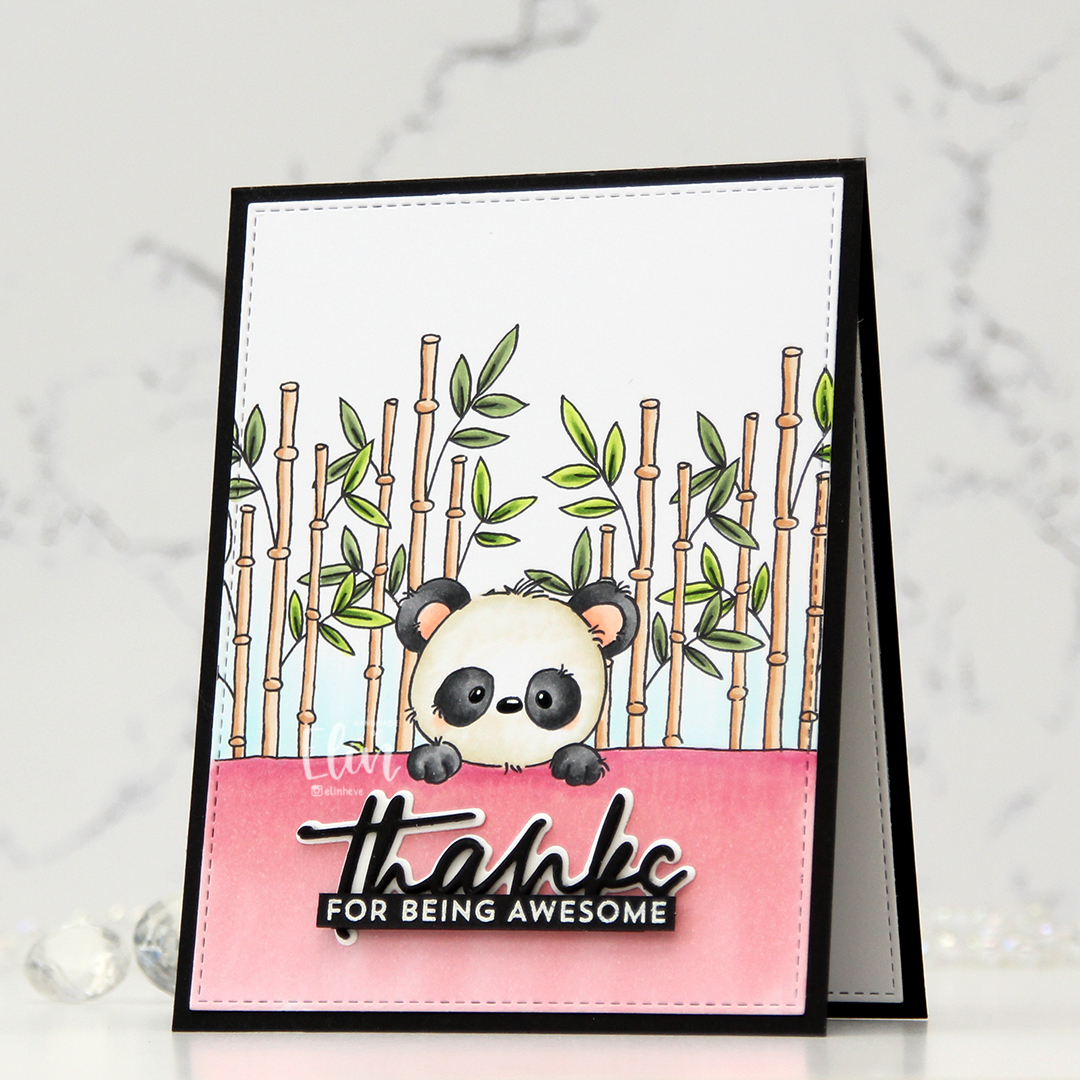 I used the largest die in the A2 Stitched Rectangle STAX Set 2 die set from My Favorite Things to create a nice faux stitch border around the edge, before adhering it to a black card base I created from True Black cardstock from Papertrey Ink. With my pink wall, I felt like I had to make a baby card, but I didn’t want to, so I opted for the black. I used the Sweet Sentiments die set from Altenew to die cut my thanks word. I stacked three black die cuts for dimension and die cut the shadow from Stamper’s Select White cardstock, also from Papertrey Ink. I rarely use shadow dies, but I knew I was going to white heat emboss the rest of the sentiment, so I figured it would work. I also tend to pop up my sentiments, but actually adhered this one flat down onto the card. It still has dimension because of the stacking. I stamped and white heat embossed a sentiment from the Bitty Thanks & Gratitude stamp set from My Favorite Things, cut it down to a strip and adhered it on top of my stacked die cut. I put an extra strip behind it for a little bit of strength. I also added a black glaze pen to the eyes and nose, before going in with a white Gelly Roll 05 on top once the black was dry. This adds some shine to my little panda. I decided not to add any embellishments to this card, which is really rare for me.
 This card started out with me playing with the cotton thread from Kort & Godt. I wanted to something with it besides tying it in bows, and crocheting came to mind. I crocheted three flowers in different colors, and that was my starting point. I created a subtle background using the Watercolor Stripes stencil from Altenew with VersaMark ink, Sticky embossing powder and Distress Glitter in the Rock Candy color. This gives a soft tone on tone sparkle on the white cardstock and doesn’t distract too much from the flowers. I thread the flowers through to the back of the panel, used some tape to hold the thread down on the back and mounted it using foam tape onto a top fold white card base.
 I die cut the leaf circle die twice; once from vellum (I used Heavyweight translucent vellum from My Favorite Things), and once from Sprout cardstock from Concord & 9th. I offset them a bit, and used small amounts of liquid glue to adhere them to the card. I also die cut Konfirmant a few times from pink cardstock and adhered them together for a stacked, dimensional look. Once I added my die cut to the card, however, it got lost, so I die cut a layer from black cardstock from Papertrey Ink and glued that on top. That did the trick. I used a sentiment sticker to complete the sentiment and added some faceted pearls as a finishing touch.
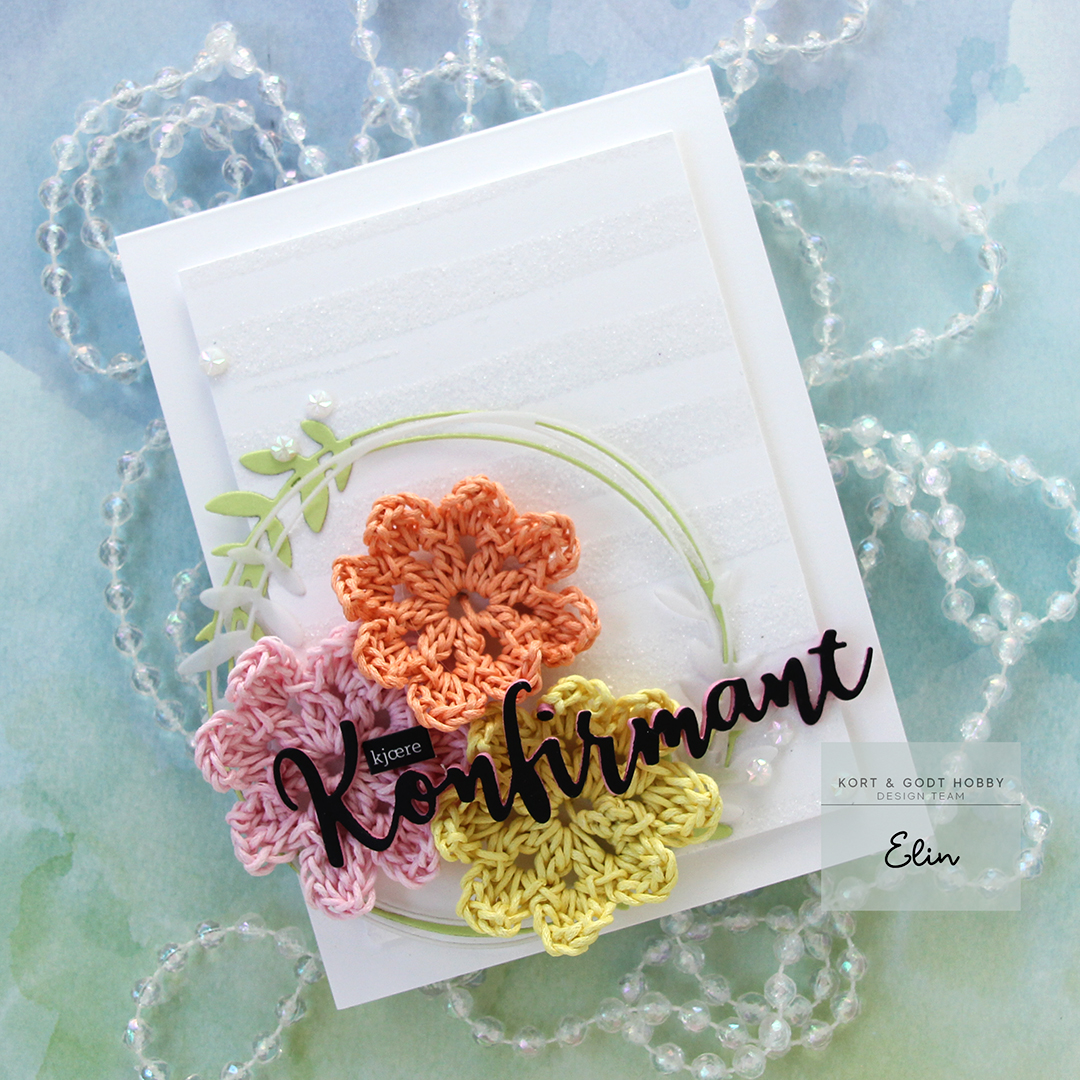 This was a fun way to use the cotton thread, and I still have heaps more!
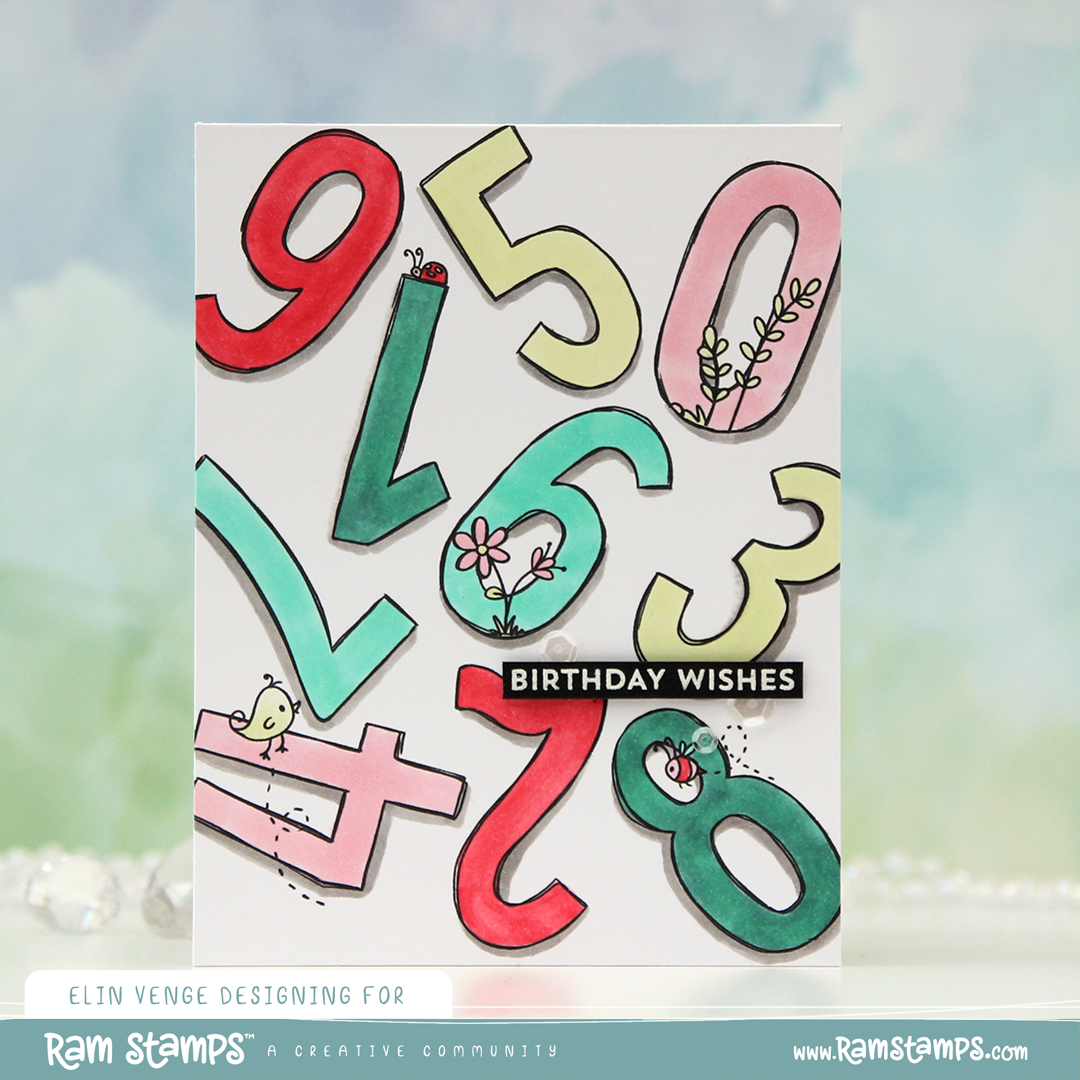
 I chose a very limited amount of Copic markers and colored the number in. I didn’t do any blending, this is all flat color. I added a little bit of shadow to the numbers and colored the flowers and small critters in the same colors, which is why the bird is light green and the bee is red and pink instead of the traditional yellow and black.
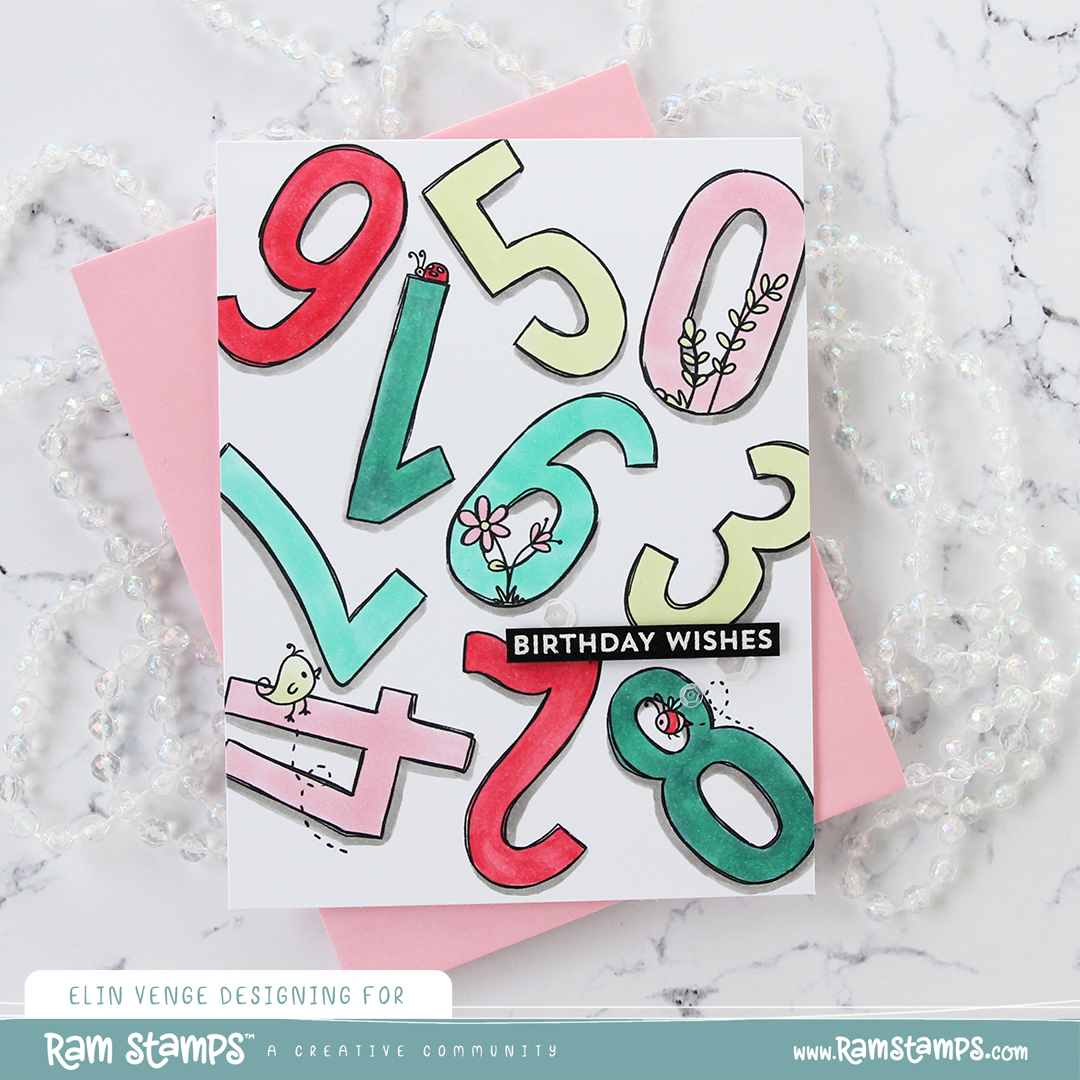 I adhered my panel directly to a card base. I also stamped and white heat embossed a sentiment from the Bitty Birthday Wishes stamp set from My Favorite Things onto True Black cardstock from Papertrey Ink. I added some dimension behind the sentiment strip, adhered it to the card and finished off with sequins from the Starry Night mix from Little Things from Lucy’s Cards.
 The little bit of lift behind the sentiment makes it stand out even more. It also helps that it’s black. I paired the card with an envelope from Altenew. The Pink Diamond color matches the light pink in my coloring.
 Very very simple color palette for this one.
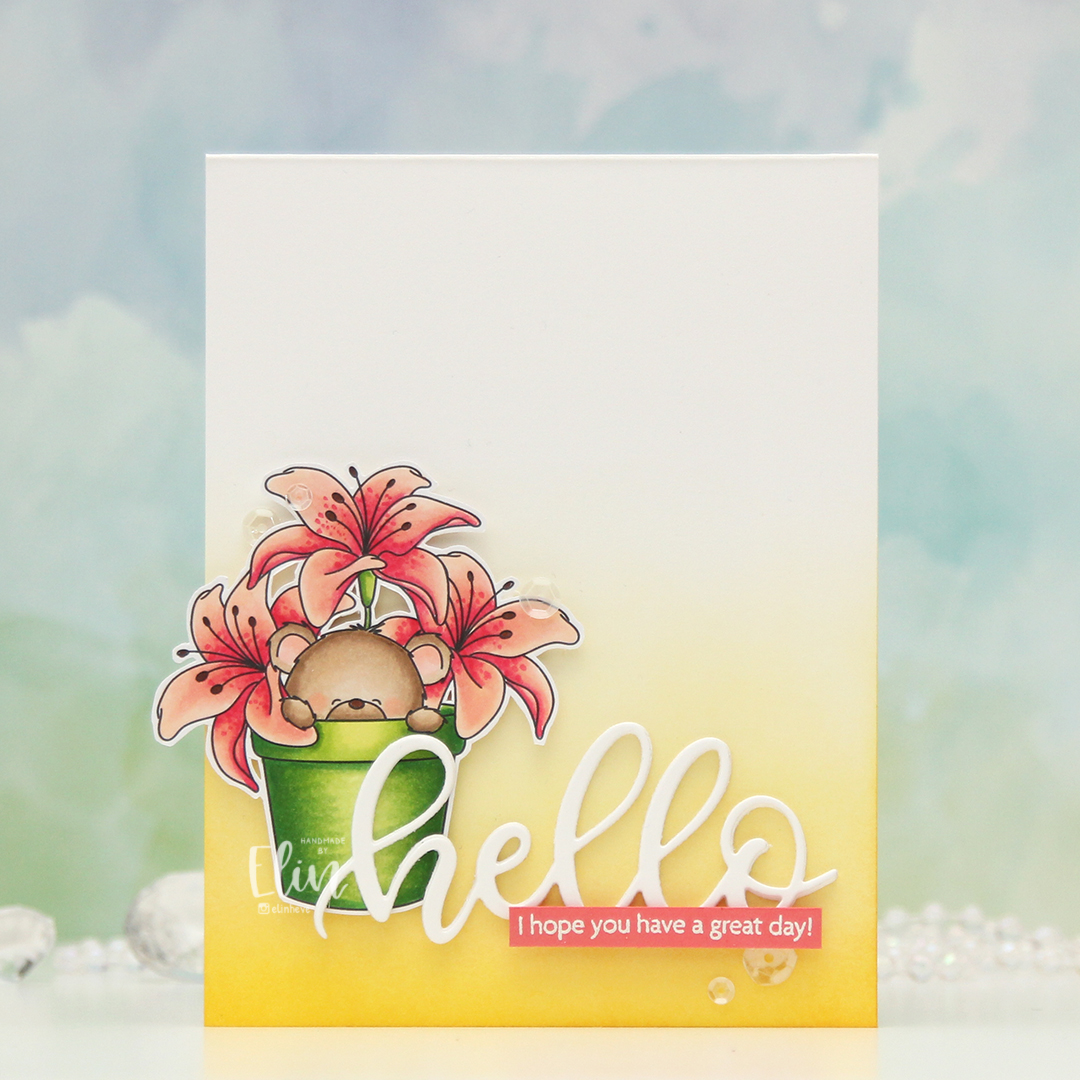 I colored the image and fussy cut, leaving a bit of a white trim around the edge, before putting it aside while I worked on the rest of my card. Onto a top fold white card base, I ink blended Scattered Straw Distress ink in a gradient from the bottom, fading into white. I wanted a little more oomph and went in just at the bottom with Mustard Seed, which is a little bit darker. I used the Sweet hello die from My Favorite Things to die cut hello four times from white cardstock, which I stacked for dimension.
 Onto a piece of Berry Sorbet cardstock from Papertrey Ink, I stamped and white heat embossed a sentiment from the Pristine Peonies stamp set from Altenew. I cut it down to a strip, added a few additional strips behind it and started assembling my card. I put foam tape on the back of the image and adhered it so a little bit of it hangs off the edge, adhered my stacked hello die cut partly on top of the pot, partly directly on the card base, and then the sentiment strip on top of the die cut. I like when it’s all connected like this, it makes for a more cohesive design than if I were to add the sentiment strip below the hello. To finish off, I added a few sequins here and there from the White Orchid Sequin mix from Little Things from Lucy’s Cards.
 Simple color palette for this one.