Hi, everyone! Today’s blog post is a long one with lots of photos of lots of cards, so I suggest you get comfortable 🙂
 I’m starting with a baby card. I made quite a few baby cards from this one sheet. Usually I make A2 size cards, but this image is so big that the card actually measures 5 x 8 1/2″. I used a knife and a pair of scissors to cut my image, keeping a thin white border along the edge.
 I ran a piece of white cardstock through my Gemini Jr. using an embossing folder from We R Memory Keepers. The result is a background with a little bit of interest, while still keeping the image in focus. I used foam tape to add my dry embossed pane to my card base and some 1 mm foam tape from Rayher on the back of my image for a tiny bit of extra dimension. I also used 1 mm foam squares to add the sentiment strips to the balloon, and finished off the card with some sequins and crystals from Little Things from Lucy’s Cards.
 The embossing folder I used is 6 x 6″. Since my panel was taller, I had to run it through from both ends. Along the seam I added a strip from another sheet of patterned paper from the same collection. The strip hides the seam and also acts as an anchor for the balloon image.
 My goal was to use every little bit of the images on the one sheet, so I glued the left over branches to the inside of the card.

This is the sheet of patterned paper I’ve used for all my cards. It’s called Cuddles and is part of the Little Treasures collection by Kaisercraft.
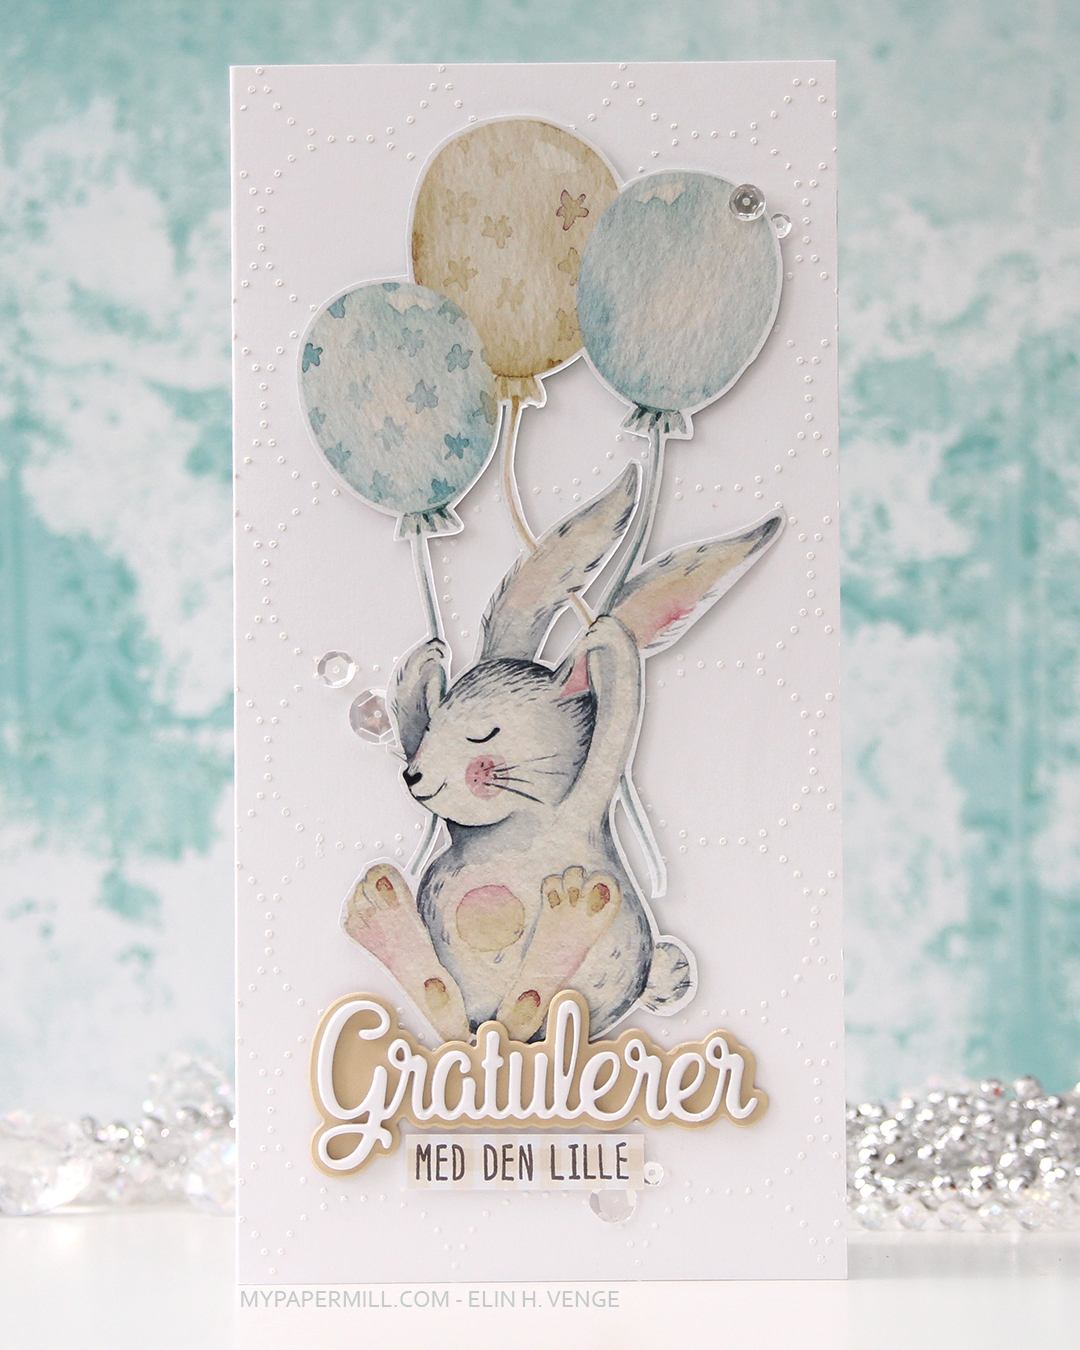
 My second card is along the same lines as the first one. I used the bunny in the pink hot air balloon and the stars that are scattered around the paper on this one. This card is a little more narrow, measuring 4 1/4 x 8 1/2″. On the background I used cloud stencil from My Favorite Things and Distress Oxide in the color Tumbled Glass to create some interest in the background without overshadowing my focal point. This time I glued the image straight to the cardbase using foam tape. I also used foam tape behind some of the stars, while others are glued down using liquid glue.
 I used a Papirdesign die set to diecut the word babyjente (baby girl). I diecut the shadow twice in vellum and the actual word several times using white cardstock. I put a few layers behind the vellum, making it look like the vellum is floating, and the rest of the layers on top of the vellum. Diecuts really pop when they’re layered like this.
 Even though the card is simple, all the dimension makes it a little bit interesting anyway.
 I glued on some sequins from Little Things from Lucy’s Cards on this one too. The leftover stars I glued to the inside of the card.
 My next card is a simple birthday card. I’ve gone back to my regular A2 size with this one. I used the largest of the dies in the Stitched Rectangles STAX 2 set from My Favorite Things and used an embossing folder from We R Memory Keepers to create a little bit of interest to my background. I glued the panel straight onto my pink card front, with no dimension this time.
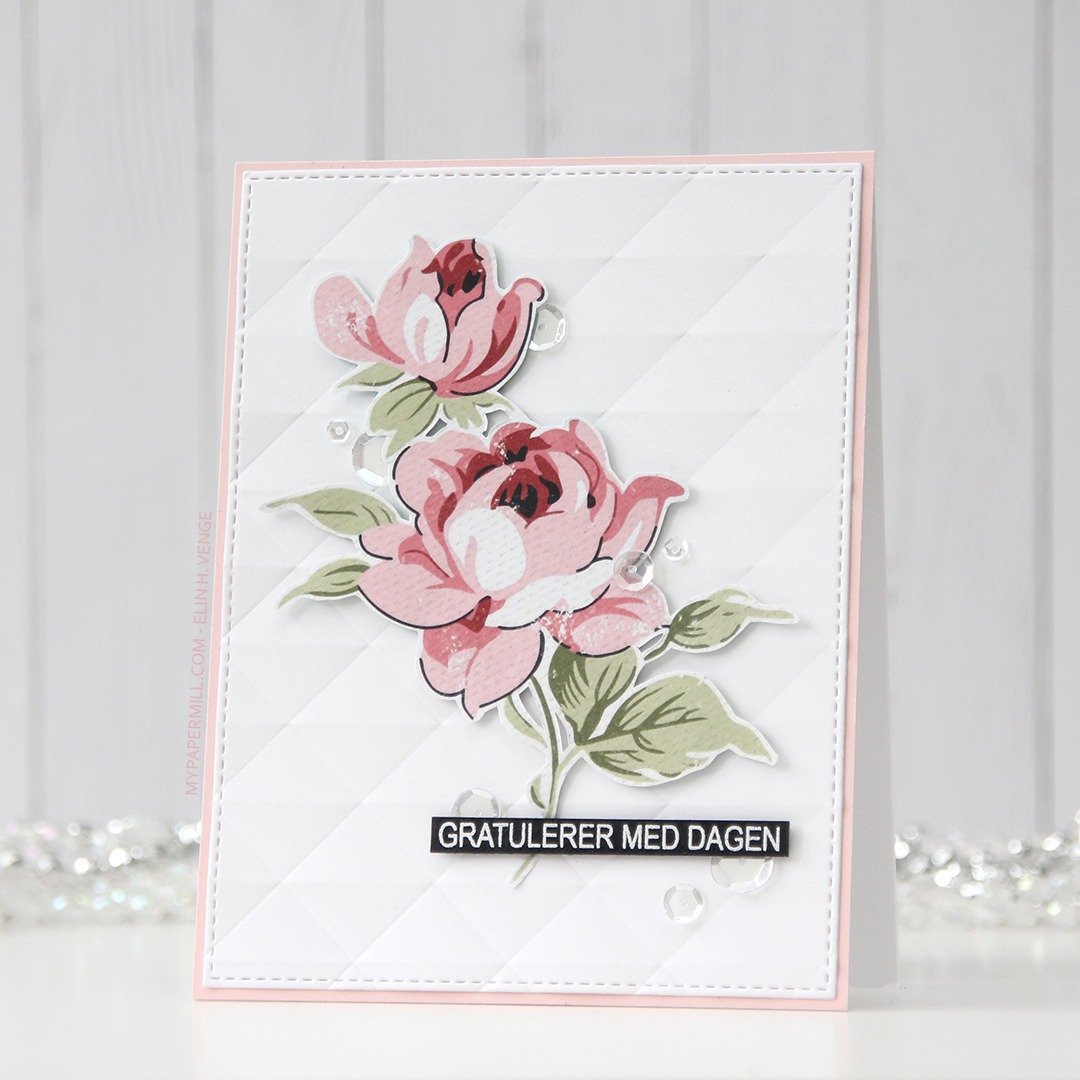 I used 1 mm foam squares to glue my fussy cut flower to the front of the card. I stamped and white heat embossed a sentiment from Mathia design on a strip of black cardstock and used foam tape to attach it to the card over the stem of the rose.
 I finished off my card by gluing on some Pretty Pink Posh sequins in a sort of visual path from the bottom of the card near the sentiment all the way to the top rose. I always glue small embellishments like this close to other elements on my cards, it creates a better visual effect than gluing them far from everything else.
 Card number four is a very different kind of card for me. When I started the process of making these cards I drew sketches for each card. The sketch for this one was for a portrait orientation, but when I actually started making this one I realized that the image was a landscape orientation, so I had to flip my sketch and change things around a bit. This image is quite large, so this is an A7 (5×7″) card. I had two sheets of the patterned paper, so I used the back of the second one to create my frame, and glued it to my cardbase using foam tape.
 I added the flowers to my cardbase using foam squares.
 I wasn’t sure what to do for a sentiment since I had to turn my sketch 90 degrees and make changes to it. The idea I had for the portrait orientation didn’t translate to a landscape orientation. In the end I chose to put my sentiment in the bottom left of my card. That’s not a spot I usually use for my sentiment, but on this card I thought it was the best placement. The sentiment itself is a veneer piece from Rayher that I embossed using four layers of white embossing powder, glued straight to my flowers and frame using liquid glue.
 A few Pretty Pink Posh sequins around the sentiment finished off this card.
 My next card is another baby card. A square one, measuring 4 1/4 x 4 1/4″. No white border around the fussy cut bunnies, simply because the tip of the tail on the largest bunny intersects with a rose bud on the patterned paper, making me have to cut a little bit off his tail. Once that was done, I decided it would be best to cut right up to the edge of the rest of the bunnies as well.
 The background paper I used on this card is part of the Little Gem sheet, so is the sentiment I used. I diecut an eyelet circle using a Cottage Cutz die and added it in the center of my card using foam tape. I added the bunnies with 1 mm Rayher foam suares, and did the same with the sentiment, staggering it.
 I finished off the card with some matte gold sequins from Little Things from Lucy’s Cards. As usual when I add sequins to my cards, I glued them on near the sentiment. There’s another yellow bunny on the sheet of patterned paper, I fussy cut that one and glued it on the inside of the card.
 The next card is a slimline card. I used a Memory Box stencil with some acrylic paste from Kreul to make a little bit of interest to the background, once again making sure it still remains a background element.
 I glued the bunny to the cardbase with 1 mm foam squares and diecut Gratulerer (Congratulations) from Papirdesign multiple times from white cardstock, then glued them to a shadow made from colored cardstock (Fine Linen from Papertrey Ink). The stamped sub sentiment is from a Papirdesign stamp set (100 år), stamped in Memento Espresso Truffle ink on the bottom strip of the patterned paper. I added it with some foam tape below the diecut.
 I finished the card by adding sequins from Pretty Pink Posh in a visual triangle. They’re all in close proximity to the sentiment and the bunny. Some of them glued on top of other elements, some of them tucked behind.
 My next card is another regular A2 size card. I covered the cardbase using the same sheet of paper I used on the square card, only the reverse side. The small flowers are from that main sheet I’ve used throughout each of the cards in this blog post. These flowers were on the edge of the sheet, so they’re flat on one side, so I had to put them along an edge. I figured that this polaroid frame from My Favorite Things was perfect.
 I made a white, dry embossed background on this card also and mounted it using foam tape. It makes the background a little less busy, and the little flowers I fussy cut a little more prominant. I stamped a sentiment from fra Mathia design onto the patterned paper and used it as my “photo” in the polaroid frame, which I created from several layers of white cardstock that I stacked on top of each other. Here you can also see a little bit of the inside of the card, as well, where I glued the flowers that didn’t fit on the front of the card. I was determined to use every single image from that one sheet of patterned paper.
 I embellished with sequins from Pretty Pink Posh. This time in two clusters near the flowers to keep the focus on them and not so much the sentiment in the center.
 The final card. I wasn’t entirely sure what to do with this one. The feathers were the only images remaining from that one sheet, and I didn’t know how to use them in a good way and turn them into a nice card until I realized I could make a background from them. There was only one turquoise feather on the page, so I fussy cut the turquoise feather from the second sheet to get a good balance of color between all the feathers.
 Embossing folder on white cardstock once again, and I created a pretty wide margin on the outside with this one. I usually like my margins fairly narrow, but I think this turned out good. I added my feathers to the dry embossed panel using 1 mm foam squares, cut off the excess and used those bits to cover the empty spots left behind in the corners.
 The sentiment is from a stamp set from Mathia design, stamped in black on a white cardstock strip. The turquoise strip behind it is from that other sheet of patterned paper that I’ve used here and there in the course of these eight cards. There’s a sentiment in white on that strip, but the strip I glued on top started and ended between words on the turquoise one, so only the turquoise is showing, I was really lucky that way. I finished off my card with some Pretty Pink Posh Sequins. This time I glued some near the sentiment and scattered a few others tucked between some of the feathers.
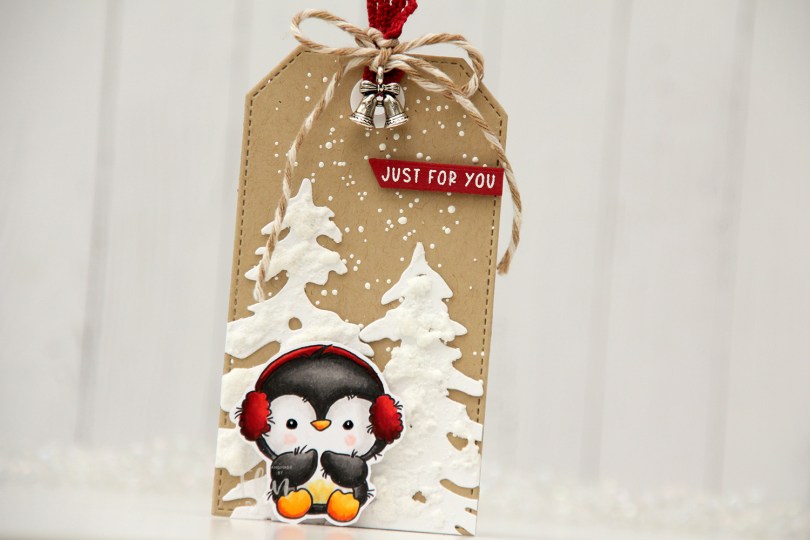
 I colored him with Copics and fussy cut him leaving a white trim around the edges. This particular image would be easy to cut up against the lines, but the wispy lines so characteristic of Lili of the Valley images would be lost, so I opted for the white border. I put black glaze pen in his eyes for shine, and then a dot of white using a 05 Gelly Roll, and put him aside while I worked on the rest of my tag.
 I used a die from the Stitched Traditional Tag STAX die set from My Favorite Things to die cut from Classic Kraft cardstock from Papertrey Ink. I sprinkled Chunky White embossing enamel from Stampendous on top and melted it from behind for a snowy background look.
 I used the Silhouette Snow Trees die set from Mama Elephant to die cut trees from Stamper’s Select White cardstock from Papertrey Ink, before I added some snowy texture to them using a Snow Pen from Rayher.
 I stamped and white heat embossed Just for you from the Christmas Greetings stamp set from Lili of the Valley onto a piece of Amarena Cherry cardstock from My Favorite Things, before using a banner die in the Everyday Gift Box die set from My Favorite Things to turn it into a nice strip. I added a couple of layers of cardstock behind it for dimension and adhered it to the top right of my tag.
 I used some ribbon and twine from my stash, as well as a charm, to finish off the front of this tag. The ribbon, banner and the penguin’s earmuffs create a visual triangle of red elements on this otherwise very neutral tag.
 I die cut the same tag from white cardstock to use on the back. I added a couple of kraft colored branches that I die cut with the Pine Branches die set from Craft Emotions, as well as a to/from from the Tag Builder Blueprints 6 die set from My Favorite Things.
 This image is super fast and easy to color. It’s just a head, a hat and a couple of mittens. I wanted a green and gold card, so I colored her hat and mittens green and fussy cut her.
 Onto a white top fold card base, I adhered a panel of brushed gold cardstock. Actually I cheated a bit and only added a frame. I die cut the center out of it, so I can use that for something else. No one will ever know I cut a chunk out of it to save for later.
 Using the Stitched Snowflake Backdrop die from Lawn Fawn, I created a snowflake background from white cardstock. Once I’d die cut, I ran the panel through my Gemini Jr a second time with an embossing mat to add extra depth to the texture the die made. It really makes a huge difference, as opposed to just running it through once with the die.
 I used the Merry Christmas die from My Favorite Things to die cut from the same gold cardstock I used on the base. I die cut six additional layers from white cardstock, adding three of those behind the gold and three behind the shadow I cut from heavyweight translucent vellum from My Favorite Things. All these layers add a ton of dimension to an otherwise simple card.
 I added my image to the card using foam tape. Her hands hover just above the merry, it’s like she’s peeking in from behind the sentiment.
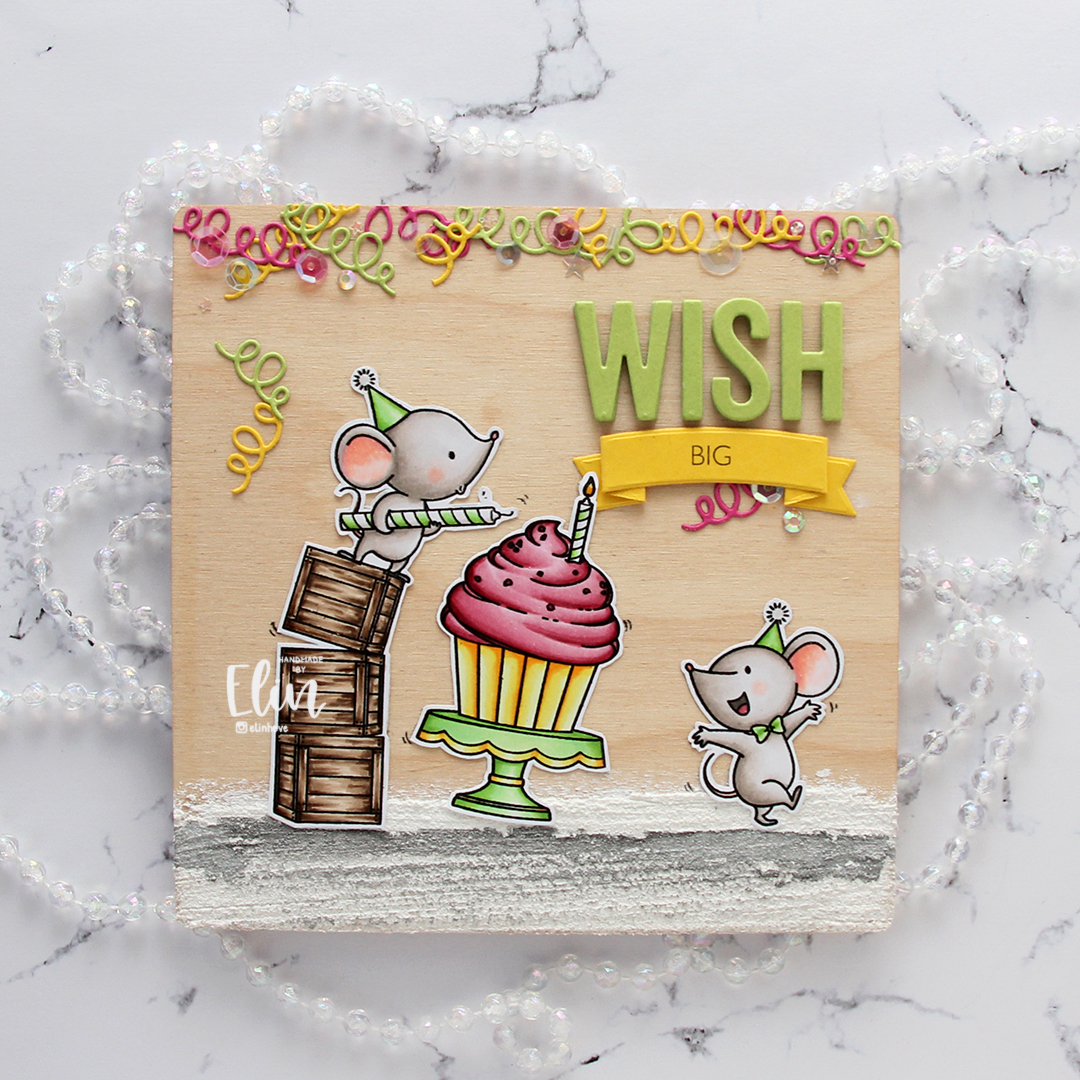
 Three same, but different gift tags using all the gingerbread people in the stamp set. I created the tags themselves using dies (two of them are actual tag dies, I used the topper from the ornament die set to create a topper for the heart to create a tag from that too). I used the Itty Bitty Gifting stamps and the Itty Bitty Strips dies, both from My Favorite Things, for all my to/from strips.
 I used Classic Kraft and Stamper’s Select White cardstock for most of my die cutting, both from Papertrey Ink. For the ornament I also used a piece of silver cardstock from Rayher. I did all my Copic coloring on 120 lb white cardstock from Simon Says Stamp. This isn’t the cardstock I normally use with my Copics, but it’s great for one layer cards and elements that you can see the back of, because the markers don’t bleed through. Getting smooth color blends with Copics is trickier on this cardstock than my beloved X-Press It blending card, but the thickness saves me from having to fussy cut each of those gingerbread twice to cover up any bleed through. It’s worth the trade off, I think.
 For the yellow one, I used the Snøfnugg, stor die from Papirdesign to create the snowflake tag. I added Nuvo Jewel Drops in the Key Lime color to the green buttons on the belly, and used a couple of pearls from the Igloo mix from Little Things from Lucy’s Cards for a little bit of embellishment. I put a piece of Divine Twine in the Lemon color through the hole at the top, making it easy to add to a gift.
 For the pink one I used the Hjerte 3 die from Papirdesign to create the tag (and the Julekule die to create the hole at the top). The sequins are from the same Igloo mix that I used for the yellow, and I also added Jewel Drops in the color Key Lime to the buttons on her belly. The twine is Divine Twine in the Cotton Candy color.
 And finally the green one. I used the Julekule die set from Papirdesign to create the actual tag, Nuvo Jewel Drops in the Limoncello color for the star on his sweater, and green dots from Papirdesign to embellish. The twine is Divine Twine in the color Green Apple.
 Very simple color palette for these.


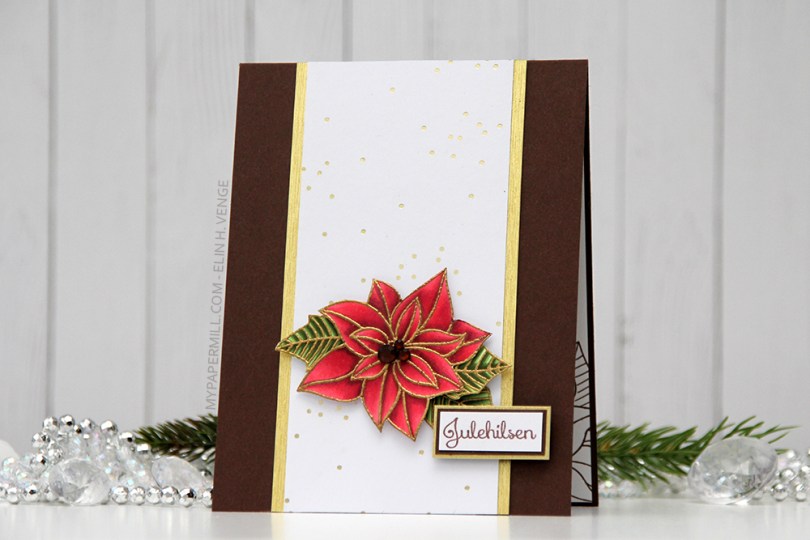
 Noen som husker
  Som på det forrige kortet har jeg brukt et hvitt ark med folierte gullprikker. Jeg syns den diskrete effekten er veldig fin, og det at prikkene er litt vilkårlig i arket gjør at det ikke blir altfor strukturert og strengt selv om jeg har mange rette linjer.
 Julestjernen har jeg satt på 3D-puter, det samme har jeg gjort med teksten, som er et stempel fra Papirdesign. Gullfargen fra prikkene i arket og embossingen på blomstene har jeg plukket opp ved å bruke en stripe av
  Siden kortbasen min er såpass mørk ville jeg sette på et eget panel på kortets innside til å skrive personlig hilsen på. Det ga meg en ypperlig anledning til å stemple blomsten på nytt, bare for å pynte litt opp. Maskerte blomsten og stemplet bladene også. Man trenger ikke engang å fargelegge, selve stempelet er pynt nok i seg selv.
 Her er fargene jeg brukte på blomsten min. Når man skal embosse og bruke Copics er det viktig at man stempler som normalt og fargelegger først, så stempler på nytt og embosser. Du vil ikke fargelegge etter at du har embosset, det kan nemlig skade tuppen på tusjen. Ved å fargelegge først og embosse etterpå unngår du hele problematikken.
 For en som stort sett lager veldig enkle kort er dette noe litt utenom normalen. Tro det eller ei, men bare selve shakerboksen tok et par timer å lage.
 Jeg er i utgangspunktet ingen fan av rødt til jul, men jeg er glad i utfordringer. Ikke er jeg glad i gull heller, så man skulle tro at julearkene til Prima, som både hadde rødt og gull, ikke var noe for meg, men jeg er også sta, så jeg får til å bruke det meste likevel. Jeg valgte arket
  Jeg brukte en
  Bak shakerboksen har jeg enda et mønsterark, her ville jeg ha noe i kontrast til det røde, så da falt valget på
  Her er omtrent alt på kortet limt på med dimensjon, så kortet er ganske tykt, selv om det kun er forsiden som er pyntet.
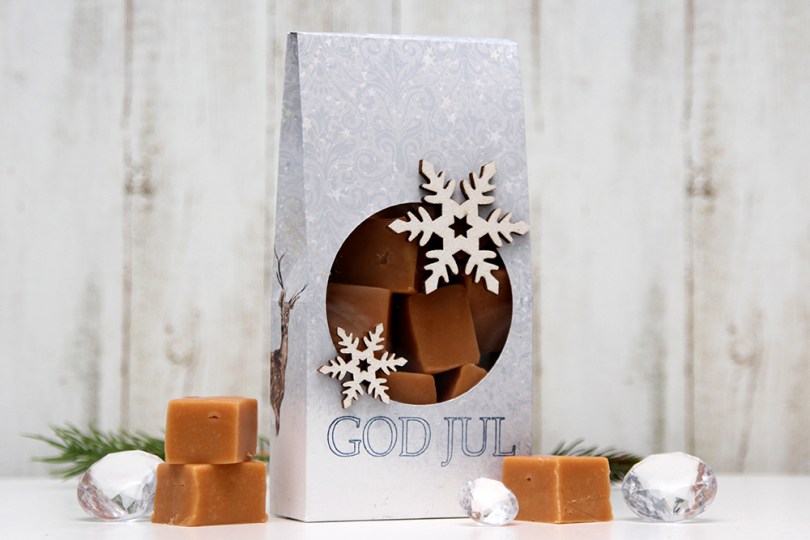
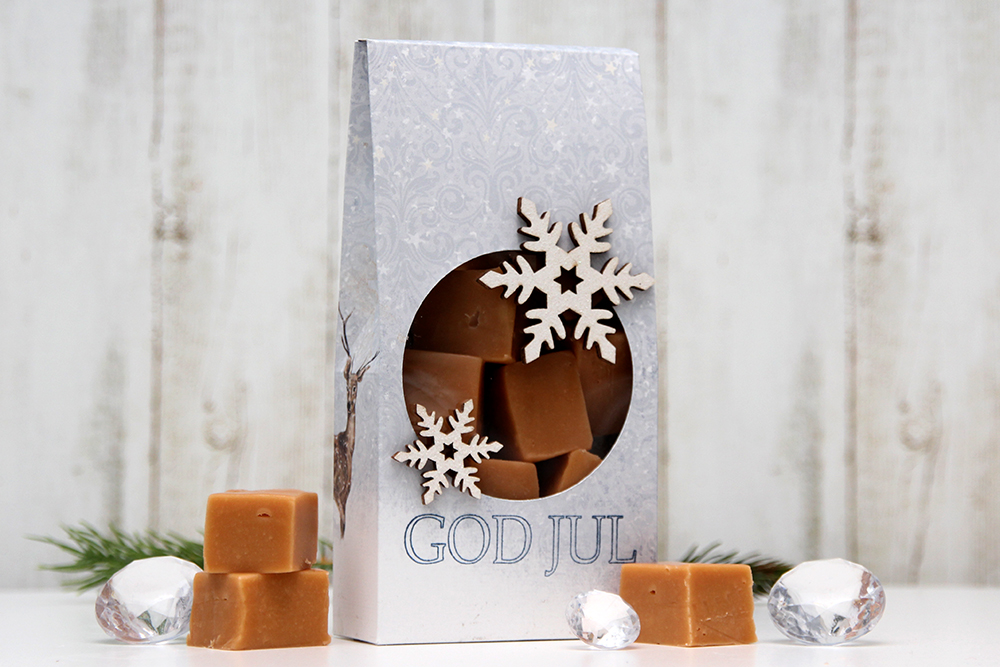 Jeg brukte
  Siden man kun bruker 9″ av bredden på arket er det greit å velge seg ut en bit som gjør seg fin både på for- og bakside av posen. Disse hjortebukkene gjør seg veldig fint på baksiden (og litt siden) av posen, man trenger ikke mer pynt enn det.
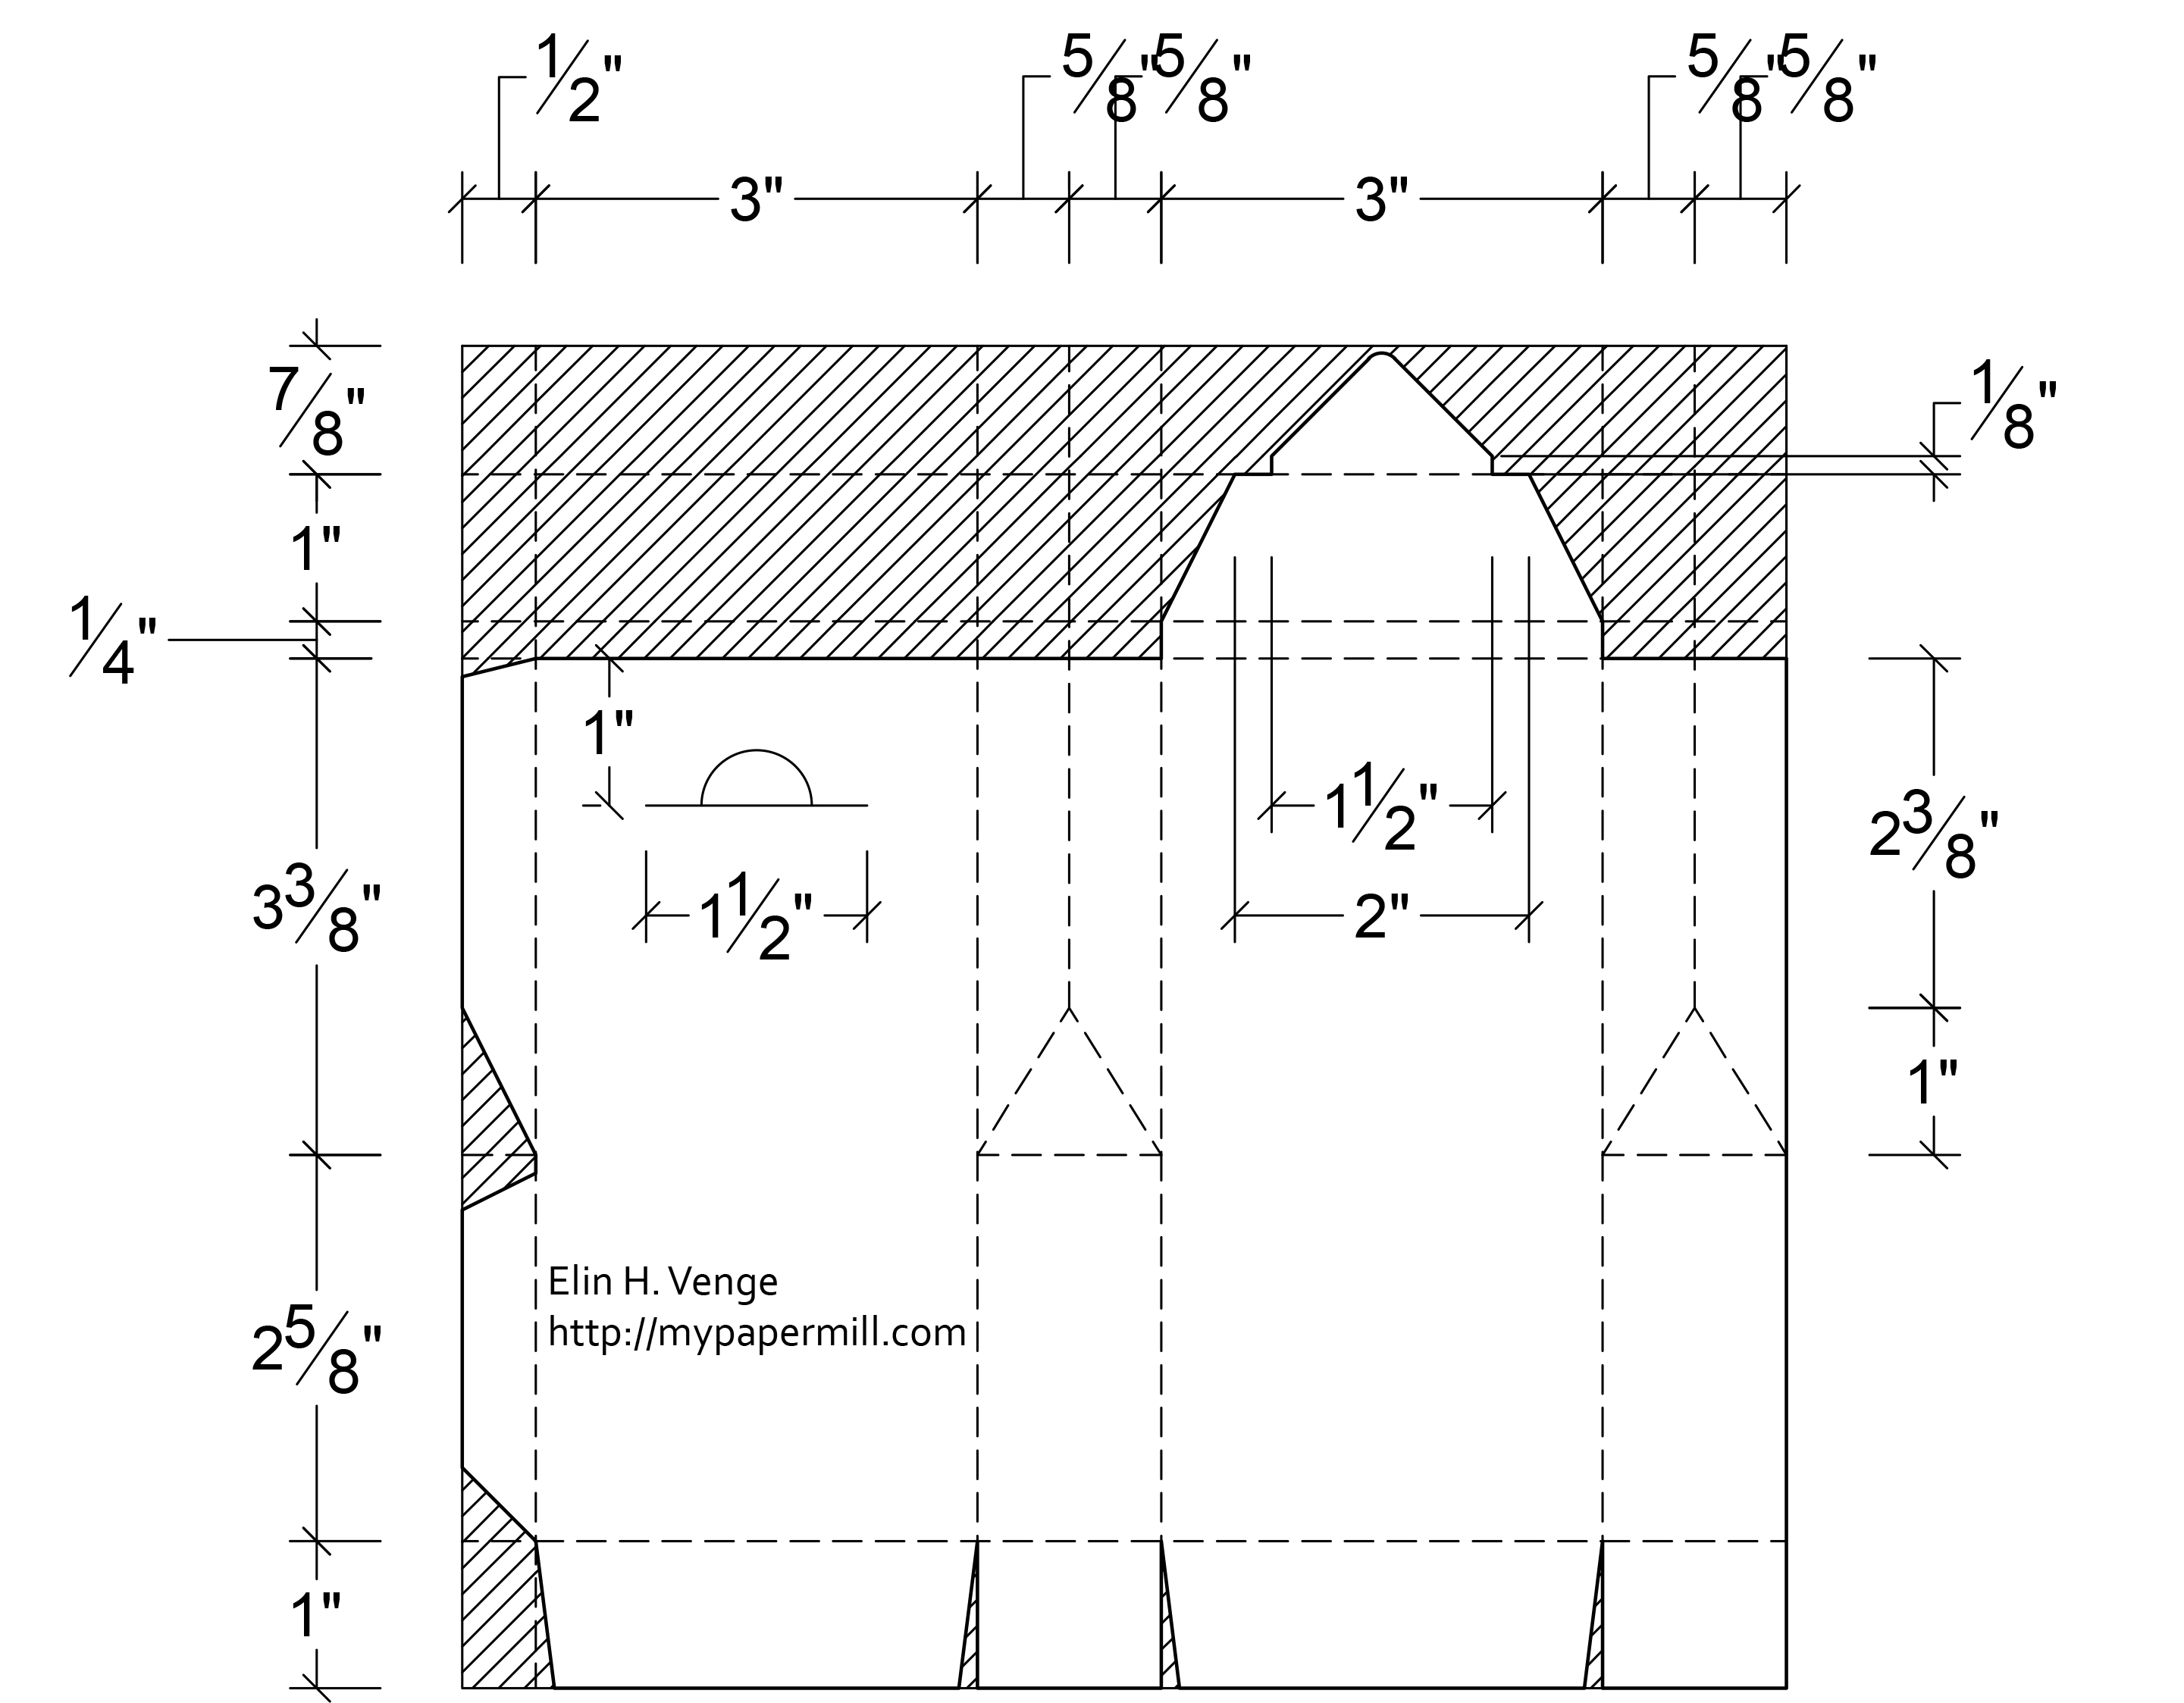 Da gjenstår kun å ønske god jul fra meg. Håper du går en fin julefeiring i møte!
 I have a soft spot for Stacey Yacula’s images, and the Sweet Holiday Penguins set from My Favorite Things was perfect for a quick, simple Christmas card. I’m normally not one for scene cards, but I thought these two deserved better than to just float around, so I added a night sky and some subtle hints of snow on the ground.
 I colored my penguins during Kathy Racoosin’s 30 day challenge on Instagram, and asked my followers how to add snow. Someone suggested paint splatters and embossing powder, so that’s what I did. I used liquid watercolor from Hero Arts for the splatters, and lots and lots and lots of chunky white embossing enamel from Stampendous for the rest. It makes the card seem very wintry, and the embossing enamel adds a ton of texture to an otherwise very simple card.
 I could have made it a one layer wonder, but I like the faux stitch look you get with the stitched rectangle STAX sets from My Favorite Things, and I love the 1/16″ frame of pure white around it. I even mounted my panel on foam tape for that extra bit of dimension.
 Simple, yet dimensional from that foam tape, with lots of texture from the embossing enamel. Maybe I should start making scene cards more often?
 I can’t believe I’ve nearly used all the different gray families on one card, all I’m missing are the Ws.
 Jeg stemplet blomstene og bladene i
  Jeg ville ha en enkel, men ikke altfor enkel bakgrunn på kortet mitt. Valget falt på et ark med folierte gulldetaljer. Prikkene går litt inn i arket og gir et letterpress-utseende som jeg virkelig liker.
 Jeg stemplet en tekst fra en stempelplate fra
  Her kommer gullprikkene i hovedpanelet på kortet godt frem.
 Jeg prøver å være flink til å få med hvilke tusjer jeg har brukt på motivene mine, veldig kort og enkel fargepalett denne gangen.