
Hi, crafty friends. I’m sharing a super simple card today, featuring Deer & Bunny from Rachelle Anne Miller. This is such a sweet image from her, and it happens to be one that I hadn’t used before, so it was about time I colored this one.
 I colored the image with my Copics before cutting out a couple of quick masks for the deer and bunny. I ink blended a soft blue circle behind them, using the Watercolor Circle stencil from My Favorite Things and ink (Harbor ink from Concord and 9th) that was left on my light blue blender brush from my last project. Using a die in the Additional A2 Layers die set from Waffle Flower, I cut my panel down, added four layers of cardstock behind it for dimension and put it aside while I worked on the rest of my card.
 To a top fold white card base, I adhered a piece of patterned paper from the Watercolor Wash 6×6 paper pad from My Favorite Things and added my stacked panel in the center. Using a die from the Sweet Sentiments die set from Altenew, I die cut for you twice from white cardstock and once from the patterned paper. I stacked the die cuts and glued my sentiment right above the deer. The green patterned paper is very soft, but by stacking the die cuts, the sentiment still stands out a little. I added a bit of black Glaze pen to the eyes and finished off the card with pearls from the Fresh Mint mix from Little Things from Lucy’s Cards.
![]() Limited color palette for this one, it came together fairly quickly.
Limited color palette for this one, it came together fairly quickly.

 I used the panda peeking out from behind a fence or a wall or whatever you’d like it to be, as well as the bamboo. I used the bamboo multiple times to create a “wall” of bamboo behind my panda. I created mirrored versions so they wouldn’t all look the same, and I made sure to make them different heights. I erased the bottom of the bamboo so they’d end at the horizontal lines going out from the paws of the panda. Once I printed my image, I used a 0.35 Copic multiliner to extend the horizontal lines, making it look like a wall. I colored in my image, making sure to use a couple of green combos for the bamboo leaves for a little bit of variety.
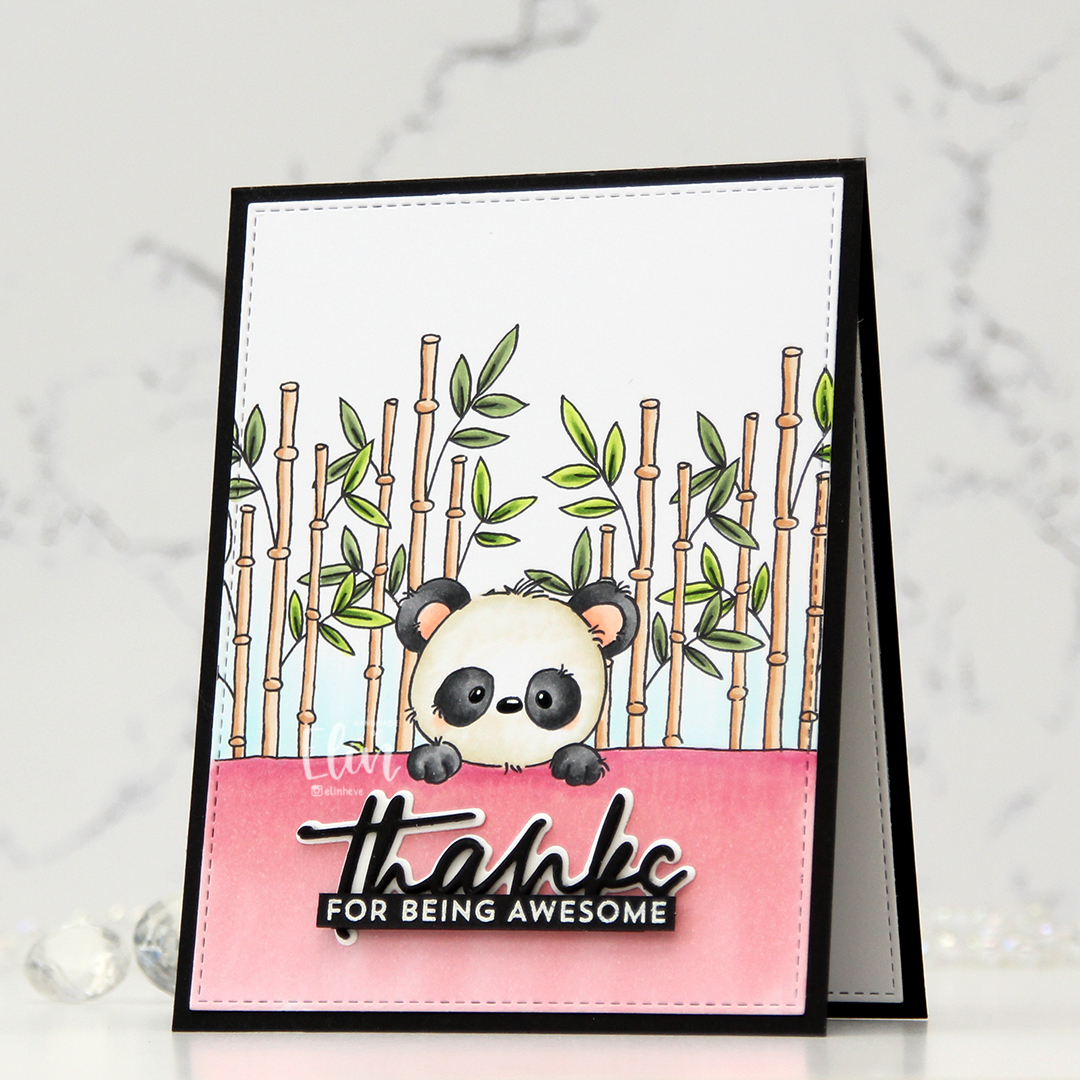 I used the largest die in the A2 Stitched Rectangle STAX Set 2 die set from My Favorite Things to create a nice faux stitch border around the edge, before adhering it to a black card base I created from True Black cardstock from Papertrey Ink. With my pink wall, I felt like I had to make a baby card, but I didn’t want to, so I opted for the black. I used the Sweet Sentiments die set from Altenew to die cut my thanks word. I stacked three black die cuts for dimension and die cut the shadow from Stamper’s Select White cardstock, also from Papertrey Ink. I rarely use shadow dies, but I knew I was going to white heat emboss the rest of the sentiment, so I figured it would work. I also tend to pop up my sentiments, but actually adhered this one flat down onto the card. It still has dimension because of the stacking. I stamped and white heat embossed a sentiment from the Bitty Thanks & Gratitude stamp set from My Favorite Things, cut it down to a strip and adhered it on top of my stacked die cut. I put an extra strip behind it for a little bit of strength. I also added a black glaze pen to the eyes and nose, before going in with a white Gelly Roll 05 on top once the black was dry. This adds some shine to my little panda. I decided not to add any embellishments to this card, which is really rare for me.
 I colored my raccoon with Copics, deciding to go with a triadic color combo of primary colors for his paints and accessories. I obviously used green for the grass, but the rest of this is all red, blue and yellow. I used the second largest die in the Watercolor Rectangle STAX die set from My Favorite Things to give it a playful, loose look on the edges, then used the Say Anything stencil, also from My Favorite Things, to ink blend a speech bubble using Harvest Gold ink from Papertrey Ink.
 In the speech bubble, I stamped a couple of sentiments from the Mini Messages & More stamp set from My Favorite Things, using Obsidian ink from Altenew. I took the various ink splatter stamps in the same stamp set and stamped in various colors across my panel, to amp up the crafty feel of the card. I used Watermelon, Harbor and Dove inks from Concord & 9th, as well as more of the Papertrey Ink Harvest Gold color that I used for the ink blending. Onto a card base I created from Cement Gray cardstock from My Favorite Things, I added some strips of cardstock to break the lines in my design. I used Watermelon cardstock from Concord & 9th, Blue Breeze from My Favorite Things and Harvest Gold from Papertrey Ink. I added my panel in the center using foam tape, and finished off with a few sequins from the Starry Night mix from Little Things from Lucy’s Cards. I actually also used a black glaze pen to create shine and a tiny bit of dimension to the eyes. On the raccoon, I also used a dot of white Gelly Roll 05 to each of the eyes once the black was dry.
 I printed my image on a quarter sheet of X-Press It blending card and colored it in. I stamped the word friend from the Mini Messages stamp set from Mama Elephant using Obsidian ink from Altenew. The sentiment actually says hello friend across two lines, but I masked off the top row so I’d have friend isolated. I adhered my panel to a top fold card base and used a black glaze pen to add some shine and a tiny bit of dimension to the eyes of the bunnies, the girl and the cute little bird.
 Onto a scrap piece of X-Press It, I scribbled RV34 across a section large enough to die cut from. The Sweet Sentiments die set from Altenew is such a great one, I love that these dies create small words that don’t take up too much real estate on a card. I backed my colored die cut with two white ones for a little bit of dimension and added it at somewhat of an angle right above the stamped part of the sentiment. This also served to cover up a booboo. Somehow, I was able to spill a tiny little drop of juice from a peach (note to self – don’t eat in the craft room), and the sentiment covers it nicely. I finished off the card with a triangle formation of sequins from the Starry Night mix from Little Things from Lucy’s Cards.
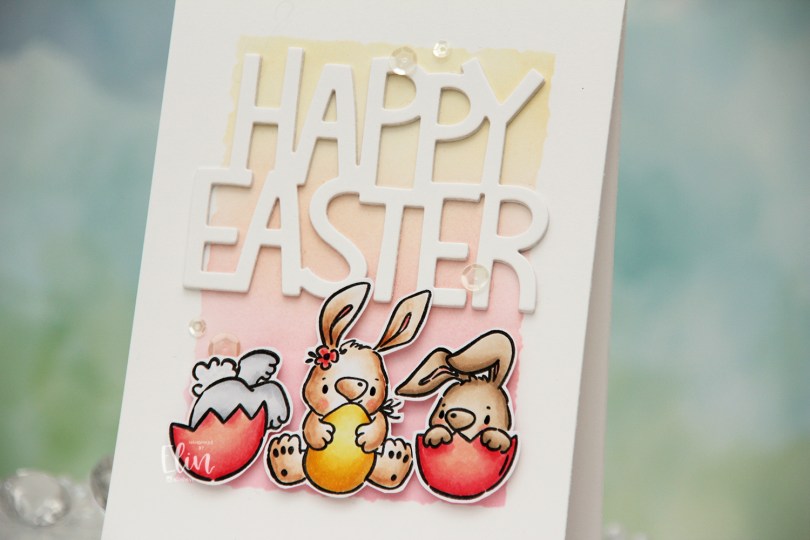
 The Easter Bunnies stamp set from Simon Hurley was the perfect one to teach with. It’s a stamp set with lots of images to choose from. They’re all small, easy to color and very beginner friendly, as there aren’t any big areas to fill in. Once colored, we fussy cut the bunnies. There’s a coordinating die set for this stamp set, but these are pretty easy to fussy cut.
 I did some simple ink blending on the background. I used the Watercolor Rectangle stencil from My Favorite Things and ink blended from the bottom to the top using Worn Lipstick distress ink, Pink Pearl ink from Altenew and Scattered Straw distress ink. These colors went well with the Copics I used for the bunnies, and it creates a little bit of interest to the background. I used the Giant Happy Easter die from Lawn Fawn and die cut that four times from white cardstock, before gluing them all together for a stacked look. I adhered the sentiment in the top center of the card, mounted the bunnies on foam tape and added a few sequins from the White Orchid Sequin mix from Little Things from Lucy’s Cards. I also used a black Glaze pen for the eyes, which the attendees really enjoyed, as it creates a little bit of dimension and shine very quickly and easily.
 I colored the image with my Copics, then used the second largest die in the A2 Stitched Rectangles STAX 2 set from My Favorite Things to turn it into a nice panel with a faux stitch edge. I put a few additional layers of cardstock behind my colored piece for dimension and adhered it to a card base that I had covered in the patterned paper in this release. I used the blossoms, I thought the pattern went well with the blooms in the image and colored my dragon to be a good color match.
 Using the Waterbrush Hello Die from Altenew, I die cut three layers from white cardstock and one from the patterned paper, adhered them together for a stacked look and placed the die cut so it nestles in with the image, before finishing off with a few pearls. These Panduro pearls are very pale pink and they’re at least ten years old, but they worked really well for this card. I also used a black Glaze pen from Sakura to add shine to the eyes, and on the dragon, I added a white dot to each eye once the black was dry.
 Simple color palette this time, one that really makes me think of (and long for) spring. Even though spring technically starts today in the Northern Hemisphere, it doesn’t feel like it yet. I’m getting impatient, I’m 100 % over the cold weather.
 I used the second largest die in the Watercolor Rectangle STAX die set from My Favorite Things to turn my colored piece into a panel with a fun edge. I added some layers of cardstock behind it and adhered it to a top fold card base I created from Berry Sorbet cardstock from Papertrey Ink.
 I used the Sweet Hello die from My Favorite Things to create my sentiment. I die cut four from white cardstock and one from Grapefruit cardstock from Concord & 9th and adhered them all together for a stacked, dimensional look. I stamped and white heat embossed a sub sentiment from the IWCL2017005 English stamp set from InkyWings on a strip of Berry Sorbet cardstock and added it to my die cut sentiment, making sure to put a few layers of cardstock behind it on the part that overhangs. I added a few sequins from the White Orchid Sequin Mix from Little Things from Lucy’s Cards, and put a dot of black Glaze pen from Sakura on the squirrel’s eye for a little bit of shine and dimension to finish off the card.
 I used a lot of colors for this simple image.
 I colored the image with my Copics and stamped love you from the Mini Messages stamp set from Mama Elephant using Berry Sorbet ink from Papertrey Ink, before using the panel die in the Blueprints 27 die set from My Favorite Things to cut it out and give it a nice scalloped edge with a faux stitch line on the inside.
 Onto a top fold white card base, I adhered a piece of blue patterned paper from the Watercolor Brights 6×6″ paper pad from My Favorite Things. I added a few layers of cardstock behind my large panel for a little bit of lift and adhered it to the card front, before finishing off simply with a few pearls from the Glossy Porcelain Mix from Little Things from Lucy’s Cards. Oh, and I also used a black glaze pen from Sakura to add a black dot to each of the eyes. This makes the eyes pop, and it adds shine and a little bit of dimension in real life, which you can’t really tell from the photo.
 I colored up
  I stamped a sentiment from InkyWings using Pink Pearl ink from Altenew. The stamp actually has the word hugs in it too, but I opted for a die cut hugs, using the Sweet Sentiments die set from Altenew. I die cut four from Grapefruit cardstock and stacked them together for a dimensional look.
 I finished off with a couple of heart droplets from Little Things from Lucy’s Cards.
 Fairly simple color palette for this one.
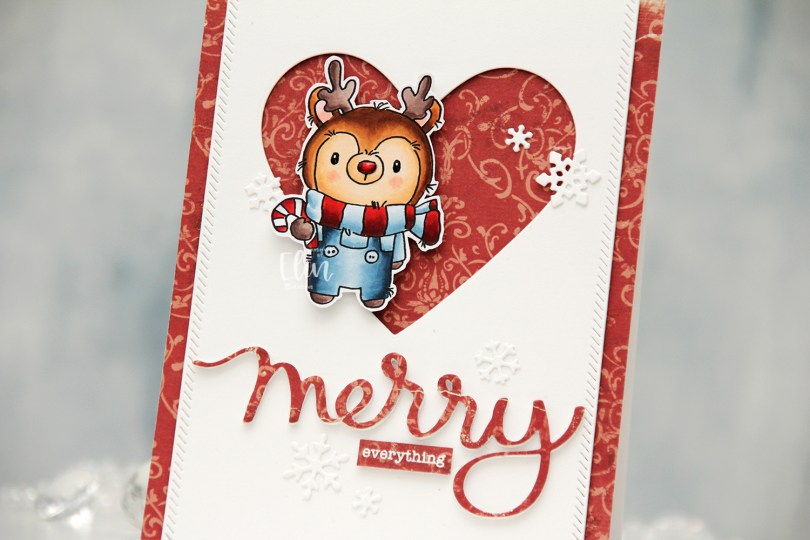
 I colored my reindeer with Copics, added black Glaze to his eyes for shine, a white dot on top with a Gelly Roll 05 once the black was dry and also a thick layer of Glossy Accents to his nose for dimension as well as shine. I fussy cut him leaving a white border and proceeded to work on the rest of my card.
 I covered a card base with the Julhälsningar sheet from the Vintage Winter collection from Maja Design. This has a little bit of pattern to it, but not so much that it’s too distracting. I created a window in a white panel using a heart die from Papirdesign, then used one of the dies in the Stitched Borders die set from Lawn Fawn to create a little bit of interest to the sides, before adhering the panel with foam tape to the center of the card front.
 Using the Merry Script die from Mama Elephant, I die cut three layers from white cardstock and one from the patterned paper to adhere on top. I stacked the four together and adhered my die cut to the card. I white heat embossed a sub sentiment from the Holiday messages stamp set from Mama Elephant onto a scrap piece of patterned paper and trimmed it down to a strip, before I added a few layers of cardstock behind it for dimension and adhered it below my die cut word.
 I mounted the reindeer on foam tape offset in the heart opening and added die cut snow flakes here and there. Some I created with the Snowflake Confetti Fancy die from Hero Arts, some are made with the Stitched Let It Snow Circle Frame die set from Memory Box, which includes a die that cuts three individual snowflakes (which is what I used).
 This card has a lot of texture and dimension, and the shine on Rudolph’s nose is the perfect detail to draw attention to him!