
Hi, crafty friends. A few weeks ago, Amanda over at Amanda Jayne Designs asked me if I wanted to color up a few of her new images. I usually jump at the chance to color, and her images are often pretty small and really cute. I shared the coloring of this Little Friend image on Instagram, but I now have the finished card to share.
 I used the second largest die in the Watercolor Rectangle STAX die set from My Favorite Things to turn my colored piece into a panel with a fun edge. I added some layers of cardstock behind it and adhered it to a top fold card base I created from Berry Sorbet cardstock from Papertrey Ink.
 I used the Sweet Hello die from My Favorite Things to create my sentiment. I die cut four from white cardstock and one from Grapefruit cardstock from Concord & 9th and adhered them all together for a stacked, dimensional look. I stamped and white heat embossed a sub sentiment from the IWCL2017005 English stamp set from InkyWings on a strip of Berry Sorbet cardstock and added it to my die cut sentiment, making sure to put a few layers of cardstock behind it on the part that overhangs. I added a few sequins from the White Orchid Sequin Mix from Little Things from Lucy’s Cards, and put a dot of black Glaze pen from Sakura on the squirrel’s eye for a little bit of shine and dimension to finish off the card.
 I used a lot of colors for this simple image.

 I colored the image with my Copics and stamped love you from the Mini Messages stamp set from Mama Elephant using Berry Sorbet ink from Papertrey Ink, before using the panel die in the Blueprints 27 die set from My Favorite Things to cut it out and give it a nice scalloped edge with a faux stitch line on the inside.
 Onto a top fold white card base, I adhered a piece of blue patterned paper from the Watercolor Brights 6×6″ paper pad from My Favorite Things. I added a few layers of cardstock behind my large panel for a little bit of lift and adhered it to the card front, before finishing off simply with a few pearls from the Glossy Porcelain Mix from Little Things from Lucy’s Cards. Oh, and I also used a black glaze pen from Sakura to add a black dot to each of the eyes. This makes the eyes pop, and it adds shine and a little bit of dimension in real life, which you can’t really tell from the photo.
 I colored up
  I stamped a sentiment from InkyWings using Pink Pearl ink from Altenew. The stamp actually has the word hugs in it too, but I opted for a die cut hugs, using the Sweet Sentiments die set from Altenew. I die cut four from Grapefruit cardstock and stacked them together for a dimensional look.
 I finished off with a couple of heart droplets from Little Things from Lucy’s Cards.
 Fairly simple color palette for this one.
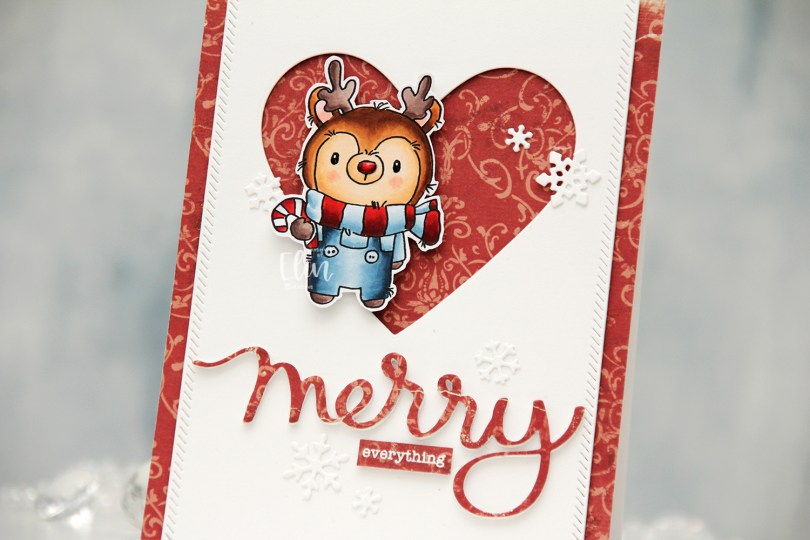
 I colored my reindeer with Copics, added black Glaze to his eyes for shine, a white dot on top with a Gelly Roll 05 once the black was dry and also a thick layer of Glossy Accents to his nose for dimension as well as shine. I fussy cut him leaving a white border and proceeded to work on the rest of my card.
 I covered a card base with the Julhälsningar sheet from the Vintage Winter collection from Maja Design. This has a little bit of pattern to it, but not so much that it’s too distracting. I created a window in a white panel using a heart die from Papirdesign, then used one of the dies in the Stitched Borders die set from Lawn Fawn to create a little bit of interest to the sides, before adhering the panel with foam tape to the center of the card front.
 Using the Merry Script die from Mama Elephant, I die cut three layers from white cardstock and one from the patterned paper to adhere on top. I stacked the four together and adhered my die cut to the card. I white heat embossed a sub sentiment from the Holiday messages stamp set from Mama Elephant onto a scrap piece of patterned paper and trimmed it down to a strip, before I added a few layers of cardstock behind it for dimension and adhered it below my die cut word.
 I mounted the reindeer on foam tape offset in the heart opening and added die cut snow flakes here and there. Some I created with the Snowflake Confetti Fancy die from Hero Arts, some are made with the Stitched Let It Snow Circle Frame die set from Memory Box, which includes a die that cuts three individual snowflakes (which is what I used).
 This card has a lot of texture and dimension, and the shine on Rudolph’s nose is the perfect detail to draw attention to him!
 I die cut the reindeer from several colors of colored cardstock. I used Cocoa Nibs from Papertrey Ink for the antlers, Amarena Cherry from My Favorite Things for the red nose, Milk Chocolate from My Favorite Things for eyes and the remaining noses, as well as Kraft from Bazzill. I would have preferred Classic Kraft from Papertrey Ink, as it’s a heavier weight cardstock, but I’ve run out, and the Bazzill kraft worked just fine.
 I mounted a white panel onto my top fold landscape card base and adhered the reindeer in a line. A couple of them have additional layers of cardstock behind them for a tiny bit of dimension, Rudolf has lots of layers behind him, as well as shine to his nose. I added a very thick coat of Glossy Accents, and I also added black Glaze to his eyes for shine and dimension. I stamped GOD JUL using Milk Chocolate ink from My Favorite Things.
 I had an extra reindeer that I decided to add to the inside of the card, you can see his ear peeking out in this photo.
 I colored my snowman with Copics, added black Glaze to his eyes, then a white dot using a Gelly Roll 05 once the black was dry. I also used the white to add the white dots to his hat. I fussy cut my snowman, leaving a thin white trim around him, before putting him to the side to work on the rest of my card. I covered my card base with patterned paper from Maja Design. This frosty blue paper is from the Vintage Frost Basics collection from 2013, the sheet’s called 13th of December. I used the Notebook Edge die from My Favorite Things to create a fun border on a piece of Stamper’s Select White cardstock from Papertrey Ink. I used Light & Fluffy Modeling Paste from The Crafter’s Workshop to create snow through the Falling Snow stencil from Simon Says Stamp. While the paste was still wet, I sprinkled on Rock Candy distress glitter for an even frostier effect, and mounted my white panel with foam tape to my card front.
 I stamped and white heat embossed a sentiment from the
  Simple color palette for this one. Lots of blues.
 I knew one of the elves at the bottom would get his head cut off (the one wearing blue), so I created a copy with just his head, rotated it and put it in the top right corner to include another kid peeking in.
 I colored in the scene with Copics, choosing very bright colors. I then took my white Gelly Roll 05 to create patterns on most of the kids’ clothes. I used the largest die in the Watercolor Rectangle STAX die set from My Favorite Things to create a fun edge to my panel, before using the Connected alphabet die set, also from MFT, to spell out the name of the recipient. At first, I thought of cutting them straight, but realized that a wonky look would work well with the card and also be less time consuming.
 I wanted to include her age too, but didn’t have any number dies that matched the letters. There was just enough room on her apron for me to sketch in a couple of stick figures holding signs. I used my 0.03 Copic multiliner, and I think it’s running out of ink, which only enhanced the sketchy look I was going for. I die cut six more of each of the letters from True Black cardstock from Papertrey Ink, stacked them and added the colored pieces on top for a stacked inlay look. I mounted the panel on foam tape and adhered it to a card base I created from True Black cardstock from Papertrey Ink. I decided not to add any embellishments, I figured this card is colorful and really doesn’t need it.
 For the inside, I stamped a fun sentiment (You’re not thaaaat old – you were just born too soon) from the Til mannen stamp set from Norsk Stempelblad AS using Summer Splash ink from My Favorite Things.
 I stamped a sentiment from the Go’klem stamp set from Norsk Stempelblad AS onto a Summer Splash envelope from My Favorite Things using Summer Splash ink. I thought the envelope and ink matched the dress nicely.
 Here you can see those popped up letters a bit better.
 I used a lot of Copics for this one. Skin tones (and hair) make up that entire top row. I wanted different skin tones for the kids, and even though they don’t look that different in my photos, the difference is more pronounced in real life.
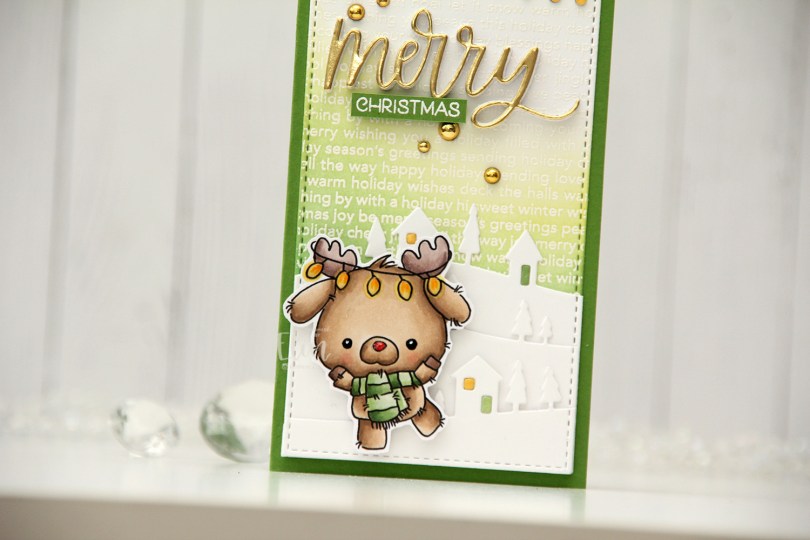
 I colored my reindeer with Copics and fussy cut him leaving a thin white border. I added Glossy Accents to the string of lights and his nose for shine, and used a black Glaze pen and a white Gelly Roll 05 for his eyes.
 I stamped and white heat embossed the Christmas Background stamp from My Favorite Things on a piece of white cardstock, before using Hunter Green, Forest Glades and Frayed Leaf inks from Altenew, as well as Squeezed Lemonade Distress ink, to ink blend on top. I ten used a die in the Stitched Mini Slimline STAX die set from My Favorite Things to turn it into a nice panel that would fit my card. I used the Country Landscape die from Memory Box to die cut the landscape in the background, and used the same stitching die on the hilly die cuts for a continuous stitching border across the card. I die cut the windows from Buttercup cardstock from Concord & 9th and the doors from white cardstock from Papertrey Ink that I ink blended with the same colors I used for the ink blending in the background.
 I used the Snow Globe Accessories die set from My Favorite Things to die cut the string of lights from a dark gray cardstock and the individual bulbs from Buttercup cardstock once again. I added Glossy Accents on top of the bulbs for extra shine and dimension.
 I die cut the word merry from the Merry Christmas die set from My Favorite Things five times from white cardstock, and once from Gold shine cardstock from My Favorite Things. I stacked them, adding the gold on top, and adhered my chunky die cut to the card. I stamped and white heat embossed a sentiment from the
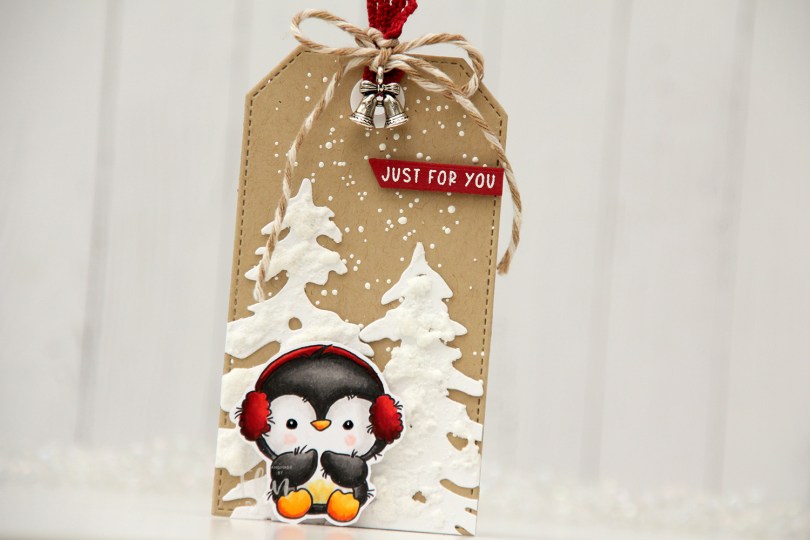
 I colored him with Copics and fussy cut him leaving a white trim around the edges. This particular image would be easy to cut up against the lines, but the wispy lines so characteristic of Lili of the Valley images would be lost, so I opted for the white border. I put black glaze pen in his eyes for shine, and then a dot of white using a 05 Gelly Roll, and put him aside while I worked on the rest of my tag.
 I used a die from the Stitched Traditional Tag STAX die set from My Favorite Things to die cut from Classic Kraft cardstock from Papertrey Ink. I sprinkled Chunky White embossing enamel from Stampendous on top and melted it from behind for a snowy background look.
 I used the Silhouette Snow Trees die set from Mama Elephant to die cut trees from Stamper’s Select White cardstock from Papertrey Ink, before I added some snowy texture to them using a Snow Pen from Rayher.
 I stamped and white heat embossed Just for you from the
  I used some ribbon and twine from my stash, as well as a charm, to finish off the front of this tag. The ribbon, banner and the penguin’s earmuffs create a visual triangle of red elements on this otherwise very neutral tag.
 I die cut the same tag from white cardstock to use on the back. I added a couple of kraft colored branches that I die cut with the Pine Branches die set from Craft Emotions, as well as a to/from from the Tag Builder Blueprints 6 die set from My Favorite Things.
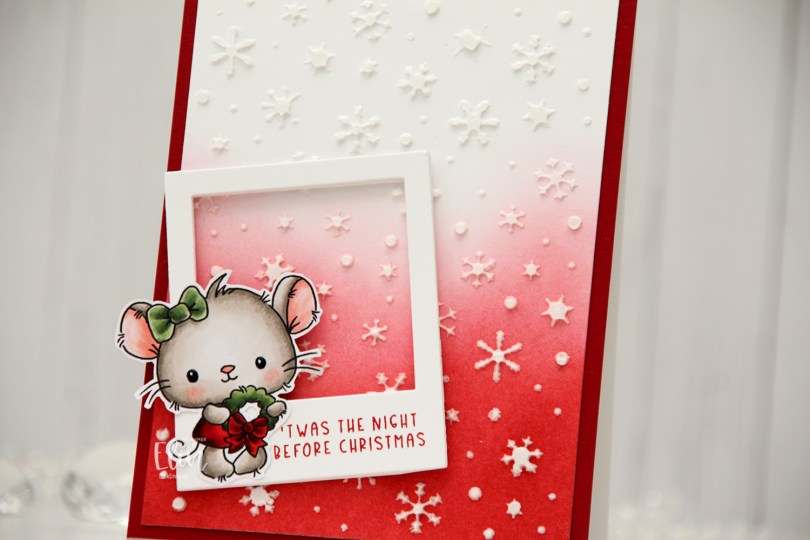
 I colored the mouse with Copics and fussy cut her, leaving a thin white border. I used a black Glaze pen to create some shine in her eyes, and once the black was dry I added a dot of white using a Gelly Roll 05.
 Onto a white cardstock panel, I ink blended Amarena Cherry and Wild Cherry inks from My Favorite Things for an ombre effect. I then used a die cut as a stencil to add some snowflakes to the background with modeling paste from The Crafter’s Workshop. The die I used to die cut the makeshift stencil is the Snowflake Confetti fancy die from Hero Arts, which is one of my all time favorite Christmas/winter dies.
 I cut the ink blended panel down a little and adhered it to a panel of Amarena Cherry cardstock from My Favorite Things that covers the front of a top fold white card base I created from Stamper’s Select White cardstock from Papertrey Ink.
 From white cardstock, I die cut the Polaroid Shaker Frame die from My Favorite Things five times for a stacked look, stamping a sentiment from the Christmas Greetings stamp set from Lili of the Valley to the top layer using Amarena Cherry ink from My Favorite Things. I added the cute little mouse on top of the frame, and my card was complete.
 If you look closely, you can see the shine in the eyes in this photo.