Hi, crafty friends. It’s been a while since my last post. Things have been crazy busy this past month, and I’ve had zero time in my craft room, and not even time to write blog posts for cards that were finished before things went bananas. The annual holiday sale from Purple Onion Designs is a great way to come out of hibernation, though.
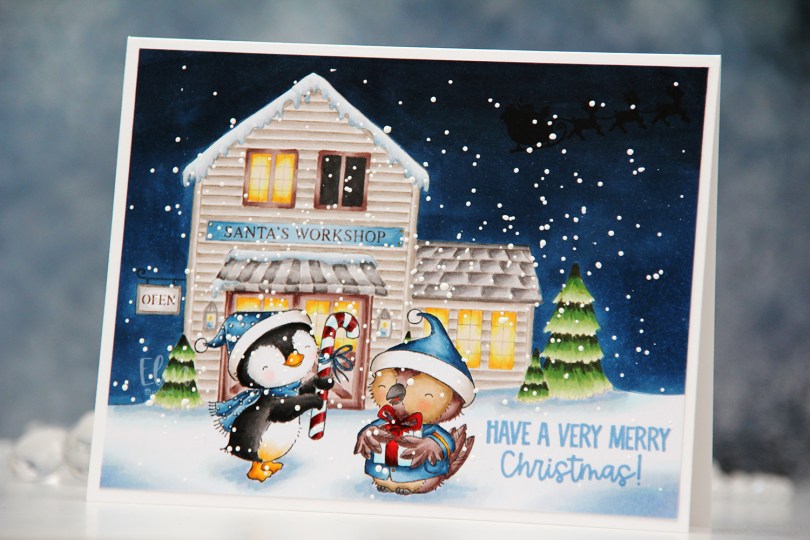
 Winter and Balsam from the latest Christmas release from Stacey Yacula are exchanging gifts. They both look pretty happy to be out in the snow in front of Santa’s workshop. I snuck in the Santa silhouette in the sky and stamped a sentiment from the Santa Sentiments set in the snow.
 I love creating these scenes with Stacey’s images. It’s a time consuming process, as I create masks for each critter and fussy cut them, but the end result is always worth it.
 I stamped Winter and Balsam using Extreme Black ink from My Favorite Things before covering both of them with masks. I then did second generation stamping of Santa’s workshop using Memento Rich Cocoa ink, using first generation for the signage only. I like the softer look of the brown lettering in the background. I stamped the silhouette of Santa’s sleigh using VersaFine Onyx Black ink AFTER I’d colored in the entire scene. This is an ink that stamps very black and very crisp, but it’s a pigment ink and doesn’t play well with Copics, so it’s best to leave it to the end. I stamped the sentiment using Blueberry Sky ink from Papertrey Ink.
 I also went back over the “cast iron” of the OPEN sign using a 0.3 cool gray multiliner from Copic and added white dots on the penguin’s hat and scarf using my white Gelly Roll 05.
 I sprinkled on chunky white embossing enamel from Stampendous, melted the granules from the back of the paper and adhered my finished scene onto a 5 3/4 x 4 1/2″ white card base, making this card slightly larger than the regular A2 size card.
 Lots of Copics used for this one.
 There are some awesome stamps in the Black Friday – Cyber Monday deals category over at the Purple Onion Designs store, a few of my very favorites even. Take advantage of this massive sale while you can.
 For this card, I chose
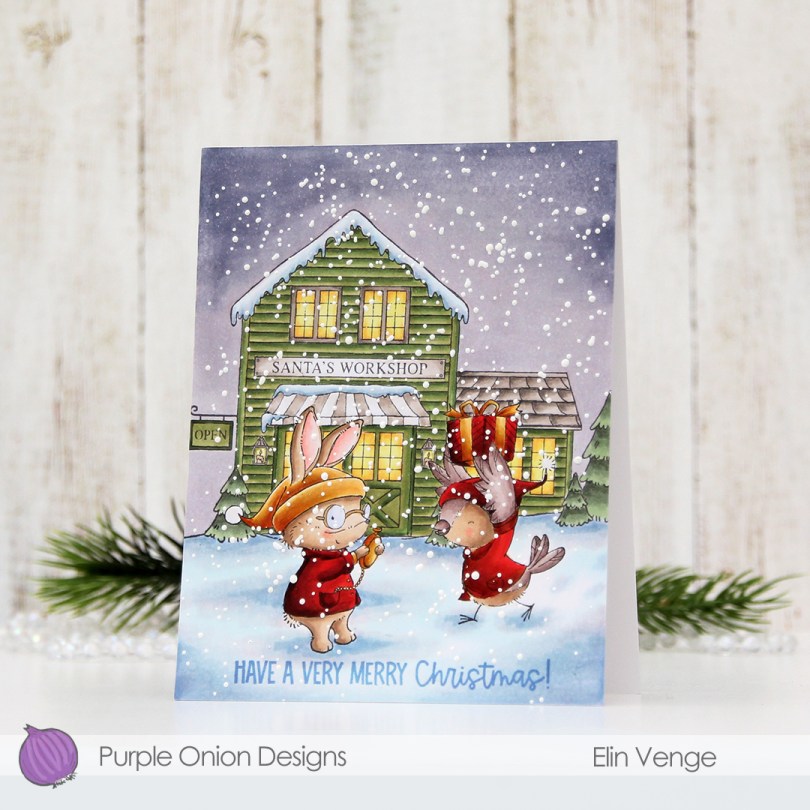
  I didn’t want a dark night sky for this card. I also didn’t want it to have a basic blue sky, because I wanted to add lots of snow, and it doesn’t really snow from clear skies. I opted for a soft blue violet combo that wasn’t too dark and that fit the snowy scene look I was after.
 When everything was colored, I stamped a sentiment from
  I sprinkled on a generous amount of chunky white embossing enamel from Stampendous, making sure no granules covered up the critters’ eyes or the sentiment, before melting the granules from the back of the panel. I then adhered it directly to a top fold white card base, and my card was complete.
 Lots of Copics for this one.
 I thought this guy from the Smile and Wave stamp set was too cool not to use, so I colored him with my Copics and did some fussy cutting, leaving a white border around the edge. I wanted him to stand out and to make a super simple card.
 I created a mask with some 2″ post-It tape by cutting a sloping hill with a craft knife. This is easy to do free hand, but you can use a curved die if you’d like.
 I wanted this guy to really stand out against the background and decided to ink blend using distress inks. I used Abandoned Coral, Worn Lipstick, Spiced Marmalade, Mustard Seed and Scattered Straw for the sky. The yellow and orange tones pick up the colors from his belly, beak and feet and really stand out against the blue of his hat. For the ground I used a little bit of Tumbled Glass Distress Ink near the horizon, fading into white near the bottom.
 I sprinkled on Chunky White embossing enamel to the background, making sure no granules covered my stamped sentiment before melting the granules from the back. I mounted the panel onto the white top fold card base using foam tape for dimension.
 I mounted the penguin onto foam tape and used some clear iridescent crystals from the Crystal Collection (Glass) from Little Thing from Lucy’s Cards to finish off this very simple card.
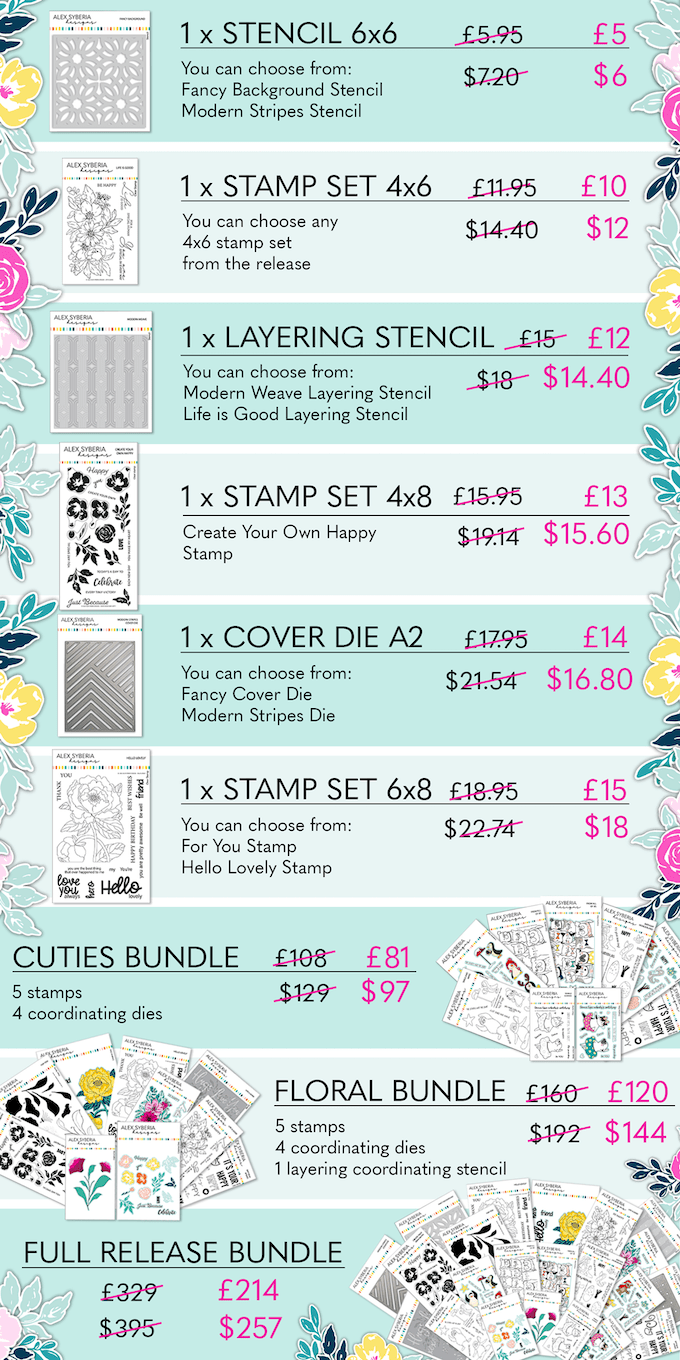

 I created a very simple scene for this card, stamping the snowman in Fadeout ink from Inkon3 before adding a mask, then stamping the
  Every once in a while, I break out my airbrush system. I actually keep it out on my desk, but I have a big desk and don’t usually sit close to it. I love the airbrush system, it’s such an awesome way to get a layer of color quickly. Coloring an entire nighttime sky with Copics takes a while, airbrushing it is faster. Use colors that are darker than what you think you want, and make sure there’s enough ink in the marker before starting. I used B99 and B97 for this sky, and it’s wonderfully dark and the perfect backdrop for the lighter colors of the snowy scene in front.
 Once I finished the airbrushing, I carefully removed the masks and did no line coloring of the rest of the scene. At this point, I’ve colored snow so often, I can do it in my sleep. This snowman is pretty easy to color too, most of the areas are pretty big surfaces, so it’s a very forgiving image.
 After I finished my coloring, I stamped and white heat embossed a sentiment in the sky. The sentiment is actually from the Scripty Xmas stamp set from Mama Elephant, I kind of forgot for a second that I was creating a Purple Onion card, I was a little lost in a creative zone. After heat embossing the sentiment, I sprinkled on chunky white embossing enamel from Stampendous to create my super snowy scene, making sure to remove any granules that landed on top of the embossed letters before melting the granules from the back.
 I trimmed 1/8″ off each side of my scene and adhered it to a white card base I created from white cardstock from Papertrey Ink, deciding not to add any embellishments. I figured there was enough going on already with all the snow.
 As usual – lots of colors used for the snow. The two blues at the very bottom after the break are the colors I used for the airbrushed sky.
 I didn’t know what color scheme to go for, and my color buddy Liz suggested purple, knowing I’d kind of hate her for it. 😉 I struggle with purple. It’s not my favorite color to begin with, it’s tricky to photograph well, and also difficult to find good matches with ink and cardstock for. AND it’s even hard to find colors that pair well with it. It’s not something I’d normally use for a Christmas card, but I love a good challenge, so I grabbed a bunch of purple Copics and started coloring.
 I kind of tried to chicken out a bit by asking Liz if it’d be okay if I added some aqua tones. “Only if purple is the dominant color,” was her answer. With no chance to weasel my way out of purple and into something I’m more comfortable with, there was only one thing to do… keep coloring purple.
 I did add a little bit of aqua to not have everything purple. I even tried some blue, but that didn’t really work and I actually covered up the blue… with more purple. Once I finished my coloring, I added a sentiment from the
  I used a black glaze pen to get their eyes extra black and shiny, added a tiny white dot to each eye using the 05 white Gelly Roll, and covered Rudolph’s nose with Glossy Accents. Once dry, I sprinkled on lots of chunky white embossing enamel from Stampendous and melted the granules from the back of the panel for a snowy look.
 I adhered my colored panel to a top fold landscape card base I created from Royal Velvet cardstock from Papertrey Ink, and added a thin strip of Sea Glass cardstock from Concord & 9th below the sentiment for an additional element that wasn’t purple.
 I used so many colors for this, it’s ridiculous. I used different colors for all the animals, only keeping cheeks, noses and inner ears the same throughout.
 I colored up the scene using Copics, then used the largest die in the Slimline Double Stitched Rectangle STAX die set from My Favorite Things to add faux stitching to both sides. There’s no reason you can’t use slimline dies for an A2 sized card, and this worked out really well, the die was the perfect width for my image.
 I used a black glaze pen from Sakura to get some shine and dimension into the eyes of these cute critters (you can see it in real life when you tilt the card in the light, I promise), then sprinkled on Stampendous chunky white embossing enamel that I melted from the back of the panel.
 Using lots of foam tape, I adhered my panel to a top fold card base I created from Blueberry Sky cardstock from Papertrey Ink. This blue is gorgeous, and it’s perfect for the B90 Copic family.
 I white heat embossed a sentiment from the Christmas Greetings stamp set from Lili of the Valley onto a piece of Amarena Cherry cardstock from My Favorite Things. I cut the sentiment down to a strip and added it to the card using foam tape.
 To finish off the card I added a few die cut heart outlines. These are from the Wax Seals die set from Waffle Flower. There are two different sized hearts in the die set, I used both for this card and cut them from Amarena Cherry cardstock before adhering them to the card.
 Simple color palette for this one. Lots of colors used for the snow, that’s pretty much a given when I color snow.
 I’ve created a very simple card this time, featuring this cute little car from the new
  I did some simple no line coloring of the image. I hadn’t done no line in a while when I created this, so opting for this tiny image was perhaps not the most brilliant idea ever. It’s kind of what I do, though, I jump in. I used a grey Copic to give the illusion of someone sitting in the car, used a couple of blues for some simple shading near the tires and kept everything very simple.
 Using four different shades of blue ink (Distress Inks in the colors Chipped Sapphire, Faded Jeans and Stormy Sky, in addition to Iceberg ink from Altenew), I softly ink blended an ombre sky before sprinkling on Chunky White embossing enamel for a snowy effect that I love having on my cards. I heated the panel from the back, melting the granules and adhered the panel onto a top fold card base I created from white cardstock from Papertrey Ink.
 Using the sentiment die from The Penguin’s Waddle die set from Mama Elephant, I created a chunky sentiment by adding several die cuts together for a stacked, dimensional look. I adhered it to the top center of my card and finished it off by placing a few snowdrift sprinkles from Little Things from Lucy’s Cards near the car.
 I love a dimensional die cut sentiment, it kind of says I mean business and adds so much to a simple card!
 This is one of the penguin chicks from the
  I colored the penguin very simply with my Copics, sprinkled on chunky white embossing enamel to my panel and added it to a top fold note card I created from Blue Breeze cardstock from My Favorite Things. I then die cut the Let it snow sentiment using a die from Mama Elephant. I die cut three layers of the same blue color cardstock and adhered them for a stacked look in the top center of the card before finishing off with a few snowdrift sprinkles from Little Things from Lucy’s Cards.
 I printed the image on a piece of X-Press It blending card, extending the candy cane so it would run along the entire left side of my card front. The line style of the image is somewhat sketchy, which means you can’t really mess up creating an additional couple of lines. I colored the image with Copics and sprinkled on lots of chunky white embossing enamel, before melting the granules from the back of the cardstock.
 I wanted a big sentiment for this card, and chose the Let It Snow die from Lawn Fawn to create it. I cut once from Hawaiian Shores cardstock from Papertrey Ink, and three times from white cardstock, also from PTI, to create a chipboard like element that adds dimension to my card. I finished off with a few snowflake sprinkles from Little Things from Lucy’s Cards.
 I printed my image onto X-Press It blending card and colored the penguins with Copics, before sprinkling on chunky white embossing powder from Stampendous for a snowy look. I then die cut the Mega Snowflake Cover die from Mama Elephant three times; twice from white cardstock, once from Sno Cone cardstock from My Favorite Things. I glued them together and added my penguins to the back, before adhering everything onto a top fold A2 cardbase I created from Stamper’s Select White cardstock from Papertrey Ink.
 To keep the rest of the colors soft, I diecut the letters for HUGS three times from white cardstock using the Sending You Hugs die from MFT. I glued them to the bottom center of my card, and added a secondary sentiment that I stamped and white heat embossed on a strip of Cotton Candy cardstock, also from My Favorite Things. I added two more strips of cardstock behind for dimension and stability, before finishing off the card with a few Sparkling Clear Sequins from Pretty Pink Posh.
 I used probably way more gray markers than I needed to to create these penguins, but sometimes, that’s what I do.