Hello {Streamside Studios}

Good morning! It’s the start of a new week, and if this green color doesn’t wake you up, nothing will. It’s bright!! It feels like summer’s finally on its way, and I spent a good chunk of yesterday hiking. Everything is so bright green now after what feels like the coldest, rainiest spring ever.

Streamside Studios Woodland Friends Owl front rett

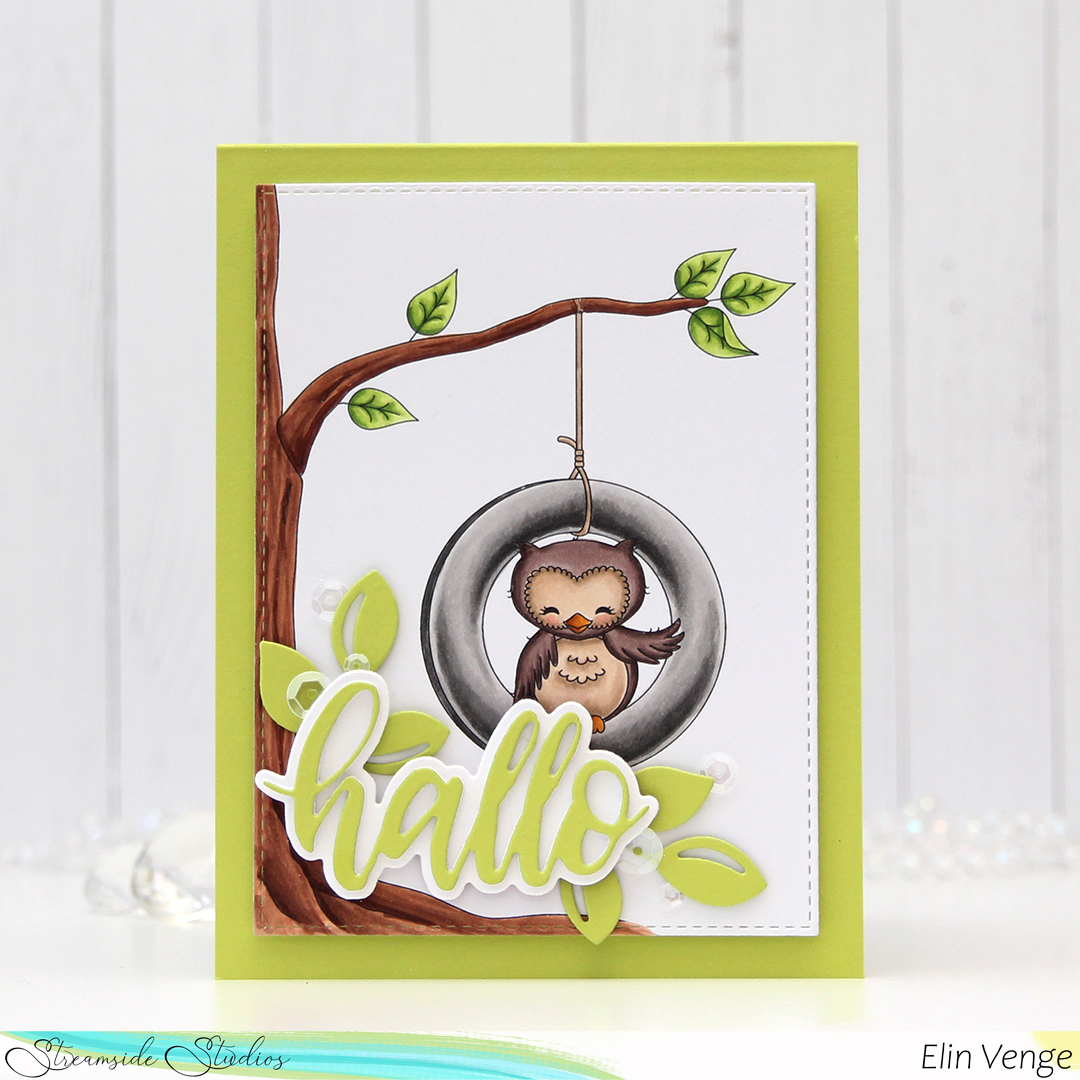
I put together this little scene with an owl, a tire swing and a tree, all from the Woodland Friends digital stamp set from Streamside Studios. I did some simple Copic coloring and used a die from the A2 Stitched Rectangles STAX 2 set from My Favorite Things to turn it into a nice panel with faux stitching around the edge. I love these stitched rectangle dies, I use them so much!

Streamside Studios Woodland Friends Owl front skrått

I mounted the colored piece onto a card base made from Limelight cardstock from My Favorite Things. It’s a very bright green. I die cut some leaves from the Leafy Cover die from Mama Elephant and mounted those near the bottom left corner using some 1 mm foam squares.

Streamside Studios Woodland Friends Owl flatlay

On top of the die cut leaves I added a die cut “hallo” (hello in Norwegian) consisting of 3 white layers with the Limelight green on top, and a white shadow. I mounted this on foam squares, too, so this has a lot of dimension.

Streamside Studios Woodland Friends Owl flatlay høyre

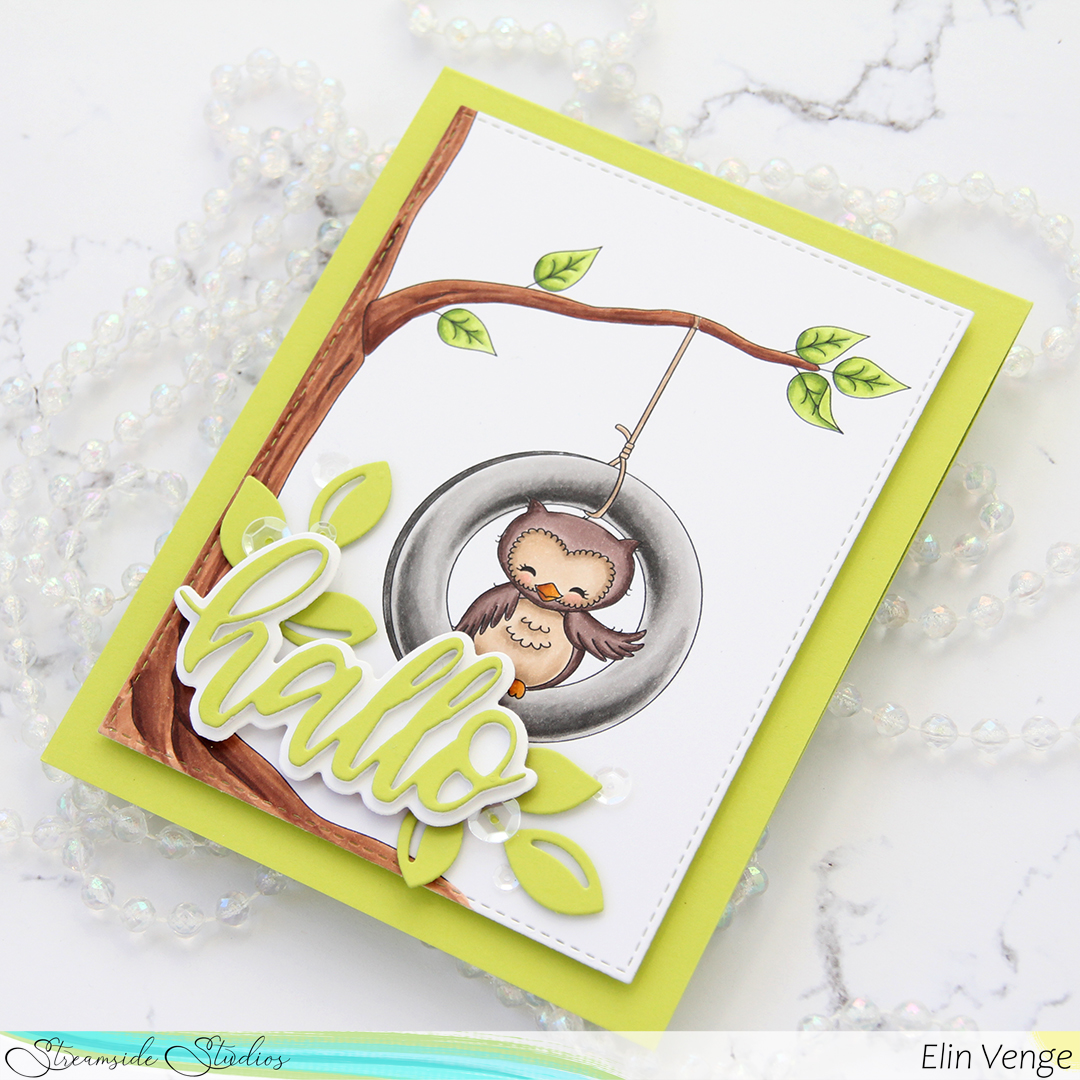
A side view to show more of all the layers. I added some sequins from the White Orchid sequin mix from Little Things from Lucy’s Cards for a little bit of an extra detail near the die cuts.

Streamside Studios Woodland Friends ugle huske Copics

Last, but not least, the Copics I used to color my image.

Grrreetings

Hi, there. I wasn’t planning on sharing a card today, but last night Liz Vefall messaged me asking if I was up for a challenge. I’m always up for a challenge, and hers are so much fun. She wanted me to join the current color challenge over at MFT.

MFT_ColorChallenge_PaintBook_166

That wasn’t the challenging part – she wanted me to finish the card last night. I work best under pressure, and she knows it. Short deadlines are great, they force me to come up with ideas and execute them quickly. And that’s what I did, this card only took me about 2.5 hours to make, which is fast for me.

MFT Monster Sized front rett

I chose to color three of the monsters from the Monster Sized stamp set. I tried to get as close to the colors in the challenge as possible. I die cut the monsters, and added four more white die cuts behind the monsters on the sides for dimension. For the middle monster, I added eight additional die cuts behind the colored one, I wanted it to really stand out on the card.

MFT Monster Sized front skrått

I needed to incorporate the gray, and chose Gravel Gray card stock for my card base. I don’t have the Eiffel Tower color (yet), but I thought this might be close enough to work. I stamped the Four Corners background stamp onto white card stock using Soft Granite Ink from Hero Arts, and die cut the white panel with the second largest die in the A2 Stitched Rectangles STAX 2 set, mounting it on foam tape to the card base.

MFT Monster Sized flatlay rett

I adhered two of my stacked die cut monsters directly to the white panel, the one in the middle is actually hovering. It’s glued to the monsters behind it. I even added Glossy Accents to the eyes of this monster for a fun little accent.

MFT Monster Sized Flatlay høyre

I stamped and white heat embossed a sentiment from the Monster Sized stamp set onto a separate piece of Gravel Gray card stock, cut it down to a strip and adhered it below the monsters on my card. The banner actually covers the feet of the monsters on the sides.

MFT Monster Sized zoom

A quick peek at all that dimension. I think this is about 1/2″ thick at its thickest. Dimension is life 🙂

MFT Monster Sized Copics

Limited color palette. 4 Copics for each of the monsters and black for the mouths on all.

Have a wonderful day {Purple Onion Designs}

Hi, there. I have a tri-fold window card to share today, featuring some cuties from the latest release from Purple Onion Designs.

Purple Onion Designs - Elin Venge - Junie Flower Shop tri-fold front straight

For the front of the card, I colored Junie and fussy cut her, mounting her on foam tape in the bottom right corner of the card, right in front of a circle window I created. I wanted a card base other than white for this card, and chose Hawaiian Shores from Papertrey Ink, which is a beautiful teal color. I used the largest of my A2 Stitched Rectangles STAX dies from My Favorite Things to die cut a white panel to go on top. I stamped one of the sentiments from the Around the Town sentiment set using Hawaiian Shores ink to match the card base.

Purple Onion Designs - Elin Venge - Junie Flower Shop tri-fold front angled

A bit of a side angle. You can see the flower shop on the inside of the card a little bit better, and even that there is another layer of card behind there, which folds down.

Purple Onion Designs - Elin Venge - Junie Flower Shop tri-fold inside

This flower shop is a fairly large stamp, and it juuuust fit the panel I was working on. Before I started coloring, I left the stamp in my MISTI, so I could go back in once the coloring was complete and stamp and heat emboss the letters in the sign. You don’t want to color with Copics on a heat embossed image, it will ruin your marker nibs, but by doing the embossing last, you avoid that problem altogether. This panel flips down, revealing plenty of room for a personal message.

Purple Onion Designs Junie Flower Shop Copics

Last, but not least, the Copics I used. Lots of different grey families in this one.

Merry Christmas from me to you {Lili of the Valley}

Hi, there! You may think I’ve lost my mind making Christmas cards in May, but I actually enjoy making them all year. It saves me from having to scramble last minute in November to get them all done. It’s also been really wet and cold here lately, so it’s felt like we’re closer to Christmas than to summer. It’s sunny today, though, and tomorrow, the temperature’s supposed to creep over 20! Feels like spring is finally on its way now that it’s actually almost over.

Lili of the Valley Winter fun front rett

I colored Winter Fun with my Copics, trimmed off a little on the sides and adhered my panel onto a top fold white card base.

Lili of the Valley Winter fun front skrått

I don’t normally use red on my Christmas card, but when I can pair it with blue or grey, I can tolerate it. The coloring on this card is pretty busy (it’s all those stripes), so I needed my sentiment to stand out. I used a god jul die from Papirdesign, and in the sleeve with the die were 7 white die cuts that were apparently scrapped from a previous project. I glued them together for a stacked look, die cutting one more to put on top from Electric Red card stock from My Favorite Things. Sadly, they’ve discontinued this color. I’m super picky about my reds, and this one is nice and rich and dark. I heat embossed a sub sentiment from Norsk Stempelblad AS onto a strip of more of that red card stock, and mounted it on foam tape below my die cut. To finish off the card and add a little more dimension and interest, I sprinkled some snowdrift sprinkles from Little Things from Lucy’s Cards here and there. I love these little clay snowflakes.

Lili of the Valley Winter Fun Copics

Not a massive amount of colors for this. Everything left of E13 on the top row is used for the snow.

Wish BIG on your birthday

Hi, there. Second blog post of the day. If you’re looking for a Mo Manning creation, it’s right here. This time I’ve got a bright, slimline birthday card to share, featuring lots of goodies from My Favorite Things. It’s no secret that I love their products, and I rarely make cards without at least using MFT dies.

MFT Picture Perfect Party Animals slimline flatlay

I stamped the images from the Picture Perfect Party Animals stamp set using MFT Extreme Black ink, which is a hybrid ink that works well with Copics. I cut each of the squares right up against the lines and mounted them on foam tape onto a piece of Limelight card stock that I die cut using a die from the Slimline Starter die set. I adhered the green card stock directly to the white card base.

MFT Picture Perfect Party Animals slimline flatlay høyre

Using the Big Birthday Wishes die, I die cut the word wish four times from Tropical Teal card stock and stacked them for a little bit of dimension. I adhered the letters to the green card stock and mounted a sub sentiment on top using some 1/16″ foam tape from Gina K. That sub sentiment is part of a sentiment from the Pawty Time stamp set, and just for a little bit of a different look, I used Milk Chocolate card stock for that. To finish off the card, I added quite a few enamel dots from Papirdesign to pick up the orange from my coloring.

Normally, I’d have my Copic colors at the end of the post, but I colored these images for Kathy Racoosin’s 30 day coloring challenge last July, and don’t recall what colors I used.

Happy birthday monsters {Mo’s Digital Pencil}

Hi, everyone! I’ve got a simple, colorful, dimensional birthday card to share today, featuring some adorable monsters from Mo Manning. They’re from the Cupcake Monster set. It exists as a merged version, and a separated version, which is what I used today. I didn’t even use the big monster, just the smaller ones.

Mo Manning Cupcake Monster front rett

There are 7 small monsters in this stamp set – perfect for a rainbow. I actually colored all 7, the last little (red) monster’s on the inside of the card, you’ll have to trust me on that 🙂 Once I was done coloring, I fussy cut them all, leaving a thin white border on the outside edge of each. I usually prefer cutting right up against the line, but these are so small, and those candles so thin, that there was just no way to do it.

Mo Manning Cupcake Monster flatlay rett

I used the Simply hexagons die from Pinkfresh Studio to create some hexagons from Soft Stone cardstock from Papertrey Ink. I love this soft grey for a neutral on neutral look. I adhered the hexagons in the center of a white top fold card base using foam tape.

Mo Manning Cupcake Monster front skrått

I put the monsters on 1 mm foam squares, cutting the squares into little slivers to put behind their feet and the candles. These monsters really are tiny, but I wanted the dimension, so I think it was still worth the extra effort.

Mo Manning Cupcake Monster flatlay høyre

I stamped and heat embossed a sentiment from the Over under easy stamp set from Papertrey Ink onto Smokey Shadow cardstock, also from Papertrey Ink. I love the cardstock colors from PTI, they’re my favorite!! I cut the sentiment down to two strips and adhered them at wonky angles with foam tape, before finishing off the card with a few sparkling clear sequins from Pretty Pink Posh.

Mo Manning Cupcake Monster Copics

Lots of Copics for this one. That happens with rainbows 🙂

Mr. Fixit {Purple Onion Designs}

Hi, there! I’ve got a simple card with some dimension and fussy cutting to share today, featuring a couple of stamps from the latest release from Stacey Yacula and Purple Onion Designs.

I started by stamping Milton the bear and the ivy cottage in Extreme Black ink from My Favorite Things, coloring in both images with my Copics. I fussy cut both right up to the stamped lines, and used a die from the A2 Stitched Rectangles STAX 1 set from MFT to do some partial die cutting of the cottage. I wanted the foreground to have that nice stitched edge, but not cut off the tree – partial die cutting is great for that. 

On a piece of white cardstock, I used the cloud stencil from My Favorite Things to ink blend some puffy clouds with Iceberg ink from Altenew. I die cut this panel with that same die that I used for the ivy cottage, adhered it directly onto a white top fold card base, and mounted the ivy cottage onto that using 1 mm foam squares. I added Milton on top with more 1 mm foam squares, stamped a sentiment from the Around the Town sentiment set using Soft Granite ink from Hero Arts, and added the sentiment towards the top of the card using foam tape. I adhered a few sequins from the white orchid sequin mix from Little Things from Lucy’s Cards to finish my card. I need to create a slightly bigger envelope than usual for this card. The tree hanging out from the edge means it won’t fit in a standard envelope for A2 cards.

Not a whole lot of Copics for this one. Lots of green, though.

You deserve flowers {Rachelle Anne Miller Creative Studios}

Hi, there! I have a super simple card to share today, featuring the Little Fairy image from Rachelle Anne Miller.

Rachelle Anne Miller Little Fairy front skrått

I colored my image with Copics and die cut it using a die from My Favorite Things and adhered it to a top fold card base I made from Bright Buttercup cardstock from Papertrey Ink.

Rachelle Anne Miller Little Fairy flatlay venstre

Using VersaMark ink, I stamped a sentiment from Norsk Stempelblad AS onto a scrap piece of Raspberry Fizz cardstock from Papertrey Ink. I turned it into a strip using one of the dies in the Fishtail Flag Frames die set from My Favorite Things, mounted it on foam tape and adhered it to the card.

Rachelle Anne Miller Little Fairy flatlay høyre

I finished off the card with some white sequins from Little Things from Lucy’s Cards.

Rachelle Anne Miller Little Fairy Copics

As usual, a graphic of the Copics I used.

Hang in there {Purple Onion Designs}

Hi, there! I have a very clean and simple card to share today, featuring some more stamps from the latest release from Stacey Yacula and Purple Onion Designs.

Purple Onion Designs - Elin Venge - Jane Clothes Line Country Side front

I thought the Hang in there sentiment from the Around the Town sentiment set (also new with this release) would be the perfect accompaniment to the clothes line. I could have kept my card even simpler by not adding anything else to it, but I wanted to create a little scene. I stamped Jane the fox waving hello at the very front and added in one of the stamps from the country flowers set to fill out my scene a little. They match the little sprigs at the bottom of the clothes line perfectly. I stamped the countryside horizon towards the top of my panel and colored everything with my Copics.

Purple Onion Designs - Elin Venge - Jane Clothes Line Country Side front angled

Once my entire scene was colored, I used the largest of the A2 Stitched Rectangles dies from My Favorite Things to turn it into a panel with a nice faux stitch egde and adhered it to a top fold white card base. I stamped the sentiment using Blueberry Sky ink from Papertrey Ink, die cutting it into a nice banner using one of the dies in the Fishtail Flag Frames die set from My Favorite Things. I adhered it to my card using foam tape and added some blue enamel dots from Papirdesign to finish.

Purple Onion Designs Jane Country side clothes line Copics

I’ve colored a lot of scenery for the cards I’ve made with this release, and wanted to get a different green look for the grass and trees for this card compared to the others, which have all been fairly bright. This is a more subdued green, I kind of like it.

Best news ever! {Purple Onion Designs}

Hi, there! I’m sharing a shaker card today, featuring Alex the owl from Purple Onion Designs. He’s got good news to share!

Purple Onion Designs - Elin Venge - Alex shaker front

I colored the image with Copics and set it aside while I worked on the rest of the card. On a piece of white card stock, I used the Linen & Canvas impression plate from Papertrey Ink to add texture to all that white space, before using the Selfie Square die and the largest of the A2 Stitched Rectangles dies from My Favorite Things to add the faux stitching around the edge and also to frame the window.

Purple Onion Designs - Elin Venge - Alex shaker front angled

I added acetate in the window and put micro beads inside, before mounting it all on foam tape and adhering it to a top fold card base I made from New Leaf cardstock from Papertrey Ink.

Purple Onion Designs - Elin Venge - Alex shaker flatlay

I stamped and white heat embossed a sentiment from the Around the Town sentiment set onto a scrap of New Leaf cardstock, which I die cut using the smallest of the Fishtail Flag Frames dies from My Favorite Things. I finished off the card with a few green enamel dots from Papirdesign.

Purple Onion Designs Alex best news ever Copics

The image is small and very simply colored, so I didn’t use a lot of Copics for this.