Hi, crafty friends. Popping by today with a fun birthday card featuring a couple of cuties from the newest A Special Day release from Purple Onion Designs, illustrated by Stacey Yacula.
 I really wanted to create a birthday card with Bugsy (what a great name for a bunny, btw) and Jessie. They’re on their way to a birthday party and I stamped them using Extreme Black ink from My Favorite Things, making sure to stamp Bugsy in a way that made part of the balloon hang off the edge of the panel, creating the illusion that the scene extends beyond the card to other partygoers and the birthday boy or girl. I did a teeny tiny masking on top of the balloon to stamp the Tree Line stamp from a previous release using Fadeout ink from Inkon3 for a soft no line look on the horizon.
 I colored in my scene using Copics. I started with the sky (I don’t even remember what color I used there, sorry), before coloring the trees, the ground, then the critters. I struggled with my colors on this one. I wanted the trees to be a muted green way back in the distance, but the colors I used felt too gray, so I added a couple of more vibrant greens to make them come alive a little bit more.
 I managed to make the same mistake with the ground. I originally wanted a muted green, because most of the green backgrounds I’ve colored using stamps from this release have been very vibrant. As it turns out, I’m not as big a fan of the muted green look when it’s down on paper as opposed to what I envision in my head before I start. I was originally only going to use three green markers for the ground, I ended up with eight, and I’m still not entirely happy with it. It’s messier than what I’m used to, and I struggled with the blending.
 I used the largest die from the A2 Stitched Rectangles STAX 1 set from My Favorite Things to turn my colored panel into one with a nice faux stitch edge, and adhered it to a top fold A2 card base I created from Stamper’s Select White cardstock from Papertrey Ink. I love the look of the faux stitch with that thin white border going around the edge. For my sentiment I die cut the Happy Birthday Brush Script die from Simon Says Stamp four times from white cardstock and glued them together for a stacked, dimensional look, and I had just the right spot to adhere it to the card.
 At that point I thought the card was a little plain and decided to add some “flowers” by drawing in white dots in a few clusters on the green grass. This adds a little bit of interest, but I still didn’t think it was enough, so I pulled out my Frosted Lace Stickles and added a thick layer to the balloon, before deciding to also add it to the die cut letters. This helped a little more, but I felt like I needed another element in the sky, it was still pretty plain. Using the Cloud 1 & 2 die set from Papertrey Ink, I die cut four small clouds from vellum. I glued two and two together and adhered them to the sky, which really helped pull the entire design together. This was an evolution of a card (I also colored the bird yellow to begin with, but decided I wanted it red and colored red over the yellow), but it came together in the end.
 I used quite a few Copics for this one. I have a feeling I may have used B00 for the sky, but I’m not entirely sure.
Today is the last day for the 30% discount off the entire A Special Day release bundle, and also the last day to get 10% off the individual stamps in this release, so if you want them and have been on the fence, now is the time to get them and save.
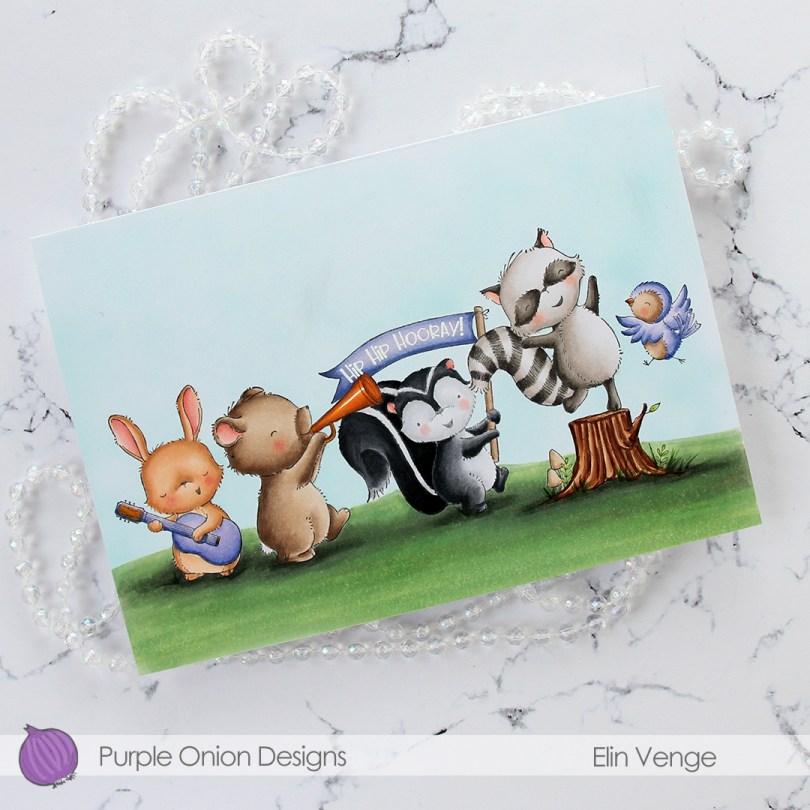
 I stamped and masked all these critters. From left to right we have
  There are two sentiments that come with Petunia that you can stamp in the banner. One is the hip hip hooray!, which I white heat embossed, the other says Happy birthday! This card is a bit of an odd size. I needed it big to fit all my images, and it measures 7 1/4 x 5 1/16″. I probably could have trimmed off a little bit on the sides and on the bottom (or top) to make it an even A7 size, but this is what I wound up with. I’ll probably make my own envelope to fit anyway.
 Lots of Copics used for this one. I tried to make the colors of the critters different even though I have two brown ones and two gray ones. I love the Copic range of earth tones and gray tones, it really does allow you the option to create different colors within the same color family.
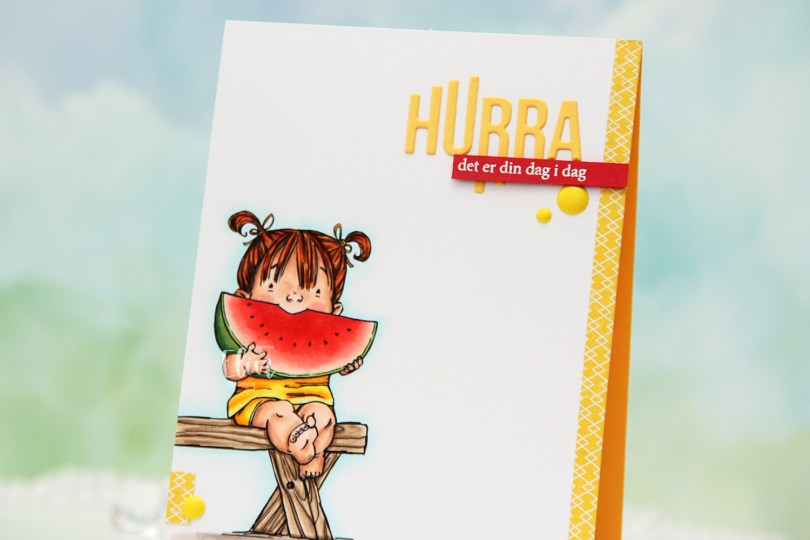
 I printed the image towards the bottom left of my panel of X-Press It blending card and colored it with Copics. I’ve colored this girl once before, but I decided to go for a different color scheme this time, I think the only thing that’s stayed the same since the last card is the coloring on the watermelon. The printer doesn’t print all the way to the edge, so I cut off a little strip on the left side and decided to add a strip of yellow patterned paper from Papirdesign on the right to balance out the design and fill the front of this A2 card.
 And as usual, I finish with the Copics I used. Quite a few for this super simple image, I reckon.
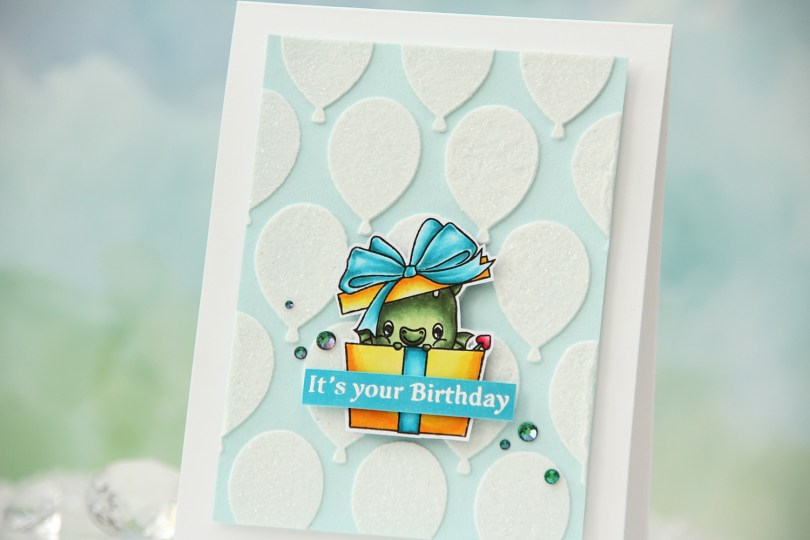
 I used one of the dragons in the
  I fussy cut around the image leaving a thin white border. There’s a set of coordinating dies to go with the stamp set, but I don’t have it, and fussy cutting this one was simple enough.
 I added a thick coat of modeling paste through the
  Using 1/16″ foam squares, I added my colored dragon towards the bottom center of the card. I added a little bit of liquid glue to make sure it really adhered to my glitter balloons, I didn’t want it coming off at any point. I didn’t have the right shade of cardstock to match my tealy blue coloring, so I colored a scrap strip of X-Press It blending card using one of the markers I used for the bow, before stamping and white heat embossing a sentiment from the Flamin’ Birthday stamp set. I cut it to fit the sentiment, added a couple of strips of cardstock behind it for dimension and stability and adhered it to the present.
 I finished off the card by adding a few sparkle gems. These are from the
 I stamped the image using Extreme Black ink from My Favorite Things, before creating a mask, adding that on top and stamping the
  I colored in my scene using Copics and stamped a sentiment from the older
  Last, but not least – the Copics I used. I also used B30 (which is a color I’ve created myself) for the sky in addition to B32.
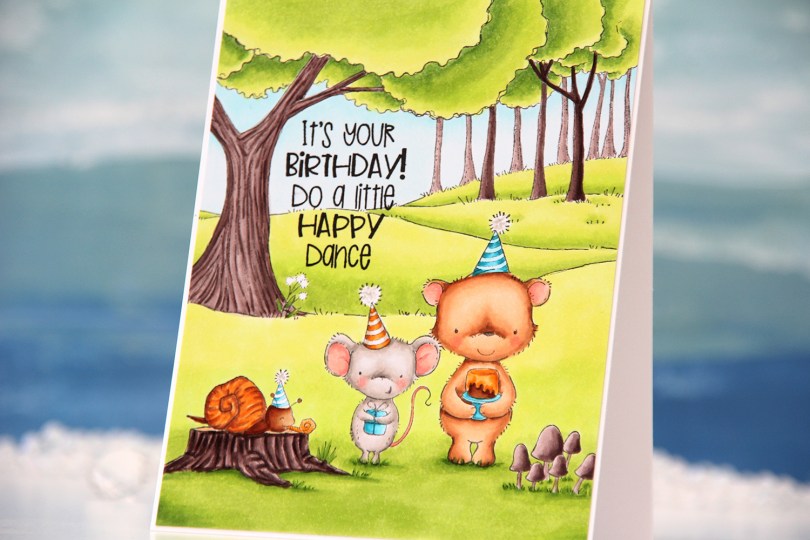
 My first card with images from the release is this one. I love creating birthday cards, so this collection is right up my alley!! Using Extreme Black ink from My Favorite Things, I stamped and masked
  I cut down my colored panel ever so slightly and adhered it to a top fold A2 card base I created from Stamper’s Select White cardstock from Papertrey Ink. I love that little 1/16″ border around the edge.
 I kind of thought I’d use a whole lot more Copics for a full panel card, but I admit I love the orange color with the teal and the bright green, it’s such a classic color combo for a reason.
 I colored the image with Copics, die cut the word HURRA from my panel using a die from Kort & Godt and the largest die in the A2 Stitched Rectangles STAX 2 set from My Favorite Things for the faux stitching to frame the image. I printed a second image to put behind, so the ball of yarn is continuous throughout the word.
 I adhered my panel to an A2 card base I created from Berry Sorbet cardstock from Papertrey Ink. Onto a strip of the same color cardstock, I stamped and white heat embossed a sentiment from Huldra Designstudio, added a couple of additional layers of cardstock behind it for dimension and embellished with a couple of sequins from Pretty Pink Posh to finish the card.
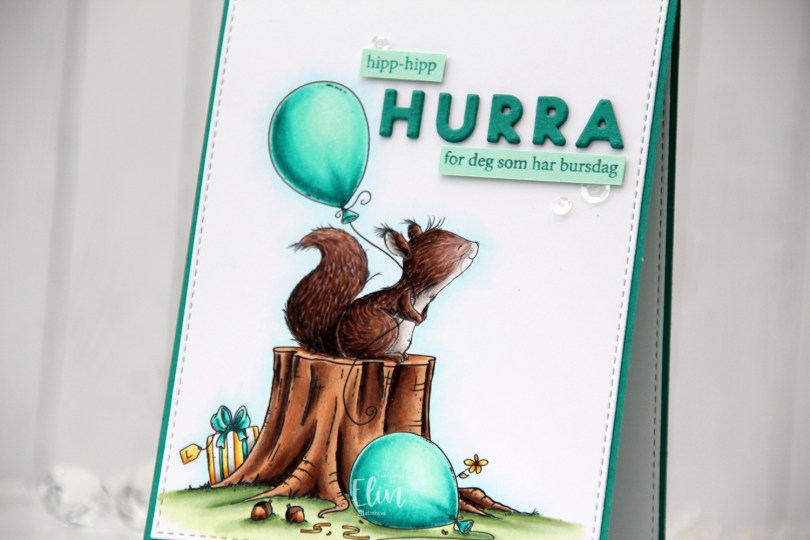
 My first card as a Lee Holland design team member HAD to be a birthday card for the wonderful friend that sent me the link, thereby letting me know that this amazing opportunity even existed.
 I first fell in love with Lee’s images because of his dragons, but all his critters are adorable, and I thought this
  She loves teal, so I knew just what color to use for the balloons. I made sure to print the image towards the bottom left corner of my quarter panel of X-Press It blending card, which is what I use for nearly all my Copic coloring. I used the largest die in the A2 Stitched Rectangles STAX 1 die set from My Favorite Things to give my panel a slight trim and that faux stitch edge I love so much, before adhering it directly to a card base I created from Tropical Teal cardstock from Papertrey Ink.
 I die cut the letters to spell HURRA three times from the same color cardstock using the Connected alphabet die set from My Favorite Things. I stacked them for dimension and stability and adhered them to the right of the top balloon.
 I also stamped a couple of sentiments from the A06 stamp set from Norsk Stempelblad AS onto strips of Sea Glass cardstock from Concord & 9th using Caribbean Sea ink from My Favorite Things. I added a few additional strips behind each and glued them to the card, before finishing off the card with a few sequins from the Seashore mix from Little Things from Lucy’s Cards.
 I used a lot of colors for the coloring of this. I used 16 colors for the squirrel, which is kind of nuts (pun intended).
 I’m focusing on ONE of the images for today’s card. I couldn’t resist the cute triceratops sitting on top of a present. I love The Land Before Time and chose to color this one similar to the character Cera from the movie. She’s orange with a cream underbelly. I kept mine all orange, but made the pads on her feet cream. Flowers are Cera’s favorite food, particularly yellow ones. There are no flowers in my scene, but opted for yellow on the present instead.
 I used a couple of very pale blues for the sky in a halo around her, and used a few greens for a simple grassy hill for her to sit on. I die cut the Leafy Cover die from Mama Elephant to frame my image. I used one white die cut and two green ones made from Meadow cardstock from Hero Arts. I stacked them for stability and dimension.
 I would have loved to use the prehistoric sentiment from the set of landscape elements, but I really wanted to heat emboss my sentiment, which is one of the few things you can’t do with digital stamps. I went digging through my clear stamps instead, and found this one from the Bitty Birthday Wishes stamp set from My Favorite Things that I thought went perfect with the image. I stamped and white heat embossed it on a piece of Hawaiian Shores cardstock from Papertrey Ink.
 I wanted sequins that would match the sentiment strip and the teal colored parts of the image, and the Seaglass mix from Simon Says Stamp was the perfect match. I used way more sequins than I normally do and scattered them all across the card front.
 There’s nothing quite like the dimension you get from layering die cuts, it adds so much interest to the card.