Hi, everyone! Today, I have no less than three cards to share, and they all share bold, geometric card stock backgrounds. It all started with the über talented Laura Bassen, and a die set she designed for the Stamptember release from Simon Says Stamp that came out a few months ago. It’s the Geometric Builder Squares die set (there’s also the Geometric Builder Circles set, but I haven’t had time to play with that yet). In the set there are eight square dies of the same size. One of them is solid, but the remaining 7 die cut smaller squares, triangles and some other fun shapes that you can use to build up a cool, geometric pattern. I focused all my efforts for these cards on the die that cuts out eight triangles.
 I have this throw pillow on my couch that jump started my inspiration. It’s got a nice geometric look, but it’s not too colorful (I prefer a neutral interior to a super busy colorful one, I put all my color into my cards), and the best thing is those blue triangles (it’s a darker blue in real life than in the photo, I need to compensate for bad winter lighting these days). I love blue (as evidenced by the blue throw pillow behind it, the blanket on the left that has lots of blue in it and the light blue walls in the background)!
 My first card uses the exact same pattern as the one that’s on the pillow, but in other colors. I used the After Midnight color from My Favorite Things, Tickled Pink and Grout Gray, also from My Favorite Things, along with Berry Sorbet and Stamper’s Select White from Papertrey Ink for the vibrant pink and white, respectively.
 I popped my panel of triangles onto a 4 3/4″ square card base using lots of foam tape. On a die cut circle I stamped and gold heat embossed a sentiment from the Courageous You stamp set from Altenew, before finishing off the card with a few matte gold sequins from the Mint Gold mix from Little Things from Lucy’s Cards.
 Being told “you are great” is something we all could use at times, right?
 My next card features basically the same pattern, but I changed up the colors and extended the pattern to make it a rectangle. I wish I hadn’t cut the top part off, or cut even more off to make the pattern end in a full size or half size rectangle instead of what I ended up with, but it’s the sacrifice I made to make my card an A2 size with 1/4″ border around the triangles.
 The card stock colors I chose for this card are Orange Zest, Summer Sunrise, Lemon Tart, True Black, and Rustic White, all from Papertrey Ink, as well as Blue Breeze from My Favorite Things. The Rustic White is more of a grungy white (is that a thing? It’s not bright white) with dark speckles here and there, it’s really cool. I used the Sweet Hello die from My Favorite Things to die cut hello six times from the Rustic White card stock, and the shadow once from the True Black. I stacked three of the hellos on top of each other, glued the shadow on top of that, and then another three hellos on top. It’s very substantial! With the stacked hello die cut and the the panel of triangles on foam tape, the card is about 3/8″ thick. I love dimension, even though the added weight of all those layers requires extra postage.
 Below the die cut hello, I added a sub sentiment from the Leaf Clusters stamp set from Altenew. I stamped it in VersaMark onto black card stock and added super fine detail embossing powder from Ranger before heat setting it. I then took my cut-align ruler from Misti to turn it into a small strip, before gluing three more black strips of cardstock behind it and adding it below the hello. I finished off the card by adding a few sparkling clear sequins from Pretty Pink Posh.
 For my last card I decided to go rainbow. No chunky 1/4″ frame, I wanted the colorful triangles to go all the way to the edge in this one. The card measures about 4 1/4 x 5 1/4 (I learned from last card and didn’t want any weird looking shapes). The card stock colors (except for the white, which is Stamper’s Select White from Papertrey Ink) are all from My Favorite Things. They are, from top to bottom, Blue Yonder, After Midnight, Field Day, Limelight, Pineapple, Orange Zest, Red Hot, Razzle Berry, Grape Jelly and Wild Wisteria.
 I didn’t want to cover up too much of the background, so I took out my Impact Alphabet die set from My Favorite Things and die cut the letters H and I six times from white card stock. I stacked two of each letter, added two layers of vellum on top, then the remaining four layers of the letters on top for a dimensional look. By having a couple of layers of the letters behind the vellum, it makes the vellum float. I added a few raindrops from Little Things from Lucy’s Cards for a finishing touch.
 This one is definitely less dimensional than the other two cards, but the colors and the stacked sentiment still make it pop.
 There you have it – 3 same but different cards using one fabulous geometric builder die. Obviously you could create triangles on your own without the die, but the die makes it so much easier and more accurate than I could ever hope to do on my own. And I’m super detail oriented and a bit of a perfectionist, so I’d definitely use the die!

 I created a scene with quite a few images from the Lakewood collection from Purple Onion Designs, illustrated by Holly Mabutas. Oliver reading to swim, Sleepy Sampson, Ollie swims, Bruno Jumps In, Boat house and Pier are all used in this one scene. It’s still not a very busy card, and I got away with only masking the guys on the pier.
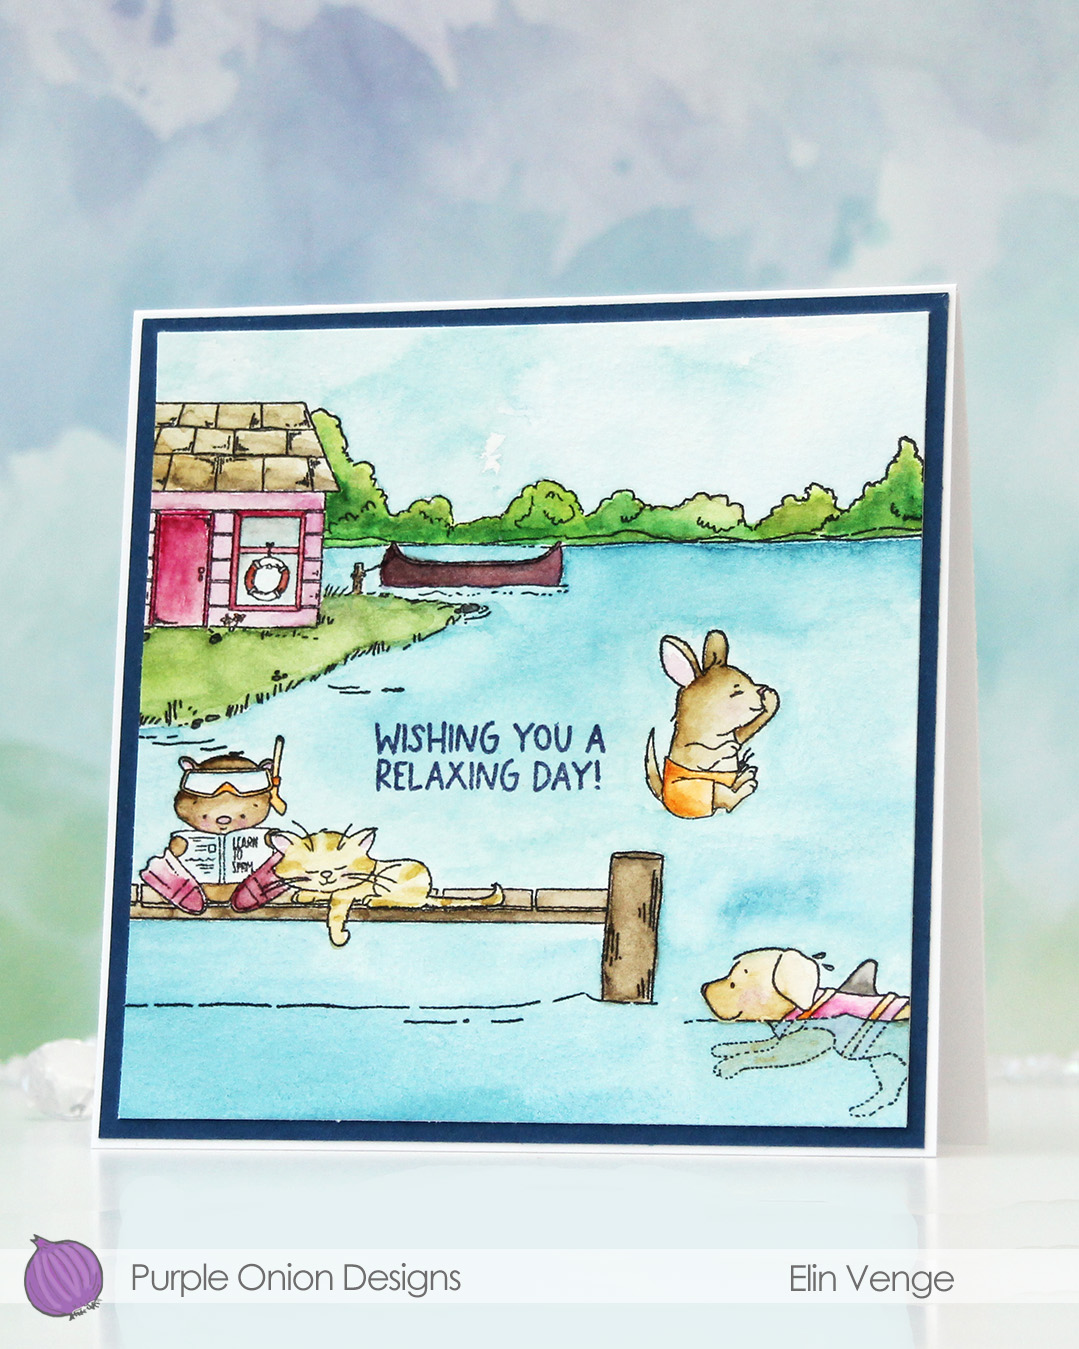 I don’t use watercolor a lot, but a palette with watercolor paint is a lot more travel friendly than 360 Copic markers, and I was on vacation in the mountains when I painted this last summer. Only having access to watercolor forces me to play with them and familiarize myself with them, which is a good thing.
 The images are all stamped using Obsidian ink from Altenew, which is a pigment ink that works well with watercolor. The paper is Fabriano Artístico cold pressed watercolor paper. I used my Mijello Mission Gold watercolor paints and brushes of varying sizes. I’m not an expert watercolorist, so the coloring’s pretty basic.
 I trimmed my panel, stamped a sentiment from the Summer Days Sentiment set using Winter Lake ink from Altenew, matted the panel with a piece of Enchanted Evening cardstock from Papertrey Ink, then adhered that to a square card base (5 5/8″ x 5 5/8″) that I created from Stamper’s Select White cardstock, also from Papertrey Ink.
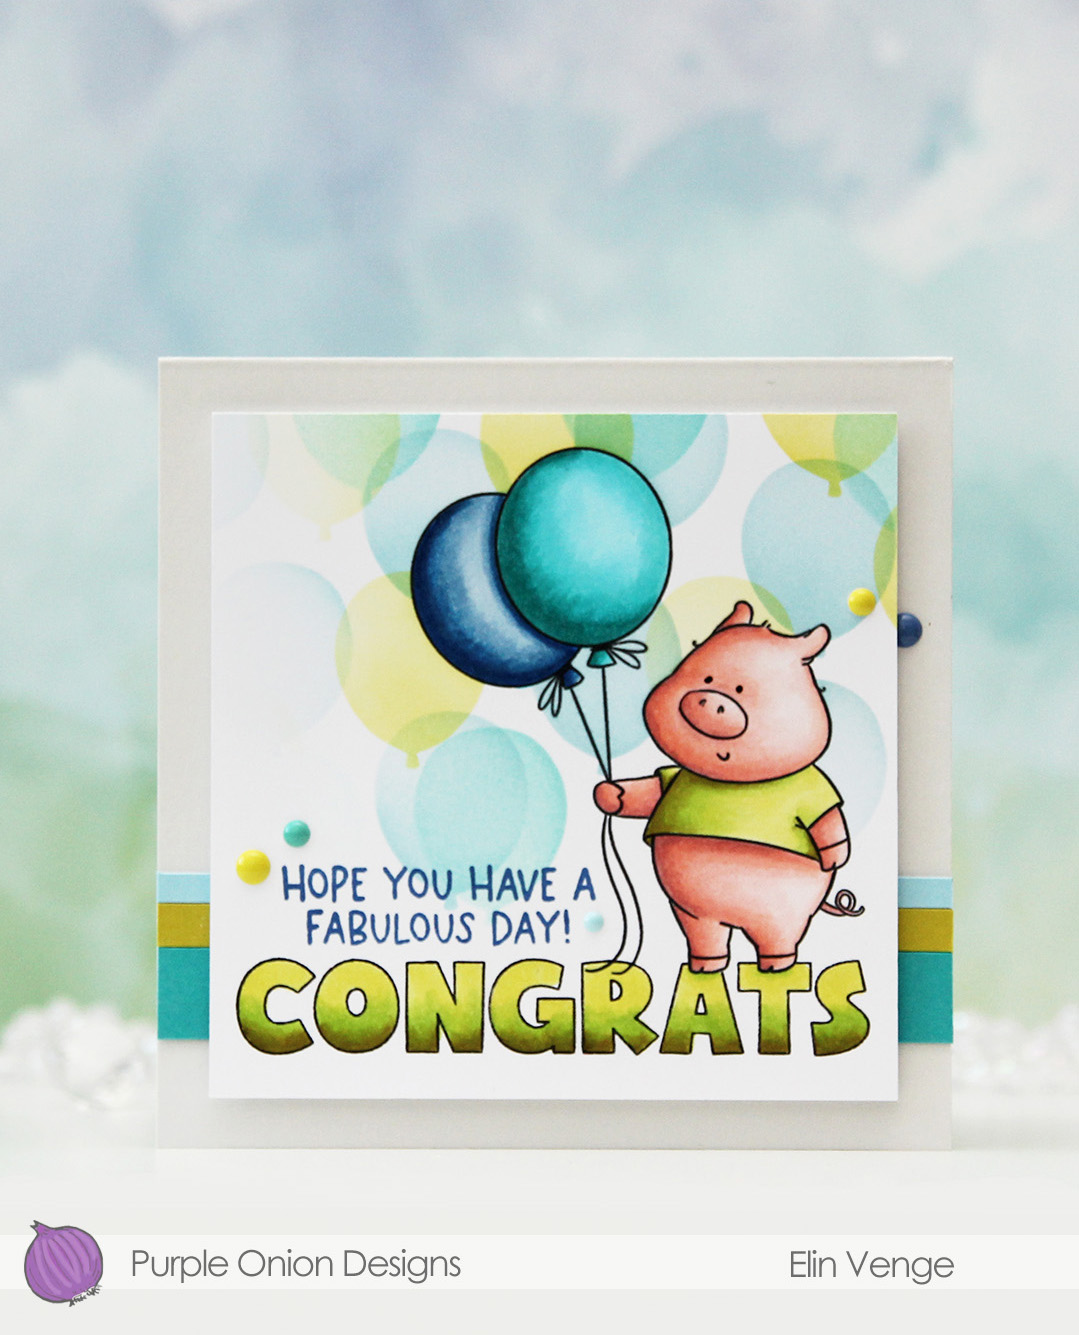 I stamped the pig, masked him, then stamped the Congrats from the
  Once I had the pig and the letters colored in with my Copics, I used the Bunch of balloons stencil from Concord & 9th to add a bunch of balloons to my background. I used Harbor, Lemongrass and Oceanside inks, all C9 colors and a light touch with my blender brushes.
 I created a 4 1/2 x 4 1/2″ top fold card base from Soft Stone cardstock from Papertrey Ink. This is a very soft grey and it’s great as a subtle neutral color. I created strips of varying widths from Oceanside, Lemongrass and Harbor cardstock from C9 and adhered them horizontally near the bottom of the card base, before mounting the panel with the pig in the center of the card using foam tape.
 I stamped a sentiment from the
  I didn’t use a ton of colors for this one.
 I’ve used this image a few times in the past, but I’ve never colored the penguins blue, which kind of blew my mind when I realized. I decided to remedy that and created soft blue penguins and a corally pink scarf. I cut my panel down to a square, die cut a heart in the center using a die from Papirdesign and mounted the negative onto a square card base I created from Berry Sorbet cardstock from Papertrey Ink.
 Onto my colored heart, I stamped a sentiment from the Mini Messages stamp set from Mama Elephant using Berry Sorbet ink from Papertrey Ink. I adhered the heart to the card front and added a few sequins from the Starry Night mix from Little Things from Lucy’s Cards to finish my card.
 Oh, and before I forget, I used a super simple color palette for this one.
 I stamped the wreath on a piece of Rustic Cream cardstock from Papertrey Ink, before coloring with pencils. Yes, you read that right, I broke out my Prismacolors and did pencil coloring. I don’t use my pencils very often. Copics are my “go to” coloring medium, but every now and then, I shake things up.
 I fussy cut around the finished piece, leaving a white border along the edge and cutting the open part at the top right as if my colored panel was a circle. I didn’t want to cut away the interior, and this seemed faster, easier and better. I created a 4 1/4″ square card base and used the Caleidoscope embossing folder from Simon Says Stamp to create a little bit of texture in the background, before mounting the wreath on foam tape.
 I stamped and white heat embossed a sentiment from the Mini Messages stamp set from Mama Elephant onto a piece of Cornflower cardstock from My Favorite Things, before using a nested circle die to turn it into a circle. I put a few foam squares behind it and adhered it to a part of the wreath where it wouldn’t cover up too many of the flowers.
 To finish the card, I added a generous amount of Papirdesign pearls for some shine.
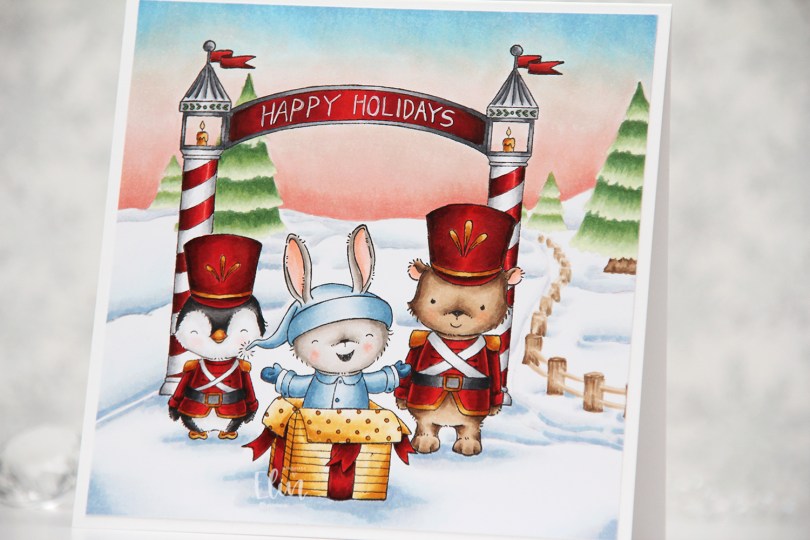
 Whenever the design team members get a glimpse of the new collection, I start my planning process. I sketch out very rough card ideas using the stamps I’d like to work with, send my stamp wish list off to Michele, the owner of Purple Onion Designs, and then wait patiently for the stamps to arrive.
 Whenever there’s a new collection I like to create scenes to show off as many of the cute images as possible (without overcrowding the card), and for this card I stamped
  I always start by coloring the sky, and for this collection, I wanted each of my cards to have a different sky. I tend to go for all blues, but winter sunsets are explosions of color, so I was very conscious of that when I created my card. Once the sky was done, I colored the snow, followed by the trees and that cute fence, before starting with the rest of the scene.
 I colored the critters, then the arch and finally all the red. I always leave the red details to the very end. It eliminates the chance of smearing and getting red ink where you don’t want it when you go in with another color right next to it. I wrote Happy Holidays with a black 0.35 Copic pen before coloring, but once the red was colored, you could hardly see the lettering, so I went back over with a white 05 Gelly Roll pen, and the text is much more visible now. My Ps are a little further apart than I’d like, and they’re also leaning a tiny bit to the right, but it’s a homemade card, it’s not supposed to be perfect, right?
 Whenever I create these scene cards with Purple Onion images, I always let the stamping and the scene itself dictate the size of the finished card. This one wound up at 5 1/4 x 5 1/4″, which seemed pretty perfect. I haven’t made a square card in a while, so this was fun.
 I used an obscene amount of Copics for this card.
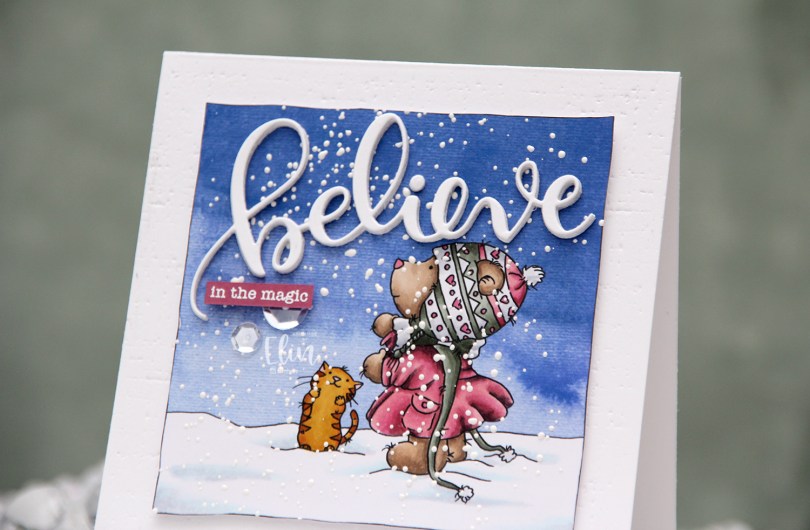

 I created a 4 1/2 x 4 1/2″ card base from Stamper’s Select White cardstock from Papertrey Ink and used an impression plate, also from PTI, to create subtle texture to the base. I put a few extra layers of cardstock behind my image and adhered it in the center of the card. I die cut the word believe using an older die from Simon Says Stamp four times from white cardstock and glued them together for a stacked, dimensional look in the sky above the bear. I finished off with a sentiment from Mama Elephant that I white heat embossed onto a strip of Autumn Rose cardstock from Papertrey Ink and embellished with a couple of Sparkling Clear sequins from Pretty Pink Posh.
 Super simple color palette. I don’t usually do reds or pinks for my holiday cards, but this muted pink combo has become a favorite of mine.
 This
This  I used 3 different collections of patterned paper from Maja Design for this card. One of the benefits of using their papers is that their collections usually match pretty well. Vintage Basics Summer, Vintage Baby and Sofiero are the collections I used for this card, and they all match. I used older dies from Lifestyle Crafts, Cottage Cutz, Scrapmagasinet, Marianne Design and Spellbinders, as well as flowers from Wild Orchid Crafts and Papirdesign.
 The insides of the card have a very similar layout, and so does the back. Onto a white circular panel, I stamped a christening stamp from North Star Design using Soft Granite ink from Hero Arts.
 The card was too thick to fit inside a regular envelope, so I created a box envelope using a punch board from We R Memory Keepers. Onto a diecut eyelet circle I stamped a Norsk Stempelblad AS sentiment and adhered it to the box envelope.
 This image is so quick to color and doesn’t require a ton of markers. Easy peasy!
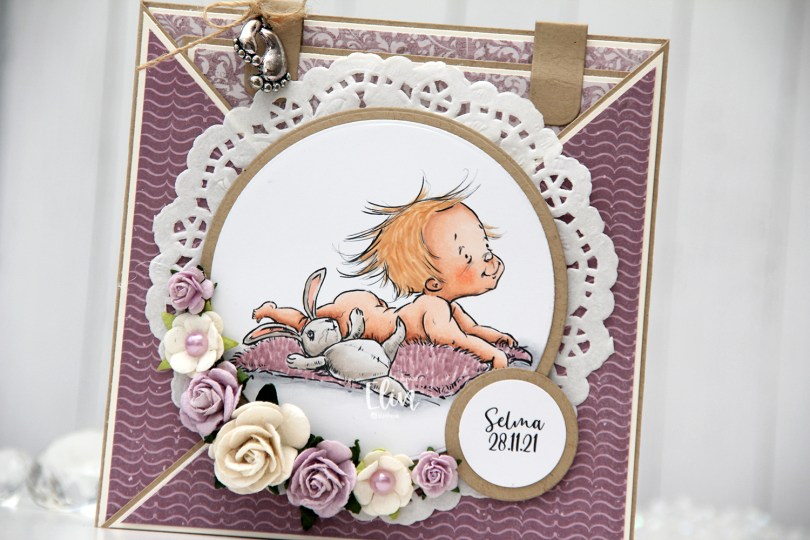
 This card was created for a little girl whose christening was this past Sunday. I think the
  I die cut the image using a circle die from Lifestyle Crafts and matted it with kraft cardstock. I also printed the name and date on a piece of white cardstock that I also matted with kraft. I put a doily from Helz Cuppelditch behind my image and added flowers using a hot glue gun. I took out the yellow centers of two of the flowers and replaced them with Lavender pearls from Kaisercraft.
 On the inside tag I added a circle diecut made from white cardstock for a space to write a personal message. I used the Labels Trio die set from Spellbinders to create two “handles” from kraft cardstock. I tied a bow and attached a charm to one of them for a little added interest.
 On the back of the card I stamped a sentiment from North Star Design using Amethyst ink from Altenew.
 The card isn’t very big, it only measures 5×5″, but it’s quite dimensional and doesn’t fit in a regular envelope, so I decided it was best to create a box envelope.
 I rummaged through my 12×12″ cardstock and found a color that matched pretty well, and used my Envelope Punch Board from We R Memory Keepers to create the box. I added another Helz Cuppelditch doily for cohesion, as well as more of the patterned paper that I die cut using the Impact alphabet die set from My Favorite Things.
 Meet
Meet  I stamped my images using Extreme Black ink from My Favorite Things, and colored in the scene using my Copics.
 After trimming down the panel, I stamped a sentiment from the
  I adhered my colored panel onto a square card base I created from Blue Yonder cardstock from My Favorite Things. When I first started making cards, they were all square; 6×6″ is the standard size for handmade cards in Norway, and I admit it’s a fun size to go back to. This isn’t actually fully square, it measures 5 7/8 x 5 1/2″, but it’s the size that best fit my scene, so I went with it.
 There’s something cozy and serene about this entire scene, and I really like how it turned out.
 Very muted color palette for this one. I see now that I forgot to add the green, but I believe they were BG99, G46, 43, YG61 and G20.
