
Hi, crafty friends. A couple of weeks ago, Jenn Shurkus asked me if I wanted to join in to share inspiration for her Get Cracking on Christmas series this year. It’s all about creating Christmas cards all year to prevent being swamped and not have time come November. As you may have noticed, I make Christmas cards all year, and of course, I immediately accepted. It’s the third Thursday of every month, and today happens to be the third Thursday of January, so here we go.
 For my first card, I chose to feature this adorable image from Lee Holland. Last year, he asked his followers and fans what more we wanted of his dragons (he is known for his dragons, he has lots of different ones), and I suggested one hugging a penguin. He came through big time, and created this image, which I, of course, had to get. I colored it in noline, because I love the look, before sprinkling Chunky White embossing enamel on top and melting the granules from the back of the paper to create that wonderful snowy look.
 I taped a square die inside a rectangle die from Waffle Flower and die cut the two dies four times from Stamper’s Select White cardstock from Papertrey Ink to create a chunky polaroid frame for my little fellas to fit into. By taping the two dies together, they won’t shift and the square opening will be in the same spot for all my diecut pieces. I stacked my diecuts and put the image behind my chunky frame, before adhering it all to a cardbase I created from Stormy Sea cardstock from Papertrey Ink. Using a die from Kort & Godt, I die cut the word klem three times from the same color cardstock. The die actually cuts the word juleklem (Christmas hug in Norwegian), but it’s so big the first part didn’t fit my card, so I just chose the latter half of the word. I stacked three together for dimension, adhered it at an angle to my card, and put a white heat embossed sub sentiment from Norsk Stempelblad AS below. This too, has additional layers of cardstock behind it for dimension. To finish off the card, I die cut a few white snowflakes using dies from Hero Arts and Marianne Design, and I stacked two of each snowflake on top of each other to make them stand out a bit.
 Fairly simple color palette for this image.
 I no line colored my snowman, but kept his eyes and eyebrows dark before I printed the image. It’s a great way to get them perfect and not have to worry about drawing the details back in when the rest of the image is colored up. I fussy cut the snowman and put him aside while I worked on the rest of my card.
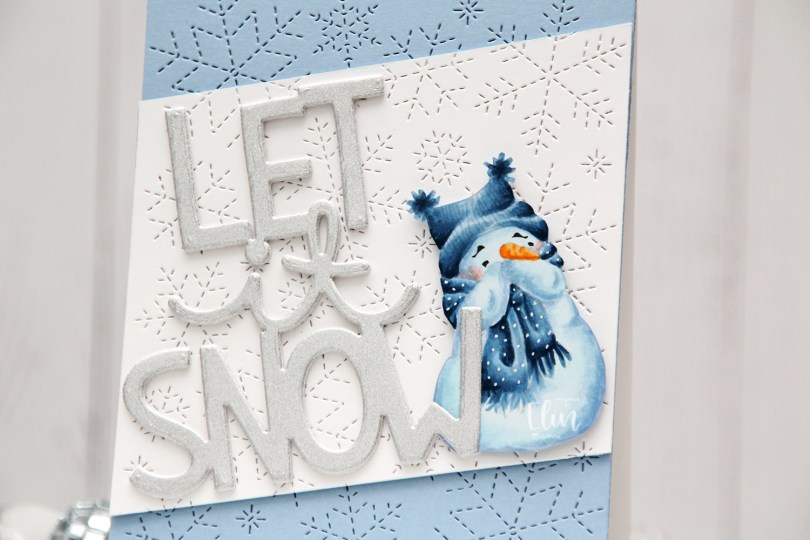
 I die cut the Stitched Snowflake Backdrop die from Lawn Fawn from a piece of Blue Breeze cardstock from My Favorite Things, and adhered it directly to my card base, which I created from Stamper’s Select White cardstock from Papertrey Ink. I also cut a panel of white cardstock using the same die, cut it at an angle and glued a couple of additional layers of cardstock behind my white piece for dimension. I love the look of the continuous background across the two colors. I die cut the Giant Let It Snow die from Lawn Fawn three times from white cardstock and once from silver glitter cardstock and stacked them for dimension. I made sure not to put glue behind half of the silver glitter W, because I needed it to cover part of my snowman, or he wouldn’t fit on the card. I put foam tape behind most of him and tucked him between the white and silver of the let it snow die cut, then added glue behind the half of the W that covered my snowman, and the card was complete.
 Super simple color palette for this card.
 I drew some sheets of ice with a pencil after I’d stamped my penguins, and made an ocean scene. The stamp with the two penguins holding the party banner is too wide for a regular portrait A2 card, and I wanted to include some more penguins in my scene as well. Slimline to the rescue. I thought it’d be fun to have the penguins on two separate icebergs instead of just the one.
 I started by coloring the sky, then the ocean. This was probably what took the longest, it’s a big ocean, and while it’s not difficult to color, it takes time to build up layers. Next up were the icebergs, then the penguins, then finally all their accessories. I love Stacey Yacula’s style, it lends itself to create very textured critters, so that’s what I opted for.
 When the entire scene was colored in I white heat embossed a sentiment from one of the stamp sets I used onto black cardstock and put two additional pieces behind it for a little dimension. I also heat embossed the word PARTY from the same stamp set. The letters are sized and spaced perfectly to fit across that bunting. It’s perfect. I mounted my colored panel onto a black cardbase to frame my cute penguins. Very simple.
 Lots and lots of Copics for this one. I used a lot for the ocean, the icebergs and the penguins, and that little rainbow of accessories make up the rest of this very colorful palette.
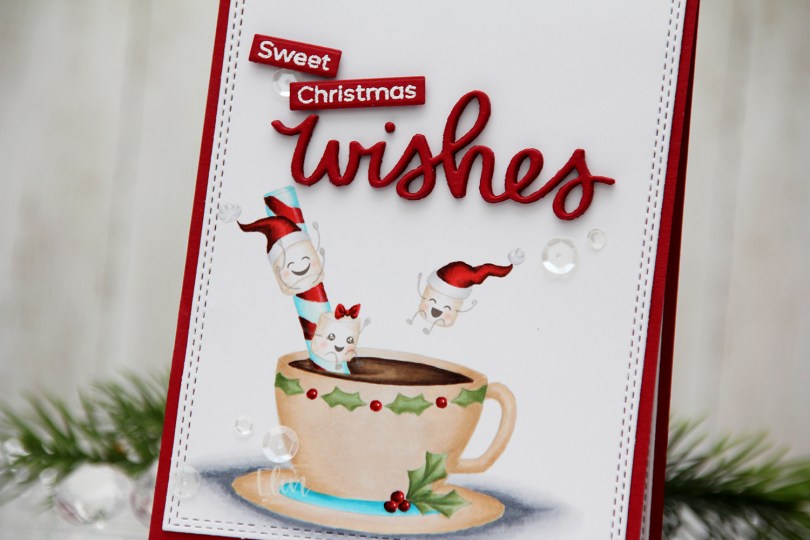
 I printed my image with gray lines so I could do no line coloring. Whenever I do this, I like keeping facial features black or a dark brown, so I don’t have to free hand draw them back in once I’m done coloring. It’s a neat little trick.
 I die cut my colored panel using the largest die in the A2 Double Stitched Rectangle STAX die set from My Favorite Things and adhered it directly onto a cardbase I created from Amarena Cherry cardstock, also from My Favorite Things.
 I die cut the word wishes five times from my red cardstock using a die from Mama Elephant. I stacked the words for a dimensional look and also stamped and white heat embossed the words Sweet and Christmas onto separate pieces of the same color cardstock. The stamped words are from two separate sentiments from the Bitty Bears stamp set from My Favorite Things. I love using pieces of sentiments from stamp sets to create new sentiments, it makes them more versatile.
 I felt like I had to add a little something to this, so I pulled out my White Orchid Sequin mix from Little Things from Lucy’s Cards and added them in a visual triangle on my card. This mix is one of my favorites, it’s right up there with the Sparkling clear mix from Pretty Pink Posh.
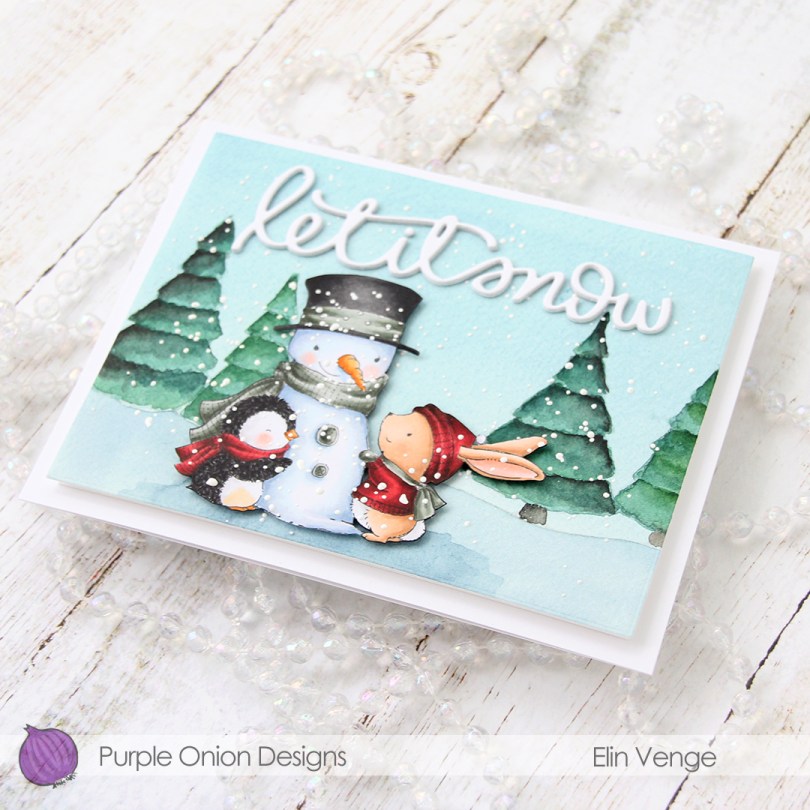
 I did something a little different for this card. Exactly one year ago, with helpful advice and a gentle nudge from
  I stamped the
  I used a die from Waffle Flower to cut my panel down to a rectangle that would fit my card, which also helped flatten it out a bit, it was a little bit warped. I sprinkled on Chunky White embossing enamel from Stampendous and melted the granules from the back, before mounting the panel on foam tape and adhering it to the front of my top fold landscape A2 card.
 Using My Favorite Things Extreme Black ink, I stamped the
  I die cut the words let it snow three times from white cardstock using a die from Mama Elephant, stacked them for a dimensional sentiment and adhered it to my scene to finish the card.
 The Copics I used for the cute critters and snowman.
 I colored in my image using the no line technique. Before printing, I made all the lines in the image light gray except for the eyes and eyebrows, which I kept black. This is a great trick to color no line without having to worry about drawing things back in with a black pen and potentially getting things wonky and weird. I’ve done that once, starting over isn’t fun, so I’ve learned to get around it.
 I cut my colored piece down using a stitched rectangle die from My Favorite Things. I covered the card base with patterned paper from the Forever Green collection paper pack from ModaScrap and mounted my colored panel onto that using lots of foam tape.
 I cut a couple of strips of patterned paper from that same paper pack from ModaScrap and added them onto my colored panel. Using a green marker, I created a green colored cardstock piece to match my dragon, stamped my Norsk Stempelblad AS sentiment onto it, heat embossed it and used a circle punch to get it to a perfect 1″ circle, before adding an epoxy sticker on top for a little shine and dimension.
 To finish off my card I added a few enamel dots. The brown ones and the white are from Papirdesign, the green ones from Altenew.
 Not a whole heap of colors for this one.
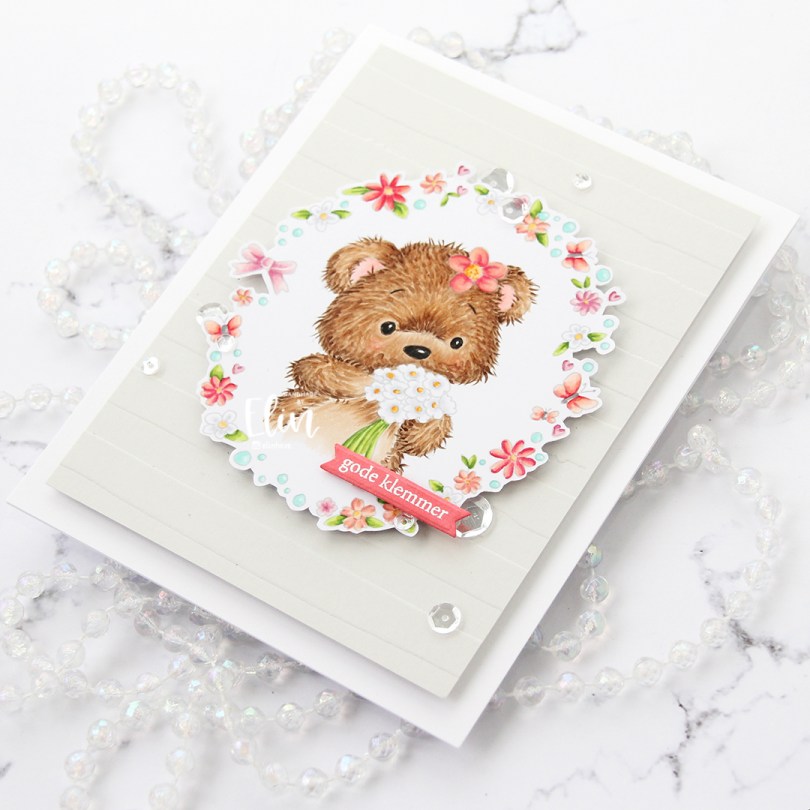


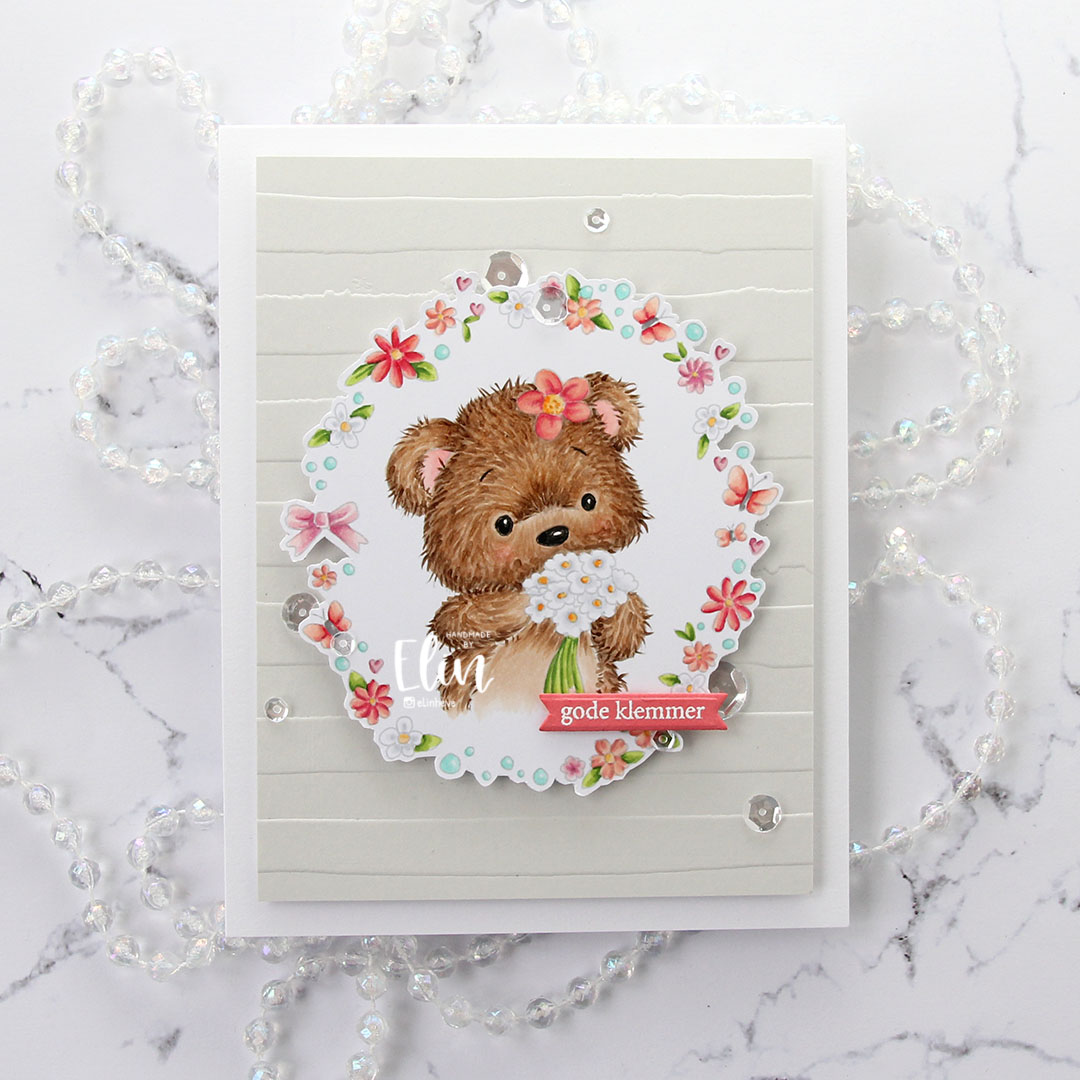
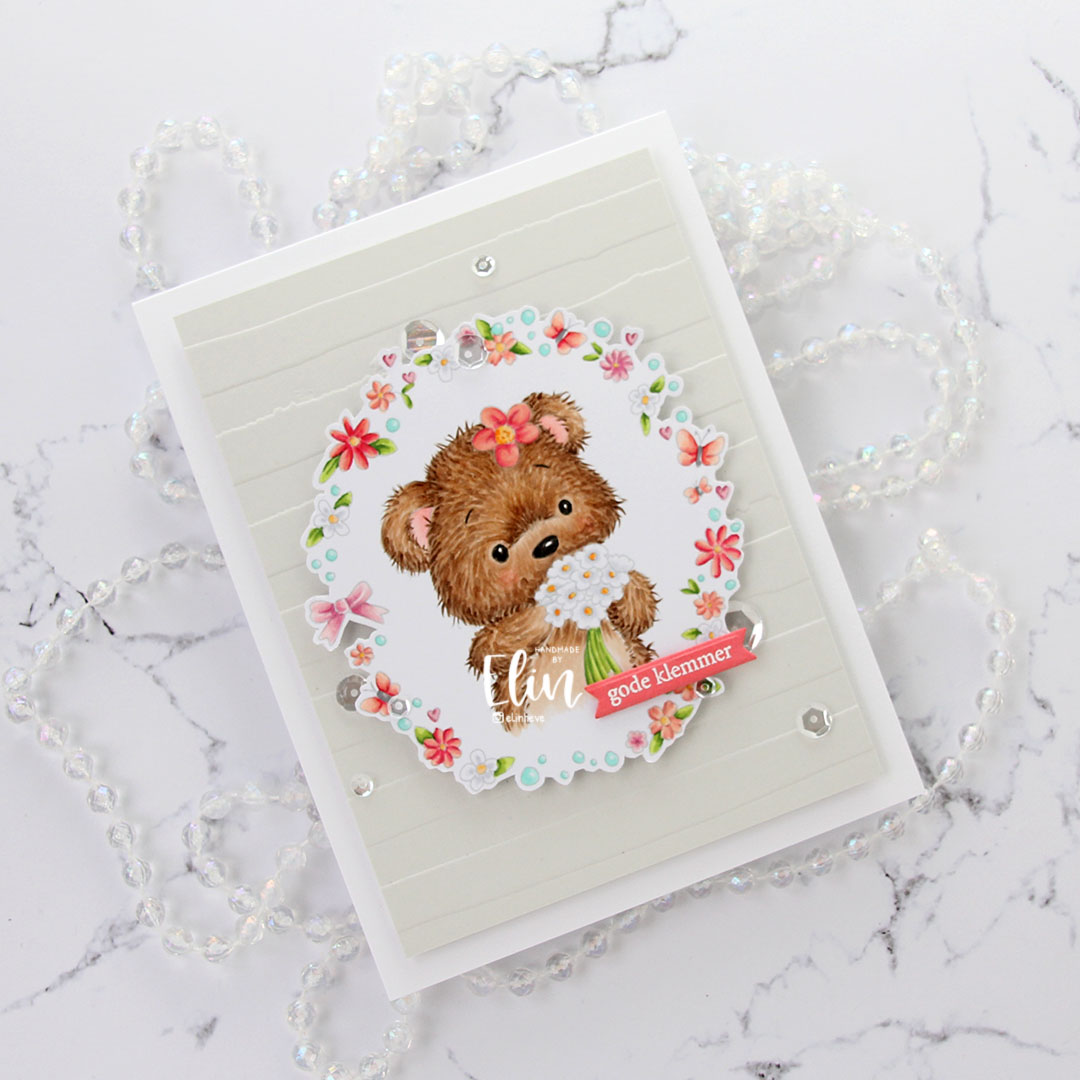

 I stamped the flowers in fadeout ink from Inkon3, before coloring them in with Copics and fussy cutting up to the line.
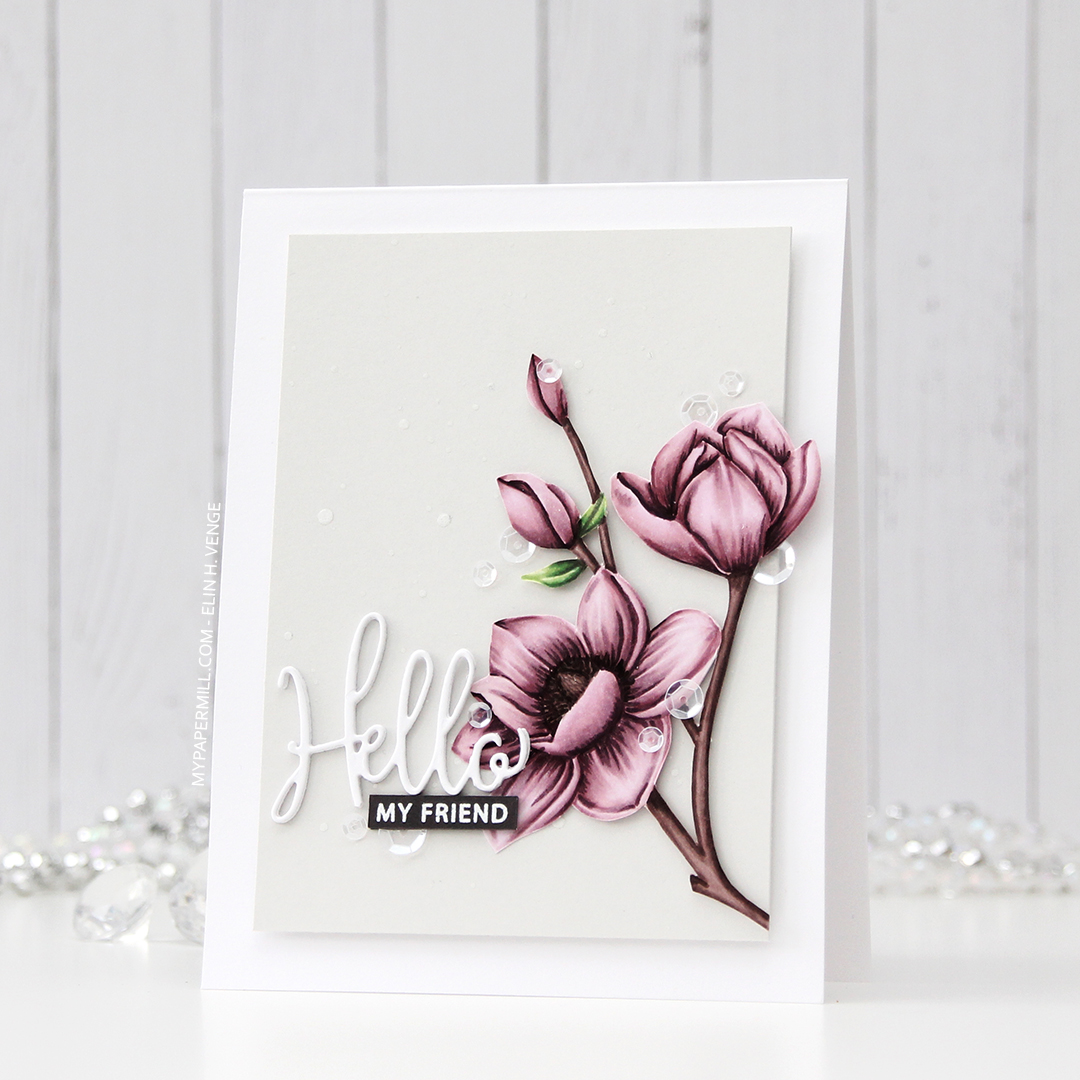
 I die cut Hello three times from white card stock and stacked the die cuts for dimension. The die is from a die set that came with my Gemini when I bought it two years ago, and this is the first time I used it. It has a swirl going down at the bottom of the H that connects to the o, but I chopped that off.
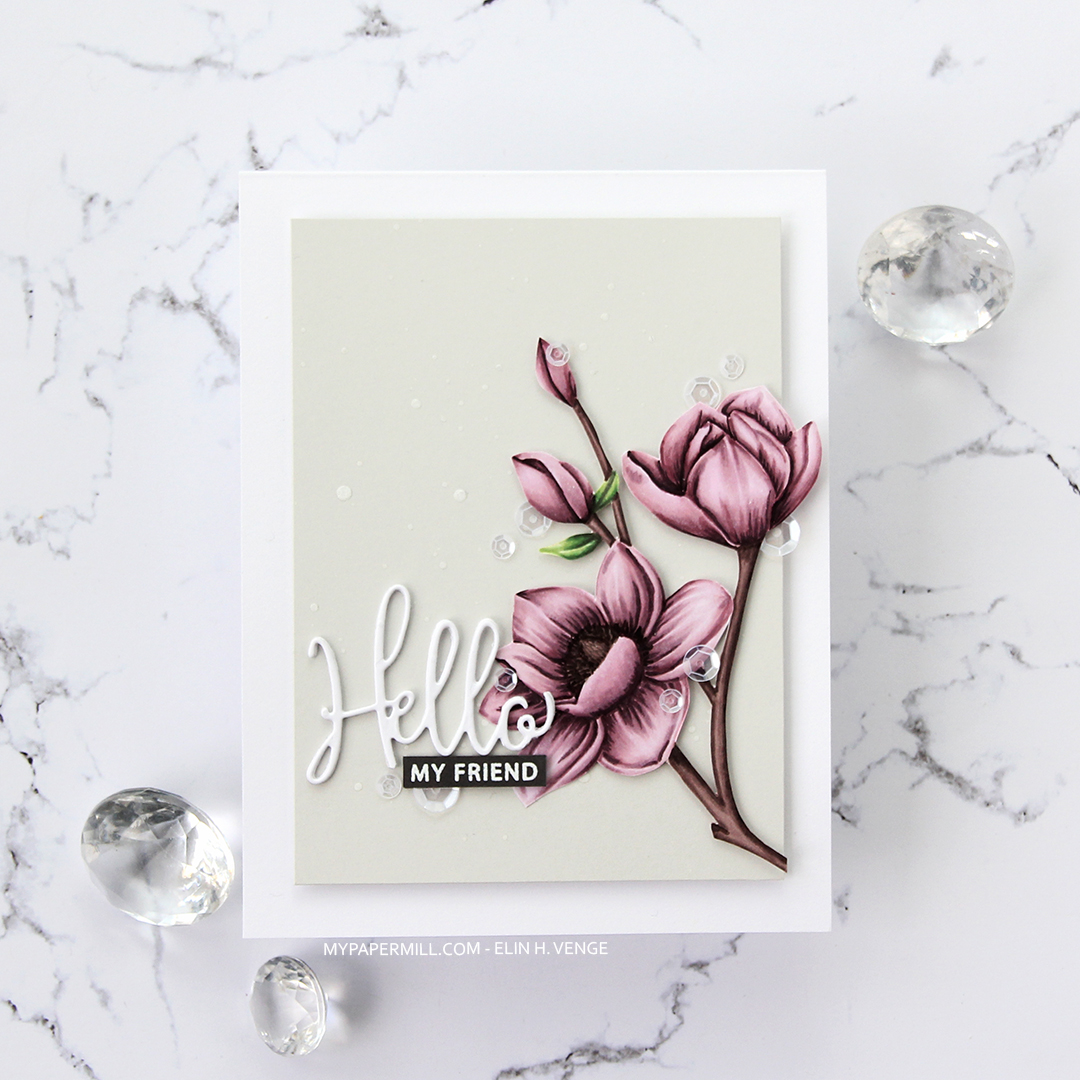
 I added sequins from the White Orchid Sequin mix from Little Things from Lucy’s cards on or near the flowers and the sentiment, and my card was complete.

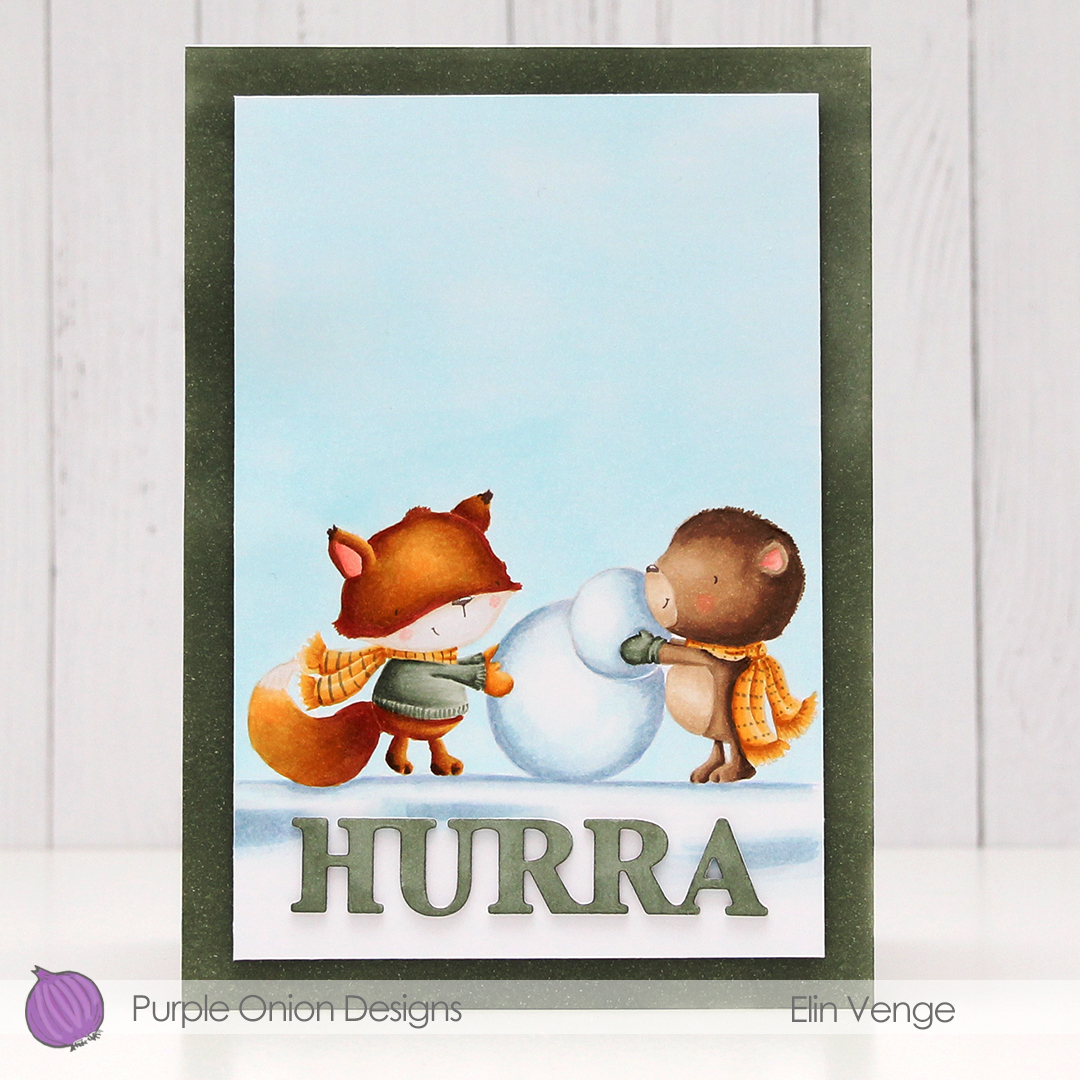 For today’s card I really wanted to include both
  I stamped the bear using fadeout ink from Inkon3 and masked him, before stamping the fox in the same ink. While I still had the stamps in my MISTI, I stamped their eyes, mouths and noses using Memento Espresso Truffle ink. This saved me from having to draw the details back in after my coloring, which could have potentially ruined the entire scene. I used my Copics to color everything, and trimmed the panel down slightly. I used one of the greens from the image on the edges of a 5×7″ piece of X-Press It blending card to make the card front match the image, as I didn’t have any card stock in the right shade of green. For the die cut HURRA (die from Kort & Godt), I scribbled one of the green Copics onto a scrap piece of X-Press It before die cutting. I added another three white die cuts behind it for dimension, and used foam tape on the back of the colored panel to give it a little lift up from the card base.
 As usual, I used lots of colors for the snow (everything in this graphic before E44), but that’s just how I roll.
 I didn’t have any birthday sentiment dies that fit my slimline plan, but this Stacked Merry die from My Favorite Things was perfect. I die cut four from white card stock and stacked them for a dimensional look, before adding embossing powder on top and heat embossing for a shine that matches the embossed snow in the background. I stamped “& bright” from the
  I used quite a few colors for this very simple image. Building color to create contrast is key when doing no line coloring, and the first 7 markers in this graphic were all used for the snow. It might be difficult to tell from the photo, but the orange combo I used for carrot is different than the combo I used for the scarf and pocket, which isn’t as bright a combo in real life.